Radio Shack 63-246 - Atomic Alarm Clock Manual
- User manual (2 pages) ,
- User manual (2 pages)
Advertisement
Features
- Radio controlled clock receives signal from WWVB 60kHz and adjusts time and date automatically.
- LED backlight.
- 4 time zone settings.
- Daylight saving time.
- Alarm and snooze function.
- Indoor temperature with Celsius or Fahrenheit option.
Check package contents
- Atomic Clock
- Quick Start
- User's Guide
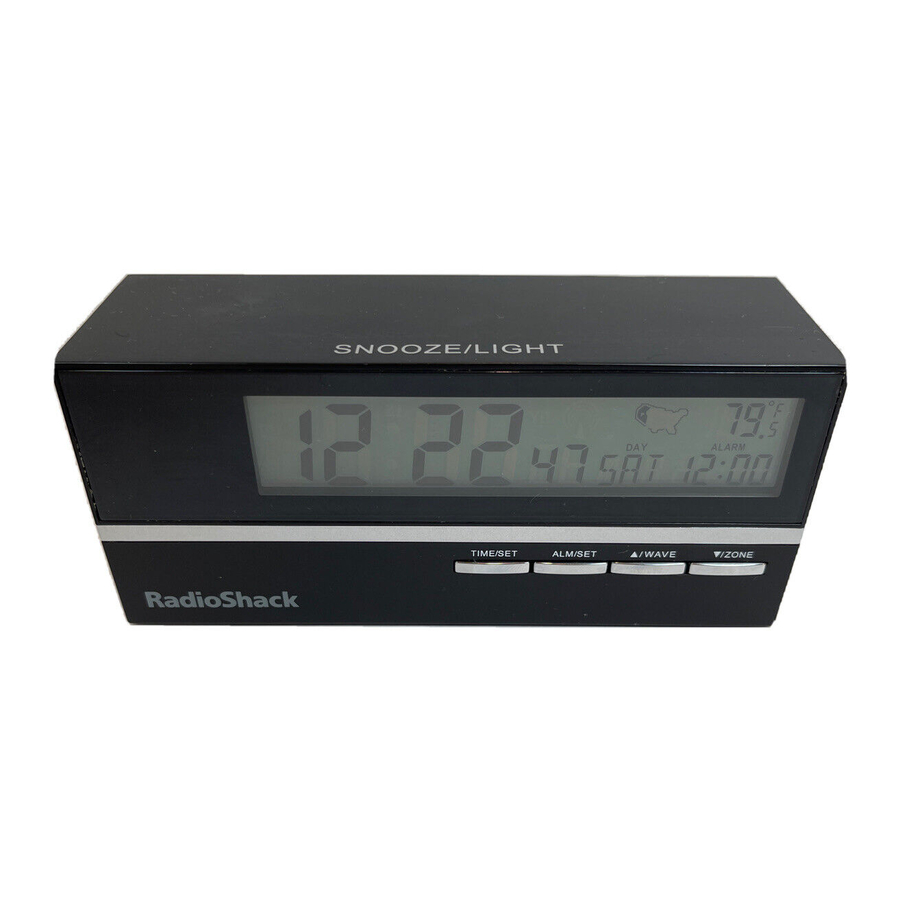
Overview

Select a Location
- Place your clock near a window.
- Do not place in direct sunlight, next to heat or cold sources such as stoves and freezers, or heating vents.
- Keep the clock away from high power cables, TVs, microwaves, refrigerators, computers, and metal furniture.
- Your atomic clock will not work in Alaska or Hawaii.
Install Batteries

- Press the tab to remove the battery compartment cover.
- Insert two AA batteries (not included) matching the polarity symbols (+ and –) marked inside.
- Replace the cover.
Replace batteries when the display dims.
Battery Notes
- Dispose of batteries promptly and properly. Do not burn or bury them.
- Use only fresh batteries of the required size and type.
- Do not mix old and new batteries, different types of batteries (alkaline, or rechargeable), or rechargeable batteries of different capacities.
- If you do not plan to use the atomic clock, remove the batteries. Batteries can leak chemicals that can damage electronic parts.
Set Time and Date
Automatic Settings
- After batteries are installed, the clock starts searching for the WWVB signal from the atomic clock in Fort Collins, Colorado.
- One of the signal reception indicators flashes during signal search.
| Weakest | Weaker | Weak | Normal | Strongest |
 |  |  |  |  |
- If reception succeeds, date and time are updated automatically, and
![]() displays until the next reception cycle.
displays until the next reception cycle.
If the reception fails, no signal indicator appears. Hold for 3 seconds to receive signal manually. If it still fails, follow "Manual Settings" to set the date and time.
The clock automatically updates the atomic time daily at 3:00 a.m., 4:00 a.m., 5:00 a.m., or 6:00 a.m. It stops the update once the time is updated for the day.
 Notes:
- The radio signal search takes approximately 10 minutes after batteries are installed or when RESET is pressed. If you want to set the time and date manually, press
![]() to stop signal search at any time.
to stop signal search at any time. - The clock automatically adjusts the daylight saving time (DST) upon receipt of a signal, and
![]() displays. If you are in an area that does not recognize DST, change the time zone on your clock until it matches the correct hour.
displays. If you are in an area that does not recognize DST, change the time zone on your clock until it matches the correct hour. - During the radio signal search, all function keys stop working except SNOOZE/LIGHT.
- Signal reception might be affected if your clock is placed in a basement or anywhere near large metal structures (tall buildings, freeways, airports, or railways).
- On very cloudy and stormy days, the radio signal might not be strong enough to set the clock.
Manual Settings
- Press
![]() to select the time zone
to select the time zone
P (Pacific), M (Mountain), C (Central), or E (Eastern). - Hold down TIME/SET until 12 Hr flashes.
- Press
![]() or
or ![]() to select available options.
to select available options. - Press TIME/SET to confirm and move on to the next setting.
- Repeat Steps 3 and 4 to set the hour, minute, year, month, date, and temperature options.
 to select the time zone
 After setting the date, the clock automatically sets the day of the week.
Notes:
- The Atomic Clock will override manual settings if it receives a good radio signal.
- The calendar extends from 2000 to 2099. The year digits do not appear on the main display. Hold down TIME/SET until 12 Hr flashes, then press three more times to view. Press TIME/SET four times until you are at the original display.
- If you do not press any key within 10 seconds, the clock returns to the current time display.
Set the Alarm
- Press ALM/SET.
![]() displays and the alarm time shows instead of the date.
displays and the alarm time shows instead of the date.

- Hold down ALM/SET until the hour digits flash.
- Press
![]() or
or ![]() to set the hour.
to set the hour. - Press ALM/SET to confirm.
- Repeat Steps 3 and 4 to set the minutes.
- Slide ALARM ON/OFF to ON.
![]() appears.
appears.
 displays and the alarm time shows instead of the date.
At the set alarm time, the clock produces a series of beeps for 1 minute.
Beep sequence
| Duration | Alarm |
| 0-9 seconds | one beep per second |
| 10-29 seconds | two beeps per second |
| 30-59 seconds | four beeps per second |
Snooze
When the alarm sounds, press SNOOZE/ LIGHT on top of the clock to silence the alarm for 5 minutes.  and
and ![]() flash. After 5 minutes, the alarm sounds again. You can repeatedly use the snooze feature as many times as you like. To stop snooze, press any button except SNOOZE/LIGHT. disappears.
flash. After 5 minutes, the alarm sounds again. You can repeatedly use the snooze feature as many times as you like. To stop snooze, press any button except SNOOZE/LIGHT. disappears.
Note:
Your clock must be on a solid, flat surface so the pressure switches on the bottom are triggered when you press SNOOZE/LIGHT. Otherwise, you may not activate the snooze and backlight functions.

Stop the alarm until the next day:
Press any button except SNOOZE/LIGHT.
![]() remains on the display and the alarm will sound again at the set time the next day.
remains on the display and the alarm will sound again at the set time the next day.
Turn off the alarm completely:
Slide ALARM ON/OFF to OFF. ![]() disappears.
disappears.
RESET

If your clock stops working properly, use a straightened paper clip to press RESET on the bottom of your clock. All display segments briefly appear, then the clock starts searching for a signal.
Specifications
Atomic frequency 60kHz WWVB
Power source Two AA batteries
Temperature range -10°~50°C (14°~122°F)
Dimensions (H×W×D) 21/2 × 61/16 × 2 in.
66 × 154 × 50 mm)
Weight 8.1 oz (230 g)
Specifications are subject to change and improvement without notice. Actual product may vary from the images found in this document.

Documents / ResourcesDownload manual
Here you can download full pdf version of manual, it may contain additional safety instructions, warranty information, FCC rules, etc.
Advertisement


Need help?
Do you have a question about the 63-246 and is the answer not in the manual?
Questions and answers