
Related Manuals for Hi-Link HLK-TX510-028S


Summary of Contents for Hi-Link HLK-TX510-028S
- Page 1 Shenzhen Hi-Link Electronic Co.,Ltd. HLK-TX510-028S Face Recognition Module Mini App User Manual...
-
Page 2: Preparation For Use
1.2 Scope of application This document applies to products using the HLK-TX510-028S series of sleeves, terminals, etc. HLK-TX510-028S firmware version: HLK-TX510 (V1.00.0004) HLK-B36 firmware version: app-2.1.1-20221110.172822... -
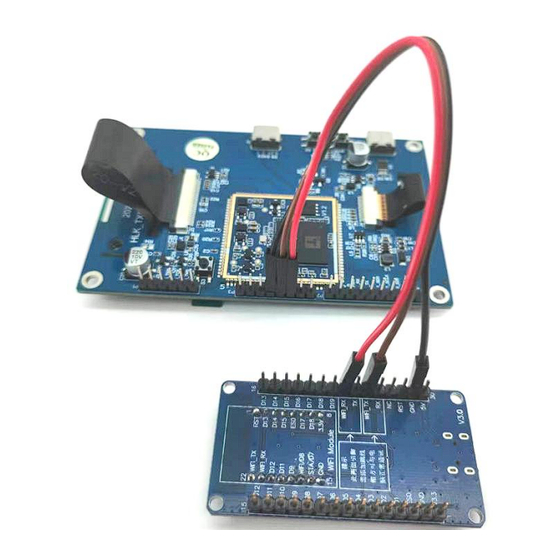
Page 3: Hardware Connections
2.2 Hardware connections Use the USB to Type-C cable, Micro USB cable to power the TX510 and B36 sets of boards respectively. Connect the RX, TX and GND pins on the B36 to the TX, RX and GND on the TX510 respectively via the Dupont cable as shown in the figure below: Note: Power supply adapter current ≥... - Page 4 3D diagram wiring: — 3 —...
- Page 5 3. Use of Mini App The mini app is based on the HLK-TX510-028S face recognition module for network distribution, device binding, remote entry of feature values and other functions. Full name: HLKTX510S. 3.1 Search to enter the WeChat mini app Go to WeChat, click on the "Search"...
- Page 6 3.2 Authorized permissions When entering the mini app for the first time, the mobile phone needs to authorize the mini app with Bluetooth and location permissions, otherwise the device cannot be found, and it is mainly used to configure the network. —...
- Page 7 3.3 Operation steps 1. Before adding a device for the first time, please log in with the account. The default login account is the mobile phone number bound to WeChat. Can also change to another mobile phone number to log in; —...
- Page 8 2. After the account login is completed, it will enter the device list interface. When adding the first device, click the "Add Device" function button in the middle. After clicking, it will jump to the search device interface, and the name of the device is "tx510_ble_XXXX"...
- Page 9 3. Click on the device to be added, a pop-up window will appear to enter the WiFi information (the device will connect to the WiFi with the corresponding information after the information is submitted, the device only supports connecting to 2.4G WiFi) to enter the network interface will automatically fill in the current mobile phone connection WiFi name, you only need to enter the password, can also manually enter the WiFi name.
- Page 10 4. The whole process of network wiring takes about 15S if the network is good, it will go through a total of 4 steps: connecting the module Bluetooth to send wiring information, connecting to the router after the module receives the wiring information, connecting to the server after the successful connection of the route, and finally binding the device, the bottom of the wiring pop-up window will synchronize the current device networking status.
- Page 11 5.Click the newly added device to enter the feature management interface to add feature values. When adding the first feature value, directly click the function button of "Add Feature" in the middle, and enter the portrait photo, name and mobile phone number to be added.
- Page 12 6.After clicking upload immediately, it will jump to the entry record interface, where can see an upload status of the face information just added and submitted. After the upload is successful, the status will be "saved successfully". The feature management interface will also have this feature value. Under normal circumstances, it takes about 2 seconds between submitting the upload information and uploading successfully to upload successfully.
-
Page 13: Introduction Of Other Functions
4. Introduction of Other Functions 4.1 Device list interface 1. Select a device and slide left to delete it 2. Select the "Edit" icon to the right of a device to rename it 3. Click on the "+" button in the bottom right corner to add more than one face recognition device —... - Page 14 4.2 Characteristic value management interface: 1. Select a feature and slide left to delete it 2. Click Add to add multiple face features — 13 —...
- Page 15 4.3 Entry record Interface: 1. Select an entry record to delete 2. Click on the "bin" icon to delete all entry records 3. Customise the time range to show only the records entered within that time range (the default is to show all time) —...
- Page 16 4.4 Identification record interface (display/record of records triggered by successful identification at the device end): 1. Select a record and slide left to delete it 2. Click on the "bin" icon to delete all identification records 3. Customise the time range to display only the records under that range —...
Need help?
Do you have a question about the HLK-TX510-028S and is the answer not in the manual?
Questions and answers