Table of Contents
Advertisement
Available languages
Available languages
Quick Links
Advertisement
Table of Contents

Related Manuals for OUTDOOR CHEF AROSA 570 G


Summary of Contents for OUTDOOR CHEF AROSA 570 G
- Page 1 MANUAL BLAZING-/COOKING ZONE KIT PLUS AROSA 570 G...
- Page 2 OUTDOORCHEF.COM...
- Page 3 BEDIENUNGSANLEITUNG Lesen Sie diese Anleitung sorgfältig durch, bevor Sie Ihren OUTDOORCHEF Gas-Kugelgrill in Betrieb nehmen. USER GUIDE Please read these instructions carefully before using your OUTDOORCHEF gas kettle barbecue. MODE D’EMPLOI Veuillez lire attentivement cette notice avant de mettre en service votre barbecue sphérique à gaz OUTDOORCHEF. ISTRUZIONI PER L’USO Prima di utilizzare il barbecue sferico a gas OUTDOORCHEF, leggere attentamente le presenti istruzioni.
- Page 4 BEDIENUNGSANLEITUNG WICHTIG: Lesen Sie diese Anleitung sorgfältig durch, bevor Sie Ihren OUTDOORCHEF Gasgrill und das Blazing-/Cooking Zone Kit Plus in Betrieb nehmen. WICHTIG: Sie finden die Seriennummer Ihres Blazing-/Cooking Zone Kit Plus auf dem Datensticker, welcher sich auf dem Blazing-/Cooking Zone Kit Plus befindet.
- Page 5 • Achten Sie beim Wechseln der Gasflasche darauf, dass der Gasregulierknopf auf Position steht und die Gaszufuhr an der Gasflasche geschlossen ist. WICHTIG: Es dürfen sich keine Zündquellen in der Nähe befinden. • Kontrollieren Sie nach dem Anschliessen einer neuen Gasflasche die Verbindungsteile gemäss Anleitung PRÜFUNG AUF DICHTHEIT. •...
- Page 6 ANSCHLUSS DES GASSCHLAUCHS DES BLAZING-/COOKING ZONE KIT PLUS ACHTUNG: Beachten Sie betreffend Aufbau und Anschluss die Informationen in der separaten Aufbauanleitung. ACHTUNG: Bei der Erweiterung mit dem BLAZING-/COOKING ZONE KIT PLUS ist die Prüfung auf Dichtheit für alle Anschlüsse der Systemelemente durchzuführen. Der Anschluss des Gasschlauchs hat zwingend mit Hilfe des beigelegten Schraubenschlüssels zu erfolgen um sicherzustellen, dass der Anschluss ausreichend fest verschraubt ist.
- Page 7 PRÜFUNG AUF DICHTHEIT WARNUNG: Während des Prüfens auf Dichtheit dürfen sich keine Zündquellen in der Nähe befinden. Dies gilt auch fürs Rauchen. Prüfen Sie die Dichtheit nie mit einem brennenden Streichholz oder einer offenen Flamme und immer im Freien. 1. Der Gasregulierknopf muss auf Position stehen.
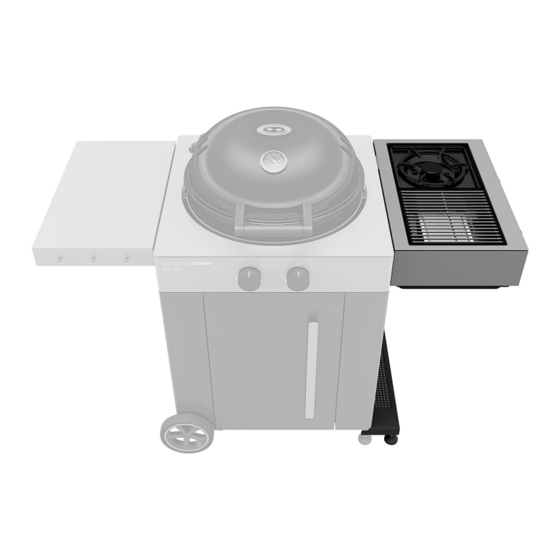
- Page 8 BLAZING-/COOKING ZONE KIT PLUS Das BLAZING- / COOKING ZONE KIT PLUS ist die perfekte Erweiterung Ihres AROSA 570 G, wenn Ihren Grill im Handumdrehen in eine vollwertige Outdoor-Küche verwandeln möchten. BESTANDTEILE BLAZING-/COOKING ZONE KIT PLUS: • High Performance Keramikbrenner BLAZING ZONE PLUS ®...
- Page 9 COOKING ZONE PLUS - VIEL MEHR ALS EIN SEITENKOCHER, 3 ANWENDUNGSBEREICHE Die komplett neu entwickelte COOKING ZONE PLUS ist, wie es der Name schon verrät, mehr als ein regulärer Seitenkocher - denn es steht Ihnen ein viel breiterer Temperaturbereich zur Verfügung. Während normale Seitenkocher meist auf mittlere und höhere Temperaturen ausgelegt sind, können auf der COOKING ZONE PLUS auch Speisen zubereitet werden, welche mit weniger Hitze zubereitet werden müssen (Pasta- Saucen, Suppen, Eintöpfe etc.).
-
Page 10: Vor Dem Erstgebrauch
2. Prüfen Sie alle gasführenden Teile, wie im folgenden Kapitel PRÜFUNG AUF DICHTHEIT beschrieben. Tun Sie dies auch dann, wenn Ihr AROSA 570 G vom Händler montiert geliefert wurde. 3. Brennen Sie das BLAZING-/COOKING ZONE KIT PLUS ca. 20–25 Minuten lang auf Stufe aus. - Page 11 TIPPS UND TRICKS BLAZING ZONE PLUS ® INFRAROT GRILLEN Wie funktioniert ein Infrarot-Brenner? Die beim Zünden der BLAZING ZONE PLUS entstehende Gasflamme verteilt sich durch hunderte von kleinsten Öffnungen gleichmässig in ® der Keramikplatte und erzeugt dabei an der Oberfläche Infrarot-Strahlung, welche intensive direkte Hitze bis zu 900 Grad Celsius an das Grillgut abgibt.
- Page 12 Einbau HEAT DIFFUSER Zubereitung von dickeren, grösseren Fleisch-Stücken Bei dickeren, grösseren Fleisch-Stücken empfehlen wir Ihnen diese nach dem Grillvorgang in der Gaskugel, bei niedriger Grilltemperatur auf die gewünschte Kerntemperatur hochzuziehen. Eine andere Möglichkeit besteht darin, das Fleisch vorher in der Gaskugel (Standardposition) bei niedrigen Temperaturen auf die gewünschte Kerntemperatur zu bringen und dieses danach auf der BLAZING ZONE PLUS mit einer leckeren ®...
- Page 13 WARTUNG DER BLAZING ZONE PLUS ® REGELMÄSSIGE REINIGUNG Wir empfehlen Ihnen Ihre BLAZING ZONE PLUS nach 3 Grillgängen jeweils zu reinigen, entnehmen Sie dazu den Grillrost und den HEAT ® DIFFUSER und reinigen Sie diesen einfach In Ihrer Spülmaschine. Wischen Sie den Innenraum mit einem trockenen Tuch ab und leeren Sie die Fettauffangschale.
- Page 14 DIE EDELSTAHL-GRILLROSTE DER BLAZING ZONE PLUS ® ANWENDUNG Die Oberfläche des Grillrosts sollte stets mit einem leichten Ölfilm überzogen sein, um das Anbrennen des Grillguts zu verhindern. Benutzen Sie ein pflanzliches Öl mit einem hohen Rauchpunkt (z.B. Avocado-Öl oder Rapsöl). VOR DEM ERSTEN GEBRAUCH Reinigen Sie die Edelstahl-Grillroste vor dem ersten Gebrauch mit Wasser oder einer milden Seifenwasserlösung.
- Page 15 Das ausgelieferte BLAZING-/COOKING ZONE KIT PLUS passt farblich bereits zu Ihrem AROSA 570 G EVO GREY STEEL. Alle anderen AROSA Modelle mit Modelljahr ab 2022, welche farblich vom AROSA 570 G EVO GREY STEEL abweichen, benötigen zusätzlich ein entsprechendes „Replacement Kit“ in der passenden Farbe, damit die Aussenfarbe des BLAZING-/COOKING ZONE KIT PLUS sowie der dazugehörige Stützfuss farblich perfekt auf Ihren Grill angepasst werden kann.
- Page 16 Auch die AROSA Grills mit Modelljahr vor 2022 sind nachrüstbar (ausgenommen Modell AROSA 570 G Premium Steel). Diese Grills (ausgenommen Modell AROSA 570 G Grey Steel) benötigen zusätzlich zum jeweiligen Replacement Kit in der passenden Farbe (siehe oben) noch das „Tool Kit AROSA“.
-
Page 17: Fehlerbehebung
UNTERHALT Ein regelmässiger Unterhalt Ihres Grills garantiert ein einwandfreies Funktionieren. • Kontrollieren Sie alle gasführenden Teile mindestens zweimal pro Jahr und jedes Mal nach einer längeren Lagerung. Spinnen und andere Insekten können Verstopfungen verursachen, welche vor Gebrauch behoben werden müssen. •... -
Page 18: Technische Informationen
TECHNISCHE INFORMATIONEN BLAZING ZONE PLUS Elektrische Zündung ® Für den Betrieb der elektrischen Zündung benötigen Sie zwei Batterien Leistung 3.50 kW (Typ AAA, LR03, 1.5 Volt). Gasverbrauch 244 g/h Düse (28–30/37 mbar) 0.88 mm / Markierung: CE Hinweis zur Temperaturanzeige Düse (50 mbar) 0.76 mm / Markierung: CD Die Anzeigenabweichung vom Thermometer kann +/–... -
Page 19: Important For Your Safety
USER GUIDE IMPORTANT: Please read these instructions carefully before using your OUTDOORCHEF gas barbecue and the Blazing-/Cooking Zone Kit Plus. IMPORTANT: You will find the serial number of your Blazing-/Cooking Zone Kit Plus on the data sticker located on the Blazing-/Cooking Zone Kit Plus. The serial number and item number are important to allow smooth processing of enquiries, orders for spare parts and any warranty claims. - Page 20 • After connecting a new gas bottle, check the connection parts in accordance with the instructions in the LEAK TEST section. • If you suspect that parts are leaking, turn the gas regulating knob to the position and close the gas supply at the gas bottle. Have the parts that carry gas checked at a specialist gas equipment retailer.
- Page 21 CONNECTING THE GAS HOSE OF THE BLAZING-/COOKING ZONE KIT PLUS CAUTION: Please refer to the assembly and connection information in the separate assembly instructions. CAUTION: When fitting the BLAZING-/COOKING ZONE KIT PLUS, carry out the leak test for all system component connections. Always use the spanner supplied to attach the gas hose to ensure the connection is sufficiently secure.
- Page 22 LEAK TEST WARNING: Ensure that no ignition sources are in the vicinity during the leak test. This also includes smoking. Never check for leaks with a burning match or a naked flame, and always do this task outdoors. 1. The gas regulating knob must be in the position 2.
- Page 23 BLAZING-/COOKING ZONE KIT PLUS The BLAZING-/COOKING ZONE KIT PLUS is the perfect extension to your AROSA 570 G and will turn your barbecue into a fully-fledged outdoor kitchen in no time at all. BLAZING-/COOKING ZONE KIT PLUS COMPONENTS • High-performance ceramic burner: BLAZING ZONE PLUS ®...
- Page 24 COOKING ZONE PLUS – MUCH MORE THAN A SIDE COOKING PLATE, 3 COOKING AREAS The completely newly developed COOKING ZONE PLUS is, as the name suggests, more than a conventional side cooking plate as it opens up a far wider temperature range. While standard side cooking plates are usually designed for medium and high temperatures, the COOKING ZONE PLUS can also be used to cook dishes at low heat (pasta sauces, soups, stews, etc.).
-
Page 25: Before First Use
BEFORE FIRST USE 1. Clean all parts that come into contact with food. 2. Check all parts that carry gas, as described in the LEAK TEST section below. Also do this if your AROSA 570 G was delivered pre-assembled by the retailer. - Page 26 TIPS AND TRICKS BLAZING ZONE PLUS ® INFRARED BARBECUEING How does an infrared burner work? The gas flame created when the BLAZING ZONE PLUS is ignited is distributed evenly in the ceramic plate through hundreds of very small ® openings and generates infrared radiation on the surface. This emits concentrated direct heat of up to 900 degrees Celsius onto the food to be grilled.
- Page 27 HEAT DIFFUSER installation Cooking thicker, larger cuts of meat For thicker, larger cuts of meat, we recommend that you heat these to the desired core temperature after barbecuing in the gas kettle at a low temperature. Another option is to cook the meat in advance in the gas kettle (standard position) at a low heat until it reaches the desired core temperature and then finish it off with a delicious crust on the BLAZING ZONE PLUS.
- Page 28 MAINTENANCE OF THE BLAZING ZONE PLUS ® REGULAR CLEANING We recommend cleaning your BLAZING ZONE PLUS after every third use. Remove the barbecue grid and the HEAT DIFFUSER and ® simply clean them in your dishwasher. Wipe the inside with a dry cloth and empty the drip pan. We also recommend that you dismantle the burner of the Blazing Zone PLUS once a year to clean all surrounding parts and remove any ®...
- Page 29 STAINLESS STEEL BARBECUE GRIDS FOR THE BLAZING ZONE PLUS ® USAGE: Always coat the surface of the barbecue grid with a light film of oil to stop food from burning. Use a vegetable oil with a high smoke point (e.g. avocado oil or rapeseed oil). BEFORE FIRST USE Clean the stainless steel barbecue grids with water or a mild soapy water solution before using them for the first time.
- Page 30 The supplied BLAZING-/COOKING ZONE KIT PLUS already matches the colour of your AROSA 570 G EVO GREY STEEL. All other AROSA models of model year 2022 or later, which differ in colour from the AROSA 570 G EVO GREY STEEL, also require a corresponding "Replacement Kit"...
- Page 31 MODEL YEAR BEFORE 2022 The AROSA barbecues of model years before 2022 can also be expanded via retrofitting (except for the AROSA 570 G Premium Steel model). These barbecues (except for the AROSA 570 G Grey Steel model) require the "AROSA Tool Kit" in addition to the corresponding Replacement Kit in the matching colour (see above).
-
Page 32: Maintenance
MAINTENANCE Regular maintenance of your barbecue will ensure it functions correctly. • At least twice a year, check all parts that carry gas; also check them after extended periods of storage. Spiders and other insects can cause blockages that must be cleared before use. •... -
Page 33: Technical Information
TECHNICAL INFORMATION BLAZING ZONE PLUS Electric ignition ® Two batteries (type AAA, LR03, 1.5 volts) are required for the electric Power 3.50 kW ignition. Gas consumption 244 g/h Nozzle (28–30/37 mbar) 0.88 mm/mark: CE Note on the temperature display Nozzle (50 mbar) 0.76 mm/mark: CD The thermometer display is subject to a +/-10% fluctuation. -
Page 34: Consignes De Sécurité
MODE D’EMPLOI IMPORTANT : Veuillez lire attentivement cette notice avant de mettre en service votre barbecue à gaz OUTDOORCHEF et le kit Blazing/ Cooking Zone Plus. IMPORTANT : Vous trouverez le numéro de série de votre kit Blazing/Cooking Zone Plus sur l'étiquette adhésive, qui se trouve sur le kit Blazing/Cooking Zone Plus. - Page 35 • Lors du changement de la bouteille de gaz, le bouton de réglage de gaz doit toujours être sur la position et l’arrivée de gaz doit être fermée sur la bouteille. IMPORTANT : tenir toute source d'ignition à distance. • Après le raccordement d’une nouvelle bouteille de gaz, contrôlez les raccordements selon les instructions concernant le TEST D’ÉTANCHÉITÉ. •...
- Page 36 RACCORDEMENT DU TUYAU DE GAZ DU KIT BLAZING/COOKING ZONE PLUS ATTENTION : pour le montage et le raccordement, veuillez consulter les informations de la notice de montage séparée. ATTENTION : pour l’extension avec le KIT BLAZING/COOKING ZONE PLUS, il faut réaliser un test d’étanchéité de tous les raccords des éléments de système.
-
Page 37: Test D'étanchéité
TEST D’ÉTANCHÉITÉ AVERTISSEMENT : pendant le test d'étanchéité, veuillez éloigner toute source d'ignition. Veuillez en outre ne pas fumer. Ne jamais vérifier l'étanchéité avec une allumette ou une flamme nue et toujours en extérieur. 1. Le bouton de réglage de gaz doit être positionné sur 2. - Page 38 KIT BLAZING / COOKING ZONE PLUS Le KIT BLAZING/COOKING ZONE PLUS est l’extension idéale pour votre AROSA 570 G et permet de transformer votre barbecue en un clin d'œil en cuisine d’extérieur de qualité. COMPOSANTS KIT BLAZING / COOKING ZONE PLUS : •...
- Page 39 COOKING ZONE PLUS - BIEN PLUS QU’UNE SIMPLE PLAQUE DE CUISSON LATÉRALE, 3 DOMAINES D’UTILISATION Le tout nouveau COOKING ZONE PLUS est, comme son nom l’indique, bien plus qu’une place de cuisson latérale : il vous permet d'atteindre une plage de température nettement plus large. Alors qu’une plaque de cuisson latérale classique est généralement conçue pour des températures moyennes à...
-
Page 40: Avant La Première Utilisation
2. Veuillez vérifier toutes les pièces conduisant le gaz, comme cela est décrit dans le chapitre suivant TEST D'ÉTANCHÉITÉ. Veuillez le réaliser également lorsque votre AROSA 570 G vous est livré monté par votre revendeur. 3. Faites chauffer le KIT BLAZING ZONE PLUS pendant environ 20-25 minutes sur la position... - Page 41 CONSEILS ET ASTUCES KIT BLAZING ZONE PLUS ® BARBECUE INFRAROUGE Comment fonctionne un brûleur infrarouge ? La flamme de gaz produite lors de l’allumage du BLAZING ZONE PLUS se propage de manière uniforme à travers des centaines de petites ® ouvertures sur la plaque en céramique, générant un rayonnement infrarouge sur la surface qui dégage une chaleur directe intense sur les grillades allant jusqu’à...
- Page 42 Montage du HEAT DIFFUSER Préparation de morceaux de viande gros et épais Pour les morceaux de viande plus épais et plus gros, nous vous recommandons de les maintenir à basse température après la cuisson dans la sphère à gaz, jusqu’à obtenir la température au cœur souhaitée. Vous pouvez également obtenir la température au cœur souhaitée avant la cuisson dans la sphère à...
- Page 43 MAINTENANCE DU BLAZING ZONE PLUS ® NETTOYAGE RÉGULIER Nous vous conseillons de nettoyer votre KIT BLAZING ZONE PLUS après 3 grillades. Pour cela, retirez la grille et le HEAT DIFFUSER et ® lavez-les simplement dans votre lave-vaisselle. Rincez l’intérieur avec un chiffon sec et videz le réceptacle à graisse. Nous vous conseillons de démonter une fois par an le brûleur du Blazing Zone PLUS et de nettoyer toute les pièces adjacentes et de retirer ®...
- Page 44 LA GRILLE EN ACIER INOXYDABLE DU BLAZING ZONE PLUS ® UTILISATION La surface de la grille doit toujours être recouverte d’un léger film d’huile afin d’éviter que les grillades ne brûlent. Utilisez une huile végétale au point de fumée élevé (par ex. huile d’avocat ou de colza). AVANT LA PREMIÈRE UTILISATION Avant la première utilisation, nettoyez la grille en inox à...
- Page 45 La couleur du KIT BLAZING/COOKING ZONE PLUS livré est assortie à votre AROSA 570 G EVO GREY STEEL. Tous les autres modèles AROSA à partir de l'année 2022, dont la couleur est différente de celle de l’AROSA 570 G EVO GREY STEEL, nécessitent un « Replacement Kit »...
- Page 46 ANNÉE DE MODÈLE AVANT 2022 Les modèles de barbecue AROSA avant 2022 peuvent également être équipés ultérieurement (sauf le modèle AROSA 570 G Premium Steel). Ces barbecues (sauf le modèle AROSA 570 G Grey Steel) nécessitent, en plus du Replacement Kit correspondant dans la couleur assortie (voir ci-dessus), un « Tool Kit AROSA ».
-
Page 47: Entretien
ENTRETIEN Un entretien régulier de votre barbecue garantit un fonctionnement irréprochable. • Contrôlez toutes les pièces conduisant le gaz au moins deux fois par an et après une longue immobilisation du barbecue. Les araignées et les autres insectes peuvent causer des obstructions qui doivent être éliminées avant l’utilisation. •... -
Page 48: Informations Techniques
INFORMATIONS TECHNIQUES BLAZING ZONE PLUS Allumage électrique ® Pour l’allumage électrique, vous avez besoin de deux piles Puissance 3,50 kW (type AAA, LR03, 1,5 volt). Consommation de gaz 244 g/h Injecteur (28–30/37 mbar) 0,88 mm/marquage : CE Indications concernant le thermomètre Injecteur (50 mbar) 0,76 mm/marquage : CD Un écart de +/- 10 % sur les indications du thermomètre est possible. -
Page 49: Istruzioni Per L'uso
ISTRUZIONI PER L'USO IMPORTANTE: Leggere attentamente le presenti istruzioni prima di mettere in funzione barbecue a gas OUTDOORCHEF e del Blazing/ Cooking Zone Kit Plus. IMPORTANTE: Il numero di serie del Blazing/Cooking Zone Kit Plus si trova sull’etichetta adesiva che si trova sul Blazing/Cooking Zone Kit Plus. Il numero di serie e il numero articolo sono importanti per consentirci un rapido disbrigo in caso di richieste di informazioni, ordini sostitutivi e richieste di garanzia. - Page 50 • Dopo aver utilizzato il barbecue, riportare sempre la manopola di regolazione del gas in posizione e chiudere la valvola di erogazione del gas posta sulla bombola. • Durante la sostituzione della bombola, assicurarsi che la manopola di regolazione del gas sia in posizione e la valvola di erogazione del gas posta sulla bombola sia chiusa.
- Page 51 ALLACCIAMENTO DEL TUBO DEL GAS DEL BLAZING/COOKING ZONE KIT PLUS ATTENZIONE: Per quanto riguarda il montaggio e l’allacciamento, osservare le informazioni nelle istruzioni di montaggio separate. ATTENZIONE: Qualora venga effettuato un ampliamento con il BLAZING/COOKING ZONE KIT PLUS, la prova di tenuta deve essere eseguita per tutti i raccordi degli elementi del sistema.
- Page 52 PROVA DI TENUTA AVVERTENZA: Durante la prova di tenuta non devono esserci fonti di accensione nelle vicinanze e non si deve fumare. Verificare la tenuta sempre all'aperto e senza utilizzare fiammiferi accesi o fiamme libere. 1. La manopola di regolazione del gas deve essere in posizione 2.
- Page 53 BLAZING/COOKING ZONE KIT PLUS Il BLAZING/COOKING ZONE KIT PLUS è l'estensione perfetta dell’AROSA 570 G se si vuole trasformare in un batter d'occhio il proprio barbecue in una vera e propria cucina all'aperto. COMPONENTI BLAZING-/COOKING ZONE KIT PLUS: • Bruciatore in ceramica ad alte prestazioni BLAZING ZONE PLUS ®...
- Page 54 COOKING ZONE PLUS - MOLTO PIÙ DI UN PIANO DI COTTURA LATERALE, 3 CAMPI DI APPLICAZIONE La COOKING ZONE PLUS di nuova concezione è, come suggerisce il nome, più di un tradizionale piano di cottura laterale, poiché fornisce un range di temperatura molto più ampio. Mentre i normali piani di cottura laterali sono solitamente concepiti per temperature medie e alte, la COOKING ZONE PLUS può...
-
Page 55: Prima Del Primo Utilizzo
2. Controllare tutti gli elementi di adduzione del gas; fare riferimento al capitolo seguente PROVA DI TENUTA. Eseguire il controllo anche nel caso in cui il barbecue AROSA 570 G sia stato fornito già montato dal rivenditore. 3. Riscaldare il BLAZING/COOKING ZONE KIT PLUS per circa 20–25 minuti al livello... - Page 56 CONSIGLI PRATICI BLAZING ZONE PLUS ® GRIGLIARE A INFRAROSSI Come funziona un bruciatore a infrarossi? La fiamma che si genera all'accensione della BLAZING ZONE PLUS si distribuisce in modo uniforme attraverso centinaia di minuscole ® aperture nel piatto di ceramica e produce una radiazione infrarossa sulla superficie, che emette un intenso calore diretto a oltre 900 gradi Celsius sul cibo da grigliare.
- Page 57 Montaggio dell’HEAT DIFFUSER Preparazione di tagli di carne grandi e spessi Nel caso di tagli di carne grandi e spessi, si consiglia di prepararli sul barbecue a sfera a gas attraverso il metodo di cottura a bassa temperatura, per raggiungere la temperatura interna desiderata. Un'altra possibilità è quella di portare in anticipo la carne alla temperatura interna desiderata nel barbecue a sfera a gas (posizione standard) a basse temperature e quindi passarla sulla BLAZING ZONE PLUS per creare una deliziosa crosta.
- Page 58 MANUTENZIONE DELLA BLAZING ZONE PLUS ® PULIZIA PERIODICA Si raccomanda di pulire il BLAZING ZONE KIT PLUS dopo 3 grigliate; a tal fine, rimuovere la griglia e l’HEAT DIFFUSER e lavarli ® semplicemente in lavastoviglie. Pulire l'interno con un panno asciutto e svuotare il recipiente raccogli grassi. Si consiglia di smontare 1 volta l’anno il bruciatore della Blazing Zone PLUS e di pulire tutti i componenti circostanti, rimuovendo ®...
- Page 59 LA GRIGLIA IN ACCIAIO DELLA BLAZING ZONE PLUS ® UTILIZZO La superficie della griglia deve essere sempre coperta con un leggero velo d'olio, per evitare che il cibo da grigliare si bruci. Utilizzare un olio vegetale con un punto di fumo elevato (es. olio di avocado o di colza). PRIMA DEL PRIMO UTILIZZO Prima del primo utilizzo, pulire le griglie in acciaio inossidabile con acqua o con una miscela delicata di acqua saponata.
- Page 60 Il BLAZING/COOKING ZONE KIT PLUS fornito è già abbinato cromaticamente al barbecue al AROSA 570 G EVO GREY STEEL. Tutti gli altri modelli AROSA a partire dall’anno 2022, che differiscono nel colore dall'AROSA 570 G EVO GREY STEEL, richiedono anche un corrispondente «Replacement Kit»...
- Page 61 ANNO PRIMA DEL 2022 Anche i barbecue AROSA di un anno antecedente al 2022 possono essere ampliati a posteriori (ad eccezione del modello AROSA 570 G Premium Steel). Questi barbecue (ad eccezione del modello AROSA 570 G Grey Steel) necessitano del «Tool Kit AROSA» in aggiunta al rispettivo Replacement Kit nel colore appropriato (vedere sopra).
-
Page 62: Manutenzione
MANUTENZIONE Una manutenzione periodica permette di mantenere il barbecue in perfetta efficienza. • Controllare gli elementi di adduzione del gas almeno due volte all'anno e comunque dopo ogni lungo periodo di inutilizzo. Ragni o altri insetti possono causare ostruzioni che vanno eliminate prima di usare il barbecue. •... -
Page 63: Informazioni Tecniche
INFORMAZIONI TECNICHE BLAZING ZONE PLUS Accensione elettrica ® Per il funzionamento dell'accensione elettrica occorrono due batterie Potenza 3,50 kW (tipo AAA, LR03, 1,5 volt). Consumo di gas 244 g/h Ugello (28-30/37 mbar) 0,88 mm/Marcatura: CE Informazione per l'uso del termometro Ugello (50 mbar) 0,76 mm/Marcatura: CD La temperatura indicata dal termometro può... - Page 64 OUTDOORCHEF.COM Outdoorchef AG | Eggbühlstrasse 28 | Postfach | 8050 Zürich | Switzerland Outdoorchef Benelux B.V. | Brabantsehoek 8 | 5071 NM Udenhout | The Netherlands Outdoorchef Austria GmbH | Dueckegasse 15 / Top 2 F | 1220 Vienna | Austria Outdoorchef Deutschland GmbH | Ochsenmattstr.
Need help?
Do you have a question about the AROSA 570 G and is the answer not in the manual?
Questions and answers