Leviton EZ-MAX H Series Installation Manual
Lighting control panel
Hide thumbs
Also See for EZ-MAX H Series:
- Installation manual (20 pages) ,
- Quick start manual (2 pages) ,
- Manual (2 pages)

Related Manuals for Leviton EZ-MAX H Series


Summary of Contents for Leviton EZ-MAX H Series
- Page 1 EZ-MAX H SERIES - Lighting Control Panel Cat. No. R08BD Installation Manual PK-A3456-10-00-0A...
-
Page 3: Table Of Contents
Connecting Panel Power ......................6 Connecting Lighting Loads ......................7 Connecting Low-Voltage Inputs ....................8 Replacing the EZ-MAX H Series Controller Battery ..............9 10 Operating Panel .......................... 10 11 What to do if ..........................11 12 EZ-MAX H Series Panel Specifications ..................12... -
Page 4: Warnings And Cautions
• No hay componentes que el usuario pueda reparar. NO intente dar mantenimiento ni reparar. • Utilice este dispositivo con ALAMBRE DE COBRE O REVESTIDO DE COBRE ÚNICAMENTE. Para la hoja de instrucciones en español, vaya a www.leviton.com. AVERTISSEMENTS • POUR ÉVITER LES RISQUES D’INCENDIE, DE DÉCHARGE OU D’ÉLECTROCUTION, COUPER LE COURANT AU FUSIBLE OU AU DISJONCTEUR ET S’ASSURER QUE LE CIRCUIT EST HORS TENSION AVANT DE PROCÉDER À... -
Page 5: Product Description And Configuration
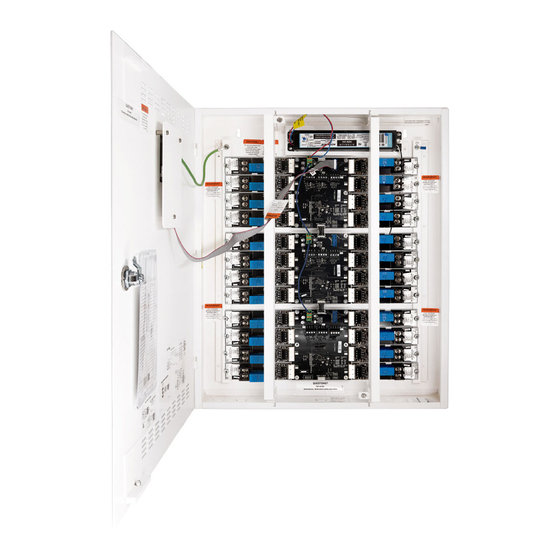
2 PRODUCT DESCRIPTION AND CONFIGURATION 2.1 Description The EZ-MAX H Series Lighting Control Panels are lighting control systems designed to control lighting loads and motor loads of up to 2 HP. The system includes an enclosure, power supply and transformer, main board with Class 2 I/O user interface, and relay cards to control loads. -
Page 6: Installation Preparation
• DO NOT energize an EZ-MAX panel during installation or while replacing any components. 3.2 What You Will Need • EZ-MAX H Series Panel (14.5 in. W x 17.0 in. H x 4.0 in. D) • 1 - Construction Level •... -
Page 7: Removing The Panel Door (Optional)
1. Align the door hinges and the enclosure, slide and rotate the door, and slide it into the hinge slots. 2. Connect the EZ-MAX H Series controller ribbon cable into the EZ-MAX H Series controller ribbon connector. NOTE: DO NOT force the end connector of the ribbon cable into place. -
Page 8: Mounting Instructions
5 MOUNTING INSTRUCTIONS 1. Remove the relay panel. a. While holding the two (2) bottom relays to the mounting rails, use a Phillips-Head screwdriver to remove the mounting screws. b. Gently pull and separate the relay from the main board’s relay plug connector, but stay under the metal barrier. -
Page 9: Connecting Panel Power
6 CONNECTING PANEL POWER WARNINGS: • When power is applied to the transformer, the unused transformer leads become electrified. Cap unused transformer leads with wire nuts to prevent an electrical short. • Panel supply power must be de-energized during installation and servicing of the EZ-MAX panel. The panel is designed to operate on 120, 208, 240, or 277V AC input voltage. -
Page 10: Connecting Lighting Loads
7 CONNECTING LIGHTING LOADS WARNING: Prior to making any connections to the relay outputs, verify that the loads have not shorted. Failure to do so, may result in personal injury, damage to the panel, and void its warranty. 1. Turn the power OFF. 2. -
Page 11: Connecting Low-Voltage Inputs
• All relay inputs located on a relay card can control the relay to which they are affixed as a momentary N.O. contact. This is a default setting on the EZ-MAX H Series controller. • Auxiliary inputs do not, by default, control anything. You can program the auxiliary inputs via the controller. -
Page 12: Replacing The Ez-Max H Series Controller Battery
9 REPLACING THE EZ-MAX H SERIES CONTROLLER BATTERY Battery back up for the time clock is located in the back of the EZ-MAX H Series Controller. 1. Turn OFF power to the EZ-MAX panel. 2. Remove the controller’s metal stand-offs with a Phillips-head screwdriver and detach the controller. -
Page 13: Operating Panel
SD Card Slot: When you insert an SD card, the EZ-MAX H Series panel provides a log of events automatically. You can download the text file to a PC, and review it while troubleshooting or validating programming. -
Page 14: What To Do If
• Communication has not been properly established with a relay card. • Contact Leviton Technical Support at 1-800-824-3005 for assistance and replacement of the relay card. • See the Troubleshooting Guide section in the “EZ-MAX Panel User Guide.” Available for download at... -
Page 15: Ez-Max H Series Panel Specifications
12 EZ-MAX H SERIES PANEL SPECIFICATIONS Specifications Panel Input EZ-MAX H Series transformer that can power up to eight devices for either Power panel size. A powered device is an occupancy sensor, daylight sensor, or Requirements wall station with a pilot light. -
Page 16: Standard Statements And Warranty
LIMITED 5 YEAR WARRANTY AND EXCLUSIONS Leviton warrants to the original consumer purchaser and not for the benefit of anyone else that this product at the time of its sale by Leviton is free of defects in materials and workmanship under normal and proper use for five years from the purchase date.
Need help?
Do you have a question about the EZ-MAX H Series and is the answer not in the manual?
Questions and answers