Bushnell GOLF Phantom 2 - GPS Rangefinder Manual
- User manual (10 pages) ,
- Quick start manual (20 pages) ,
- User manual (100 pages)
Advertisement
- 1 Care and Maintenance
- 2 WARNING
- 3 Legal Disclaimer
- 4 Additional Information
- 5 CHARGING THE BATTERY
- 6 Buttons and Functions
- 7 POWERING UP/HOME SCREEN
- 8 HOME SCREEN DISPLAY
- 9 THE SETTINGS MENU
- 10 SETTINGS MENU ITEMS
- 11 CONNECTING YOUR DEVICE TO YOUR MOBILE DEVICE & BUSHNELL GOLF APP
- 12 USING THE PLAY GOLF MODE
- 13 MAGNETIC ACCESSORY w/ BITE TECHNOLOGY
- 14 ACCESSING UPDATED GOLF COURSE DATA
- 15 ONE YEAR LIMITED WARRANTY
- 16 Disposal of Electric and Electronic Equipment
- 17 Documents / Resources
Care and Maintenance
To help ensure reliable operation, the following care and maintenance guidelines are recommended:
- Avoid exposing the unit to extreme environmental conditions for a prolonged period of time. The unit is IPX7 rated; it is water resistant, but not waterproof. Unit should not be submerged in any liquids.
- Avoid severe impacts on the unit.
- You may clean the unit occasionally with a soft, damp cloth.
- DO NOT expose the unit to strong chemicals such as gasoline and alcohol, as they will damage the unit.
- Store the unit in a dry place when it is not in use.
WARNING
Do not attempt to open the Phantom 2.
Unit contains a lithium ion battery.
- Do not attempt to open, disassemble or service the internal battery. The battery is not replaceable.
- Do not crush, puncture or short the battery's external contacts.
- Do not expose to temperatures above 140oF (60oC). Do not charge battery when temperature is over 113oF (45oC). Do not store unit in temperatures above 113oF (45o or below 32oF (0oC).
- Properly recycle or dispose of the battery. Do not dispose in fire or water.
Legal Disclaimer
By using this product, you agree that Bushnell Outdoor Products will not be held legally responsible for any injury or damage to you or any person or property caused by the user's improper operation and/or poor judgment while using this product.
Note: See Limited Warranty for other limitations to our liability.
Additional Information
The Global Positioning System (GPS), a network of 32 satellites orbiting Earth, is operated and maintained by the U.S. government. This GPS device requires at least 3 satellites to be acquired to accurately determine your position. Any change made to the system by the government could affect the accuracy and performance of this product.
Bushnell Golf Website
www.bushnellgolf.com is the best online resource for all Bushnell Golf product owners, including product support, FAQs, etc.
CHARGING THE BATTERY
The rechargeable battery of the Phantom 2 is long lasting and provides up to 18+ hrs (3+ rounds of golf typically) on a charge. However, battery life may be reduced due to a variety of factors (external temperature, etc). All rechargeable batteries lose their effective charge length over time.
To check your remaining battery life, select "Battery" from the SETTINGS menu. To recharge the battery, attach the smaller plug on the included USB-C cable to the port at the bottom side of the unit and connect the large (standard) USB plug (not included) to your computer.
The Phantom 2 and USB-C cable are compatible with all USB ports, including iPhone/other smartphone USB chargers. Once connected, press the POWER button-the display will show the battery icon charging. When the Phantom 2 is fully charged (about 3.5 hrs from totally discharged state, less if partial charge remains) and ready to use when a full circle is displayed around the battery icon (press POWER to check charge status if not displayed).

Buttons and Functions

- POWER Button: Press to turn on. In ON state, press for MENU.
In ON state in PLAY GOLF mode, press for SCORE entry. Hold for Golf Menu. - UP (
![]() ) Button: Scrolls up through Menu.
) Button: Scrolls up through Menu. - SELECT (
![]() ) Button: Selects highlighted Menu item.
) Button: Selects highlighted Menu item. - DOWN (
![]() ) Button: Scrolls down through Menu.
) Button: Scrolls down through Menu.
 ) Button: Scrolls up through Menu.
 ) Button: Selects highlighted Menu item.
 ) Button: Scrolls down through Menu.
 POWERING UP/HOME SCREEN
- Be sure the battery has a full charge before powering on.
- Press and hold the orange POWER button on the right side of the unit until Home Screen powers on. To turn off, press and hold the POWER button again to shut down.
- The display will show the Main Screen, with a choice of four operating modes: MENU, SCORING, PLAY GOLF and BLUETOOTH.
HOME SCREEN DISPLAY

- Menu button
- Scorecard list button
- Scorecard indication. Number will show the latest round played. When no rounds have been played, the default score will be "00".
- Play Golf button
- Bluetooth connection button
- Time
- Bluetooth status
- Battery icon
THE SETTINGS MENU
- From the Home Screen, press (1) SETTINGS (if you are in PLAY GOLF mode, press MENU and select EXIT ROUND to go to the main menu) and press SELECT.
- Select item from menu using UP/DOWN buttons to highlight it, then press SELECT button.
![]()
- If multiple options are available for a setting, use UP/DOWN to highlight your choice, then press SELECT.
- Press MENU button to return to previous menu screen.

SETTINGS MENU ITEMS
- SCORECARD LIST: press SELECT to open the Scorecard List. There will be a list of the ten most recent scorecards played. The Scorecard can also be accessed by the Home Screen and pressing the red Select button.

![]()
- BATTERY*: press SELECT button to check battery condition (charge %). (*also provided in the PLAY GOLF Menu)
- TIME: press SELECT then highlight and select from these time/date related settings:


- FORMAT: press SELECT and highlight your preference for time display format:
- 12 HOUR
- 24 HOUR
- TIME ZONE: press SELECT your time zone preference and time display format:
- US Eastern Time Zone = UTC -5
- US Central Time Zone = UTC - 6
- US Mountain Time Zone = UTC -7
- US Pacific Time Zone = UTC - 8
- DAYLIGHT SAVING: press SELECT and highlight current daylight savings time status for your location:
- DST ON +1
- DST OFF -1
- SET TIME MANUAL:
- Use the UP/DOWN buttons to enter the correct current time and date yourself.
Choose 12 or 24 or format. If clock is in 12 hr. format AM/PM will need to be selected.
- SET TIME GPS:
- Press SELECT to automatically set the time based on your current GPS location.


- SET UNITS*: press SELECT. The solid (filled in) check box indicates the current setting (default=YARDS). To change how distances are displayed, highlight YARDS or METERS, press SELECT. (*also provided in the PLAY GOLF Menu)
![]()
- BACKGROUND: press SELECT then use UP/DOWN to select the display white with black text (default) or black with white text.
![]()
- LANGUAGE: The Phantom 2 features 12 menu language settings (ENGLISH, SPANISH, FRENCH, GERMAN, ITALIAN, PORTUGUESE, SWEDISH, DANISH, INDONESIAN, CHINESE, KOREAN AND JAPANESE.). By default, the user interface is in English. Press SELECT, use UP/DOWN to scroll between options on the Language menu, then press the SELECT button to confirm and set all menus to your preferred (highlighted) language.
![]()
- ABOUT: press SELECT to display your unit's firmware version, FCC ID and IC#.
![]()
- RESET DEVICE: to restore the unit to all of its original factory settings, press SELECT, then select DEFAULT SETTINGS and confirm you want to do this. This will only reset the settings, not the firmware or course data stored in the device.
![]()


CONNECTING YOUR DEVICE TO YOUR MOBILE DEVICE & BUSHNELL GOLF APP
To connect your Phantom 2 to your phone and the Bushnell Golf Mobile app:
- Download the Bushnell Golf mobile app at app.bushnellgolf.com/install or scan the QR code below.
- If you are new to the app you will be asked to setup a device after registration, select Phantom 2.
- if you are a returning user to the app, select "See All" from the "My Devices Section", click "Add Device", and select Phantom 2.
- Follow the on screen instructions in the app to pair and connect your Phantom 2.


Note: After paired, once powered up the Bluetooth on/off state will be the last set state.

Scan the code to download the Bushnell Golf app and register your Phantom 2 Golf GPS.


USING THE PLAY GOLF MODE
- Make sure you are outdoors, with an unobstructed view of the sky. Highlight PLAY GOLF and press the SELECT button. Display will show "SEARCHING" as the Phantom 2 looks for multiple available GPS satellite signals and locks onto them. This can take several minutes the first time you use the Phantom 2, but will be faster when used in the same general area in the future.
![]()
- You will be asked if you wish to continue a game that is active. Make your choice. If you are continuing a game, you will be sent to the Front Center Back (FCB) screen. If you select no, the device will connect to GPS and a list of nearest courses will appear.

When flag appears, indicates distance to the pin, not the center of the green. - Use the UP/DOWN buttons to select (highlight) the course you want to play from the list of nearby courses (closest course at top of list), then press SELECT.
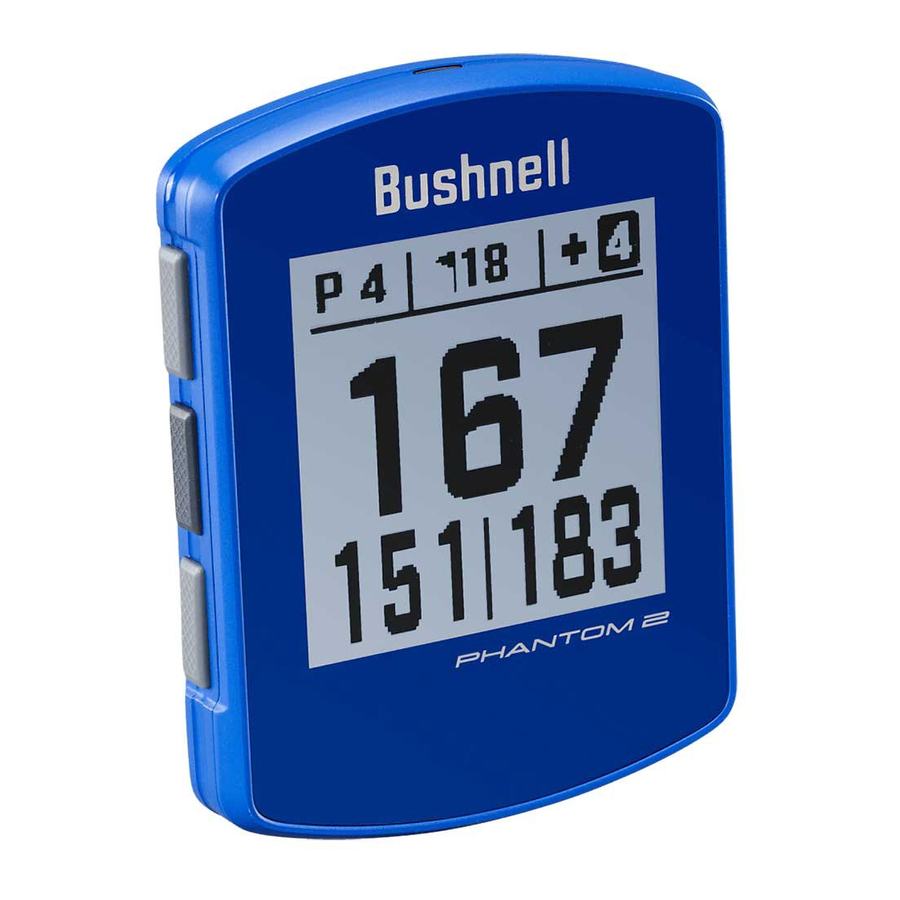
- The display then shows Front/Center/Back Distance Screen: current hole # (Fig. 1), par for the hole (Fig. 2), game score (Fig. 3), distance to the center/pin (Fig. 4), distance to the front of the green (Fig. 5) and distance to the back of green (Fig. 6).


To cycle through mode/menu screens (Front/Center/Back > GreenView > Hazards and Layup points > Time), press the Select button.
Front/Center/Back Screen
The Front/Center/Back Distance screen, see diagram below.

GreenView
The Phantom 2's GreenView Screens will allow you to move the pin around on the green for a more accurate game. When in GreenView Mode, move the hole around to its current position on the green to get an accurate front, center and back distances. Do this by pressing the UP/DOWN buttons on the left side of the unit to move the hole's position. You will notice the Nearest and Farthest distances adjust with moving the hole. When done, press the SELECT button to save and move on to the next function.
If no information is entered while in GreenView within 60 seconds, the screen will revert back to Distance Screen.

Hazard & Layup Points
Press SELECT to view Hazard callouts per hole, variable depending on the most significant hazards located near a specific hole on the current course. Hazard screen will time out after one minute and return to the FCB screen. (see above) If there are no Hazards, "No Obstacle Data" will be on screen. See "Hazard Glossary" for a list of all abbreviations used to designate various hazards.

Time Screen

Hole value indicates you are in "Play Golf" mode.
Score Entry
To enter your score, press the SCORE button (button on right side of unit). Once strokes are entered, press the NEXT button (button in the center on the left side of the unit). Enter your number of putts on the next screen and press the NEXT button again to enter the Fairway Hit screen. Scroll the buttons to the choice of Left, Hit, or Right. Press the NEXT Button to save your score and move to the next hole. *Note: to enter Putts and Fairways Hit, the device needs to be in Advanced Score mode.
GOLF MENU

If you are in Play Golf mode and wish to go to the Golf Menu, press and hold the SELECT button (on the right) until the menu appears on the screen. Your game progress will be saved.

Scorecard View: select to go to Scorecard screen

Exit Round: select to end round and go to the Round Summary
Shot Distance: Measures your shot distance.
Units: Choose Yards or Meters
Score: Choose OFF, BASIC or ADVANCED
Score Format: Choose Strokes, Stableford, or Modified Standard format
Battery: Shows the current battery life on the Phantom 2
Bluetooth: Choose to enter into Bluetooth mode and Pair to your portable device to play with the Bushnell Golf App. (see Connecting to Bluetooth)
Hazard Glossary
| ###L | To Layup point (i.e 75L= To 75yd Layup point, 100L = To 100 yard Layup point) | CRBk | Carry Right Bunker | RGBk | To Right Grass Bunker |
| CRHz | Carry Right Hazard | RHzd | To Right Hazard | ||
| ###M | To Marker (i.e. 250M = To 250 Marker | Crst | To Crest | Road | To Road |
| #Bnk | To # Bunker (i.e. T1Bk = To 1st Bunker) | CRWt | Carry Right Water Hazard | RWst | To Right Waste Area |
| #CBK | To # Center Bunker (i.e. 2CBk = To 2nd Center Bunker) | CWst | Carry Waste Area | RWtr | To Right Water |
| #Fwy | To # Fairway | CWtr | Carry Water Hazard | ThFy | Through Fairway |
| #GBk | To # Grass Bunker | Dtch | To Ditch | ThRF | Through Right Fairway |
| #LBk | To # Left Bunker | EFwy | To End of Fairway | Wter | To Water Hazard |
| #RBK | To # Right Bunker | ELFy | To End of Left Fairway | WstA | To Waste Area |
| #Wtr | To # Water Hazard | ELoF | To End of Lower Fairway | WstB | To Waste Bunker |
| Bnkr | To Bunker | ERFy | To End of Right Fairway | WstE | Waste Area End |
| C#Bk | Carry to # Bunker (i.e. C1BK = Carry 1st Bunker) | EWst | To End of Waste Area | CGrg | Carry Gorge |
| C#LB | Carry to # Left Bunker (i.e C2LB = Carry 2nd Left Bunker) | GBnk | To Grass Bunker | RvrB | To River Bed |
| C#RB | Carry to # Right Bunker (i.e. C3RB = Carry 3rd Right Bunker | Gorg | To Gorge | Wall | To Wall |
| C#Wt | Carry # Water Hazard (i.e. C2Wt = Carry 2nd Water Hazard) | Hzrd | To Hazard | ||
| CBnk | To Center Bunker | LBnk | To Left Bunker | ||
| CCBK | Carry Center Bunker | LDth | To Left Ditch | ||
| CDch | To Center Ditch | LFwy | To Left Fairway | ||
| CFwy | To Center Fairway | LGBk | To Left Grass Bunker | ||
| Frwy | To Fairway | LndA | To Landing Area | ||
| CFyB | Carry Fairway Bunker | LWst | To Left Waste Area | ||
| CHzd | Carry Hazard | LWtr | To Left Water | ||
| CLBk | Carry Left Bunker | Path | To Path | ||
| CLHz | Carry Left Hazard | PotB | To Pot Bunker | ||
| Clif | To Cliff | RBnk | To Right Bunker | ||
| CLWs | Carry Left Waste Area | Rdge | To Ridge | ||
| CLWt | Carry Left Water Hazard | RDch | To Right Ditch | ||
| CPth | Carry Path | RFwy | To Right Fairway |
MAGNETIC ACCESSORY w/ BITE TECHNOLOGY
The Phantom 2 features a powerful BITE magnet incorporated into the rear center of its housing, which allows the device to be securely attached to a golf cart bar or attached to the included bag/belt clip. To use the BITE bag/belt clip, simply slide it onto your golf bag or belt (round concave part facing out), then place the convex BITE magnet on the back of the Phantom 2 near the round concave area on the BITE clip (below).

Belt Clip with Carabiner for attaching Phantom 2 to belt or golf bag.

Mounting accessory included with device contains a Neodymium magnet. Magnets could affect the functioning of pacemakers and implanted heart defibrillators. If you use these devices, keep sufficient distance from magnet. Warn other who wear these devices from getting too close to magnets.
- Unsafe handling could cause jamming of fingers or skin under magnet.
- Magnet may lose part of its adhesive force permanently if exposed to temperatures above 175o F (80o C).
- Magnets produce far-reaching, strong magnetic field. They could damage TVs and laptops, computer hard drives, credit and ATM cards, data storage media, mechanical watches, hearing aids and speakers. Keep unit away from devices and objects that could be damaged by strong magnetic fields.
ACCESSING UPDATED GOLF COURSE DATA
Your Phantom 2 is pre-loaded with data for over 38,000 courses located worldwide. It is ready to use right out of the box, with no need to download software or pay any membership fees.
To Update a single course file. Connect the Device to the Bushnell Golf Mobile App via Bluetooth. Select Phantom 2 from your device List. Select Course Update. Follow the instructions on the Bushnell Golf Mobile App to search for your course and update your device.
To Update multiple courses. Please visit the Bushnell Golf Update Manager at https://appsupport.bushnellgolf.com in Google Chrome and follow the instructions.
ONE YEAR LIMITED WARRANTY
Your Bushnell® Phantom 2 is warranted to be free of defects in materials and workmanship for one year after the date of purchase. In the event of a defect under this warranty, we will, at our option, repair or replace the product, provided that you return the product postage prepaid. This warranty does not cover damages caused by misuse, improper handling, installation, or maintenance provided by someone other than a Bushnell Authorized Service Department.
Go to https://www.bushnellgolf.com/contact and fill out the contact form for any questions or warranty information.
This warranty gives you specific legal rights. You may have other rights which vary from country to country.
©2021 Bushnell Outdoor Products
Disposal of Electric and Electronic Equipment
(Applicable in the EU and other European countries with separate collection systems)

This equipment contains electric and/or electronic parts and must therefore not be disposed of as normal household waste. Instead, it should be disposed at the respective collection points for recycling provided by the communities. For you, this is free of charge.
If the equipment contains exchangeable (rechargeable) batteries, these too must be removed before and, if necessary, in turn be disposed of according to the relevant regulations (see also the respective comments in this unit's instructions).
Further information about the subject is available at your community administration, your local waste collection company, or in the store where you purchased this equipment.
Customer Service: (800) 423-3537 www.bushnellgolf.com
©2021 Bushnell Outdoor Products

Documents / Resources
References
![www.bushnellgolf.com]() Bushnell Golf | Golf Accessories - GPS - Laser Rangefinders
Bushnell Golf | Golf Accessories - GPS - Laser Rangefinders![app.bushnellgolf.com]() Bushnell Update
Bushnell Update![www.apple.com]() App Store - Apple
App Store - Apple![play.google.com]() Google Play
Google Play![appsupport.bushnellgolf.com]() Bushnell Update
Bushnell Update![www.bushnellgolf.com]() Contact Us | Bushnell Golf
Contact Us | Bushnell Golf
Download manual
Here you can download full pdf version of manual, it may contain additional safety instructions, warranty information, FCC rules, etc.
Advertisement


Need help?
Do you have a question about the Phantom 2 and is the answer not in the manual?
Questions and answers