Table of Contents
Advertisement
Available languages
Available languages
Quick Links
DRIVING SUPPORT
CAM44
Rear View Video Camera
EN
Installation and Operating Manual. . . . . . . 11
Rückfahrvideokamera
DE
Montage- und Bedienungsanleitung . . . . .28
Caméra vidéo de recul
FR
Instructions de montage
et de service . . . . . . . . . . . . . . . . . . . . . . . . .45
Cámara de vídeo de marcha atrás
ES
Instrucciones de montaje y de uso . . . . . . .63
Câmara de vídeo de marcha atrás
PT
Instruções de montagem e manual de
instruções . . . . . . . . . . . . . . . . . . . . . . . . . . . 81
Videocamera per la retromarcia
IT
Istruzioni di montaggio e d'uso . . . . . . . . .98
Achteruitrijvideocamera
NL
Montagehandleiding en
gebruiksaanwijzing . . . . . . . . . . . . . . . . . . 116
Bakvideokamera
DA
Monterings- og betjeningsvejledning . . . 133
Backningsvideokamera
SV
Monterings- och bruksanvisning . . . . . . . 149
Ryggevideokamera
NO
Monterings- og bruksanvisning . . . . . . . . 165
PERFECTVIEW
Peruutusvideokamera
FI
Asennus- ja käyttöohje . . . . . . . . . . . . . . . 181
Видеокамера заднего вида
RU
Инструкция по монтажу и эксплуатации 197
Kamera cofania
PL
Instrukcja montażu i obsługi. . . . . . . . . . . 215
Cúvacia videokamera
SK
Návod na montáž a uvedenie
do prevádzky. . . . . . . . . . . . . . . . . . . . . . . 233
Couvací kamera
CS
Návod k montáži a obsluze . . . . . . . . . . . 249
Tolatókamera
HU
Szerelési és használati útmutató . . . . . . . 265
Advertisement
Chapters
Table of Contents

Related Manuals for Dometic 9600000043


Summary of Contents for Dometic 9600000043
- Page 1 DRIVING SUPPORT PERFECTVIEW Peruutusvideokamera Asennus- ja käyttöohje ....181 Видеокамера заднего вида Инструкция по монтажу и эксплуатации 197 Kamera cofania Instrukcja montażu i obsługi... 215 Cúvacia videokamera Návod na montáž...
- Page 2 CAM44...
- Page 3 CAM44 Ø 16 mm...
- Page 4 CAM44 90°...
- Page 5 CAM44...
- Page 6 CAM44 9102200078...
- Page 7 CAM44 AMP100 Monitor (RCA) 12 - 24V Camera Input...
-
Page 8: Table Of Contents
CAM44 Bitte lesen Sie diese Anleitung vor Einbau und Inbetriebnahme sorgfältig durch und bewahren Sie sie auf. Geben Sie sie im Falle einer Weitergabe des Produktes an den Nutzer weiter. Inhaltsverzeichnis Erklärung der Symbole ......... 29 Sicherheits- und Einbauhinweise . -
Page 9: Erklärung Der Symbole
CAM44 Erklärung der Symbole Erklärung der Symbole WARNUNG! Sicherheitshinweis: Nichtbeachtung kann zu Tod oder schwerer Verletzung führen. VORSICHT! Sicherheitshinweis: Nichtbeachtung kann zu Verletzungen führen. ACHTUNG! Nichtbeachtung kann zu Materialschäden führen und die Funktion des Produktes beeinträchtigen. HINWEIS Ergänzende Informationen zur Bedienung des Produktes. Sicherheits- und Einbauhinweise Beachten Sie die vom Fahrzeughersteller und vom Kfz-Handwerk vorge- schriebenen Sicherheitshinweise und Auflagen! - Page 10 Sicherheits- und Einbauhinweise CAM44 • Unzureichende Leitungsverbindungen können zur Folge haben, dass durch Kurzschluss – Kabelbrände entstehen, – der Airbag ausgelöst wird, – elektronische Steuerungseinrichtungen beschädigt werden, – elektrische Funktionen ausfallen (Blinker, Bremslicht, Hupe, Zündung, Licht). • Verwenden Sie bei Arbeiten an den folgenden Leitungen nur isolierte Kabelschuhe, Stecker und Flachsteckhülsen: –...
- Page 11 CAM44 Sicherheits- und Einbauhinweise • Achten Sie beim Bohren auf ausreichenden Freiraum für den Bohreraustritt, um Schäden zu vermeiden (Abb. 2, Seite 4). • Entgraten Sie jede Bohrung und behandeln Sie diese mit Rostschutzmittel. • Beachten Sie immer die Sicherheitshinweise des Fahrzeugherstellers. Einige Arbeiten (z.
-
Page 12: Lieferumfang
Schaltbox AMP100 9600000210 Bestimmungsgemäßer Gebrauch Die Kamera CAM44 (Art.-Nr. 9600000043) ist vorrangig für den Einsatz in Fahr- zeugen gedacht. Sie ist einsetzbar in Rückfahrvideosystemen, die zur Beobachtung des Bereiches direkt hinter dem Fahrzeug vom Fahrersitz aus dienen, z. B. beim Rangieren oder Einparken. -
Page 13: Technische Beschreibung
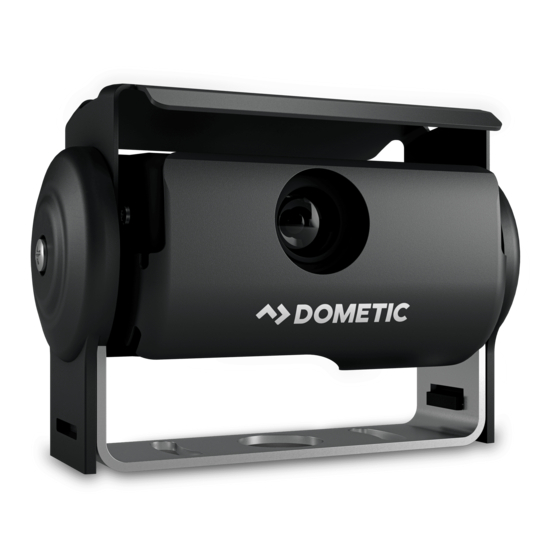
CAM44 Technische Beschreibung Technische Beschreibung Die Farbkamera mit integriertem Mikrofon ist in einem Aluminiumgehäuse unter- gebracht und überträgt Bild und Ton über ein Kabel zu einem Monitor. Sie besitzt ein Fern- und ein Nahsicht-Objektiv. Durch die Infrarot-LEDs wird die Nachtsicht verbessert. -
Page 14: Hinweise Zum Elektrischen Anschluss
Hinweise zum elektrischen Anschluss CAM44 Hinweise zum elektrischen Anschluss Kabel verlegen ACHTUNG! Beschädigungsgefahr! • Wenn Sie Löcher bohren, prüfen Sie vorher, ob ausreichender Freiraum für den Bohreraustritt vorhanden ist. • Nicht fachgerechte Kabelverlegungen und Kabelverbindungen führen immer wieder zu Fehlfunktionen oder Beschädigungen von Bauteilen. - Page 15 CAM44 Hinweise zum elektrischen Anschluss • Befestigen Sie die Kabel sicher im Fahrzeug, um ein Verfangen (Sturzgefahr) zu vermeiden. Dieses kann erfolgen durch den Einsatz von Kabelbindern, Isolierband oder durch Ankleben mit Klebstoff. • Schützen Sie jeden Durchbruch an der Außenhaut durch geeignete Maßnahmen gegen Wassereinbruch, z.
-
Page 16: Kamera Montieren
Kamera montieren CAM44 Gehen Sie wie folgt vor, um zwei Kabel miteinander zu verbinden: ➤ Isolieren Sie beide Kabel ab (Abb. c A, Seite 6). ➤ Ziehen Sie einen Schrumpfschlauch von ca. 20 mm Länge über ein Kabel (Abb. c B, Seite 6). ➤... - Page 17 CAM44 Kamera montieren Kamera montieren VORSICHT! Wählen Sie den Platz der Kamera so und befestigen Sie diese so sicher, dass unter keinen Umständen in der Nähe stehende Personen verletzt werden können, z. B. weil über das Fahrzeugdach streifende Äste die Kamera abreißen.
- Page 18 Kamera montieren CAM44 • Wenn Sie sich nicht sicher über den von Ihnen gewählten Montageort sind, erkundigen Sie sich beim Aufbauhersteller oder dessen Vertretung. HINWEIS Um die Korrosion der Schrauben zu minimieren, fetten Sie die Gewinde ein. Gehen Sie bei der Montage wie folgt vor: ➤...
- Page 19 CAM44 Kamera montieren Wenn Sie die Kamera mit Gewindeschrauben durch den Aufbau befestigen möchten (Abb. g, Seite 7) ACHTUNG! Achten Sie darauf, dass sich die Muttern beim Anziehen nicht durch den Aufbau ziehen können. Verwenden Sie ggf. größere Unterlegscheiben oder Blechplatten. ➤...
- Page 20 Kamera montieren CAM44 Kamera und Kameraschutz befestigen ACHTUNG! Montieren Sie die Kamera nie ohne den zusätzlichen Kameraschutz. Verwenden Sie zur Montage des Kameraschutzes nur die mitgelieferten Schrauben M3 x 6 mm. Längere Schrauben beschädigen die Kamera. ➤ Schieben Sie den Kameraschutz (Abb. 8 3, Seite 5) so über die Kamera –...
- Page 21 CAM44 Kamera montieren Kamera anschließen HINWEIS • Verlegen Sie das Kamerakabel so, dass Sie bei einem eventuell notwendigen Ausbau der Kamera leicht an die Steckerverbindung zwischen Kamera und Verlängerungskabel kommen. Die Demontage wird dadurch erheblich vereinfacht. • Um Korrosion im Stecker zu minimieren, geben Sie etwas Fett, z. B. Polfett, in einen der Stecker.
- Page 22 Kamera montieren CAM44 Schaltbox AMP100 anschließen (Abb. o, Seite 10) HINWEIS Wenn Sie beide Kameramodule bei der Vorwärtsfahrt nutzen möchten, müssen Sie den mitgelieferten Kippschalter montieren (siehe Montage- und Bedienungsanleitung für AMP100). Die Schaltbox (nicht im Lieferumfang enthalten) ist montagefertig vorbereitet. ➤...
-
Page 23: Kamera Verwenden
CAM44 Kamera verwenden Kamera verwenden Entfernungen einschätzen Die Kamera erzeugt im Rückfahrmodus drei Abstandsmarken, die in einem ange- schlossenen Farbmonitor als farbige Linien angezeigt werden (Abb. p, Seite 10). Die Linien erleichtern die Einschätzung der Entfernung des Fahrzeuges zu einem Hindernis. -
Page 24: Entsorgung
Wenn Sie das Produkt endgültig außer Betrieb nehmen, informieren Sie sich bitte beim nächsten Recyclingcenter oder bei Ihrem Fachhändler über die zutreffenden Entsorgungsvorschriften. Technische Daten PerfectView CAM44 Art.-Nr.: 9600000043 Bildsensor: Fernsicht: 1/4" Color CMOS Sensor, ca. 290000 Pixel, 648(H) x 488(V) Nahsicht: 1/3" CMOS, 762(H) x 504(V) - Page 25 CAM44 Please read this instruction manual carefully before installation and first use, and store it in a safe place. If you pass on the product to another person, hand over this instruction manual along with it. Contents Explanation of symbols ......... .12 Safety and installation instructions .
-
Page 26: Explanation Of Symbols
Explanation of symbols CAM44 Explanation of symbols WARNING! Safety instruction: Failure to observe this instruction can cause fatal or serious injury. CAUTION! Safety instruction: Failure to observe this instruction can lead to injury. NOTICE! Failure to observe this instruction can cause material damage and impair the function of the product. - Page 27 CAM44 Safety and installation instructions • When working on the following cables, only use insulated cable terminals, plugs and flat push-on receptacles: – 30 (direct supply from positive battery terminal) – 15 (connected positive terminal, behind the battery) – 31 (return cable from the battery, earth) –...
- Page 28 Safety and installation instructions CAM44 • Always follow the safety instructions of the vehicle manufacturer. Some work (e.g. on retention systems such as the AIRBAG etc.) may only be performed by qualified specialists. Observe the following instructions when working with electrical parts: •...
-
Page 29: Scope Of Delivery
9600000210 Intended use The CAM44 camera (item no. 9600000043) camera is designed primarily for use in vehicles. It can be used in rear view video systems to observe the space behind the vehicle from the driver's seat when manoeuvring or parking, for example. -
Page 30: Technical Description
Technical description CAM44 Technical description The colour camera with integrated microphone is encased in an aluminium housing and transmits image and sound to a monitor via a cable. It has a close-up lens and a long-range lens. The infrared LEDs improve night vision. The long-distance lens shows the space behind the vehicle as if you were looking through a rear window. -
Page 31: Notes On The Electrical Connections
CAM44 Notes on the electrical connections Notes on the electrical connections Laying cables NOTICE! Risk of damage! • To prevent damage, when drilling ensure that there is sufficient space on the other side for the drill head to come out. •... - Page 32 Notes on the electrical connections CAM44 • Protect every through-hole made in the bodywork against water penetration, e.g. by using a cable with a sealant and by spraying the cable and the cable sleeve with sealant. NOTE Only start sealing through-holes when you have completed all installation work on the camera and have laid the required cable lengths.
- Page 33 CAM44 Notes on the electrical connections Creating clean soldering joints Proceed as follows to solder a cable to the original cables: ➤ Strip approx. 10 mm of insulation from the end of the original cable (fig. b A, page 6). ➤...
-
Page 34: Fitting The Camera
Fitting the camera CAM44 Fitting the camera Tools required For installation and assembly you will need the following tools: • Drill bit set (fig. 1 1, page 3) • Drill (fig. 1 2, page 3) • Screwdriver (fig. 1 3, page 3) •... - Page 35 CAM44 Fitting the camera Observe the following installation instructions: • Fix the camera at a height of at least two metres for an adequate view. Make sure that you have a firm place from which to work when installing the camera.
- Page 36 Fitting the camera CAM44 If you want to screw on the camera with self-tapping screws (fig. f, page 7) NOTICE! Self-tapping screws may only be fastened to steel metal with a minimum thickness of 1.5 mm. ➤ Drill 4 mm diameter holes at the points you just marked. ➤...
- Page 37 CAM44 Fitting the camera Creating a through-hole for the camera connection cable (fig. h, page 8) NOTE If possible, use available openings – such as ventilation grilles – to feed the connection cables through. If there are no existing openings, you must drill a hole with a 16 mm diameter.
- Page 38 Fitting the camera CAM44 ➤ Align the camera so that the lens is at an angle of approx. 20° to the vertical axis of the vehicle (fig. k, page 8). NOTE Do not tighten the four M3 x 8 mm screws until you have aligned the camera (see chapter “Checking the function and setting the camera”...
- Page 39 CAM44 Fitting the camera Connecting the AMP100 switchbox (fig. o, page 10) NOTE If you would like to use both camera modules when driving forwards, you will need to fit the flip switch supplied (see the installation and operating manual for AMP100). The switch box (not included in delivery) is ready for installation.
-
Page 40: Using The Camera
Using the camera CAM44 Using the camera Estimating distances The camera produces three distance marks in reversing mode which are shown on a connected colour monitor as coloured lines (fig. p, page 10). The lines make it easier to estimate the distance of the vehicle to an obstacle. When the camera is installed at a height of approx. -
Page 41: Disposal
Technical data PerfectView CAM44 Ref. no.: 9600000043 Image sensor: Long-range: 1/4" Color CMOS Sensor approx. 290000 pixels, 648(H) x 488(V) Close-up: 1/3" CMOS,... - Page 42 Dometic (Pty) Ltd. Dometic Austria GmbH MEXICO Regional Office Neudorferstraße 108 Dometic Mx, S. de R. L. de C. V. South Africa & Sub-Saharan Africa A-2353 Guntramsdorf Circuito Médicos No. 6 Local 1 2 Avalon Road +43 2236 908070 Colonia Ciudad Satélite...
Need help?
Do you have a question about the 9600000043 and is the answer not in the manual?
Questions and answers