NOCO Boost Max GB500+ - 6250 Amp Jump Starter Manual
- User manual & warranty (20 pages)
Advertisement
How To Use
Charge the Device
The GB500 comes partially charged out of the box and needs to be fully charged prior to use. Connect the GB500 using the included 12V Adapter or 56W XGC Power Adapter to the 12V IN port. The GB500 must be in 12V mode to be charged. Ensure the voltage selection knob is in the 12V position prior to charging. The XGC 12V IN port is rated at 12V, 5A to ensure safe and efficient charging of the internal lithium battery. Due to FCC regulations, we recommend not to charge and discharge the unit at the same time. The time to recharge a GB500 will differ based on the discharge level and the power source used. Actual results may vary due to battery conditions.
| Recharge Time: 6-8hr |
| Using 12V DC Cable or AC Power Adapter to recharge a fully discharged unit. Recharge time will vary based on level of discharge. |
When recharging, the charge level of the internal battery is indicated by the Charge LEDs. The LEDs will slowly pulse "On" and "Off", and become solid until all four Charge LEDs are on. When the battery is fully charged, the Green 100% LED will be solid, and the 25%, 50% and 75% Charge LEDs will turn "Off". From time to time, the Green 100% LED will pulse indicating maintenance charging is occuring.

12V DC Charging (60W)
The GB500 must be in 12V mode to be charged. Ensure the voltage selection knob is in the 12V position prior to charging. Connect the 12V Cable to the 12V IN port on the GB500, and the other end to the Male 12V Plug. Plug into a powered 12V AUX Plug (Cigarette Lighter Port).
AC Charging (56W)
The GB500 must be in 12V mode to be charged. Ensure the voltage selection knob is in the 12V position prior to charging. Connect the XGC 12V Cable to the 12V IN port on the GB500, and the other end of the 56W Power Adapter to AC power (100-240VAC Wall Outlet).
Powering Your 12V Devices
The GB500 must be in 12V mode to enable 12V OUT. Connect the 12V Cable to the 12V OUT port on the GB500, and the other end to the Female 12V Plug (12V AUX / Cigarette Lighter Port). Plug-in any standard 12V device (up to 15A) with a 12V plug and turn the GB500 "On" to start powering your device.
Connect to the Battery
Carefully read and understand the vehicle owner's manual on specific precautions and recommended methods for jump starting the vehicle. Make sure to determine the voltage and chemistry of the battery system by referring to your vehicle's owner's manual prior to using this product. The GB500 is for jump starting 12-volt and 24-volt lead-acid battery systems only. Before connecting to the battery, verify the battery system voltage. Ensure the voltage selection knob is in the correct position (12V or 24V) matching the battery system being jump started. Never change the voltage while the unit is connected to a battery. Only change the voltage while the unit is off. The GB500 is not suitable for any other type of battery systems. Identify the correct polarity of the battery terminals on the battery. The positive battery terminal is typically marked by these letters or symbol (POS,P,+). The negative battery terminal is typically marked by these letters or symbol (NEG,N,-). Do not make any connections to the carburetor, fuel lines, or thin, sheet metal parts. The instructions bellow are for a negative ground system (most common). If your vehicle is a positive ground system (very uncommon), follow the instructions bellow in reverse order.
- Securely connect the negative (black) Boost Max Connector to the negative port on the GB500.
- Securely connect the positive (red) Boost Max Connector to the positive port on the GB500.
- Always clean terminals prior to connecting the clamps. NOTE: Faulty connections or dirty terminals may cause smoke. Batteries with very low voltage will also increase the chance of smoke.
- Connect the positive (red) Boost Max Connector the positive (POS,P,+) battery terminal.
- Connect the negative (black) Boost Max Connector to the negative (NEG,N,-) battery terminal or vehicle chassis. Ensure both clamps have a secure connection. (Grounding to the chassis may not be suitable for jump starting large applications.)
- When disconnecting, disconnect in the reverse sequence, removing the negative first (or positive first for positive ground systems).
Jump Starting
- Make sure all of the vehicle's power loads (headlights, radio, air conditioning, etc.) are turned "Off" before attempting to jump start the vehicle. If the vehicle is equipped with a Master Switch, turn it to the "on" position.
- Verify the voltage of the vehicle's battery system, and turn the voltage selection knob to the correct voltage.
- Press the Power Button to begin jump starting. All LEDs will flash, indicating that all LEDs are properly functioning. If Boost is properly connected to the battery, the White Boost LED will illuminate and the 25%-100% LEDs will chase. A 60-Second Timeout countdown will begin as soon as a battery is detected.
- Try starting the vehicle. Most vehicles will immediately start. If the vehicle does not start right away, wait 20-30 seconds and try again. After the 60-Second Timeout is complete, the unit must be powered off, then back on, to initiate a new jump-start sequence. Do not attempt more than five (5) consecutive jump starts within a fifteen (15) minute period. Allow the GB500 to rest for fifteen (15) minutes before attempting to jump start the vehicle again.
- Once you have started your vehicle, power off the unit, disconnect the battery clamps, and remove the GB500.
60-Second Timeout
A 60-Second Countdown will be initiated as soon as a battery is detected. After 60 seconds has elapsed, the jump starting function will be disabled. The boost LED will turn off and the internal battery charge LEDs will indicate the current charge level of the unit. To reset the jump-starting function, press the power button to power off the unit. Press the power button again to power on the unit and restart the jump starting function.

60-SECOND TIMEOUT IS DISABLED WHILE USING MANUAL OVERRIDE MODE. POWER WILL CONTINUE TO BE SUPPLIED WHILE MANUAL OVERRIDE IS ACTIVE. TO MAXIMIZE THE NUMBER OF JUMP-STARTS, IT IS RECOMMENDED TO TURN OFF THE BOOST-UNIT AS SOON AS THE VEHICLE HAS STARTED.
Low Voltage Batteries & Manual Override
The GB500 is designed to jump start batteries down to 3-volts. If your battery is below 3-volts, the Boost LED will be "Off". This is an indication that the GB500 can not detect a battery. If you need to jump start a battery below 3-volts there is a Manual Override feature, which allows you to force "On" the jump start function.
USE THIS MODE WITH EXTREME CARE. THIS MODE IS FOR 12-VOLT OR 24-VOLT LEAD-ACID BATTERIES ONLY. ENSURE THE VOLTAGE SELECTION KNOB IS IN THE CORRECT POSITION (12V OR 24V) MATCHING THE BATTERY SYSTEM BEING JUMP STARTED. BOTH THE SPARK PROOF AND REVERSE POLARITY PROTECTION FEATURES ARE DISABLED. PAY VERY CLOSE ATTENTION TO THE POLARITY OF THE BATTERY BEFORE USING THIS MODE. DO NOT ALLOW THE POSITIVE AND NEGATIVE BATTERY CLAMPS TO TOUCH OR CONNECT TO EACH OTHER AS THE PRODUCT WILL GENERATE SPARKS. THIS MODE USES VERY HIGH CURRENT (UP TO 6250 AMPS) THAT CAN CAUSE SPARKS AND HIGH HEAT IF NOT USED PROPERLY. IF YOU ARE UNSURE ABOUT USING THIS MODE, DO NOT ATTEMPT AND SEEK PROFESSIONAL HELP.
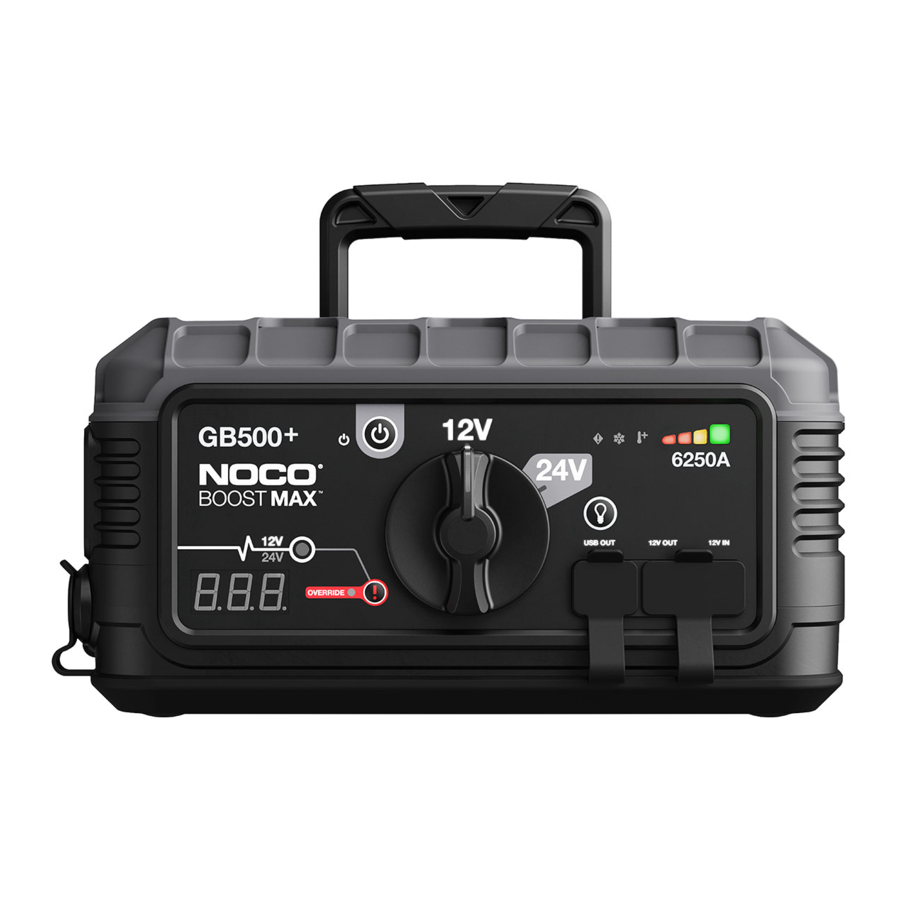
Interface

- Internal Battery Level Indicates the charge level of the internal battery.
- Hot LED Illuminates solid Red; unit is fully operational, but approaching upper temperature limit. Flashing Red; unit is too hot to jump start, but other functions are still available.
- Cold LED Illuminates solid Blue; unit is fully operational, but approaching lower temperature limit.
Flashing Blue; unit is too cold to jump start, but other functions are still available. - Error LED Illuminates Red, if reverse polarity is detected.
- Voltage Indicator Indicates the battery system voltage the GB500 is currently set to. 12V illuminates White when in 12V mode, 24V illuminates Blue when in 24V mode.
- Power Button Push to turn unit "On" and "Off".
- Power LED Illunimates White when unit is "On".
- Voltmeter/Countdown Timer. The built-in voltmeter reads the voltage of the vehicle's battery for enhanced diagnostics and troubleshooting. The voltmeter will automatically read the voltage of any battery (or battery system) when the battery clamps are connected - even if the unit is powered off. The voltmeter will read voltage between ~3V to ~30V. If the connected battery is below 3V, nothing will display. In this situation, it is likely there is a load(s) on the battery, such as, headlights or an AC fan that should be shut off before attempting to start the vehicle. While the unit is on and after a battery is detected, the voltmeter will display the 60-Second Timeout countdown.
- Boost LED Illuminates White when Boost is active. If the unit is connected properly to a battery, the GB500 will automatically detect a battery and go into Boost mode (White LED flashes when Manual Overide feature is active).
- Manual Override LED Illuminates solid Red when Manual Override is activated.
- Manual Override Button To enable, push and hold for three (3) seconds.
![]()
Disables safety protection and manually forces Boost "On". Only for use when a battery is too low to be detected. - Voltage Selection Knob Turn to switch between 12V and 24V mode.
- Light Mode Button Toggles the worklight through 7 light modes: 100% > 50% > 10% > SOS > Blink > Strobe > Off.
- USB Out LED Illuminates White; USB Out function can be used in both 12V and 24V modes.
- 12V Out LED Illuminates White; 12V Out function can only be used in 12V mode.
- 12V In LED Illuminates White; 12V In function can only be used in 12V mode.
Troubleshooting
| Error | Reason / Solution | |
 | Error LED: Solid Red | Reverse polarity detected. / Reverse the battery connections. |
| Error LED: Single (1) Flash | Short Circuit detected on battery clamps. / Remove all loads, reconnect clamps to battery. | |
| Error LED: Triple (3) Flash | Internal master switch failure. / Ensure the voltage selection knob is correctly positioned in the 12V or 24V position. | |
| Error LED: Quadruple (4) Flash | Bad battery cell detected during charge. / Power off unit, contact NOCO support. | |
| Error LED: Quintuple (5) Flash | XGC OUT overcurrent error. / Remove load from XGC OUT, then Power "Off" the unit then power "On". | |
 | Hot LED: Solid | Unit is fully operational, but approaching upper temperature limit. / Allow the unit to cool. |
| Hot LED: Flashing | Unit is too hot to jump start, only the flashlight is available in this state. / Allow the unit to cool. | |
| Hot LED: Flashes Then All LEDs Off | Unit is too hot to jump start or use other functions. / Allow the unit to cool, and bring the unit into cooler environment. | |
 | Cold LED: Solid | Unit is fully operational, but approaching lower temperature limit. / Allow the unit to warm up. |
| Cold LED: Flashing | Unit is too cold to jump start, only the flashlight is available in this state. / Allow the unit to warm up. | |
| Cold LED: Flashes Then All LEDs Off | Unit is too cold to jump start or use other functions. / Allow the unit to warm up, and bring the unit into warmer environment. | |
| Boost Light Does Not Come On w/Cables Connected Properly | Connected battery is below 3-volts / Remove all loads, and try again, or use manual override mode. | |
| Technical Note | Lithium-ion batteries self warm when used. If the Cold Error LED is illuminated, attempt jump starting multiple times to warm the battery and remove the error. Typically, 3-4 jump starts are suffient to warm the battery and remove the error. | |
Technical Specifications
| Internal Battery: | Lithium-Ion (Wh 266) |
| Peak Current Rating: | 6250A |
| Operating Temperature: | -20°C to +50°C (-4°F to +122°F) |
| Charging Temperature: | 0ºC to +40ºC (32°F to +104°F) |
| Storage Temperature: | -20ºC to +50ºC (-4°F to +122°F) (Avg Temp.) |
| USB (Output): | Dual 5V, 2.1A |
| 12V (Input): | 12V, 5A (14V Max) |
| 12V (Output): | 12.8V, 15A Max |
| Housing Protection: | IP65 (w/Ports Closed) |
| Cooling: | Natural Convection |
| Dimensions (L x W x H): | 12.25 x 8.25 x 2.25 Inches (311.15 x 209.55 x 57.15 mm) |
| Weight: | 19 Pounds |
NOCO One (1) Year Limited Warranty
NOCO warrants that this product (the "Product") will be free from defects in material and workmanship for a period of one (1) year from the date of purchase (the "Warranty Period").
To assert a warranty claim, the purchaser must:
- request and obtain a return merchandise authorization ("RMA") number and return location information (the "Return Location") from NOCO Support by emailing support@no.co or by calling 1.800.456.6626; and
- send the Product, including RMA number, receipt or a warranty fee (fee required only if not providing receipt) of 45% of MSRP of the defective Product (the "Warranty Fee") [RMA will include applicable Warranty Fee amount] to the Return Location.
Important Safety Warnings


READ AND UNDERSTAND ALL SAFETY INFORMATION BEFORE USING THIS PRODUCT. Failure to follow these safety instructions may result in ELECTRICAL SHOCK, EXPLOSION, FIRE, which may result in a SERIOUS INJURY, DEATH, or PROPERTY DAMAGE.
 Electrical Shock. Product is an electrical device that can shock and cause serious injury. Do not cut power cords. Do not submerge in water or get wet.
 Explosion. Unmonitored, incompatible, or damaged batteries can explode if used with product. Do not leave product unattended while in use. Do not attempt to jump start a damaged or frozen battery. Use product only with batteries of recommended voltage. Operate product in well ventilated areas.
Fire. Product is an electrical device that emits heat and is capable of causing burns. Do not cover product. Do not smoke or use any source of electrical spark or fire when operating product. Keep product away from combustible materials.
 Eye Injury. Wear eye protection when operating product. Batteries can explode and cause flying debris. Battery acid can cause eye and skin irritation. In the case of contamination of eyes or skin, flush affected area with running clean water and contact poison control immediately
Explosive Gases. Working in the vicinity of a lead-acid is dangerous. Batteries generate explosive gases during normal battery operation. To reduce risk of battery explosion, follow all safety information instructions and those published by the battery manufacturer and manufacturer of any equipment intended to be used in the vicinity of battery. Review wcautionary markings on these products and on engine.

Manual Override Mode disables all safety measures. When used improperly and/or against our recommended use, it may result in injury or death and will void your warranty. Risk of fire, explosion, and burns. Do not disassemble, crush, heat above 60ºC (140ºF) or incinerate. This device is intended for temporary use outdoors and reasonable care should be exercised when using this device in wet conditions.

Do not overcharge the internal battery. See Instruction Manual. Do not smoke, strike a match, or cause a spark in the vicinity of the power pack. Only charge the internal battery in a well ventilated area when not in use.
Risk of Injury To Persons. Do not use this product if the power cord or the battery cables are damaged in any way. This device is not intended for use in a commercial repair facility. This device is intended to be stored indoors when not in use. This device shall not be stored or left outdoors when not in use.
Proposition 65.
This product can expose you to chemicals including lead and exhaust fumes, which are known to the State of California to cause cancer and birth defects or other reproductive harm. For more information go to www.P65Warnings.ca.gov.
Personal Precaution.
Only use product as intended. Someone should be within range of your voice or close enough to come to your aid in case of emergency. Have a supply of clean water and soap nearby in the case of battery acid contamination. Wear complete eye protection and protective clothing while working near a battery. Always wash hands after handling batteries and related materials. Do not handle or wear any metal objects when working with batteries including; tools, watches or jewelry. If metal is dropped onto battery, it may spark or create a short circuit resulting in electrical shock, fire, explosion which may result in injury, death or property damage.
Minors.
If the product is intended by "Purchaser" to be used by a minor, purchasing adult agrees to provide detailed instructions and warnings to any minor prior to use. Failure to do so is the sole responsibility of the "Purchaser," who agrees to indemnify NOCO for any unintended use or misuse by a minor.
Choking Hazard.
Accessories may present a choking hazard to children. Do not leave children unattended with product or any accessory. The product is not a toy.
Handling.
Handle product with care. The product can become damaged if impacted. Do not use a damaged product, including, but not limited to, cracks to the casing or damaged cables. Do not use product with a damaged power cord. Humidity and liquids may damage product. Do not handle product or any electrical components near any liquid. Store and operate product in dry locations. Do not operate product if it becomes wet. If product is already operating and becomes wet, disconnect it from the battery and discontinue use immediately. Do not disconnect the product by pulling on the cables. Caution: Hot surface, Wait for the unit to cool down before handling.
Modifications.
Do not attempt to alter, modify or repair any part of the product. Disassembling product may cause injury, death or damage to property. If product becomes damaged, malfunctions or comes in contact with any liquid, discontinue use, and contact NOCO. Any modifications to the product will void your warranty.
Accessories.
This product is only approved for use with NOCO accessories. NOCO is not responsible for user safety or damage when using accessories not approved by NOCO.
Location.
Prevent battery acid from coming in contact with the product. Do not operate the product in a closed-in area or an area with restricted ventilation. Do not set a battery on top of product. Position cable leads to avoid accidental damage by moving vehicle parts (including hoods and doors), moving engine parts (including fan blades, belts, and pulleys), or what could become a hazard that may cause injury or death.
Operating Temperature.
This product is designed to work in ambient temperatures between -20º C to 50º C. Do not operate outside of temperature ranges. Do not jump start a frozen battery. Discontinue use of product immediately if the battery becomes excessively warm.
Storage.
Do not use or store your product in areas with high concentrations of dust or airborne materials. Store your product on flat; secure surfaces so it's not prone to falling. Store your product in a dry location. The storage temperature is -20ºC - 25ºC (average temperature). Never exceed 80ºC under any condition.
Compatibility.
The product is compatible with 12-volt and 24-volt lead-acid battery systems only. Do not attempt to use product with any other type of battery. Jump starting other battery chemistries may result in injury, death or property damage. Contact the battery manufacturer prior to attempting to jump start the battery. Do not jump start a battery if you are unsure of the battery's specific chemistry or voltage.
The Battery.
The built-in lithium-ion battery in the product should be replaced only by NOCO, and must be recycled or disposed of separately from household waste. Do not attempt to replace the battery yourself and do not handle a damaged or leaking lithium-ion battery. Never dispose of battery in household trash. Disposal of batteries in household trash is unlawful under state and federal environmental laws and regulations. Always take used batteries to your local battery recycling center. If the product battery is excessively hot, emitting an odor, deformed, cut, or is experiencing or demonstrating an abnormal occurrence, immediately stop all use and contact NOCO.
Battery Charging.
Charge the product with the included 12V DC Adapter or 56W XGC Power Adapter. Be cautious of using low quality power adaptors, as they may present a serious electrical risk that can result in injury to person, device, and property. Using damaged cables or chargers, or charging when moisture is present, can result in electric shock. NOCO is not responsible for the user's safety when using accessories or supplies that are not approved by NOCO. Power adapters may become warm during normal use, and prolonged skin contact may cause bodily injury. Always allow adequate ventilation around power adapters when using them. To ensure maximum battery life, avoid charging your product for more than a week at a time, as overcharging may shorten battery life. Over time, an unused product will discharge and must be recharged before use. Disconnect the product from power sources when not in use. Use the product only for their intended purposes.
Medical Devices.
Product may emit electromagnetic fields. Product contains magnetic components which may interfere with pacemakers, defibrilators, or other medical devises. These electromagnetic fields may interfere with pacemakers or other medical devices. Consult with your physician prior to use if you have any medical device including pacemakers. If you suspect the product is interfering with a medical device, stop using the product immediately and consult your physician.
Medical Conditions.
If you have any medical condition that you believe could be affected by product, including but not limited to; seizures, blackouts, eyestrain or headaches, consult your physician prior to use of product. The use of a integrated high-powered flashlight contains a light sensitivity hazard. Use of the light in Strobe Mode may cause seizures in persons with photosensitive epilepsy, which may result in serious injury or death.
Light.
Staring directly into the light beam or shine of the flashlight may result in permanent eye injury. The product is equipped with a high output LED pre-focused lamp that emits a powerful beam at the highest setting.
Cleaning.
Power off the product before attempting any maintenance or cleaning. Clean and dry product immediately if it comes in contact with liquid or any type of contaminant. Use a soft, lint-free (microfiber) cloth. Avoid getting moisture in openings.
Explosive Atmospheres.
Obey all signs and instructions. Do not operate product in any area with a potentially explosive atmosphere, including fueling areas or areas which contain chemicals or particles such as grain, dust or metal powders.
High-Consequence Activities.
This product is not intended for use where the failure of the product could lead to injury, death or severe environmental damage.
Radio Frequency Interference.
Product is designed, tested, and manufactured to comply with regulations governing radio frequency emissions. Such emissions from the product can negatively affect the operation of other electronic equipment, causing them to malfunction.
For more information and support visit:
www.no.co/support

Documents / Resources
References

Download manual
Here you can download full pdf version of manual, it may contain additional safety instructions, warranty information, FCC rules, etc.
Download NOCO Boost Max GB500+ - 6250 Amp Jump Starter Manual
Advertisement


Need help?
Do you have a question about the Boost Max GB500+ and is the answer not in the manual?
Questions and answers