Advertisement
Quick Links
Cordless Stick Vacuum
Instruction Manual
PAGES
1. Attention ··················································· 2
2. Illustration (part name) ································ 4
3. Technical parameters ···································· 5
4. Attached accessories ····································· 5
5. User Manual ··············································· 6
5.1 Assembly ········································· 6
5.2 Battery assembly and charge ················ 7
5.3 Used as stick vacuum cleaner ··············· 8
5.4 Used as handheld vacuum cleaner·········· 9
6. Cleaning and maintenance ····························· 10
6.1 Empty the dust ································· 10
6.2 Clean the dustbin system ····················· 11
6.3 Clean up the electric brush ··················· 12
6.4 Unblock ··········································· 12
7. Problem solving ··········································· 14
Advertisement

Related Manuals for Nero SL598

Summary of Contents for Nero SL598
-
Page 1: Table Of Contents
PAGES 1. Attention ··················································· 2 Cordless Stick Vacuum 2. Illustration (part name) ································ 4 Instruction Manual 3. Technical parameters ···································· 5 4. Attached accessories ····································· 5 5. User Manual ··············································· 6 5.1 Assembly ········································· 6 5.2 Battery assembly and charge ················ 7 5.3 Used as stick vacuum cleaner ···············... -
Page 2: Attention
1. ATTENTION 12. Please make sure all parts are assembled correctly. Do not use this product without filtration. To help you use this product in the correct way and protect you from 13. Do not try disassembling the battery, do not place battery on metal unnecessary bodily injury and property loss please read this surface or near heat sources, and do not put the battery in fire. -
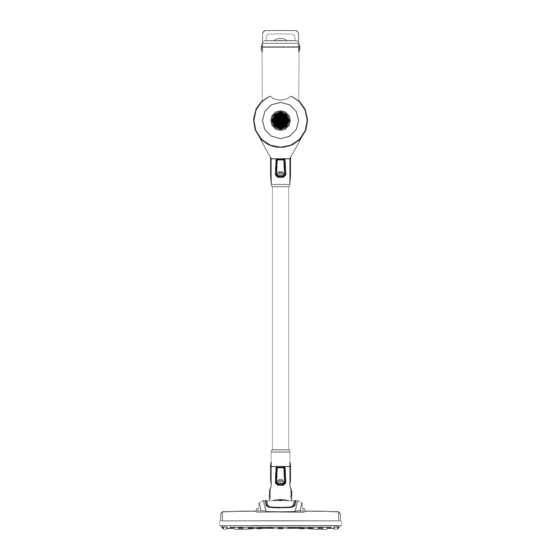
Page 3: Illustration (Part Name)
2. ILLUSTRATION (PART NAME) 3. TECHNICAL PARAMETERS Cleaner parameter Charger parameter Model name:Cordless Stick Vac Charger output: 26V, 500mA Model no. SL598 Charger input: 100-240V~50/60Hz 0.5A Rated voltage:22.2V Charger voltage:100-240V Rated power: 150W Battery Parameter Product size: 72 X 31 X 13 cm Battery: Li-ion 2200mAh N.W: 2KG... -
Page 4: Assembly
5. ASSEMBLY INSTRUCTION 5.2 Vacuum Cleaner Charging Please carefully read “ATTENTION” before assembly: This product can’t stand by itself, please apply body part onto holder which is BATTERY ASSEMBLY: on the connection tube. Same as illustration: have battery 5.1 PRODUCT ASSEMBLY pack locked into cleaner body. -
Page 5: Used As Stick Vacuum Cleaner
5.3 USED AS STICK VACUUM CLEANER USED AS HANDHELD VACUUM CLEANER Place your foot gently on the motorized brush and tilt the product backward, switch on the product and move it back and forward to start your cleaning (You may use 1pc of tube only or 2pcs tubes connected). -
Page 6: Cleaning And Maintenance
6. CLEANING AND MAINTENANCE 6.1 EMPTY THE DUST CANISTER Attention: ① Turn off the power and press the connection tube button to separate the vacuum cleaner as shown. 1. Turn off the power, press the bottom switch and empty the dust; 2. -
Page 7: Empty The Dust
7. PROBLEM SOLVING 6.3 CLEAN THE MOTORIZED BRUSH There are some simple problems in the process of use that can be resolved by reference to the following methods. Problem Possible causes Solving Product will not ●Running out of power ●Referring to “battery start charging”...