Table of Contents
Advertisement
Quick Links
EBS‑2600 USER
MANUAL
Industrial DROP ON DEMAND Printers
Original Instructions
Part 1 of 3
2023.05.16
0/72
-260 0/51
T EBS
INK -JE
Type
123 4
Typ
500 0-10
Numbe r
P12 042
Numme r
202 2
Manufa ctured
Baujah r
V
Vol t age
100 – 240
Spannu ng
Hz
50 - 60
Freque ncy
Made in
EU
Freque nz
< 0.5 A
Curren t
e
Stroma ufnahm
Advertisement
Table of Contents

Related Manuals for EBS Hi-Res EBS-2600


Summary of Contents for EBS Hi-Res EBS-2600
- Page 1 EBS‑2600 USER MANUAL Industrial DROP ON DEMAND Printers Original Instructions 0/72 -260 0/51 T EBS INK -JE Type 123 4 500 0-10 Numbe r P12 042 Numme r 202 2 Manufa ctured Baujah r Vol t age 100 – 240...
- Page 2 G2023/04/26_1EN 2 of 184 2023.05.16...
- Page 3 eneral nformatIon 1.1. pplIcatIon escrIptIon 2.1. vervIew 2.2. rInter tructure 2.2.1. ront 2.2.2. 2.2.3. xternal onnectIons 2.2.4. ottle onnectIon 2.2.5. onsumaBles 2.2.5.1. ottle 2.3. nstallInG the rInter 2.3.1. DDItIonal nformatIon 2.3.2. lectrIcal onnectIons 2.3.3. yDraulIc connectIons 2.3.4. nstallInG ccessorIes 2.3.4.1. tatuS eacon 2.3.4.2.
- Page 4 3.2.2. IaloG oxes 3.2.3. Irtual eyBoarD 3.3. ypes of rIvIleGes sers 3.3.1. hanGInG a 3.4. emote ontrol 3.4.1. eBs w (wuI) nterface 3.4.2. eBs w wuI) fflIne nterface fflIne peratIon 4.1. tartInG the rInter up 4.2. huttInG the rInter Down 4.2.1.
-
Page 5: Table Of Contents
5.1.6. eletInG an Bject 5.1.6.1. eStorIng a eleted Bject 5.1.7. opyInG Bjects 5.2. ypes anD arameters of Bjects 5.2.1. ommon arameters of Bjects 5.3. DItInG a roject 5.4. reatInG a roject 5.4.1. roject arameters 5.4.2. reatInG DItInG a Bject 5.4.2.1. ommon arameterS of BjectS... - Page 6 6.3. rInter nformatIon 6.4. ottle nformatIon 6.5. etermInInG actory onveyor arameters rInter onfIGuratIon 7.1. eneral ettInGs 7.1.1. axImum rIntInG peeD 7.2. ocal ettInGs 7.3. ettInG the urrent ate anD 7.3.1. onfIGurInG the Isplay 7.3.2. ounD IGnal ettInGs 7.4. onfIGurInG ommunIcatIons nterfaces 7.4.1.
- Page 7 erIoDIc aIntenance 8.1. urGInG entInG the rIntheaD 8.2. eplacInG the Ilter 8.3. torInG anD ransportInG 8.3.1. torInG the rInter 8.3.1.1. nStallIng a ealIng over 8.3.2. ransportInG the rInter rouBleshootInG 9.1. essaGe anDlInG 9.1.1. rror essaGes 9.1.2. arnInG essaGes 9.1.3. nformatIonal essaGes 9.2.
- Page 8 CHAPTER 1 GENERAL INFORMATION G2023/04/26_1EN 8 of 184 2023.05.16...
- Page 9 This version of the document includes most of the modifications implemented to the EBS printers (manufactured by EBS Ink Jet Systeme GmbH) up to version 1.03.21 of the system and the descriptions contained herein correspond to the printers on which the system in this version is installed.
- Page 10 GENERAL INFORMATION The following symbols are used in the manual: Additional information on a given subject. A supplement or a reference to the text where more details can be found. An important note, tip, piece of information on safety. It is advisable to strictly follow the tips. A list of tools, accessories and spare parts necessary for carrying out a given maintenance or service proce- dure.
- Page 11 1.1. APPLICATION printers make firm and clear prints on: – paper and cardboard, – plastics, – fabric, – leather and leatherette, – wood and wood‑like products, e.g. Euro‑pallets, – glass and ceramic products, – metal surfaces of any type. printers print in black oil‑based ink. 2023.05.16 11 of 184 G2023/04/26_1EN...
- Page 12 CHAPTER 2 DESCRIPTION G2023/04/26_1EN 12 of 184 2023.05.16...
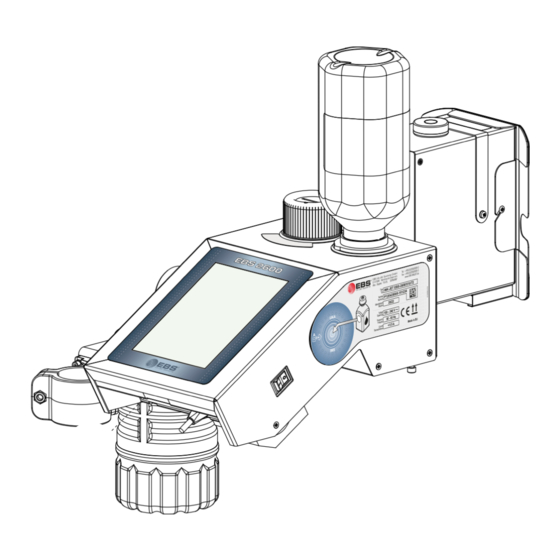
- Page 13 DESCRIPTION 2.1. OVERVIEW printer is an industrial ink‑jet DOD (Drop‑on‑Demand) printer for touchless labeling of objects moving (traveling, rotating) in front of stationary printhead 2 (see Fig. 1 on page 14). The printhead is equipped with 510 nozzles, which generate 32 or 80 pl drops, depending on the vari- ant.
- Page 14 2.2.1. FRONT VIEW Fig. 1. Printer control unit with ink system. Socket for fitting bottle 4. Plug for securing bottle socket. Ink system valve with air filter 1e. Air filter upstream of ink system. Holder for removed socket plug 1c. Control unit holder.
- Page 15 “2.3.1. Additional Information”. For information about customized accessories contact an authorized representative of EBS Ink Jet Systeme GmbH. 2023.05.16 15 of 184 G2023/04/26_1EN...
- Page 16 2.2.2. BACK VIEW 1n 1o 1p 10 /7 2 26 00 /5 T EB S- IN K- JE Typ e 01 23 4 50 00 -1 P1 20 42 Num ber Num mer 20 22 Man ufac ture Bau j a hr 10 0 –...
- Page 17 Information”. ‑ depending on a given country, power plug 7a may differ from that shown in Fig. 2 on page For information about customized accessories contact an authorized representative of EBS Ink Jet Systeme GmbH. 2.2.3. EXTERNAL CONNECTIONS USB connector An appropriate USB memory device connected to the USB port (1o;...
- Page 18 The external photodetector is connected to input 1p (see Fig. Two photodetectors can be used at the same time. The function can be used for synchronizing printouts while Euro‑pallets are labeled, for example. For more information see “2.3.4.3. External photodetector” “2.3.5.
- Page 19 A description of 6‑pin female connector 1r (see Fig. 4) of the rotational speed sensor is given in the following table. Encoder pulse input (printing direction signal). GND (ground). Not used. +24 VDC (power supply). Not used. Fig. 4. Encoder pulse input (timing signal). Fig.
- Page 20 kit. NOTE: The power cord must be disconnected! An Ethernet cable can be connected to connector 1s in control unit 1 only when the control unit is detached from mains electricity! RS-232/RS-485 connector The RS-232 standard is designed to transfer data to the printer from external devices such as a bar/ matrix code reader, scales.
- Page 21 the following table. Error; open collector, max. 45 mA. Warning; open collector, max. 45 mA. Printing; open collector, max. 45 mA. +24 VDC (power supply). GND (ground). Fig. 7. Fig. 7 shows a view of the connector from the outside of the printer. Conveyor stoppage output printer offers an option of stopping the factory conveyor if an error that makes printing impossible occurs.
- Page 22 2.2.4. INK BOTTLE CONNECTION Socket 1b (see Fig. 2 on page 16) is used to fit ink bottle 4 in the printer. Owing to its construc- tion, the connection ensures easy replacement of the bottle, while the IMS (Ink Monitoring System) with antenna 1l situated on the side wall of control unit 1 prevents a bottle of ink that is incorrect or has passed its expiration date from being fitted in the printer.
- Page 23 2.3. INSTALLING THE PRINTER The printer can be basically installed or relocated by an instructed person in accordance with the rec- ommendations given in The User Manual. Installation of advanced features (to use special types of ink, integrate the printer with a production line, work with external devices, etc.) can only be done by a skilled person, who will bear the full responsibili- ty for the job.
- Page 24 Actual or optional components may differ from those depicted in illustrations. For information about optional accessories contact an authorized representative of EBS Ink Jet Systeme GmbH. Before you start installing your printer, read carefully the information that is given at the be- ginning of this chapter and in The Safety Instructions.
- Page 25 3. Make drip system 3 and waste bottle 3a ready for fasten- ing to support beam 8. Before drip system 3 is installed, you must remove the plugs from the tubes that are part of the sys- tem. While positioning the drip system, you should take into consideration the length of the tubes that are part of drip system 3.
- Page 26 Fig. 6. Use the cross head screwdriver to loosen two screws (see that fasten sealing cover 5a. 7. Remove sealing cover 5a. Fig. 14. 8. Select slide 5 for the user's application and a holder of photode- tector 6 for the selected slide (5) and for the direction in which objects move in front of the face of printhead 2.
- Page 27 through towards printhead 2. Fig. 17. 14. Attach the following tubes within the drip system: Air tube 3f to the stub pipe in through element 1w on the bottom side of control unit 1, – Ink tube 3e (that has previously been pulled through the strain relief in through element 1w to –...
- Page 28 The turning of a new bottle of ink upside down will not cause the ink to spill out because the bottle is equipped with a protective valve. 0/51 0/72 0/51 0/72 EBS -260 EBS -260 INK- JET Type INK- JET...
- Page 29 The printer is installed in its standard working position and ready for startup. Fig. 21. Objects to be labeled must be within the reach of a photodetector selected as the source of the trigger signal: internal photodetector 2c (standard), – external photodetector;...
- Page 30 2.3.1. ADDITIONAL INFORMATION Articulated holder Articulated holder 9a (see Fig. 22), part of the installation kit, offers 3 positions. Owing to that, the printer can be fastened to a factory conveyor and thereby customized in a variety of ways. Fig. 22. A #7 open ended spanner and a #3 hex (Allen) key are necessary for changing the position of articu- lated holder 9a.
- Page 31 Below there is a list of selected slides 5 and photodetector holders 6. Recommended applica- Slide 5 Recommended photodetector holder 6 tion P561253 Labeling “soft” objects such as cardboard pack- ages. P863678 Direction: any (leftward/ rightward). P511642 P561253 P863679 Labeling Euro‑pallet brackets.
- Page 32 Recommended applica- Slide 5 Recommended photodetector holder 6 tion Labeling entire Euro‑ pallets. Direction: leftward. P811680 P863421 P863679 Labeling entire Euro‑ pallets. Direction: rightward. P811681 P863422 P863678 A cross head screwdriver is required to attach/detach slide 5 and photodetector holder 6 to/from the printhead.
- Page 33 * The double‑sided accessory (Part No. P513324) is not supplied with the printer. For information about customized accesso- ries contact an authorized representative of EBS Ink Jet Systeme GmbH. Fig. 24. A sealing cover, either standard (5a) or optional (5b) should be used: –...
- Page 34 Dedicated stands Section “2.3. Installing the Printer” shows an example of how to install the printer on a factory conveyor. In fact, the printer can be installed in many ways, also by means of dedicated stands such as: – a legged stand (Part No. P910214; see Fig.
- Page 35 2.3.2. ELECTRICAL CONNECTIONS 0/7 2 600 /51 T EB S-2 INK -JE Type 101 234 250 00- Numb er P1 204 Numm er 202 2 Manu factur Bauja hr 100 – 240 Vol t age Spann ung 50 - 60 Frequ ency Mad e in Frequ enz...
- Page 36 2.3.3. HYDRAULIC CONNECTIONS Fig. 28. Tube Color Ink tube. Drip rail 3b Drip system. Air tube with filter 3c. brown Through element 1w Drip system. G2023/04/26_1EN 36 of 184 2023.05.16...
- Page 37 A status beacon equipped with an alarm buzzer is also available. If such a beacon is used, the sound alarm is heard when an error occurs, that is when the beacon glows red. For more information about options available contact an authorized representative of EBS Ink Jet Systeme GmbH. 2023.05.16 37 of 184...
- Page 38 Fig. 30 shows an example of an encoder. For more information about available encoders contact an authorized representative of EBS Ink Jet Systeme GmbH. An encoder constant and an external source of timing pulses need to be set for correct operation of the encoder.
- Page 39 2.3.4.3. EXTERNAL PHOTODETECTOR printers are provided with internal photodetector 2c (see Fig. 31), as standard. If such a photodetector cannot be used (e.g. the user's photodetector must be used or a photodetector with a longer cable is needed), external photodetector 12 can be applied and can be connected to input on back panel of the printer's control unit.
- Page 40 2.3.5. LABELING EURO‑PALLETS Labeling of Euro‑pallets is one of primary applications of the printers. If both sides of Euro‑pallet 13 are to be labeled correctly, printout P consisting of three pieces (P1, P2, P3) must be made. The successive pieces of a print are to be made on three successive brack- ets 13a (see Fig.
- Page 41 Flip horizontal [mm]: Every application shall each time meet the user's requirements. For information about configu- ration capabilities of the printers contact an authorized representative of EBS Ink Jet Systeme GmbH. 2.3.5.1. USE OF ONE PHOTODETECTOR ‑ PRINTS NOT SYNCHRONIZED WITH EURO‑PALLETS If the printer is equipped with internal photodetector 2c only, the photodetector can be used for: Fig.
- Page 42 Example: One of pallets to be labeled has a bracket whose width is smaller than that of other brackets. directi on of movement space space space space space space print P print P print P Fig. 34. If the location or size of a bracket is not to a standard, it may happen that a print piece is not made on the bracket correctly (see piece on the Euro‑pallet on the right in Fig.
- Page 43 Example: One of pallets to be labeled has a defect: the middle bracket is missing. directi on of movement print P print P print P Fig. 36. If a pallet to be labeled has a defect such as a missing bracket, the print piece designed for the given pallet will be skipped (see the Euro‑pallet on the right in Fig.
- Page 44 In each example given in this chapter, a project to be printed must be prepared in such a way that the print pieces (P1, P2, P3) are interleaved with Line divider‑type objects . An object of this type pauses printing of the consecutive print piece until the trigger signal occurs, that is until the consecutive bracket is detected.
- Page 45 2.4. STARTING THE PRINTER UP FOR THE FIRST TIME printer is started up for the first time during installation. Owing to that, the printer is able to verify the transponder in an ink bottle. On installing and starting up the printer: –...
- Page 46 Many operations described in this Manual can be carried out by instructed persons only. Therefore, a local representative of EBS Ink Jet Systeme GmbH is obliged to deliver relevant training. Such train- ing shall include at least the following topics: –...
- Page 47 CHAPTER 3 USER INTERFACE 2023.05.16 47 of 184 G2023/04/26_1EN...
- Page 48 The user interface enables the user to operate the printer easily and intuitively. This applies to both proj- ect management (editing, setting project parameters, starting/pausing printing) and printer maintenance and servicing. -260 0/51 0/72 INK -JE T EBS Type 123 4 500 0-10 Numbe r P12 042...
- Page 49 Fig. 40. Status bar. Project window. Menu bar. 3.1.1. STATUS BAR Fig. 41. Status bar A (see Fig. 41) is displayed at the top of the screen. Items available on status bar A Item Meaning Printing status: ‑ printing is OFF (readiness for printing), ‑...
- Page 50 Items available on status bar A Item Meaning Status of connection of a memory device to the USB port in the printer: no icon - no memory device is connected to the USB port, - an appropriate memory device is connected to the USB port. Carry out USB memory operations, that is import files , export files , up-...
- Page 51 3.1.2. PROJECT WINDOW Fig. 42. Items available in project window B Item Meaning Open a project for printing. Edit the project and edit parameters of the project open for printing. Project Parameters Editing of a project/project parameters is not available to operator‑type users.
- Page 52 3.1.3. MENU BAR Fig. 43. Items available in menu bar C Item Meaning Create a new project . Edit an existing project . Continue editing Project Create Continue Edit project project editing The project creating/editing/continuing functions are not available to oper- ator‑type users.
- Page 53 Items available in menu bar C Item Meaning Start / pause printing . Start purging nozzles hold over 2s Stop Start Start Purge Long purge The functions marked with the icon are not available to operator ‑type users. 2023.05.16 53 of 184 G2023/04/26_1EN...
- Page 54 3.2. RULES FOR USING THE USER INTERFACE 3.2.1. NAVIGATION printing status return return Fig. 44. Most of printer functions are accessible with the Project / Tools icons in menu bar C on the main screen, e.g. Additionally, the icon, which is used for returning to the previously displayed screen, is avail- able in the menu.
- Page 55 In certain windows, the parameters/functions are divided into groups marked with sheet tabs. If you select a sheet tab, the tab will be enclosed in the characters ”|”, e.g. Geometry| The tab marking described above is used further in this document.
- Page 56 3.2.3. VIRTUAL KEYBOARD Use the virtual keyboard to modify the values of parameters and to enter texts at the level of the printer's LCD touch screen. It is displayed on the LCD when the value box for a given parameter is selected, the password is to be entered for logging in, or a text is to be entered to a project.
- Page 57 Delete the character that is on the left of the cursor position. Delete the whole text (clear the edit area). Reverse (undo) the deletion of the whole text. The icon is available after pressing the icon. Return to the previous screen. Save the text contained in the text box and close the keyboard.
- Page 58 LCD display, – remotely: with the EBS Web User Interface (WUI) editor. If local control and remote control take place at the same time, the type of privileges (access level) is used for establish which should take priority. The user who is at a higher level will take priority.
- Page 59 The accounts of serviceman‑type users are designed for use by skilled persons only. Two serviceman‑type users named “EBS” and “Service” are defined in the printer. These users must not be deleted, modified or marked with 3.3.1. CHANGING A USER The printer is started up with a logged‑in user by default. The user is marked with in the user manager.
- Page 60 Ethernet network and using – the EBS Web User Interface (WUI) editor, using the Offline EBS Web User Interface (Offline WUI) editor, which shall be installed on a PC – with the Windows operating system in advance.
- Page 61 To run the EBS Web User Interface (WUI) editor in the web browser window on a PC: 1. Connect the printer to an Ethernet network or to a PC direct. An Ethernet crossover cable, which is part of the installation kit can be used for connecting the printer to a PC.
- Page 62 There is also no need for connecting a PC with the printer (direct or via an Ethernet network). Projects prepared with the Offline EBS Web User Interface (Offline WUI) editor can be imported to the printer: –...
- Page 63 CHAPTER 4 OPERATION 2023.05.16 63 of 184 G2023/04/26_1EN...
- Page 64 OPERATION 4.1. STARTING THE PRINTER UP To start the printer up: 1. Connect power plug 7a (see Fig. 2 on page 16) to the electrical mains. 2. Press button 1k on the side wall of control unit 1. The welcome screen is displayed on the LCD. Wait several dozen seconds.
- Page 65 4.2.2. SHUTTING DOWN IN EMERGENCY SHUTDOWN MODE The printer can be shut down in emergency shutdown mode only if a printer failure occurs, when shutting down in regular mode, which lasts longer, could cause further damage, e.g. ink spill- ing. The printer can be shut down in emergency shutdown mode in two ways.
- Page 66 4.3. PRINTING The printer is ready for printing when an appropriate project is open for printing. 4.3.1. OPENING A PROJECT FOR PRINTING The name and preview of the project currently open for printing (the so called active project) are displayed on the main screen. To open a project for printing: 1.
- Page 67 4.3.2. STARTING PRINTING To start printing the open project: icon in menu bar C on the main screen. 1. Press the Edit before printing is started or | Edit counter before starting If the parameter | printing is active in any project object, then before printing starts, the request to enter initial values is displayed.
- Page 68 4.4. PREVIEWING A PROJECT The preview of the project that is open for printing/being printed is displayed on the main screen. If the width of a project exceeds the width of the preview window, the project can be shifted within the preview window (see Fig.
- Page 69 * If a correct bottle of ink is installed but the printer cannot recognize it successfully, you can contact an authorized representative of EBS Ink Jet Systeme GmbH to activate service mode. In this mode printing can continue over another 50 hours until a new bottle of ink is installed or a service intervention is made.
- Page 70 4.5.1. REPLACING THE INK BOTTLE Contact an authorized representative of EBS Ink Jet Systeme GmbH to order a new bottle of ink of an appropriate type. The necessary information is available on the label of the bottle installed in the printer or by pressing indicator A2 in status bar A on the main screen.
- Page 71 6. Install bottle of ink 4 screwing it into socket 1b. The turning of a new bottle of ink upside down will not cause the ink to spill out because the bottle is equipped with a protective valve. The new bottle is installed. 7.
- Page 72 4.6. EMPTYING THE WASTE BOTTLE Tools required: ‑ protective gloves that are resistant to ink/wash‑up, ‑ safety goggles, ‑ absorbent material or a metal vessel for collecting waste. Fig. 52) in transparent waste bottle 3a should be subjected to system- The amount of liquid waste (see atic visual assessment during printer operation.
- Page 73 EBS‑2600 USER MANUAL Industrial DROP ON DEMAND Printers Original Instructions 0/72 -260 0/51 T EBS INK -JE Type 123 4 500 0-10 Numbe r P12 042 Numme r 202 2 Manufa ctured Baujah r Vol t age 100 – 240...
- Page 74 G2023/04/26_1EN 74 of 184 2023.05.16...
- Page 75 CHAPTER 5 EDITING 2023.05.16 75 of 184 G2023/04/26_1EN...
- Page 76 EDITING PROJECTS AND PROJECT PARAMETERS 5.1. PROJECT EDITOR The functions of creating/editing/continuing editing a project are not available to operator‑type users. Owing to that, operator‑type users have no access to the project editor. The project editor starts when any function designed to create/edit projects is selected: Icons Function Project...
- Page 77 * Communications port‑type bar/matrix codes can be created by means of the EBS Web User Interface only. Basic notions and rules applied to project editing and printing – A project is created/edited by the user with the project editor; it consists of objects.
- Page 78 Print resolution in a horizontal direction is defined as a number of columns (or dots) per unit of – length. – For adequate legibility and proportionality of prints, it is recommended that resolution in a horizon- tal direction be equal to resolution in the vertical direction of 180 dpi (about 7086 dots/meter). 5.1.1.
- Page 79 To change the position of an object in a project: 1. Select an object whose position you wish to change in the project editor window. 2. Press The color of the frame of the object changes to green. Navigation icons are displayed: ‑...
- Page 80 5.1.5. USING THE OBJECT MANAGER The object manager consists of three parts (sheet tabs): – |: List of all objects in the project, – |: Clipboard, – |: Trashcan. Press in the project editor window to start the object manager. List of objects Press | | in the object manager window to display the list of objects.
-
Page 81: D Eleting An O Bject
the clipboard can be used for copying objects from one project to another. The clipboard is emptied automatically each time the printer is shut down. The following functions are available in the clipboard: Icon Function Delete the selected object from the clipboard. Paste the selected object into the project. -
Page 82: R Estoring A D Eleted O Bject
5.1.6.1. RESTORING A DELETED OBJECT The objects deleted while the project is being edited are stored in the trashcan. Therefore objects can be restored back to the project. An object can be restored only by time that the project edi- tor closes, the object is removed from the trashcan or the trashcan is emptied. For more details about trashcan management see “5.1.5. -
Page 83: T Ypes And P Arameters Of O Bjects
Line divider Spacer Intensifier The use of the EBS Web User Interface (WUI) editor to operate the printer allows the user to create/ edit bar/matrix codes whose contents are dynamic and which are graphic interpretation of text objects such as Date/Time... -
Page 84: C Ommon P Arameters Of A Ll O Bjects
5.2.1. COMMON PARAMETERS OF ALL OBJECTS After pressing the icon, the parameters of the selected object are available in the project editor window. The list of the parameters available depends on the type of object. The following parameters are common to all types of objects: Parameter Range of settings Object name... -
Page 85: Diting A P Roject
If you save the project open for printing/being printed, this may mean that the project is reloaded and if that is so a relevant message is displayed in the dialog box. The projects that are in the printer's project library can also be edited using the EBS Web User Interface. Press Project Continue editing to continue editing the project open for editing using the EBS Web User Interface. -
Page 86: C Reating A P Roject
5.4. CREATING A PROJECT To create a new project: Project Create project. 1. Press The project library is displayed. “5.9. Managing Projects”. For more details about the project library see 2. Enter the name of a new project in the white text box in the upper part of the window. 3. - Page 87 The values of project parameters are modified as follows: Numerical parameters Parameter values can be modified using: – the numeric keypad available when you click on a value, – icons to increment / decrement the values, – a slider Binary (bistable) parameters Values can be modified by means of icons: –...
- Page 88 Project parameter Range of settings 1 to 10 Dot size Print intensity level. Adjust print quality to the type (hygroscopicity) of surface to be printed on. If you raise the value of the parameter, the intensity of prints increases as the volume of the ink drops jetted from the printhead increases.
- Page 89 Project parameter Range of settings 0 to 1000 mm Initial distance [mm] Initial distance for a printout. A distance from the point where the photodetector selected as the source of the trigger signal triggers up to the point where printing of a printout should start. The distance is given in millime- ters.
- Page 90 Project parameter Range of settings Internal generator, External source Impulse generator source The source of timing signals, i.e. the signals that determine when consecutive columns of a text are printed: Internal generator: printing at a constant speed timed by the printer’s internal generator. The printing speed is set with the Conveyor speed parameter.
- Page 91 Project parameter Range of settings see the description of the parameter Trigger signal mode Type of trigger signal. The parameter can be used, e.g. for selecting trigger mode for the type of photodetector applied or for deciding whether triggering should take place at the beginning or at the end of an object to be labeled.
- Page 92 Examples of applications of selected project parameters In all presented examples: A ‑ width of a project in the project editor window (the project parameter Project width), – A’ ‑ real width of a project (when the blank space after the last column is removed), –...
- Page 93 Example 1 Fig. 55 Fig. 56 show the configuration in which: Printout repeti- – The printer is not in continuous printing mode (the value of the parameter | tion is different from ) which means that when printing starts ( ) ( ) it awaits the active edge of the trigger signal ( ) ( Trigger type = Level, and this means that:...
- Page 94 Example 2 Fig. 57 Fig. 58 show the configuration in which: Printout repeti- – The printer is not in continuous printing mode (the value of the parameter | tion is different from ) which means that after printing starts ( ) ( ) it awaits the active edge of the trigger signal ( ) ( Trigger type = Edge, and this means that:...
-
Page 95: Creating/Editing A Text Object
“favorite” list. Additional fonts can be imported to the printer using the font manager available in the EBS Web User Interface. 0 to 20 Line spacing Space (a number of rows) between text lines within one text object | 2023.05.16... - Page 96 | before a project is printed. Before a script is used in a project, it must be saved in the printer's internal memory. Scripts can be imported to the printer using the script manager available in the EBS Web User Interface. For matrix fonts...
-
Page 97: Type T Ext O Bject
For TrueType fonts only: Parameter Range of settings Font size Constrain font proportions: Font size is used for setting if | the parameter | font height (or a number of horizontal rows). To keep the dimensions in proportion, the font width is determined automatically. - Page 98 To create a Date/Time‑type text object 1. Press In the sheet tab | |, the following are displayed in se- quence: – The date and time currently set in the printer, – A quick preview of the contents of the Date/Time‑type object –...
- Page 99 Parameter Range of settings DD:MM:YY, MM:DD:YY, DD:MM:YYYY, MM:DD:YYYY, YYYY:DD:MM, Date format YYYY:MM:DD, YY:DD:MM, YY:MM:DD Allow formatting string editing: The parameter is available only if | Select one of predefined date formats. The default date format for newly created Date/Time‑type objects can be set by pressing Date format.
- Page 100 The names of days of the week and the names of months are printed in English. Item Meaning 3‑letter abbreviation for the name of a day of the week (Mon, ..., Sun). Full name of a day of the week (Monday, ..., Sunday). 3‑letter abbreviation for the name of a month (Jan, ..., Dec).
-
Page 101: Creating/Editing A Counter-Type Text Object
Item Meaning Time zone in numerical format (e.g. +0100). Name of the time zone (e.g. EDT). 5.4.2.4. CREATING/EDITING A COUNTER‑TYPE TEXT OBJECT With a Counter‑type text object you can provide a project with automatic customized num- bering. A counter may consist of up to three identical sections connected in cascade. Each of the sec- tions may be visible or hidden. - Page 102 Parameter Range of settings Start mode Min, Max, Start value, Last value Select a value to start counting from: Min: counting starts from the value given with the Min parameter both when project printing starts for the first time and when printing is resumed. Max: counting starts from the value given with the Max parameter both when project printing starts for the first time and when printing is resumed.
-
Page 103: C Reating /E Diting A C Ommunications Port - Type T Ext O Bject
CREATING/EDITING A COMMUNICATIONS PORT‑TYPE TEXT OBJECT 5.4.2.5. Use a Communications port‑type text object to add data received from an external device (e.g. a computer, automatic scales, a bar code reader) to a project via: – Ethernet (with connector the RS-232/RS-485 (with connector –... - Page 104 Parameter Range of settings Expert settings Activate advanced settings for a Communications port object Expert settings: If | , then: The additional sheet tab | Advanced| is available, Prefix and | Suffix are not available, The parameters | Formatting string is available, The parameter | The parameter | Communication|...
- Page 105 Before a script is used in a project, it must be saved in the printer's internal mem- ory. Scripts can be imported to the printer using the script manager available in the EBS Web User Interface. Do nothing, String, ASCII code...
- Page 106 Parameter Range of settings Do nothing, String, ASCII code Advanced| On print finish Expert settings: The parameter is available only if | Data that is sent from the printer to the external device when you pause printing a project containing a Communications port‑type object , i.e.
-
Page 107: Creating/Editing A Text File-Type Text Object
Before a text file is used in a project, it must be imported to the printer via the text file manager available in the EBS Web User Interface. To create a Text file‑type text object 1. - Page 108 Parameter Range of settings 1 to 1000000 Line maximum value Number of the last text‑file line to be printed. Start value, Last value Start mode Indicate which text‑file line is read in after printing resumption: Line start value parameter Start value: the line whose number is given with the | is read in, i.e.
-
Page 109: Creating/Editing A Shape
5.4.3. CREATING/EDITING A SHAPE The group of shapes | | includes the following objects: – Line Rectangle – Ellipse – 5.4.3.1. CREATING/EDITING A LINE‑TYPE SHAPE To create a Line‑type shape 1. Press 2. Set the parameters that are specific to the Line‑type object Parameter Range of settings 1 to 30... -
Page 110: Creating/Editing A Ellipse-Shape
4. Press to acknowledge. The Rectangle ‑type shape is created in the left top corner of the project. 5.4.3.3. CREATING/EDITING A ELLIPSE‑SHAPE To create an Ellipse‑type shape 1. Press 2. Set the parameters that are specific to the Ellipse‑type object Parameter Range of settings Filled Define whether the ellipse shall be filled or only its outline shall be printed. -
Page 111: Creating/Editing The Other Objects
1‑dimensional (1D) bar code or a 2‑dimen- sional (2D) matrix code whose content is static. The EBS Web User Interface can also be used for creating bar/matrix codes whose content is dynamic and that are graphic interpretation of text objects such as Date/Time... - Page 112 2D:MicroPDF417. When a type of code is selected, an example of the code of the selected type is displayed in the sheet tab | |, together with basic information such as: ‑ a set of characters/signs that can be used in the code of the selected type, ‑...
-
Page 113: Creating/Editing An Image-Type Object
Before a graphics file is used in a project, it must be imported to the printer via the image manag- er available in the EBS Web User Interface. Only a graphics file in *.png format can be added to a project. It is recommended that monochro- matic (black and white) images be used. -
Page 114: Creating/Editing A Spacer-Type Object
Position. the parameter | The Line divider‑type object is shown in the project editor window as a vertical, light blue line of maximum height. 5.4.4.4. CREATING/EDITING A SPACER‑TYPE OBJECT Use a Spacer‑type object to add a space in the form of a defined number of blank columns (vertical rows) to a project. - Page 115 the printing speed). For more details about the relationship between intensity and printing speed see “7.1.1. Maximum Printing Speed”. To create an Intensifier‑type object 1. Press 2. Set the parameters that are specific to the Intensifier‑type object Parameter Range of settings Position Position of an object in a project;...
-
Page 116: Saving A Project
5.5. SAVING A PROJECT The currently edited project can be saved in the editor in two ways: ‑ save the project with its exiting name or a new name; the project editor is not exited, ‑ save the project with its exiting name and exit the project editor. icon is available only when contents of the project being edited or project parameters have been modified. -
Page 117: Changing A Project Name
If the original version is selected, the rescue copy is deleted and the original project remains un- changed. If the rescue copy is selected, it can be saved as a project with any name. 5.7. CHANGING A PROJECT NAME A change in the name of a project is not available to operator‑type users. To change a project name: Project Create project or... -
Page 118: Deleting A Project
5.8. DELETING A PROJECT Project deleting is not available to operator‑type users. The function is used for deleting permanently a selected project (or selected projects) from printer memory. To delete a project: 1. Press Project Create project or Project Edit project. The project library is displayed. -
Page 119: Managing Projects
5.9. MANAGING PROJECTS Projects are managed via the project library, which is called by pressing: Project Create project Project Edit project Note that operator‑type users can gain access to the project library only while they are opening a project for printing using the icon. - Page 120 ‑ acknowledge an operation (such as open a project for printing, edit a project). The icons that are available in the file and folder manager: The file and folder manager is not available to operator‑type users. ‑ create a new folder, ‑...
- Page 121 CHAPTER 6 INFORMATION 2023.05.16 121 of 184 G2023/04/26_1EN...
-
Page 122: Information
INFORMATION 6.1. MESSAGE HISTORY To get access to message history: 1. Press Press on status bar A (see Fig. 41 on page on the main screen. 2. Select the group of messages you wish to view: – |: all messages. –... -
Page 123: Statistics
Service report clearing is available to serviceman‑type users only. A wider scope of statistics is offered by the EBS Web User Interface editor. The scope of statistics available in the EBS Web User Interface editor can be modified by pressing Statistics. For more details see “7.1. - Page 124 6.4. INK BOTTLE INFORMATION To get access to information about the ink bottle in use: on status bar A (see Fig. 41 on page 49) on the main 1. Press screen. The following information is available in the window displayed: –...
- Page 125 6.5. DETERMINING FACTORY CONVEYOR PARAMETERS The functions that are used for determining conveyor parameters are not available to operator‑type users. Tools required: ‑ any two objects, ‑ a photodetector, ‑ an encoder; to measure the encoder constant only. The following conveyor data needs obtaining to set printing parameters correctly: –...
- Page 126 To measure the conveyor belt travel speed: 1. Press The general settings window is displayed. 2. Press next to the parameter | Conveyor speed. The measuring tool is displayed (see drawing). Press to start measuring. The measured speed at which the conveyor belt moves is dis- played in the measurement window.
- Page 127 To measure the encoder constant it is required that two objects put on the conveyor at a distance of 1 meter (between the objects' leading edges) move one after another in front of the photodetector selected as the source of the trigger signal (the parameter of a project open for printing/being printed: | Trigger source) when: –...
- Page 128 An example of how to calculate an encoder constant The example shows an application for labeling Euro‑pallets (see Fig. 61), where there are: programmable encoder 11, which is programmed to generate X = 63779 pulses/revolution, – roll 11b, L = 250 mm (0.25 m) in circumference, –...
- Page 129 EBS‑2600 USER MANUAL Industrial DROP ON DEMAND Printers Original Instructions 0/72 -260 0/51 T EBS INK -JE Type 123 4 500 0-10 Numbe r P12 042 Numme r 202 2 Manufa ctured Baujah r Vol t age 100 – 240...
- Page 130 G2023/04/26_1EN 130 of 184 2023.05.16...
- Page 131 CHAPTER 7 PRINTER CONFIGURATION 2023.05.16 131 of 184 G2023/04/26_1EN...
- Page 132 For more information see “6.5. Determining Factory Conveyor Parameters”. Statistics Decide whether the scope of statistics available in the EBS Web User Interface editor shall in- clude the number of printouts of every project ( ) or not ( G2023/04/26_1EN 132 of 184 2023.05.16...
- Page 133 Parameter Range of settings Autostart current project Printing of the open project starts immediately after the printer starts up ( ) or it needs to be started manually ( Change the current date and time. 2. Modify the selected parameter. 3.
- Page 134 7.2. LOCAL SETTINGS Local settings are not available to operator‑type users. To modify local settings: 1. Press The local settings involve the following parameters: Parameter Range of settings Language The language in which the user interface is displayed. DD:MM:YY, MM:DD:YY, DD:MM:YYYY, Date format MM:DD:YYYY, YYYY:DD:MM, YYYY:MM:DD, YY:DD:MM, YY:MM:DD...
- Page 135 7.3. SETTING THE CURRENT DATE AND TIME The current date or time cannot be set by operator‑type users. Operator‑type users can only access the preview of the current data and time by pressing the clock icon on the status bar on the main screen. To set the current date and time: 1.
- Page 136 Parameter Range of values It is dependent on the value of the Normal Dimmed screen brightness screen brightness parameter Brightness of the screen after the expiration of the idle time given with the Dim screen after parameter. When you press any point on the screen, brightness returns to normal. 2.
- Page 137 Creating/Editing a Communications port-type Text Object”. Bar/matrix codes with dynamic contents can be graphic interpretation of a Communications port‑type text object and as such they can be created by means of the EBS Web User Interface only. To configure the Ethernet interface: 1. Press...
- Page 138 Creating/Editing a Communications port-type Text Object”. Bar/matrix code with dynamic contents can be graphic interpretation of a Communications port‑type text object and as such they can be created by means of the EBS Web User Interface only. G2023/04/26_1EN 138 of 184...
- Page 139 5. Select a user icon. A graphics file that can be selected as a user icon must first be imported to the printer by means of the image manager available in the EBS Web User Interface. 6. Enter the user password.
- Page 140 7. Re‑enter the password. 8. Press to acknowledge. The user is added. 7.5.3. DELETING A USER Administrator‑type users can delete a user who is at the same or lower access level except the user currently logged‑in. To delete a user: 1. Press 2.
- Page 141 7.5.5. CHANGING THE USER NAME Administrator‑type users can change the name of every user at the same or lower access level. To change the user name: 1. Press 2. Select the user whose name you wish to change. 3. Press If the icon is inactive, you are not authorized to change the selected user's name.
- Page 142 Before a text file is used in a project, it must be imported to the printer via the text file manager available in the EBS Web User Interface. The text file manager can also be used for deleting select- ed files from printer memory.
- Page 143 Before a script is used in a project, it must be imported to the printer via the script manager avail- able in the EBS Web User Interface. The script manager can also be used for deleting selected scripts from printer memory.
- Page 144 7.7. EXCHANGING DATA VIA A USB PORT Data exchanging via the USB port is not available to operator‑type users. Data can be exchanged between devices by means of an approved USB memory device plugged in to the connector in the control unit. For USB memory specifications see “2.2.
- Page 145 7.7.1. EXPORTING/IMPORTING PROJECTS Projects can be transferred between: – printers, the printer and a PC (e.g. to use the Offline EBS Web User Interface editor). – The project files are: in *.exp format, – – saved in a USB memory device in the main folder.
- Page 146 The version of the printer software (system) can be viewed by pressing – Contact an authorized representative of EBS Ink Jet Systeme GmbH to obtain an update pack- age; the update package is a file in *.ebs format, Export all projects to a USB memory device; if projects contain external items such as a font, –...
- Page 147 4. Select the *.ebs file that contains a suitable update package. Files in other formats are not visible. 5. Press to acknowledge. The message is displayed. Printer is prepared for update. Press “OK” to turn off the printer. After printer is turned off please turn it on again, update will continue.
- Page 148 CHAPTER 8 PERIODIC MAINTENANCE G2023/04/26_1EN 148 of 184 2023.05.16...
- Page 149 PERIODIC MAINTENANCE The objective of periodic maintenance is to ensure reliable operation of the printer. 8.1. PURGING/VENTING THE PRINTHEAD Purging functions are not available to operator‑type users. The printhead purging/venting can be done by instructed persons. Printhead purging/venting is disabled if the printer reported a warning about critically low ink in the bot- tle.
- Page 150 2. Use the cross head screwdriver to loosen two screws 5d (see Fig. 62) that fasten slide 5. 0/7 2 26 00 /51 T EB S- IN K- JE Type 12 34 50 00 -10 P1 20 42 Num ber Num mer 20 22 Manu factu...
- Page 151 Press Purge. The purging/venting procedure starts and lasts about 2 seconds. Multiple pressing of the icon Purge extends the time for short purging/venting of the print- head. To start long purging/venting of the printhead: icon on menu bar C (see 1.
- Page 152 To restore normal operation of the printer after the printhead purging/venting procedure without the use of an optional drip molding has been carried out: icon on menu bar C (see 1. Press the Fig. 43 on page 52) on the main screen to resume printing. 2.
- Page 153 Fig. 63. 3. Assess how dirty the filter gauze is. If the filter gauze is not dirty, complete air filter 1e can be installed back into the printer. Otherwise, a new filter must be installed. 4. Assess how clean the seat of ink system valve 1d is. If it is soiled with ink, clean the seat using sprayed wash‑up and then dry it.
- Page 154 8.3. STORING AND TRANSPORTING 8.3.1. STORING THE PRINTER The printer shall be stored in a dry place. It is recommended that the printer be stored in its original package. The printer must be in a horizontal position in storage. The procedure for preparing the printer for storing depends on the period over which the printer is not to be used.
- Page 155 Only skilled persons can prepare the printer for storing over a period longer than 1 week. For more information contact an authorized representative of EBS Ink Jet Systeme GmbH. When a storage period of over 1 week elapses, the printer must be started up in a way similar to starting up directly after installation.
- Page 156 8.3.1.1. INSTALLING A SEALING COVER To protect the nozzles and the nozzle plate and also to avoid ink leaks from the printhead while the printer is stored/transported, it is recommended that a sealing cover be used. The sealing Fig. 64): cover is available in two variants (see –...
- Page 157 the main screen to pause printing. 2. Use the cross head screwdriver to loosen two screws 5d (see Fig. 64 on page 156) that fas- ten slide 5. 3. Remove slide 5. 4. Use the sprayer to spray wash‑up over the nozzle plate. 5.
- Page 158 Only skilled persons can prepare the printer for external transportation. For more information con- tact an authorized representative of EBS Ink Jet Systeme GmbH. Before the printer is transported outside the premises, it is necessary to prepare it as if it was pre- pared for storing over a period of more than 1 week.
- Page 159 CHAPTER 9 TROUBLESHOOTING 2023.05.16 159 of 184 G2023/04/26_1EN...
- Page 160 TROUBLESHOOTING 9.1. MESSAGE HANDLING Important information concerning printer operation is signaled in the following way: is displayed on status bar A (see – The icon Fig. 41 on page 49); the color of the icon indicated a type of message, –...
- Page 161 If an error message is displayed due to an error in the printer (e.g. the empty ink bottle) and the printer automatically goes into an error state: – View the contents of the error message. – Press to acknowledge the message or to display more details about the error.
- Page 162 9.1.3. INFORMATIONAL MESSAGES Informational messages (see drawing) are displayed in the dialog box when the necessity to inform the user of the existent situation arises or when the user is expected to decide on further actions. Printing may be turned on/continue. The printer does not change its status.
- Page 163 9.2. DIAGNOSTIC 9.2.1. PRELIMINARY CHECKS Before you proceed to locate a faulty component, it is advisable to conduct preliminary checks such – Visual inspection, to detect problems such as dirty parts, ink leaks, or damaged/disconnected cables/tubes, – Verification of messages, information about the printer, consumables and settings, which can help identify the source of the problem.
- Page 164 9.2.1.2. VERIFICATION OF MESSAGES, INFORMATION AND SETTINGS To facilitate diagnostic, verify the following: Project and project parameters editing as well as general settings editing are not available to operator‑type users. – Contents of the project that is open for printing/being printed. You can start editing the project that is open for printing/being printed by pressing Project.
- Page 165 After solving the problem, acknowledge the message displayed. If you have not managed to solve the problem by yourself, contact an authorized representative of EBS Ink Jet Systeme GmbH. Some of the settings listed below are not available to operator‑type users.
- Page 166 Irregularity Recommended action The setting of print resolution in a horizontal direc- tion does not equal print resolution in the vertical direction. Resolution Set the project parameter | at 7086 dots/m. Conveyor belt parameters are incorrectly set. No proportional square, circle or 2D code Set the parameter Conveyor speed at the can be obtained.
- Page 167 Carry out the nozzle plate cleaning procedure using a cleaner. Contact an authorized representative of EBS Ink Jet Systeme GmbH. Check what the amount of waste in the waste Leakages of ink from the drip rail during bottle is and empty the bottle, if need be.
- Page 168 Replace the ink bottle with a correct one. Contact an authorized representative of Ink bottle or IMS (Ink Monitoring System) EBS Ink Jet Systeme GmbH to enter service errors. mode (in which printing can continue for a pe- riod of 50 hours).
- Page 169 4. Use the sprayer to spray wash‑up over nozzle plate 2a. 5. Clean nozzle plate 2a gently using cleaner 16 supplied by EBS Ink Jet Systeme GmbH. Nozzle plate 2a must be cleaned with cleaner 16 from top to bottom.
- Page 170 NOTE: The nozzle plate is at risk of getting damaged! No tools different from the cleaner supplied by EBS Ink Jet Systeme GmbH must be used to clean the nozzle plate as otherwise the plate and the nozzles may get damaged.
- Page 171 3. Use the cross head screwdriver to remove screw 3h that fastens drip rail 3b to printhead 2. Fig. 66. 4. Pull drip rail 3b out of the guides towards the back of the printer. Should the removal of drip rail 3b be difficult, it is advisable to loosen or completely remove slide 5.
- Page 172 OTP and OTA codes. To release the protection press on the protection release screen. An authorized representative of EBS Ink Jet Systeme GmbH will release the protection remotely at his/her earliest convenience. G2023/04/26_1EN 172 of 184...
- Page 173 “9.3.3. Releasing Protections”. 2. Contact an authorized representative of EBS Ink Jet Systeme GmbH and notify him /her that you want to enter service mode, that is, enable printing over a period of 50 hours. is displayed on status bar A (see Fig.
- Page 174 The recovery procedure must not be interrupted. Otherwise, the printer may get damaged. To restore the default settings: 1. Press The virtual keyboard is displayed and should be used to enter the password obtained from an authorized representative of EBS Ink Jet Systeme GmbH. 2. Enter a password. 3. Press to acknowledge.
- Page 175 CHAPTER 10 TECHNICAL SPECIFICATIONS 2023.05.16 175 of 184 G2023/04/26_1EN...
- Page 176 10. TECHNICAL SPECIFICATIONS Physical properties Weight Complete printer (control unit with printhead) and 0.5 l bottle: about 4.8 kg (10.6 lbs) Bottle of ink: 0.25‑liter bottle: about 0.25 kg (0.55 lbs) 0.5‑liter bottle: about 0.5 kg (1.10 lbs) Installation kit (beams, holders): about 2.5 kg (5.51 lbs) Dimensions (printer: control unit with printhead and bottle of ink) Fig.
- Page 177 Physical properties Dimensions (waste bottle) Ø 65 Fig. 69. Ø88 Dimensions (examples of Ø40 fastening elements) 1008 Fig. 70. Material for housing Stainless steel INOX 100% Technical data Project width Maximum width: 4000 pixels (vertical rows), i.e.: about 56.5 cm / 22.24 in. (at 7086 dots/m in horizontal direction) Maximum print height 71.8 mm (2.83 in.) Resolution in vertical di-...
- Page 178 Functions Control Built-in 5.7’’/144.8 mm LCD with touch panel EBS Web User Interface (WUI): to edit projects and control the printer remotely (online) via Ethernet (or direct connection to a PC) with any Web browser Offline EBS Web User Interface (Offline WUI): a project editor for...
- Page 179 Inks Type Oil-based Color Black Ink bottle capacity 0.25 liter (starter bottle) 0.5 liter Ink consumption up to 0.5 million prints – at 500x500 dots, 10% filling to 0.5 liter of Waste bottle capacity 0.5 liter Working conditions Working position of Horizontal the printer Distance from printhead to...
- Page 180 Text objects: Normal text, Date/Time, Counter, Communications port, Text file Shapes: Line, Rectangle, Ellipse Other objects: Barcode, Image, Line divider, Spacer, Intensifier Object are available only when processed by EBS Web User Interface: Codes: Date/Time, Counter, Communications port, Text file Fonts Types of fonts: matrix, TrueType Additional TrueType fonts in *.ttf format or matrix fonts in *.xml format...
- Page 181 CHAPTER 11 VERSION CONTROL 2023.05.16 181 of 184 G2023/04/26_1EN...
- Page 182 11. VERSION CONTROL Version of manual Date of issue System version 2020/01/09#1.1EN 2020.01.09 1.02.45 G2023/04/26_1EN 2023.05.16 1.03.21 G2023/04/26_1EN 182 of 184 2023.05.16...
- Page 183 2023.05.16 183 of 184 G2023/04/26_1EN...
- Page 184 D‑51588 Nümbrecht‑Elsenroth, Alte Ziegelei 19‑25, Deutschland +49 2293 / 939‑0 +49 2293 / 939‑3 www.ebs‑inkjet.de mail@ebs‑inkjet.de Manufacturing, Distribution and Service: EBS Ink‑Jet Systems Poland Sp. z o.o. ul. Tarnogajska 13, 50‑512 Wrocław, Poland +48 71 367 04 11 + 48 71 373 32 69 www.ebs‑inkjet.pl bok@ebs‑inkjet.pl Sales, Logistics and Service in the USA: EBS Ink‑Jet Systems USA, Inc.
Need help?
Do you have a question about the Hi-Res EBS-2600 and is the answer not in the manual?
Questions and answers