
Related Manuals for Sailfish 320 EXP


Summary of Contents for Sailfish 320 EXP
- Page 1 Sailfish 320 EXP Owner’s Manual 04/24/2019 FISHING FOCUSED. FAMILY FRIENDLY.™ www.SailfishBoats.com...
-
Page 2: Table Of Contents
Table of Contents 04/24/2019 2. Boat Specifications 20. Helm Area 35. Trim Tab Maintenance 3. Trailer Measurement Chart 21. UFLEX Steering System 36. Lewmar V-700 Windlass 4. Boat Layout 22. Ignition Switches, Engine Shut-Off 37. Lewmar Windlass Troubleshooting Cord/Lanyard Chart 5. Boat Safety & Warning Labels 23. Plug and Play Wiring 38. Marine Head With Waste Tank 7. Boat Safety & Warning Label Loca- (Type III MSD Waste Management tions 23. Fuel-Water Separator - Yamaha System) 8. Boarding Ladder & Unassisted 24. Console / Head Area 44. Vinyl Care and Cleaning Boarding Situations 25. VSR Battery System... - Page 3 Sailfish 320 EXP Specifications 04/24/2019 SPECIFICATIONS Cabin Amenities Helm Seating Options • Cabin V-Berth Cushions and Filler • Large Dash Area (Capable of flush • 58” Aft Folding Seat LOA Hull Only .......... 31’ 6” Cushions mounting 16” Screen) • Rear Cooler Seat - 125 Qt. Yeti Length Rigged ........
-
Page 4: Trailer Measurement Chart
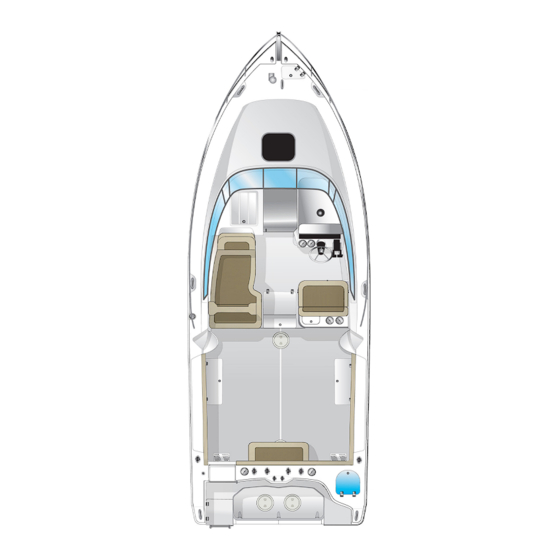
SAILFISH BOAT TRAILER MEASUREMENT CHART: Boat Models 208CC 78 in. 53 in. 28 in. 11 in. 82 in. 218 in. 235 in. 27 in. 1900BB 88 in. 66 in. 37 in. 10.5 in. 99.5 in. 198 in. 217 in. 24 in. - Page 5 Sailfish 320 EXP Boat Layout 04/24/2019 Description Description Boarding Ladder / Fresh Water Fill Mechanical Room 30 Gallon Livewell Helm Area Bilge Access Cabin Door Fuel Sender and Pick-up Access Full Wrap-Around Windshield Built-in Rod and Tackle Storage Windlass Assembly In-Floor Fish Boxes Anchor Locker Fuel Fill Full Bow Rail Tackle Storage Bow Roller FISHING FOCUSED. FAMILY FRIENDLY.™ www.SailfishBoats.com...
-
Page 6: Boat Safety & Warning Labels
Boat Safety & Warning Labels Sailfish 320 EXP 04/24/2019 03/04/2019 Warning Labels The safety for you and everyone on board, as a boat owner, you need to become familiar with and the locations of the Caution, Warning and Danger Labels found on your boat. - Page 7 Boat Safety & Warning Labels Sailfish 320 EXP 04/24/2019 03/04/2019 Warning Labels Continued The safety for you and everyone on board, as a boat owner, you need to become familiar with and the locations of the Caution, Warning and Danger Labels found on your boat.
-
Page 8: Boat Safety & Warning Label Loca
Boat Safety & Warning Label Locations Sailfish 320 EXP 04/24/2019 03/04/2019 FISHING FOCUSED. FAMILY FRIENDLY.™ FISHING FOCUSED. FAMILY FRIENDLY.™ www.SailfishBoats.com www.SailfishBoats.com... - Page 9 Boat Safety & Warning Labels Sailfish 320 EXP 04/24/2019 03/04/2019 Replacement Warning Labels If any of your Boating Safety or Warning Labels become damaged, please call Sailfish Boats’ parts department for replacement stickers at 229-377-2125 FISHING FOCUSED. FAMILY FRIENDLY.™ FISHING FOCUSED. FAMILY FRIENDLY.™ www.SailfishBoats.com...
-
Page 10: Boarding Ladder & Unassisted
Boarding Ladder & Unassisted Sailfish 320 EXP Boarding Situations 04/24/2019 03/04/2019 Unassisted Boarding Instruction When using the ladder in an unassisted boarding situation, reach over the transom and open the covering board lid that is covering the ladder, pull ladder towards you, by picking up the ladder by the steps, release the strap, deploy the four step ladder by rotating it to the down position. -
Page 11: Battery Selector Panel And Wiring
Battery Selector Panel and Wiring 04/24/2019 Front View Back View With Wiring B-493-001 PB-493-001 B#8S B#8S 038-1012 038-1012 VOLTAGE SENSITIVE VOLTAGE SENSITIVE RELAY MODULE RELAY MODULE A#8S A#8S IGNITION PROTECTED IGNITION PROTECTED 125 AMP 125 AMP SINGLE SENSE MAIN MARINE SINGLE SENSE MAIN MARINE... -
Page 12: Breaker Panel Schematic
Breaker Panel Schematic 04/24/2019 Download High Resolution Diagram FISHING FOCUSED. FAMILY FRIENDLY.™ www.SailfishBoats.com... -
Page 13: Switch Panel Schematic
Switch Panel Schematic 04/24/2019 SPREADER FRESH DECK HORN LIGHTS WATER LIGHTS WASH BILGE BAITWELL ACCY ACCY DOWN PUMP 6" 6" 6" Download High Resolution Diagram FISHING FOCUSED. FAMILY FRIENDLY.™ www.SailfishBoats.com... -
Page 14: Distribution Harness
Distribution Harness 04/24/2019 Download High Resolution Diagram FISHING FOCUSED. FAMILY FRIENDLY.™ www.SailfishBoats.com... -
Page 15: Cabin Liner Harness
Cabin Liner Harness 04/24/2019 Download High Resolution Diagram FISHING FOCUSED. FAMILY FRIENDLY.™ www.SailfishBoats.com... -
Page 16: Cabin Light Harness
Cabin Light Harness 04/24/2019 Download High Resolution Diagram FISHING FOCUSED. FAMILY FRIENDLY.™ www.SailfishBoats.com... -
Page 17: Adapter Harness
Adapter Harness 04/24/2019 Download High Resolution Diagram FISHING FOCUSED. FAMILY FRIENDLY.™ www.SailfishBoats.com... -
Page 18: Shore Power Panel Wiring Diagram
Shore Power Panel Wiring Diagram 04/24/2019 14 GRN 19" 120 VOLTS A.C. 60Hz PLUG "A" 3 POS 25A LG CAP HSG 052-2011 PLUG "B" 3 POS 25A LG PLUG HSG 052-2010 PLUG "C" 3 POS 25A LG PLUG HSG 052-2010 W/LARGE PINS W/LARGE SKTS W/LARGE SKTS... -
Page 19: Fuel System Layout
Fuel System Layout 04/24/2019 Description Fuel Filter Access Fuel Fill Fuel Tank Location Fuel Pickups Fuel Sender Primer Bulbs Yamaha Only FISHING FOCUSED. FAMILY FRIENDLY.™ www.SailfishBoats.com... -
Page 20: Plumbing Diagram
Plumbing Diagram 04/24/2019 FISHING FOCUSED. FAMILY FRIENDLY.™ www.SailfishBoats.com... -
Page 21: Helm Area
Helm Area 04/24/2019 Description Compass Switch Panel Remote Spotlight Control Brand Specific Motor Guage Trim Tab Actuator Switches Binnacle Power Assist Steering Control Ignition Switches Uflex Tilt Helm Fireboy Charge Indicator 12 Volt Accessory Plug Windlass Control Switch Panel FISHING FOCUSED. FAMILY FRIENDLY.™ www.SailfishBoats.com... -
Page 22: Uflex Steering System
Sailfish 320 EXP 04/24/2019 UFLEX Steering System UFLEX is the standard for steering systems in the marine industry because of the quality of their USA built products. Every helm comes standard with a full stain- less steel shaft; cylinders are built with carbon steel pistons, coupled with extra-large end caps to prevent leakage. All of their connection materials are 304 stain- less steel that has been electro-polished and passivated. For more information on the service and maintenance of your UFLEX system please refer to your UFLEX owner’s manual or view it electronically at http://uflexusa.ultraflexgroup. com/public/File/UFLEX2013_USA.pdf FISHING FOCUSED. FAMILY FRIENDLY.™... -
Page 23: Ignition Switches, Engine Shut-Off Cord/Lanyard
Sailfish 320 EXP 04/24/2019 Ignition Switches, Engine Shut-off Cord/Lanyard Each Sailfish boat will be equipped with a Yama- ha or Mercury ignition switch with an emergency engine shut off cord/lanyard. This lanyard should be worn at all times while operating the vessel, if the vessel operator falls or moves a unsafe distance away from the helm controls the lanyard will pull out causing the en- gine to shut down. Make sure the lanyard is not attached to a part of your clothing that could be easily torn free caus- ing the switch not to pull. See your YAMAHA or MERCURY owner’s manual for more information on this safety feature. Engine Break-In Period Each new outboard motor will need to go through a break in period to make sure all of the internal moving parts and components have a chance to correctly mate. For more information on the break in period spe- cific to your engine please refer to your YAMAHA or MERCURY Owner’s manual. -
Page 24: Plug And Play Wiring
Sailfish 320 EXP 04/24/2019 Plug and Play Wiring Deutsch Connectors are quick discon- nect plugs used for durability and ease of replacing components in your Sailfish Boat. These water resistant plugs are for use in electrical systems where moisture, salt spray, dirt and dust could affect the electrical connections or systems. Fuel-Water Separator Sailfish has rigged either Yamaha or Mercury water fuel separators in the bilge compartment. Each engine will have its own filter. These filters can be accessed through the bilge access doors, in the back of the boat. For more information on these filters, please review your Yamaha or Mercury Owner’s Manuals. FISHING FOCUSED. FAMILY FRIENDLY.™ www.SailfishBoats.com... -
Page 25: Console/Head Area
Console/Head Area 04/24/2019 Description Marine Head Control Electric Marine Head Console Components / Wiring Located behind the head wall is easy access to console components and wiring. FISHING FOCUSED. FAMILY FRIENDLY.™ www.SailfishBoats.com... -
Page 26: Vsr Battery System
VSR Battery System - “The Smart Battery Switch” 04/24/2019 The VSR, or Voltage Sensitive Relay, is a very handy little box battery and house battery together. Both are now charging. that solves a load of traditional charging problems on marine Upon reaching his destination, the boater kills the engine – and, electrical systems. It essentially serves as a smart battery switch the alternator output – and begins trolling. Because of the lowered deciding automatically when either one or two batteries are voltage, the VSR now disconnects the batteries. Because he is charged – or discharged. It works great on almost any boat with now discharging only one battery, our fisherman is going to have multiple batteries – and eliminates all of the guesswork that used starting power when he needs it later – no matter how long he to come with manual battery switches. uses the trolling motor and depletes that trolling battery.Once underway again, the alternator power causes the VSR to recon- What a VSR does nect the batteries and begins replenishing the trolling battery. The VSR is installed between two batteries. Many People are Back home, the fisherman powers up his onboard battery charger, surprised to learn that it is NOT connected to either the alternator this increased voltage causes the VSR to once again link the or charger output wires! Its setup is much more clever. batteries. This means that even a single output battery charger would now be charging both batteries! It either battery goes above 13.7 volts (due to either alternator or charger output), the VSR connects both batteries together. Both batteries are now charging – without the boat ever having to throw a switch. Alternately, when the system voltage drops back below 12.6 volts, i.e., no more charging, the relay opens and the batteries are separate. This means that both batteries now discharge... -
Page 27: Cabin Control Panels
Cabin Control Panels 04/24/2019 Description Description 120 Volt AC Power Panel Shore Power/Generator Generator On/Off Switch and Hour Meter Cabin Accessory Switches CO2 Alarm Breaker Panel Air Conditioning Control Panel Cabin Lights and Accessory Switch Panel FISHING FOCUSED. FAMILY FRIENDLY.™ www.SailfishBoats.com... -
Page 28: Cockpit Storage And Access
Cockpit Storage and Access 04/24/2019 Generator Depending on the equipment in your boat, many of your power options can be accessed by removing the tackle stations in the cockpit. Behind these you will have access to the Air Condi- toning, Water Heater and the Fire Boy System, as well as plumbing hoses and wiring. The generator will be located in the center step of the cockpit, although you may also need to remove the tackle stations to be able to access all components of the generator. Fire Boy FISHING FOCUSED. FAMILY FRIENDLY.™ www.SailfishBoats.com... -
Page 29: Midship Seacock Access
Midship Seacock Access 04/24/2019 Access to the Marine Head Discharge Sea-cock is located under the Mid-Ship berth mat- tress through an access hatch, it is the same access hatch used to access the Fwd Bilge pump and Generator Sea-cock. Description Shower Sump Marine Head Discharge Generator and Seacock Filter Air Conditioning Sea- cock and filter Forward Bilge Pump FISHING FOCUSED. FAMILY FRIENDLY.™ www.SailfishBoats.com... -
Page 30: Bilge Access And Explanation
Sailfish 320 EXP 04/24/2019 Bilge Access and Explanation The bilge of your boat can be accessed through the large door in the aft of the boat. This large door allows easy access too many of the boats components. You may also access it through the two access plates in the splash-well. The bilge area of your sailfish boat should be checked before, during and after each operation. FISHING FOCUSED. FAMILY FRIENDLY.™ www.SailfishBoats.com... -
Page 31: Bilge Pumps
Sailfish 320 EXP 04/24/2019 Bilge Pumps All Sailfish Boats are furnished with Rule Bilge Pumps, The Rule 2000 GPH (gallon per hour) pump has a built in automatic float switch. This is engaged when the water level rises in the bilge and the float rises in the pump causing the pump to turn on. ***The 320CC and 320WAC are furnished with two of these pumps as shown in the picture - The lower pump can be engaged auto- matically or manually via the bilge pump switch on the dash - The higher pump is an automatic only pump that is wired directly to the batteries.*** These pumps can be tested by turning them upside down, the pump should turn on, once turned back over it will run for a few more seconds and then shut off. The pumps also have a manual switch function on the main switch panel. These pumps are wired into your boat bypassing the battery switch so that they have power at all times, this allows the automatic fea- ture to work while you are away from the boat and the batteries are turned off. Sailfish boats 241CC and larger are equipped with a forward bilge pump that is an electronic sensor pump. These pumps have a state of the art internal water sensor that detects water and automatically activates the pump when there is enough present to be pumped out. These pumps can be tested by placing your finger over the “Test Area” on the back of the pump for 5 seconds, the pump will turn on to let you know it is functioning correctly. All wiring and switches to these pumps are the same as the Rule 2000GPH pumps. FISHING FOCUSED. FAMILY FRIENDLY.™ www.SailfishBoats.com... -
Page 32: Raw Water Washdown System
Sailfish 320 EXP 04/24/2019 Raw water Washdown system The raw water wash down on your Sailfish Boat is powered by a Shur-flo Pro Blaster Pump which creates a pressur- ized system, once the pump is turned on and pressure is created the pump will shut down until more pressure is needed. The raw water wash down pump can be accessed through the bilge access door in the aft of the boat. To operate make sure the seacock is in the open position. The hose fitting for the wash down is located in the transom splash well, to use simply attach a hose with a nozzle and turn the switch on. Pressure will build up in the hose and the nozzle and as you spray the pump will continue to engage as needed. FISHING FOCUSED. FAMILY FRIENDLY.™ www.SailfishBoats.com... -
Page 33: Freshwater Washdown And Shower System
Sailfish 320 EXP 04/24/2019 Freshwater Washdown and Shower System The freshwater washdown and shower system on your Sailfish Boat is powered by a Shur-flo Pro Blaster Pump which creates a pressurized system, once the pump is turned on and pressure is created throughout the freshwater hoses; once they are all pressurized the pump will shut down until more pressure is needed. All of the freshwater systems on the boat will operate on this system once the freshwater switch is engaged. You should allow a few seconds for the system to prime and pressurize before attempting to use any of the showers/sinks ect. The freshwater holding tank is located behind the fuel tank in the bilge area. The fill for this tank is located under the board- ing latter on the port side of the vessel. The freshwater pump can be accessed through the bilge access door in the aft of the vessel. FISHING FOCUSED. FAMILY FRIENDLY.™ www.SailfishBoats.com... -
Page 34: Livewell Operation
Livewell Operation 04/24/2019 Instructions • Make sure the seacock below the baitwell pump is in the open position (seacock is accessed through CLOSED the hatch under the transom walk thru door). • Turn on the livewell switch. • Adjust the black aerator in the livewell to the desired flow (if your model has a livewell in the leaning post you can adjust the aerator to pump water into the transom livewell or the leaning post livewell or both) • In order to fill the livewell, reach in the access hatch below the livewell and close the red handle ball valve. • The livewell will fill up until it reaches the Overflow built into the side of the livewell. This allows the water to continually pump in and drain out while maintaining the water level. • To drain the livewell open the red handle ball valve. FISHING FOCUSED. FAMILY FRIENDLY.™ www.SailfishBoats.com... -
Page 35: Fishbox Pump
Fishbox Pump 04/24/2019 The 320EXP is equipped with a diaphragm pump called the gulper grouper (pictured top right). The Whale Gulper Grouper pump has no impeller to clog or burn out. Unlike impeller pumps these have no-choke valves that easily pump out fish box waste. This pump will pump both fish boxes through a system called a flooded T (pictured bottom right). The flooded T allows both boxes to have a centralized drainage location that can be operated by a single pump Troubleshooting Electric Motor Runs but doesn’t pump • Disconnect pump and turn off all power. • Disconnect hoses and unscrew housings. • Check entire hose system for blockage. • Inspect tricuspid valves for blockage or inverted valve(s). • If valve(s) are blocked, remove blockage, re-assemble the pump and continue use. • If a tricuspid valve is inverted, replace with a new tricuspid valve, reassemble the pump and continue use. If the electric motor will not operate, check that: • The isolator switch is on. • There is 12 volts at the battery terminals. • The in-line fuse / circuit breaker are operational. If the fuse / circuit breaker has blown, check for debris in pump head and clean out if necessary. Replace the fuse or re-set circuit breaker and run the pump. FISHING FOCUSED. FAMILY FRIENDLY.™ www.SailfishBoats.com... -
Page 36: Trim Tab Maintenance
Trim Tab Maintenance Tips 04/24/2019 Cleaning Sacrificial Anodes for your Lenco SS The attractive surface appearance of stainless steel cannot be regarded Trim Tabs as completely maintenance-free. Our 304 Series Stainless Steel may in fact Be aware that stray currents in your stain, discolor, or accumulate a layer of marina or in a visiting marina can surface contamination (dirt and grime) cause damage to your trim tab blades during the normal course of the life if not protected by sacrificial anodes. cycle. • The addition of anodes on each tab Minute particles of dust and rust may will deter electrolysis. adhere to the stainless steel during • Do not paint under the anode or the shipping, installation or storage at anode itself. OEM or retail locations. • Check Anode condition frequently. Replace when necessary. Also, please remember that some types of stainless steel fasteners tend Visual inspection of to “bleed” over the tabs and onto the... -
Page 37: Lewmar V-700 Windlass
Lewmar V-700 Windlass 04/24/2019 Troubleshooting If your boat was has a factory installed wind- lass there will be a complete owners' manual Anchor Rode pays out independently while in your owners packet. For more detailed windlass is not in use information please refer to you windlass own- ers manual If you have a thru hull windlass This problem is a result of not securing the anchor system the remote will be stored forward in the rode combined with the Gypsy Drive Cap being windlass hatch. slack. Tighten the Gypsy Drive Cap using the tool provided and always secure the anchor rode Included on this page are some maintenance independently of the windlass whenever it is not recommendations and a troubleshooting guide. being deployed or recovered. Maintenance Electrical Troubleshooting As with most electrical marine equipment the General Recommendations majority of problems that arise are electrical in nature. Therefore it is essential that the proper • After the first two or three anchor recover- voltage be maintained. The proper voltage on a 12 ies, check the mounting nuts to ensure that Volt system is 13.5 Volts. (Constant low voltage... -
Page 38: Lewmar Windlass Troubleshooting Chart
Lewmar V-700 Windlass Troubleshooting Chart 04/24/2019 Failure to Operate Troubleshoot Chart: Reversing Toggle Control Switch (Part No. 0052519) Is there voltage at the input terminal (positive) to the If no voltage is present, the battery isolation is OFF, the control switch? breaker is tripped or a fuse has blown. The battery may also have been dead or disconnected. Check voltage at the output terminals of the control switch with the switch on forward then reverse. Control switch is defective. Replace Motor Sluggish Operation Troubleshoot Chart Is windlass overloaded? Ease the load and ensure the battery is well charged. Check the voltage across the motor leads with the There is a severe voltage drop in the circuit. windlass on. (Proper voltage is 13.5V. Constant low voltage will destroy the motor). Check for undersized cables, poor connections or corroded connections. Also check for resistance across the battery Is the voltage low? (Below 11.0V on a 12V system? isolation switch or solenoid. (Feel them to see if they are heating up). -
Page 39: Marine Head With Waste Tank
Marine Head with Waste Tank 04/24/2019 Type III MSD Waste Management System FISHING FOCUSED. FAMILY FRIENDLY.™ www.SailfishBoats.com... - Page 40 Marine Head with Waste Tank 04/24/2019 Type III MSD Waste Management System Description Battery Fuse Waste Management System Master Switch Description Controller for Waste Vent Management System Inlet Toilet Deck Pump Out Overboard Discharge Waste Holding Tank Outlet FISHING FOCUSED. FAMILY FRIENDLY.™ www.SailfishBoats.com...
- Page 41 Type III MSD Waste Management System 04/24/2019 Cleaning Access to the Marine Head Discharge Sea-cock is located under the Mid-Ship berth mattress through an access hatch, it Use Thetford’s Aqua-Clean, a non-abrasive all purpose is the same access hatch used to access cleaner, on the bowl and macerator pump. It is specially the Fwd Bilge pump and Generator Sea-cock. formulated and thoroughly tested to be save for all com- ponents of your toilet system. It safely removes iron stains NOTE: This is a freshwater marine head system that runs off the boats freshwater and hard water deposit and can be safely used on many tank, using the head will affect the boats other surfaces, including countertops, sinks, showers and freshwater supply. tubs. Just squeeze Aqua-Clean onto surface. Allow to sit a few minutes and clean with a sponge. For severely soiled Seasonal Start-up toilets, allow Aqua-Clean to soak overnight. Test the toilet before using by flushing the toilet to check operation. Never use household cleaners, which can contain bleach, Verify that there are no leaks. in the toilet system. Household toilet bowl cleaners contain harsh acids. Bleach, petroleum based products, strong Deodorants acids and abrasives can cause irreversible damage to the Thetford holding tank deodorants deliver exceptional deodorant toilet system and components. performance, tank cleaning and waste digestion. Winterizing Formaldehyde-based deodorants like Thetford’s Aqua-Kem deliver Use only propylene glycol based, non-toxic antifreeze unsurpassed odor control even in the hottest conditions. Eco-Smart...
- Page 42 Type III MSD Waste Management System 04/24/2019 PROBLEM CAUSE ACTION / SOLUTION Waste tank is full Empty waste tank before continuing to use toilet. Clog at pump inlet Clear clog. DO NOT flush foreigh objects. DISABLE power. Attempt to remove object. if unsuccessful, Solid object in macerator contact Thetford Tecma Servcie (1-800-521-3032). DO NOT Toilet does not flush or performance is flush foreign objects. poor Check that toilet supply voltage is 12V+/-2V (24V+/-2V) AND that there is no more than a 10% decrease in voltage when Low Voltage macerator is running. If voltage decreases more than this, there may be a wiring problem in the boat. Check that supply line is properly connected to fresh water Water supply line kinked or not connected supply. Check for kinks in the supply line. Check that fuse/circuit breaker has not tripped. Ensure all No power to water pump Water does not enter bowl during flush electrical connectors to water pump are fully mated. or water add cycle Water supply has been turned off Open water supply valves or reconnect power to supply pump. Solenoid not plugged into relay module Ensure wiring harness to solenoid is fully connected.
- Page 43 Type III MSD Waste Management System 04/24/2019 • Rugged Polyethylene holding tank • Evacuation Pump • Barbed fittings for all hose connections • Touch-pad waste management control • Heavy Duty Macerator panel • Three run-dry and accidental activation • Additional dock side evacuation pick up safety features Pump Features Pump: Self-Priming Flexible Impeller with Stainless Steel Wearplate Impeller: Jabsco Nitrile compound Macerator: Stainless Steel Cutter reduces particle size to 1/8” (3mm) maximum Seal: Lip Type Ports: Intec – 1-1/2: (38mm) Hose Barb and 1-1/2” N.P.T. (Male) Outer – 1” (19mm) Hose Barb Permanent Magnet Type, Fully Enclosed with Stainless Steel Shaft Includes Run-Dry Motor: Protection Device that shuts off pump. Powder coated housing with sealed end bolts and bearings. System Features seconds to activate the pump. This eliminates the possibility of accidental operation.
- Page 44 Type III MSD Waste Management System 04/24/2019 Installation: Maintenance: The holding tank should be located close to the toilet. Flush system with clean water to remove any build up of sludge A proper seacock is required if the discharge thru-hull is posi- or debris. It is recommended that this process be completed at tioned below the waterline. least once a year. Please reference 18590 Series Macerator datasheet servicing section for details. Both the discharge thru-hull and the holding tank are installed to prevent a potential siphon. Contact a marine plumber or Jabsco Winter Storage: technical support specialist for installation assistance. Empty the complete system of all water making sure pipe work and pump are completely free of waste. Mount on a strong flat surface. Note: the area of installation needs to support the weight of the unit and its contents. Four mounting feet (included) need to be attached to the plat- form with four machine or lag screws and four flat washers. Plumbing: Each tank contains: • 1 x 1 ½” deck pump out – evacuation pickup tube (Install to dockside pump-out deck plate) • 1 X 1 ½” inlet port – from toilet system • 1 x 3” O-ring sealed inspiration hatch • 1 x 1” vent* - connect to vent outlet usually sited high on a The fuses for both the vessel’s hull near the gunwale marine head and the waste...
- Page 45 Sailfish Boats Marine Vinyl 04/24/2019 Legend Failure to care for your vinyl properly, or use of improper Step-by-Step Cleaning Instructions cleaners may void your warranty & damage your vinyl. Type of Stain Steps: A. Medium-Soft General Care brush, warm soapy Dirt Build-Up water, Rinse / Dry Ballpoint Ink* Do’s & Don’ts B. Vinyl Finish Vinyl...
-
Page 46: Galley Cook Top Stove
Galley Cook Top Stove 04/24/2019 320 EXP Galley Cook Top Stove Kenyon B41605 Caribbean 1 Burner • Smooth black glass with white graphics • Rounded edged ceramic glass • Durable ceramic glass is easy to clean • Heat-limiting cooking surface protects for safety • “On” & “Hot” burner indicator lights • Push-to-turn knob control • ADA Compliant • UL / C-UL Approved • 120V • 3-Year product replacement warranty Owner’s manual download; http://www.cookwithkenyon.com/wp-content/uploads/2014/07/143117-2017.pdf FISHING FOCUSED. FAMILY FRIENDLY.™... - Page 47 Sailfish 320 EXP 04/24/2019 Isotherm CRUISE 42 Stainless Steel (INOX) Small CRUISE Marine Fridge The Isotherm Cruise 42 Stainless Steel is a unique refrigerator that can fit locations with limited depth because of its remote-mount compressor. The CR42 has 1.5 cubic feet of storage with room for tall bottles to stand upright inside the fridge due to its ‘right-sized’ freezer compartment. • Volume: 42 liters (1.5 cubic feet) • Silent, highly efficient, fan cooled 12/24V Danfoss / Secop re- mote-mount compressor (type DB35F) • Mounting frames for a complete flush integration • 316 grade brushed stainless steel doors • Exclusive, complete stainless steel design (doors and handles) • 4 liter ‘right size’ freezer compartment allows tall bottles to stand upright in fridge interior For More information, click here or check your Owner’s Packet for your user manual. FISHING FOCUSED. FAMILY FRIENDLY.™ www.SailfishBoats.com...
- Page 48 Sailfish 320 EXP 04/24/2019 Salvinco’s Stainless Muave’ 0.7 Cu. Ft. Microwave Dimensions: Exterior: 17.3” W x 10.2” H x 13.2” D Specifications: Capacity: 0.7 Cu. Ft. Power: input 1,150 watts Cooking Power: 700 watts, 2460MHz Voltage: 120 Volts AC, 60 Hz, Single Phase 1050 • Push Button Door - positive lock • 10” Diameter Rotating Glass Table • Interior Oven Light • 10 Power Levels • Six One-Touch Menu Buttons: Popcorn; Potato; Pizza; Frozen Veggies; Beverage; and Dinner Plate • Express Cook Buttons: 1-6 Minutes • Other Touch Pad Buttons: Time Cook; Time Defrost; Weight Defrost; Kitchen Timer; Clock • 30-Second Quick Start Button • Child Safety Control Panel Lock - prevents accidental operation • One Year Warranty •...
-
Page 49: Aluminum Cosmetic Corrosion (Pitting)
Caring for Aluminum Cosmetic Corrosion (Pitting) 04/24/2019 The information provided is designed to the amount of preventative maintenance other abrasive impacts can break the give you a thorough understanding of the performed. Our goal is to slow down or anodized coating. factors that can impact the appearance of stop this natural phenomenon we call your anodized aluminum. By using this in- pitting (or corrosion). Chemical Attack formation, we hope to help you enhance Corrosive chemicals containing high the beauty and value of our products. Anodized Aluminum concentrations of acids or alkalis will The aluminum on your boat has been remove the anodized coating. Solutions What Causes It? anodized. This creates a very hard pro- containing chlorine, salts, or ammonia Corrosion is a natural phenomenon that tective seal on the surface of the alumi- are all harmful to the anodized aluminum affects metals by either a chemical or num to protect it as much as possible on your boat. Many common household electrochemical reaction. The rate at from pitting. When the anodized coating cleaners contain chemicals that will which aluminum corrodes depends great- is broken and raw aluminum is exposed,... - Page 50 Caring for Aluminum 04/24/2019 Tips Protective Products is subjected to, and how often you use and wash your boat. Follow the applica- Avoid the use of bleach or chlorides There are many different products tion guidelines provided with the protector to clean the aluminum or nearby com- available to protect aluminum. Some you choose. ponents. Chlorides can leach onto the are designed to seal and protect before aluminum when used nearby. problems occur and others are designed Harmful Cleaners to use after pitting has appeared. Avoid abrasive cleaning products. Never Bleach (Chlorox, etc.) use steel or brass wool, wire brushes, While these products are effective, they Mild abrasive cleaners (Ajax, Comet, polishing wheels, rubbing or polishing are not one time solutions. Metal protec- Soft Scrub, Rubbing Compounds, etc.) compounds. These items will remove the tors must be reapplied on a regular basis. Strong cleaners (409, Engine anodizing and lead to pitting. How often a protector should be used Degreasers, Bilge Cleaners, Teak varies according to the protector you Cleaners, Bottom Cleaners, etc.) choose, the types of exposure your boat Below are some metal protection products that are readily available at marine retailers.
-
Page 51: Caring For Stainless Steel
Caring for Stainless Steel 04/24/2019 Will Stainless Steel The information provided is designed to 1% Chromium and 8% Nickel, while 316 give you a thorough understanding of the Contains 16% Chromium and 10% Nickel Discolor? factors that can impact the appearance and 2% Molybdenum. The Molybdenum is of your anodized aluminum. By using this added to help resist corrosion to chlorides Cleaners that are typically used with information, we hope to help you enhance (like sea water and de-icing salts). cement, grout and stone, etc., may contain the beauty and value to our products. Muriatic Acid. Stainless Steel is not Can Stainless Steel resistant to Muratic Acid. MURIATIC ACID What Makes Stainless SHOULD NOT BE USED IF STAINLESS rust? STEEL IS PRESENT. It is not even nec- Steel Stainless? essary that the acid touch the Stainless Not in the way steel rusts. Steel will Steel, just the “fumes” from it will cause a Oxygen is the key element in causing rust, discolor, bubble and flake from red oxide discoloration of the Stainless Steel. Other or red oxide on steel and other metals. -
Page 52: Windshield, Window And Hatch Care Instructions
Windshield, Window and Hatch Care Instructions 04/24/2019 Regular cleaning with fresh water and specific for the purpose. Use a soft rag spray paint. Touch up kits are available a soft cloth will keep and protect your and wash off the plastic windshield first from the factory. Boat top clips – never windshield, window, or hatch for years. with lukewarm water to avoid scratching slide along windshield framework. the surface. GLASS To change clip location, snap on and off WINDOW CHANNELS the aluminum top track. Use commercially available glass cleaners or a mixture of fresh water and Clean window channels with mild deter- SIDE WING VENT vinegar. Do not use abrasives, harsh gent only. Channels can be sprayed with ADJUSTERS chemicals, or metal scrapers. Regular silicon aerosol while sliding the glass cleaning will help assure clarity of the back and forth. Use care when opening and closing glass for safe boating. vent. Do not force. STAINLESS STEEL PLASTIC TYPE Polish with commercially available metal Never ground windshield with any elec-... -
Page 53: Gel Coat
Gel Coat 04/24/2019 Your Boat’s Note: Do not use caustic or highly alkaline polishing with a self-cleaning marine or (high pH) cleaners or those containing automotive wax. Waxing in the fall and Gel Coat Finish ammonia. These type of cleaners may spring is generally recommended to main- Congratulations! You are the proud owner darken white or off-white weathered tain and restore most of the original gloss. of a new power or sail boat. You are also gel coat surfaces. A chemical reaction If the surface has not been maintained and the owner of a new Integrity® gel coat producing staining occurs if these type of has weathered badly, and if cleaning and finish on the hull and/or topside, and we cleaners are used on weathered gel coat. waxing does not restore the finish satisfac- would like you to be as proud of it as we However, the stain may be removed with torily, compounding will be required. are. That beautiful, shiny new color you a rubbing compound or by lightly sanding love is the result of many years of gel coat Compounding with 400 grit sandpaper followed by an research, testing and development. application of rubbing compound and a Please see your marine dealer for advice. thorough waxing. Polishing and compound (fine abrasive) or But as proud as we are of the gel coat, no rubbing compound (coarser abrasive) is finish is totally impervious to chemicals Cleaning... - Page 54 Gel Coat 04/24/2019 Repairs Discolored areas are very shallow in repaired. Apply slightly more mixture to depth, literally right on the surface. The avoid having to fill the damaged section During the life of your boat, some damage discoloration may be removed by gently a second time. Allow the patch to harden to the gel coat surface is unavoidable. wet-sanding the affected areas only by thoroughly for a minimum of two to three We recommend repairs done by trained, using 600 grit, wet or dry specially treated hours. experienced professionals at your local waterproof sandpaper. It’s important to marine dealer. always sand in one direction, this includes Using a fine grit “wet or dry” sandpaper on the curves too. Use plenty of water to cool a sanding block, wet-sand the patch until Scratches and clean the sandpaper and cut back on it is level with the surrounding surface. dust. After you are finished sanding, dry Finish with a marine or automotive rubbing If the scratch is in the gel coat surface, the areas and verify all the discoloration compound using the same approach as not penetrating the fiberglass, use an has been removed. If not, repeat the used for the scratches. automotive polishing compound and rub it process. out. Apply the compound by hand using a Refinishing damp rag or by using a power buffer. The After all the discoloration has been scratch may not entirely disappear, but it For a severely scratched or weathered...
Need help?
Do you have a question about the 320 EXP and is the answer not in the manual?
Questions and answers