Sage the Fast Slow Pro BPR700 Instruction Book
Hide thumbs
Also See for the Fast Slow Pro BPR700:
- User manual ,
- Quick manual (40 pages) ,
- User manual (172 pages)
Advertisement
Quick Links
Advertisement

Related Manuals for Sage the Fast Slow Pro BPR700


Summary of Contents for Sage the Fast Slow Pro BPR700
- Page 1 Fast Slow Pro ™ Instruction Book – BPR700...
-
Page 2: Table Of Contents
IMPORTANT Contents SAFEGUARDS READ ALL INSTRUCTIONS 2 Sage Recommends Safety First ® BEFORE USE AND SAVE 8 Components FOR FUTURE REFERENCE 10 Important Safety Information for your Fast Slow Pro™ • Do not let children near the 14 Functions pressure cooker when in use. - Page 3 In particular, use a body do not fill the cooker to more and a lid from Sage indicated ® than half of its capacity. as being compatible.
- Page 4 • As the colours of the wire • Always insert the connector may not correspond with the end of the power cord into coloured markings which the appliance inlet before identify the terminals in inserting power plug into the your plug, please refer to power outlet and switching on the following: appliance.
- Page 5 • Do not place this appliance • Do not place food or liquid on or near a hot gas or electric directly into the stainless steel burner, or where it could touch base. Only the removable a heated oven. cooking bowl is designed to contain food or liquid.
- Page 6 OFF position, switch off If damaged or maintenance at the power outlet, remove the other than cleaning is required, plug and allow all parts to cool please contact Sage Customer ® before attempting to move the Service on 0808 178 1650 |...
- Page 7 The symbol shown • The use of attachments not indicates that this sold or recommended by Sage ® appliance should not be may cause fire, electric shock disposed of in normal or injury. household waste. It should be • This appliance is for household taken to a local authority waste use only.
-
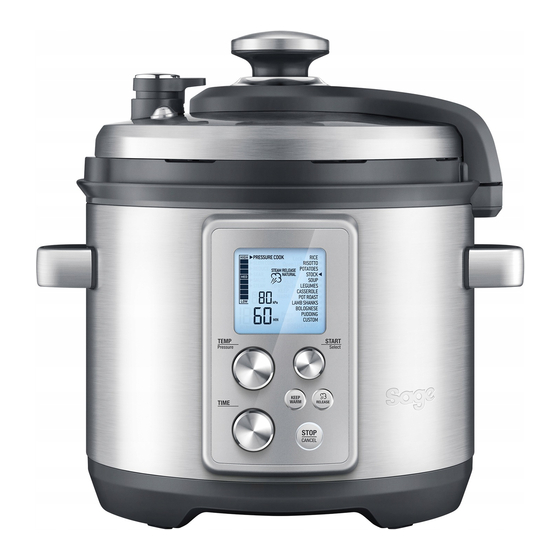
Page 8: Components
Components... - Page 9 A. Pressure Release Valve K. Time Dial Automatically controls the rate at which L. Keep Warm steam is released from the cooker. Holds food at safe serving temperatures for B. Pressure Safety Valve up to 2 hours. Can be automatically enabled at the end of pressure or slow cook cycles.
-
Page 10: Important Safety Information For Your Fast Slow Pro
IMPORTANT SAFETY INFORMATION FOR YOUR FAST SLOW PRO™ This appliance cooks under pressure and must be operated and maintained as described in this book. The trapped air pressure inside the pressure cooker may cause a hazardous situation if not operated and maintained as described in this manual. COOKING BOWL CAPACITY NEVER FORCE THE LID CLOSED •... - Page 11 • Always ensure the safety locking pin is AUTOMATIC HANDS-FREE STEAM properly aligned within the opening of the lid RELEASE arm and is not restricted in any way. The cooker features automatic hands-free steam release that will occasionally release steam as the cooker pressurises as well as automatically start the steam release cycle after cooking.
- Page 12 PREPARING THE FAST SLOW PRO™ 5. The lid can only be inserted one way and must be assembled correctly for the cooker 1. Remove and safety discard any packaging to operate. Position the lid so the steam material, promotional labels and tape from release valve cover is to the rear of the the cooker.
- Page 13 6. Clean and dry the underside of the 8. Insert the connector end of the power removable cooking bowl and the cord into the cooker base, ensuring it is temperature sensor, making sure there completely dry. Insert the power plug in are no unwanted materials on the surface.
-
Page 14: Functions
These can be selected using the STEAM RELEASE button on the control panel Functions during the set up and steam release cycles. Once selected, the pressure release valve will automatically release the steam at the end SMART SETTINGS of the pressure cooking cycle. The Fast Slow Pro™... - Page 15 ALTITUDE ADJUST Pressure builds and increases when the temperature inside the cooking vessel exceeds boiling point. As altitude increases, the temperature at which water boils decreases as a result of the drop in air pressure. This creates very different conditions for cooking when using a pressure cooker.
- Page 16 COOKER SETTINGS OVERVIEW SETTING MENU RECOMMENDED SETTING SUITABLE FOR PRESSURE RICE 50 kPa Brown Rice COOK 10 MINS White Rice AUTO PULSE Quinoa & Ancient Grains RISOTTO 40 kPa Aborio Rice 7 MINS Carnaroli Rice AUTO QUICK Vialone Rice POTATOES 60 kPa Whole &...
- Page 17 SETTING MENU RECOMMENDED SETTING SUITABLE FOR SLOW COOK STOCK Beef Stock 4:00 HRS Chicken Stock Vegetable Stock SOUP Vegetable Soup 4:00 HRS Meat Soup KEEP WARM LEGUMES Chickpeas 6:00 HRS Cannelini Beans Red Kidney Beans Green & Brown Lentils CASSEROLE All Stewing meat such as Gravy Beef, Chuck &...
- Page 18 PRESSURE COOK 5. The steam icon on the LCD screen indicates the preset steam release method The PRESSURE COOK setting is a great for the selected setting. Press the STEAM option for cooking succulent roasts, RELEASE button to select between ‘AUTO flavoursome casseroles, delicious soups and QUICK’, ‘AUTO PULSE’...
- Page 19 8. Ensure the pressure release valve is placed 12. The time can be adjusted during the on the lid, is properly seated in position pressure cook cycle by turning the TIME and facing the lid knob. dial. The cycle can be paused at any time by pressing the STOP/CANCEL button.
- Page 20 SLOW COOK to select or deselect the function. 6. Place food into the removable cooking bowl. The SLOW COOK setting has cooking Ensure there is at least 1L of combined food profiles designed for long cook times at low and liquid in the bowl. temperatures.
- Page 21 no longer illuminate. • The key to creamy risotto is toasting the rice grains before the liquid is added. For best TIPS FOR PRESSURE results, use SAUTÉ setting to toast the & SLOW COOKING grains prior to cooking. Stir rice grains for 2–3 minutes or until the edges of the rice grains become transparent and then Rice...
- Page 22 • For best results, do not overfill the cooking Casserole bowl. The total volume of water, bones • The PRESSURE & SLOW COOK and/or aromatics should not exceed the CASSEROLE setting is ideal to cook MAX level marking inside the removable a selection of meats, vegetables and chicken cooking bowl.
- Page 23 • Choose lamb shanks that will fit easily into • Arrange ramekins on a trivet inside the removable cooking bowl or ask your the removable cooking bowl. butcher to trim shanks. • Do not overfill the cooking bowl. The total •...
- Page 24 5. Press the START/SELECT dial to 4. Once the cooker has reached temperature, commence cooking. The STOP/CANCEL ‘PREHEATING’ will go out. Place food to button backlight will illuminate red, be cooked into the removable cooking bowl. the LCD screen will illuminate orange 5.
- Page 25 6. The timer will start counting up. The cycle 6. Close the lid but do not lock. can be paused at any time by pressing the 7. Remove the pressure release valve from STOP/CANCEL button. To end the cycle the lid. press and hold STOP/CANCEL for 8.
-
Page 26: Care & Cleaning
WARNING Care & Cleaning Do not immerse the body, power cord or power plug in water or any other liquid as this may cause electrocution. The cooker bowl, outer body, lid and accessories should be thoroughly cleaned CLEANING THE LID before every use. - Page 27 CLEANING THE STEAMING TRAY AND TRIVET 1. Wash all accessories in warm soapy water with a soft sponge or soft plastic scouring pad. Rinse and dry thoroughly. Do not use abrasive cleansers, metal scouring pads or metal utensils to clean any of the accessories as they may damage the surfaces.
-
Page 28: Troubleshooting
Follow step 8 on page 19. • Add more liquid/food to the bowl. There should be a minimum of 1 litre combined food and liquid. • If problem persists, call Sage Customer Service. ® The cooker automatically switches •... - Page 29 Sage Appliances GmbH Johannstraße 37, 40476 Düsseldorf, Deutschland Für den Kundendienst besuchen Sie bitte www.sageappliances.com BRG Appliances Limited Unit 3.2, Power Road Studios, 114 Power Road, London, W4 5PY Freephone (UK Landline): 0808 178 1650 Mobile Calls (National Rate): 0333 0142 970 www.sageappliances.com...
Need help?
Do you have a question about the the Fast Slow Pro BPR700 and is the answer not in the manual?
Questions and answers