Table of Contents
Advertisement
Quick Links
1.
INTRODUCTION .........................................................................................................................2
2.
MINIMUM SYSTEM REQUIREMENTS.......................................................................................2
3.
INSTALLATION...........................................................................................................................3
3.1.
Installing drivers and software .............................................................................................3
3.1.1.
Installation in Windows 7 / Vista .............................................................................4
3.1.2.
Installation in Windows XP......................................................................................6
3.1.3.
Installation on Mac ..................................................................................................7
3.2.
Connecting and disconnecting your DJ Console Mk4.........................................................9
4.
OVERVIEW................................................................................................................................10
4.1.
The top panel.....................................................................................................................10
4.2.
The back panel ..................................................................................................................11
4.3.
The front panel...................................................................................................................12
4.4.
The top panel skin and sub-skin........................................................................................13
5.
THE DJ CONSOLE MK4 CONTROL PANEL ..........................................................................15
5.1.
Accessing the control panel on PC....................................................................................15
5.2.
Accessing the control panel on Mac..................................................................................15
5.3.
Using the DJ Console Mk4 control panel ..........................................................................15
5.3.1.
General control panel settings ..............................................................................16
5.3.2.
Main tab ................................................................................................................17
5.3.3.
ASIO tab (not available on Mac)...........................................................................17
5.3.4.
Advanced tab .......................................................................................................18
5.3.5.
About tab ..............................................................................................................19
6.
OUTPUT OPTIONS...................................................................................................................19
6.1.
Connecting speakers and/or an external mixer to your DJ Console Mk4 .........................19
6.2.
Connecting headphones....................................................................................................20
7.
INPUT OPTIONS.......................................................................................................................20
7.1.
Connecting external audio sources ...................................................................................20
7.2.
Connecting a microphone..................................................................................................21
8.
DJ CONSOLE MK4 FEATURES ..............................................................................................21
8.1.
Jog wheels.........................................................................................................................21
8.2.
Faders (sliders)..................................................................................................................22
8.3.
Play/Pause, and Cue buttons ............................................................................................22
8.4.
Rewind and Fast forward buttons......................................................................................22
8.5.
Pitch settings .....................................................................................................................23
8.6.
Source buttons...................................................................................................................23
8.7.
Shift button (for loops/effects), and buttons 1-4 ................................................................23
8.8.
Load A / Load B buttons ....................................................................................................24
8.9.
Listen A / Listen B buttons.................................................................................................24
8.10. Browser buttons: Up and Down.........................................................................................24
8.11. Cue to Mix knob.................................................................................................................24
8.12. Equalization knobs.............................................................................................................24
9.
DJING BASICS .........................................................................................................................25
10.
CONFIGURATION IN MIDI MODE ...........................................................................................26
11.
FAQ .........................................................................................................................................29
12.
TECHNICAL SUPPORT............................................................................................................30
12.1. Warranty information .........................................................................................................31
12.2. Additional warranty provisions...........................................................................................31
ENVIRONMENTAL PROTECTION RECOMMENDATION.................................................................32
CONTENTS
Advertisement
Table of Contents

Related Manuals for Hercules MK4


Summary of Contents for Hercules MK4
-
Page 1: Table Of Contents
ASIO tab (not available on Mac)................17 5.3.4. Advanced tab .......................18 5.3.5. About tab ......................19 OUTPUT OPTIONS........................19 6.1. Connecting speakers and/or an external mixer to your DJ Console Mk4 ......19 6.2. Connecting headphones....................20 INPUT OPTIONS........................20 7.1. Connecting external audio sources ...................20 7.2. -
Page 2: Introduction
DJ Console Mk4 is a high-performance DJ controller that opens up the doors to mixing music on your computer. Intuitive and fun to use, DJ Console Mk4 lets you put your own mark on your favorite music and share it with your friends to host great parties or make creative mixes. -
Page 3: Installation
Mac, make sure that your user account in Mac OS is set to Administrator. Do not install the DJ Console Mk4 with a Guest account: the installation would fail, as you need permission to write in the Documents folder to install the VirtualDJ software. -
Page 4: Installation In Windows 7 / Vista
- Accept to install the software at each of these prompts to proceed with the installation. A dialog box appears, prompting you to connect DJ Console Mk4 to your computer's USB port. - Connect DJ Console Mk4 to your computer's USB port, then click Next. - Page 5 You are notified when the installation is complete. The DJ Console Mk4 icon appears in your Windows taskbar, next to the clock, indicating that your DJ Console Mk4 is installed and ready for use: Please note that in Windows 7, you must click on the Windows taskbar in order to accept that the DJ Console Mk4 icon be displayed in the taskbar.
-
Page 6: Installation In Windows Xp
VirtualDJ serial number is indicated on a sticker with a barcode found on the underside of your DJ Console Mk4. The VirtualDJ serial number is in the following format: XXXX-XXXX-XXXXX/Mk4. For more information on configuring your DJ Console Mk4, please refer to chapter 5. The DJ Console Mk4 control panel. -
Page 7: Installation On Mac
You are notified when the installation is complete. The DJ Console Mk4 icon appears in your Windows taskbar, next to the clock, indicating that your DJ Console Mk4 is installed and ready for use: You should now install the VirtualDJ DJC Edition mixing software on your computer: - In the installation menu, click Install VirtualDJ DJC Edition and follow the on-screen instructions. - Page 8 Once files have been copied to your computer, the drivers will be installed. A dialog box appears, prompting you to connect DJ Console Mk4 to your computer's USB port. - Connect DJ Console Mk4 to your computer's USB port.
-
Page 9: Connecting And Disconnecting Your Dj Console Mk4
USB hot-plug function (although you should never do so when DJ Console Mk4 is playing or recording music, or else the application will terminate and display an error message). -
Page 10: Overview
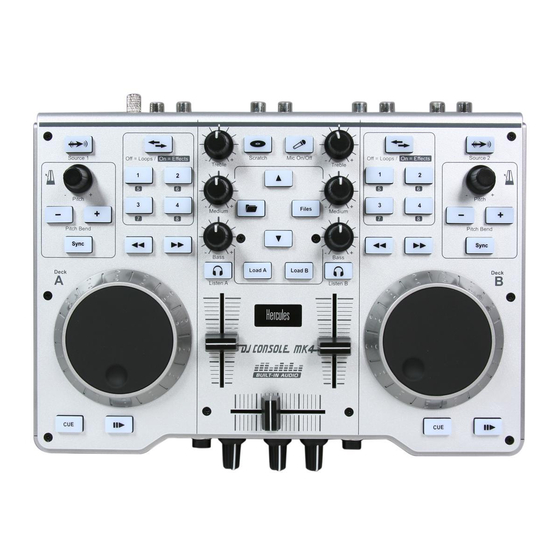
Your DJ Console Mk4 features a variety of controls allowing you to interact with DJ software. There are two sets of these controls, as the left and right sections of the DJ Console Mk4 each correspond to a separate deck in DJ software applications. Descriptions of the default function of each control are provided below. -
Page 11: The Back Panel
4.2. The back panel DJ Console Mk4 has a USB connector on its back panel, allowing you to connect it to your computer. As DJ Console Mk4 is USB bus-powered, no external power source is required. -
Page 12: The Front Panel
2 (please see the front panel description, below). When the microphone input is selected for inputs 1-2 in the DJ Console Mk4’s software control panel, all of the input level indicator LEDs for inputs 1-2 on the device’s rear panel are off, indicating that the microphone is enabled. For more information on selecting input levels for inputs 1-2 and 3-4, please refer to chapter 5.3.1. -
Page 13: The Top Panel Skin And Sub-Skin
To install the flexible sub-skin underneath the rigid transparent skin, follow these steps (as shown in the diagrams found after the list of steps): 1. Carefully remove the 11 caps from the DJ Console Mk4’s top panel (6 EQ knob caps, 2 pitch knob caps, 3 fader caps). - Page 14 6. Replace and re-tighten the 10 screws holding down the rigid transparent skin. Be careful not to over-tighten the screws, to avoid the risk of cracking the rigid transparent skin! 7. Carefully replace the 11 caps on the DJ Console Mk4’s top panel (6 EQ knob caps, 2 pitch knob caps, 3 fader caps).
-
Page 15: The Dj Console Mk4 Control Panel
DJ Console Mk4, check for updates for your DJ Console Mk4, or exit the control panel. Please note that in order to check for updates, you must have an active Internet connection. -
Page 16: General Control Panel Settings
ASIO mode manually before launching the application. You can only switch between modes when playback is stopped. - Select Device (Mac only): If you have more than one DJ Console Mk4 controller connected to your Mac, you can switch between their control panels here. -
Page 17: Main Tab
Steinberg company. It allows a variety of programs to communicate with different sound cards and recognize all of the inputs and outputs available on the sound card, with short latency. Your DJ Console Mk4 is ASIO 2.0 compliant. When in ASIO mode, you can adjust the following settings: Sample Rate, Sample Size, ASIO Buffer Size. -
Page 18: Advanced Tab
- This tab allows you to set the MIDI channel for controls (1, by default), in the event that there is some conflict between your DJ Console Mk4 and another MIDI device. If you have more than one Hercules device installed on your system, the MIDI channel numbers are assigned by order of connection, i.e. -
Page 19: About Tab
With the included VirtualDJ software, you can play your mix for the audience over a hi-fi system connected to outputs 1-2 on your DJ Console Mk4, for example, and preview upcoming songs on outputs 3-4, using your headphones or monitoring speakers. -
Page 20: Connecting Headphones
Your DJ Console Mk4 features 2 stereo audio inputs on its back panel (2 pairs of 2 mono RCA connectors). Define your audio source type in the DJ Console Mk4 control panel – it can be phono level, consumer line level (-10dBv), pro line level (+4dBu) or boosted line level (+8dBu) –... -
Page 21: Connecting A Microphone
DJ Console Mk4 without any problem. You can use the two Source buttons on your DJ Console Mk4 (Source 1 for Deck A, Source 2 for Deck B) to control the audio input for the corresponding deck. By default, the input is set to computer audio tracks: simply press the Source button to switch to the external audio source. -
Page 22: Faders (Sliders)
8.2. Faders (sliders) Cross fader Your DJ Console Mk4 plays 1 stereo music track per deck (2 stereo music tracks simultaneously). The cross fader moves between the left and right decks, allowing the DJ to adjust the mix between the 2 tracks. -
Page 23: Pitch Settings
8.5. Pitch settings - 2 Pitch encoders (knobs): you can use the pitch encoders to adjust the playback speed of a track, increasing or reducing its BPM (Beats Per Minute) rate, in order to make dancing easy by setting new music tracks at the same BPM as the previous track so that dancers don’t need to change their rhythm during the transition from one track to another. -
Page 24: Load A / Load B Buttons
- Button 6: in effects mode, applies the Beatgrid effect. - Button 7: in effects mode, applies the FlippinDouble effect. - Button 8: in effects mode, applies the Overloop effect (Windows); and the last effect used (Mac). 8.8. Load A / Load B buttons Use these buttons to load the highlighted music track in the VirtualDJ software on Deck A or Deck B, respectively. -
Page 25: Djing Basics
While songs are playing, the DJ can also use the effects and looping features on the DJ Console Mk4 to call attention to different parts of songs or their mix, to pump up the crowd and keep them dancing: the creative possibilities for mixing are endless – and with a bit of practice, you’ll be mixing like a pro in no time! User Manual –... -
Page 26: Configuration In Midi Mode
Many music software applications that incorporate MIDI control feature a “learning mode”: simply click a button, turn a knob or jog wheel or move a slider on your DJ Console Mk4 to link that control to a control in the software. Some popular applications to include a MIDI learning mode include: Native Instruments Traktor, Ableton Live, Mixvibes, and Image Line Deckadance. - Page 27 Toggling Pressed – “0” Toggling Pressed – “0” On/Note On/Note Output : Released Output : Released Play_DB Note Button- “127” Listen_DB Note Button- “127” On/Note On/Note Toggling Pressed – “0” Toggling Pressed – “0” Output : Released Output : Released Load_DB Note Button-...
- Page 28 Input Input K1_DB Note 0 : OFF – K2_DB Note 0 : OFF – On/Note Toggling 127: ON On/Note Toggling 127: ON Input Input K3_DB Note 0 : OFF – K4_DB Note 0 : OFF – On/Note Toggling 127: ON On/Note Toggling 127: ON...
-
Page 29: Faq
Yes, you can mix audio CDs directly from your CD/DVD-ROM drive in VirtualDJ. Simply load the CD-Audio track in your playlist on a DJ Console Mk4 deck, as if it were an audio file, and you can mix it immediately. -
Page 30: Technical Support
12. TECHNICAL SUPPORT If you encounter a problem with your product, please go to http://ts.hercules.com and select your language. From there you will be able to access various utilities (Frequently Asked Questions (FAQ), the latest versions of drivers and software) that may help to resolve your problem. If the problem persists, you can contact the Hercules products technical support service (“Technical... -
Page 31: Warranty Information
Where authorized by applicable law, the full liability of Guillemot and its subsidiaries (including for indirect damages) is limited to the repair or replacement of the Hercules product. The consumer’s legal rights with respect to legislation applicable to the sale of consumer goods are not affected by this warranty. -
Page 32: Environmental Protection Recommendation
Copyright © 2010 Guillemot Corporation S.A. All rights reserved. This publication may not be reproduced in whole or in part, summarized, transmitted, transcribed, stored in a retrieval system, or translated into any language or computer language, in any form or by any means, electronic, mechanical, magnetic, photocopying, recording, manual or otherwise, without the prior written permission of Guillemot Corporation S.A.
Need help?
Do you have a question about the MK4 and is the answer not in the manual?
Questions and answers