
Related Manuals for flamco Meibes MeiFlow Top S MF


Summary of Contents for flamco Meibes MeiFlow Top S MF
- Page 1 MeiFlow Top S MF Installation and operating instuction www.flamcogroup.com/manuals...
- Page 2 Manual MeiFlow Top S...
- Page 3 Abbreviation English Flow line Return line Female thread Male thread Chap. Chapter Pos. Position We reserve the right to change designs and technical specifications of our products.
- Page 4 Manual MeiFlow Top S...
-
Page 5: Table Of Contents
Table of contents Basic information ....................7 Safety instructions ......................7 Intended use ........................9 1.2. Intended use ............................9 1.2.2 Improper use ............................9 Device designation ......................9 Residual hazards ......................10 What to do in the event of breakdown or leaks ..............10 Spare and wear parts ...................... - Page 6 Manual MeiFlow Top S...
-
Page 7: Basic Information
1. Basic information Please follow these safety instructions carefully to eliminate hazards, personal injury and material damage. The installation, commissioning, inspection, maintenance and servicing may only be performed by an approved, specialist company. Please familiarise yourself with all the parts and their handling before starting work. - Page 8 Target group These instructions are intended exclusively for authorised trained experts. Only trained experts or installers authorised by the respective competent utility companies are permitted to work on heating systems and domestic water, gas and electric circuits. Regulations When carrying out work, you must comply with: The statutory accident prevention regulations, The statutory environmental protection regulations, The German Employer's Liability Insurance Association regulations,...
-
Page 9: Intended Use
1.2 Intended use 1.2. Intended use All instructions in the operating instructions must be followed and the maintenance plan adhered to. Any deviation from the intended use may cause hazards and is fundamentally not permitted. The components listed in the following instructions are intended for use in heating systems according to DIN EN 12828. -
Page 10: Residual Hazards
1.4 Residual hazards The safety and warning information draws attention to residual hazards that cannot be avoided due to the design and construction of the device. Please always observe the measures shown for avoiding these hazards. The device has been built according to the state of the art and in accordance with recognised safety regulations. -
Page 11: Requirements On Trained Engineers
1.7 Requirements on trained engineers A trained expert has undergone advanced technical training and has sufficient experience to independently perform complicated tasks or work associated with residual hazards. Such experience will in each instance refer to a specific specialism, e.g. maintenance, working on electrical systems, systems mechanic for sanitary, heating and air conditioning technology. -
Page 12: Description And Functions
2. Description and functions 2.1 Technical data Heating circuit manifold including wall brackets, either hydraulically separated or with low differential pressure for max. number of heating circuits Connection pairs at top Connection pairs at bottom Total width (E) 500 mm 750 mm 1000 mm Clearance of bracket (F) - Page 13 We reserve the right to change designs and technical specifications of our products.
-
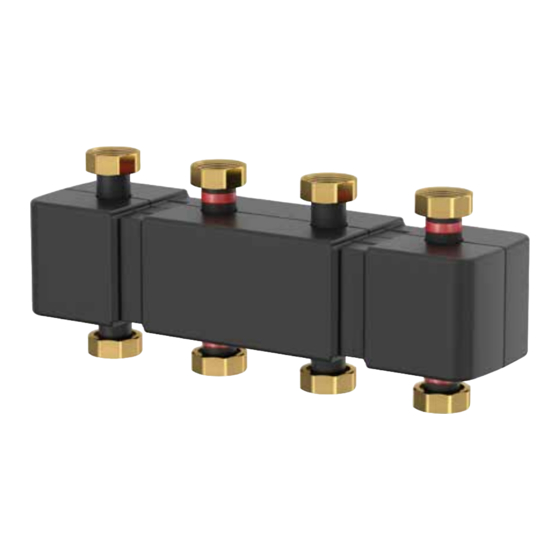
Page 14: Dimensions, Using The Example Of 3-Way Manifold
2.2 Dimensions, using the example of 3-way manifold Manual MeiFlow Top S... -
Page 15: Functions, Using The Example Of 3-Way Manifold
2.3 Functions, using the example of 3-way manifold Pos. Designation Description thermal insulation Robust insulation shells with locking mechanism minimise the heat losses. Wall installation brackets (included in delivery) surround the insulation. The bracket is thermally separated and acoustically insulated. Identification of the hydraulically The connections which are hydraulically connected to one another inside are colour coded. -
Page 16: Installation And Operation
3. Installation and operation 3.1 Installation 3.1.1 General installation instructions: • Sufficient space for installation, maintenance and service • Tighten all screw fittings if necessary during a pressure test or following the initial heating 3.1.2 Configuration and scope of delivery of wall bracket Legend: Wall bracket for heating circuit manifold bar up to 70 ... -
Page 17: Adjustable Wall Clearance For Wall Bracket
3.1.3 Adjustable wall clearance for wall bracket Two-stage Pos. A or B Pos. A) For wall clearance of thermal insulation 29 mm and axial distance from the wall: 96.5 mm Pos. A) For wall clearance of thermal insulation 68 mm and axial distance from the wall: 135.5 mm For other dimensions: see chapter 2.2 3.1.4 Installation of heating circuit manifold on the wall We recommend first securing the manifold with the corresponding wall brackets (included with... - Page 18 Installation steps, using the example of 3-way manifold: Attach wall brackets to the wall, taking dimensions in Chap. 2 into account. Set the clearance to the wall by adjusting the internal brackets (see also Chap. 3.1.2) Insert the manifold bar with insulation into the mounting Fix manifold bar in place by tightening the remaining internal brackets Connect the hydraulics, observing the correct assignment of FL/RL connecting pieces Manual MeiFlow Top S...
-
Page 19: Installation Of Pump Groups On The Heating Circuit Manifold
3.1.5 Installation of pump groups on the heating circuit manifold The pump group is installed on the flat sealing screw fittings of the heating circuit manifold. Secure the manifold appropriately to ensure it is capable of taking the weight of the pump groups. Caution: This is only possible if the lower insulation shell can be attached afterwards from the rear. -
Page 20: Commissioning And Servicing
4. Commissioning and servicing 1. Check the leak tightness of the system 2. Flush, fill and bleed the pipework (with filling water in accordance with VDI 2035) Operation: Please note the application limits: • see Chap. 1 Maintenance: We recommend performing regular leak-tightness tests. Manual MeiFlow Top S... - Page 21 +32 50 31 67 16 +49 342 927 130 050 042 89 95 info@flamco.be info@meibes.com vvs@flamco.se China Germany Switzerland Flamco Heating Accessories Flamco GmbH Flamco AG (Changshu) Ltd, Co. +49 2104 80006 20 +41 41 854 30 50 512 528 417 31 info@flamco.de info@flamco.ch yecho@flamco.com.cn...
- Page 22 Copyright Flamco B.V., Bunschoten, the Netherlands. No part of this publication may be reproduced or published in any way without explicit permission and mention of the source. The data listed are solely applicable to Flamco products. Flamco B.V. shall accept no liability whatsoever for incorrect use, application or...
Need help?
Do you have a question about the Meibes MeiFlow Top S MF and is the answer not in the manual?
Questions and answers