Table of Contents
Advertisement
Available languages
Available languages
Quick Links
VDLT17
INSTRUCTION MANUAL
Texto en español, página 12
WE'RE HERE TO HELP
Want to watch a video that
shows how easy this DIY
project will be?
Watch it now at:
SANUS.com/2953
GET IT
RIGHT
THE FIRST TIME
Follow this step-by-step
instruction manual to
speed up your installation.
Get it right the first time.
HeightFinder™ shows you
where to drill.
Check it out at:
SANUS.com/1172
Our US-based install experts
are standing by to help.
Call us at:
800-359-5520
Or, chat at:
SANUS.com/chatSP
Advertisement
Table of Contents

Related Manuals for Sanus VDLT17


Summary of Contents for Sanus VDLT17
- Page 1 GET IT RIGHT THE FIRST TIME Follow this step-by-step VDLT17 instruction manual to speed up your installation. INSTRUCTION MANUAL Texto en español, página 12 WE’RE HERE TO HELP Want to watch a video that Get it right the first time.
-
Page 2: Important Safety Instructions
If your TV, plus accessories, weighs MORE than (including accessories) 150 lbs. indicated, this mount is NOT compatible. DO NOT EXCEED Visit SANUS.com or call customer service to find a (68.0 kg) compatible mount. Wall Wood studs Solid concrete or... -
Page 3: Before You Begin
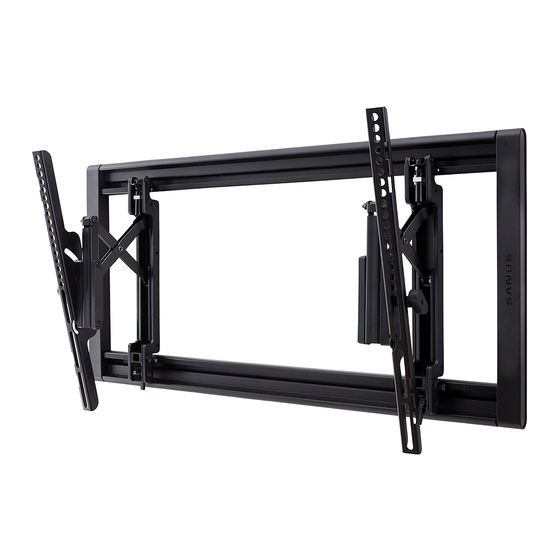
Dimensions in. [mm] TV INTERFACE 23.6in 600mm 5.9in 150mm 15.7in 3.9in 400mm 100mm WALL PLATE TOP VIEW - EXTENDED SIDE VIEW - EXTENDED 24.0in 610mm 7deg 31.3in 16.0in 796mm 406mm 12deg 15deg 15deg 15.1in 10.8in 28.7in 383mm 273mm 730mm SIMULATED 42" FLAT SCREEN TV WITH 400 MM VESA 6.8in 172mm... - Page 4 STEP 1 ATTACH TV BRACKET TO TV Parts and Hardware for STEP 1 WARNING: This product contains small items that could be a choking hazard if swallowed. Before starting assembly, verify all parts are included and undamaged. If any parts are missing or damaged, do not return the damaged item to your dealer;...
- Page 5 1.3 Attach TV Bracket Assembly to TV POSITION SECURELY TIGHTEN NO SPACER SPACER NEEDED tilt tension knob TV brackets should be oriented to TIP: the outside edges. CAUTION: Arrow points to the top of your TV. CAUTION: Make sure brackets are parallel with one another.
-
Page 6: Wood Stud Installation
/1172 7/32 in. (5.5 mm) To calculate your precise wall plate location, check out our CAUTION: Be sure you drill into the CENTER of the stud. TIP: HeightFinder at sanus.com [www.sanus.com/1172]. REMOVE TEMPLATE SECURELY TIGHTEN Open covers Close bottom cover... - Page 7 . Keep this in mind when selecting the wall plate location Min. 16 in. (40.6 cm) To calculate your precise wall plate location, check out our TIP: TIP: HeightFinder at sanus.com [www.sanus.com/1172]. DRILL REMOVE TEMPLATE 3 in. (7.6 cm) 3/8 in. (10 mm)
-
Page 8: Steel Stud Installation
1/2 in. (13 mm) To calculate your precise wall plate location, check out our Height CAUTION: Be sure you drill into the CENTER of the stud. TIP: Finder at sanus.com [www.san.us/1172]. SECURELY TIGHTEN INSTALL ANCHORS Open covers Close bottom... -
Page 9: Attach Tv To Wall Plate
HEAVY! STEP 3 You may need assistance ATTACH TV TO WALL PLATE with this step. EXTEND HANG CAUTION: Avoid potential personal CAUTION: Avoid potential personal injury or property damage! injury or property damage! For CONCRETE APPLICATIONS: TV brackets MUST remain centered in wall plate The TV brackets contain potential pinch points during operation. - Page 10 ADJUSTMENTS LEVEL To level your TV, turn the level adjustment RAISE LOWER screw on the top of either TV bracket to raise or lower that respective side of the TV. HEIGHT Adjust the height by turning the level RAISE LOWER adjustment screw on the top of both TV brackets...
- Page 11 EXTEND RETRACT CAUTION: Avoid potential personal injury or property damage! The TV brackets contain potential pinch points during operation. Keep fingers away from pinch points when retracting the TV. (see arrows) SWIVEL LOCK HEAVY ! You may need REMOVING THE TV assistance with this step.
-
Page 12: Antes De Comenzar
● El fabricante no se responsabiliza de ningún daño o lesión resultante del montaje incorrecto o el uso indebido. Si su TV (incluidos los accesorios) pesa MÁS, esta Peso máximo montura NO es compatible. 68,0 kg (incluidos los accesorios) Visite MountFinder.Sanus.com o llame para encontrar (150 lbs) NO EXCEDAS un soporte compatible. PRECAUCIÓN: La construcción Hormigón macizo o... - Page 13 MARCAR LOS CENTROS DE LOS MONTANTES COLOCAR LA PLANTILLA CONSEJO: Para calcular la ubicación concreta de la placa mural, pruebe nuestra herramienta HeightFinder disponible en sanus.com [www.sanus.com/1172]. TALADRAR ORIFICIOS EN LOS CENTROS DE LOS MONTANTES RETIRAR LA PLANTILLA APRETAR CON FIRMEZA PRECAUCIÓN:...
- Page 14 . Tenga esto en cuenta al seleccionar la ubicación de la placa mural COLOCAR LA PLANTILLA CONSEJO: ara calcular la ubicación concreta de la placa mural, pruebe nuestra herramienta HeightFinder disponible en sanus.com [www.sanus.com/1172]. TALADRAR LOS ORIFICIOS RETIRAR LA PLANTILLA...
- Page 15 Español Organizar los cables PÁGINA 9 Cambie la posición de su televisor para poder conectar los cables y, a continuación, ajústelo como desee. Ajustes PÁGINA 10 NIVEL Para nivelar el televisor, gire el tornillo de ajuste de nivel situado en la parte superior de cualquiera de los soportes para subir o bajar el lado correspondiente del televisor.
- Page 16 Legrand no asume ninguna responsabilidad por la exactitud, integridad o suficiencia de la información contenida en este documento. ©2022 Legrand AV Inc. All rights reserved. SANUS is a brand of Legrand. SANUS and the SANUS logo are registered trademarks.
Need help?
Do you have a question about the VDLT17 and is the answer not in the manual?
Questions and answers