
Related Manuals for Acard Ultra ATA-133 AEC-6280


Summary of Contents for Acard Ultra ATA-133 AEC-6280
- Page 1 ACARD Ultra ATA-133 AEC-6280 PCI-to-IDE Ultra ATA-133 Controller User’s Manual Version:1.0 Copyright 2001 ACARD Technology Corp. Ver:1.0.20011007.6280...
- Page 2 ACARD and SCSIDE are the trademarks of ACARD Technology Corp. Windows is a trademark of the Microsoft. All brand names and trade- marks are properties of their respective owners.
-
Page 3: Table Of Contents
Chapter 2 Hardware Installation........7 2.1 ACARD AEC-6280 Board Layout: ..........7 2.2 Installing the AEC-6280 IDE Adapter ........... 8 2.3 ACARD AEC-6280 cable & power installation ......9 2.4 Compatibility list ................. 10 Chapter 3 BIOS Setup ............11 3.1 Functions description .............. -
Page 4: Chapter 1 Introduction
Chapter 1 Introduction 1.1 Introduction ACARD AEC-6280 is a high performance PCI P&P bus master Ul- tra ATA-133 adapter and on board Flash BIOS that supports to boot from ATA device or Ultra ATA 100/66/33 and even ATA-133 hard drives. -
Page 5: Specification
ACARD AEC-6280 Specification Power requirement - voltage : 3.3V+/- 2% 5V+/- 2% current : 0.5A Max. Environment Temperature Operating 0 C to 70 Storage -20 C to 85 Humidity 15% to 90% Models: AEC-6280 Dimentions Width: 14 cm Height: 4.7 cm... -
Page 6: Chapter 2 Hardware Installation
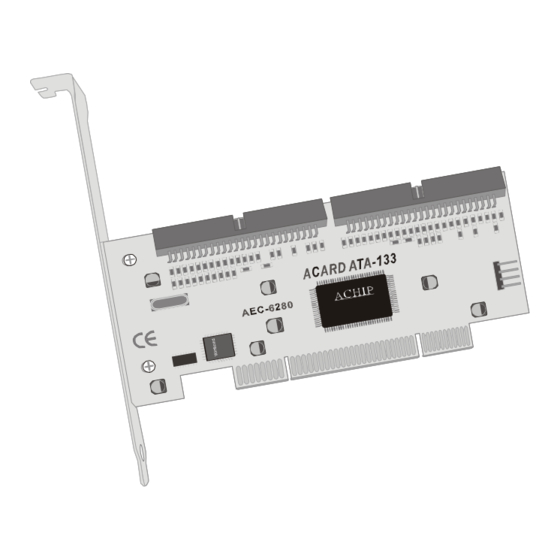
ACARD AEC-6280 Chapter 2 Hardware Installation 2.1 ACARD AEC-6280 Board Layout: IDE1: The Primary IDE port IDE2: The Secondary IDE port IDE2 IDE1 ATA-133 Cable Layout: Connect to Connect to ACARD AEC- Connect to IDE hard 6280 Adapter IDE hard drive... -
Page 7: Installing The Aec-6280 Ide Adapter
Then fit the adapter bracket on case frame just like a slot cover. ! ! ! ! ! When two hard drives connected with ACARD AEC-6280 at the same IDE port (i.e.on same cable), the hard drives Jumper setting must be set as a respectively positioning “Master”... -
Page 8: Acard Aec-6280 Cable & Power Installation
ACARD AEC-6280 2.3 ACARD AEC-6280 cable & power installation The cable connection methods: Step 1. Find out pin 1 of IDE connector on IDE device. Step 2. Find out a color line of the internal IDE ribbon cable which indi- cates pin 1 of the connector. -
Page 9: Compatibility List
ACARD AEC-6280 2.4 Compatibility list IDE Hard Drive ! ! ! ! ! Quantum FireBall LM series, LC series, LB series, LD series FireBall KX series, KA series FireBall CX series, CR series, EX series FireBall EL series, AS 20G,60G... -
Page 10: Chapter 3 Bios Setup
ACARD AEC-6280 Chapter 3 BIOS Setup Plug the ACARD AEC-6280 IDE card in the PCI slot, while the PC remains power on. When you see the following messages, press <F1> or <F10> to BIOS setup. 3.1 Functions description Press <F1> or <F10>, the BIOS setup screen will be appeared :... - Page 11 8X, 10X, 16X ! ! ! ! ! AOPEN/Acer ! ! ! ! ! RICOH 9060A, 9120A ! ! ! ! ! Pioneer 113, 114, 115, 16X ! ! ! ! ! SONY For the lastest compatibility list, please refer to http://www.acard.com...
-
Page 12: Ide Deivces
ACARD AEC-6280 3.1.1 IDE Deivces To get the IDE device information which connect with AEC-6280. 3.1.2 Adapter Setup ! ! ! ! ! Host Adapter BIOS : For setting AEC-6280 adapter’s BIOS. ! ! ! ! ! PCI Master-DMA Burst Mode : For setting AEC-6280 adapter’s DMA- Brust mode. -
Page 13: Utility
ACARD AEC-6280 ! ! ! ! ! Support Removable Disk As Fixed Disk : For setting removabledisk as fixed disk. ! ! ! ! ! ATAPI CD-ROM Bootable : For setting ATAPI CD-ROM to boot. ! ! ! ! ! Primary Master IDE &... -
Page 14: Load Defaults
ACARD AEC-6280 3.1.4 Load Defaults To restore the AEC-6280 BIOS defaults parameters setting. 3.1.5 Exit Setup Press <Esc> to quit the RAID setup utiltiy screen. Then choose the “Up- date Data” or “No Update” to Exit. -
Page 15: Chapter 4 System Installation
System Installation 4.1 DOS Environment For Boot Device 1. Complete ACARD AEC-6280 hardware installation. 2. Boot-up the computer, press <Del> to enter the motherboard’s BIOS setup. Then change “Boot Sequence” to A:. 3. Restart the computer by a DOS bootable floppy and run DOS FDISK. -
Page 16: Windows 95/98/Me Environment
ACARD AEC-6280 4.1.2 Windows 95/98/ME Environment Non Boot Device 1. Complete ACARD AEC-6280 hardware installation. 2. The system will detect any new device and ask for directory to access the device driver. Click “Next” to go on. 3. Select “Search for the best driver for your device (Recommend)”. - Page 17 ACARD AEC-6280 4. Windows will display the message when the system has found the driver for it and is going to install the driver. 5. Select “Specify a location”. Please insert the directory of AEC6280.inf for it (such as a:\WIN9X).
- Page 18 Step 1. Enter “My Computer” and double click on “Control Panel”. Step 2. Double click on “System” and enter “Device Manager”. Step 3. Click the “Hard disk controllers” to check whether ACARD AEC- 6280 adapter has installed properly. For Boot Device For bootable drive from ACARD AEC-6280, complete Windows 95/98/ME operation system installation onto ACARD AEC-6280 drive first.
-
Page 19: Windows Nt Environment
Please follow the Microsoft Windows NT installation. Install Driver for Windows NT After Windows NT has been installed, you may wish to plug the ACARD AEC-6280 device on the Windows NT system. Follow the procedures below, Windows NT would install the newest ACARD AEC-6280 driver to the... - Page 20 ACARD AEC-6280 1. Double click on “My Computer”, enter ”Controller Panel” . 2. Double click on “SCSI Adapter“. 3. Choose “Drivers” and click on “Add”.
- Page 21 ACARD AEC-6280 4. Click on “Hard Disk” to select the right driver for the IDE adapter. 5. Insert the directory of driver for Windows NT, for example “A:\Winnt” 6. Then follow the direction to complete the installation.
- Page 22 Step 1. Enter “My Computer” and double click on “Control Panel”. Step 2. Find “SCSI Adapters”, double click it. Step 3. In “SCSI Adapters”, get the “ACARD AEC6280 UDMA133 IDE Adapter ” to check whether the device has connected to AEC-6280.
-
Page 23: Windows 2000 Environment
IDE hardware. Please follow the Microsoft Windows 2000 installation. Install Driver for Windows 2000 After Windows 2000 has been installed, you may wish to plug the ACARD AEC-6280 device on the Windows 2000 system. Before plug in AEC-6280, follow the procedures to install driver manually. - Page 24 ACARD AEC-6280 1. Complete ACARD AEC-6280 hardware installation. The system will find “New Hardware”. 2. The system will detect a new device and ask for directory to access the driver. Select “Search for a suitable driver for my device (Recommended)”. Then click “Next”.
- Page 25 ACARD AEC-6280 4. Select “Browse” to find out the driver directory of AEC6280.inf for it (such as A:\Win2000). 5. The wizard will find a driver for IDE adapter. Click on “Next” to install the driver.
- Page 26 ACARD AEC-6280 6. Click on “Yes” to continue the installation. 7. Follow the directions, the system will complete the setup automatically.
- Page 27 Step 3. In “System Properties”, choose “Hardware” and click on “Device Manager”. Step 4. In “SCSI and RAID controllers” to double click on “ACARD TECHOLOGY CORP. AEC6280 IDE Ultra ATA133 Adapter” to check whether the device has connected to AEC-6280.
-
Page 28: Windows Xp (Beta Version) Environment
5. Before the installation, copy the AEC-6280’s driver into a floppy diskette first. Then insert the ACARD AEC-6280 driver disk into the floppy. 6. The ACARD Miniport driver should be highlighted at this stage. Press “Enter” to proceed. 7. Windows XP (Beta Version) should now recognize the ACARD Miniport driver and the IDE hardware. - Page 29 ACARD AEC-6280 1. Complete ACARD AEC-6280 hardware installation. The system will find “New Hardware”. 2. The system will detect a new device and ask for directory to access the driver. Select “ Install from a list or specific location (Advanced)
- Page 30 ACARD AEC-6280 3. Follow the wizard, Windows will ask for the driver files’ location. Select “Include this location in the search”. 4. Then select “Browse” to find out the driver directory of AEC6280.inf for it (such as A:\Win2000). 5. The wizard will find a driver for IDE adapter. Click on “Next” to install the...
- Page 31 ACARD AEC-6280 6. Click on “Continue Anyway” to continue the installation. 7. Follow the directions, the system will complete the setup automatically.
- Page 32 Verify ACARD AEC-6280 After the system booted, follow the directions below to check “Device Man- ager” and see whether the ACARD AEC-6280 has installed. Step 1. Press “Start” and select “My Computer” Step 2. Find “View system information”, double click it.
- Page 33 Step 3. In “System Properties”, choose “Hardware” and click on “Device Manager”. Step 4. In “SCSI and RAID controllers” to double click on “ACARD AEC- 6880 PCI Ultra ATA133 RAID Controller” to check whether the device has success connected to ACARDAEC-6880.
-
Page 34: Chapter 5 Troubleshooting
ACARD AEC-6280 Chapter 5 Troubleshooting Installing the ACARD AEC-6280 while it does not function properly, follow the troubleshooting guide below. 1. Check power supply Check the malfunction devices and the power status (ON / OFF) at all times. 2. Verify IDE device Before installing the ACARD AEC-6280, ensure your IDE device functions are set in proper mode. -
Page 35: Appendix 1 Application Utility
Windows OS while connect with ACARD SCSI adapter or IDE adapter. The ASPITool32 Man- ager program has proudly and solely developed by ACARD. You may get the installation executive program from the ACARD Driver CD. -
Page 36: Appendix 2 Technical Support Form
ACARD AEC-6280 Appendix 2 Technical Support Form Email: support@acard.com http://www.acard.com Model F/W Version AEC-6280 System Configuration Main Board vendor BIOS version SCSI adapter Chipset Memory Dispay card Other I/O card OS version Hard Disk Configuration Hard Disk Model/type Capacity Firmware version...
Need help?
Do you have a question about the Ultra ATA-133 AEC-6280 and is the answer not in the manual?
Questions and answers