Sony Mavica MVC-FD83 Operating Instructions Manual
Hide thumbs
Also See for Mavica MVC-FD83:
- Operating instructions manual (132 pages) ,
- Service manual (113 pages) ,
- User manual (2 pages)
Chapters
Table of Contents

Related Manuals for Sony Mavica MVC-FD83


Summary of Contents for Sony Mavica MVC-FD83
- Page 1 3-866-779-13 (1) Digit al St ill Camera Operat ing Inst ruct ions M anual de inst rucciones M VC-FD88 M VC-FD83/FD88 ©1999 by Sony Corporation Downloaded from: https://www.usersmanualguide.com/...
- Page 2 English Operat ing inst ruct ions Before operating the unit, please read this manual thoroughly, and retain it for future reference. The instructions in this manual are for the two models: MVC-FD83, MVC-FD88 The MVC-FD88 is the model used for illustration purposes. Otherwise, the model name is indicated in the illustrations.
- Page 3 Ow ner’s Record The model and serial numbers are located on the bottom. Record the serial number in the space provided below. Refer to these numbers whenever you call upon your Sony dealer regarding this product. Model No. M VC-FD Serial No.
- Page 4 DISPOSAL OF LITHIUM ION BATTERY. LITHIUM ION BATTERY. DISPOSE OF PROPERLY. You can return you unwanted lithium ion batteries to your nearest Sony Service Center or Factory Service Center. Note: In some areas the disposal of lithium ion batteries in household or business trash may be prohibited.
- Page 5 Be sure to read before using your camera Trial recording Before you record one-time events, you may want to make a trial recording to make sure that the camera is working correctly. No compensation for contents of the recording Contents of the recording cannot be compensated for if recording or playback cannot be made due to a malfunction of the camera, floppy disk, etc.
-
Page 6: Table Of Contents
Table of contents Before using your camera ............... 8 Parts identification .................. 9 Basic operat ions Preparation ..................12 1: Charging the battery pack ........... 12 2: Installing the battery pack .......... 13 3: Setting the date and time ..........15 Recording and playing back images .......... - Page 7 Copying images – COPY ............46 Copying all the infomation in your floppy disk – DISK COPY ..............48 Formatting a floppy disk – FORMAT ........49 Writing a print mark on an image ........50 Using image data with other equipment ......52 Changing the mode settings ............
-
Page 8: Before Using Your Camera
Before using your camera This digital still camera uses a floppy disk as a medium for recording images. Use the following floppy disk type: •Size: 3.5 inch •Type: •Capacity: 1.44 MB MS-DOS format (512 bytes × 18 sectors) •Format: When using 3.5 inch, 2HD floppy disk other than described above, format it using the camera or personal computer. -
Page 9: Parts Identification
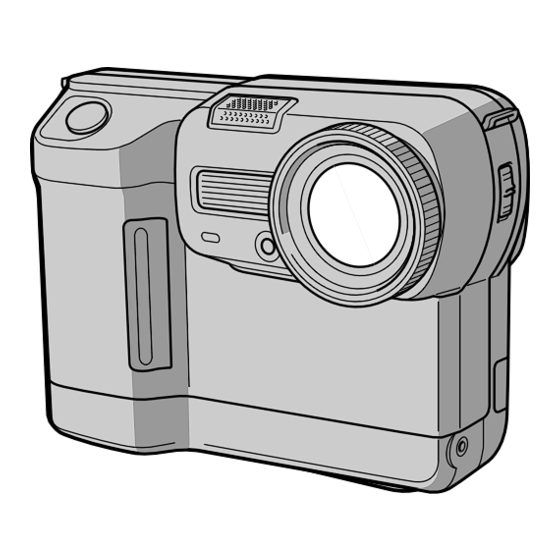
Parts identification See pages in ( ) for more details. M icrophone Lens Do not touch when recording. Focus ring (27) FOCUS AUTO/ Shutter button (17, 18) M ANUAL sw itch Self-timer lamp (27) The lamp keeps on blinking until recording starts after the shutter button is depressed. - Page 10 k Parts identification Hooks for strap LCD BACK LIGHT sw itch Normally select ON. Attaching the shoulder Set to OFF to save strap the battery. BRIGHT +/ – button Press to adjust the brightness of the LCD screen. PLAY/ STILL/ M OVIE LCD screen sw itch (17, 18, 20) POWER sw itch...
- Page 11 Zoom lever Photocell w indow for LCD screen The LCD screen becomes brighter when exposed to sunlight. Floppy disk VOLUM E +/ – button slot Press to adjust the volume of the speaker. POWER lamp (17, 20) FLASH/ CHARGE lamp Speaker FLASH button Auto is set at the factory.
-
Page 12: Preparation
To charge the battery pack, use the battery charger. Your camera operates only with the “InfoLITHIUM” battery pack (L series) “InfoLITHIUM” is a trade mark of Sony Corporation. Connect t he pow er cord t o a w all out let . -
Page 13: 2: Installing The Battery Pack
Inst alling t he bat t ery pack Open t he bat t ery cover. Slide the battery cover in the direction of the arrow pressing PUSH button. (base) Inst all t he bat t ery pack. Insert the battery pack with the V mark facing toward the battery compartment. - Page 14 This unit is compatible with the “InfoLITHIUM” battery pack (L series). Your camera operates only with the “InfoLITHIUM” battery. “InfoLITHIUM”battery packs have the mark. “InfoLITHIUM” is a trademark of Sony Corporation. 14-GB Downloaded from: https://www.usersmanualguide.com/...
-
Page 15: 3: Setting The Date And Time
Set t ing t he dat e and t im e When you use the camera first, set the date and time. The date and time are necessary for MS-DOS format recording. If they are not set, incorrect date and time are recorded, and CLOCK SET screen in step 5 appears whenever you turn on the camera in STILL/MOVIE mode. - Page 16 k Preparation Select t he desired display of t he dat e w it h t he cont rol but t on, t hen press z. Y/M/D (year/month/day) M/D/Y (month/day/year) D/M/Y (day/month/year) CLOCK SET Y / M / D M / D / Y D / M / Y 1999 1 12 00...
-
Page 17: Recording And Playing Back Images
Recording and playing back images Recording st ill im ages To record the images, slide the POWER switch down to turn on the power (The POWER lamp lights up) and insert the floppy disk until it clicks. POWER lamp ACCESS lamp Set PLAY/STILL/M OVIE t o STILL. -
Page 18: 2: Recording Moving Images
k Recording and playing back images Recording m oving im ages Set PLAY/STILL/M OVIE t o M OVIE. Press t he shut t er but t on f ully dow n m om ent arily. The image and sound are recorded for the length which you select in the file menu: 5 seconds, 10 seconds, 15 seconds. - Page 19 The indicators during recording The indicators on the LCD screen are not recorded. Image size indicator Image quality indicator Recording mode indicator Number of stored images AE/ Focus lock indicator M anual focus indicator Remaining disk capacity indicator Remaining battery time indicator 120min FINE...
-
Page 20: 3: Playing Back Still Images
k Recording and playing back images Playing back st ill im ages To view the recorded images on the LCD screen, slide POWER down to turn on the power (The POWER lamp lights up) and insert the floppy disk until clicks. Set PLAY/STILL/M OVIE t o PLAY. -
Page 21: 4: Playing Back Moving Images
Playing back m oving im ages Set t he PLAY/STILL/M OVIE t o PLAY. The last recorded image appears on the LCD screen. The image recorded in MOVIE mode is displayed one-size smaller than the other normal-sized images. Press v of t he cont rol but t on t o display t he m enu bar on t he LCD screen. - Page 22 k Recording and playing back images The indicators during playback During playback still images (STILL) Recording mode indicator Image size indicator Image quality Image number Remaining disk capacity indicator FINE 120min 11/12 1280 Number of stored images in a floppy disk Print mark indicator Protect indicator...
-
Page 23: Battery Life/No. Of Images That Can Be Recorded/Played Back
Bat t ery lif e/No. of im ages t hat can be recorded/played back STILL mode Battery Battery life No. of images (min.) (record/ playback) NP-F330 Continuous recording* 55 (50) 550 (500) (Supplied) Continuous playing* * 65 (60) 1700 (1500) NP-F550 Continuous recording* 120 (110) - Page 24 k Recording and playing back images M OVIE mode Battery Battery life No. of images* (min.) (record) NP-F330 Continuous recording 75 (65) 55 (45) (Supplied) NP-F550 Continuous recording 160 (140) 120 (100) Approximate minutes that can be recorded at a temperature of 77°F (25°C) and 160 ×...
-
Page 25: Viewing Images Using A Personal Computer
View ing im ages using a personal com put er With this camera, the still image data is compressed in JPEG format and move image data is compressed with MPEG-1 format. These data can be viewed using a personal computer which installed JPEG and MPEG browsing software as Microsoft Internet Explorer 4.0. -
Page 26: Playing Back Jpeg Files With Microsoft Office
k Recording and playing back images Notes •To play back an MPEG file, install Active Movie Player (Direct Show). • For playing back a file recorded in MOVIE or VOICE mode, first copy it to the hard disk of the personal computer. If you play back the file from a floppy disk, the picture and sound may break off. -
Page 27: Various Recording
Various recording FOCUS AUTO/ M ANUAL Focus ring PROGRAM AE PICTURE EFFECT Focusing m anually Set FOCUS AUTO/M ANUAL t o M ANUAL. 9 appears on the LCD screen. Turn t he f ocus ring t o achieve a sharp f ocus. 9 changes as follows: : when recording a distant subject : when the subject is too close to focus on... -
Page 28: Recording Images In Macro
k Various recording Recording im ages in m acro Select M ACRO f rom t he m enu bar w it h t he cont rol but t on, t hen press z appears on the LCD screen. SELF MACRO MACRO FILE CAMERA... -
Page 29: Adjusting The White Balance
Adjust ing t he w hit e balance White balance adjustment makes white subject look white and allows more natural color balance for camera recording. Normally white balance is automatically adjusted. Set PLAY/STILL/M OVIE t o STILL or M OVIE, t hen press v of t he cont rol but t on. -
Page 30: Enjoying Picture Effect
k Various recording Enjoying Pict ure Ef f ect Press PICTURE EFFECT repeat edly t o select t he desired pict ure ef f ect m ode. NEG. ART: The color and brightness of the picture is reversed. SEPIA: The picture is sepia. B&W: The picture is monochrome (black and white). -
Page 31: Using The Program Ae Function
Using t he PROGRAM AE f unct ion You can select one of six PROGRAM AE (Auto Exposure) modes to suit your shooting situation, referring to the following. Press PROGRAM AE repeat edly t o select t he desired PROGRAM AE m ode. Spot light-metering mode For recording subjects with backlight or strong contrast between subjects and background. - Page 32 k Various recording To cancel PROGRAM AE Press PROGRAM AE repeatedly until the indicator on the LCD screen goes out. Notes on focus settings • You can focus only on distance subjects in Sunset & Moon and Landscape modes. • In Panfocus mode, the zoom position and focus are fixed. •...
-
Page 33: Selecting Image Quality (Quality)
Select ing im age qualit y (QUALITY) You can select one of two available image quality modes. The number of images you can record is different depending on which image quality mode you select. Set PLAY/STILL/M OVIE t o STILL, t hen press v of t he cont rol but t on. -
Page 34: Selecting Image Size
k Various recording Select ing im age size You can change the image size for your purpose. Set PLAY/STILL/M OVIE t o M OVIE or STILL, t hen press v of t he cont rol but t on. The menu bar appears on the LCD screen. Select FILE w it h t he cont rol but t on, t hen press z. -
Page 35: Selecting Recording Mode (Rec Mode)
Select ing recording m ode (REC M ODE) You can record a still image and sound togeter or a still image which is suitable for e-mail transmission. Set PLAY/STILL/M OVIE t o STILL, t hen press v of t he cont rol but t on. The menu bar appears on the LCD screen. - Page 36 k Various recording No. of images that Recording Image Recorded file File name can be recorded mode size (ex.)* on a floppy disk M VC– STANDARD FINE NORM AL **1280 JPEG (1280 × 960) 001F.JPG × 6 – 10 4 – 6 960 For index screen 001F.411 ***1216 JPEG (1216 ×...
- Page 37 JPEG (1024 × 768) 001F.JPG 1024 MPEG audio × with still image 001A.MPG 4 – 9 3 – 6 768 (320 × 240) For index screen 001F.411 JPEG (640 × 480) 001F.JPG 640 MPEG audio × with still image 001A.MPG 5 –...
-
Page 38: Various Playback
Various playback Playing back m ult iple im ages at a t im e (INDEX) You can play back six recorded images at a time. You can also select a specific image from the six images and enlarge it to full-size. This function is useful for searching for an image you want from all the recorded images. -
Page 39: Playing Back Images In A Continuous Loop - Slide Show
Playing back im ages in a cont inuous loop – SLIDE SHOW Press v of t he cont rol but t on t o display t he m enu bar. Select “ FILE” w it h t he cont rol but t on, t hen press Select “... - Page 40 k Various playback To cancel setting the slide show Select CANCEL with the control button in step 5, then press z. Operation during slide show Pause: Select X with the control button, then press z. Start: Select N with the control button, then press z. Display the preceding or next image: Press ?b or B? on the LCD screen or control panel.
-
Page 41: Preventing Accidental Erasure - Protect
Prevent ing accident al erasure – PROTECT To prevent accidental erasure, you can protect all or selected image. In single mode Set PLAY/STILL/M OVIE t o PLAY, t hen display t he im ages t o prot ect . Press v of t he cont rol but t on. The menu bar appears on the LCD screen. - Page 42 k Various playback To release protection Select OFF with the control button in step 5, then press z. In INDEX mode Display t he INDEX screen. Select PROTECT of t he FILE m enu w it h t he cont rol but t on, t hen press z.
- Page 43 <When selecting SELECT> To protect images 0 0 0 1 - 0 0 0 6 / 0 0 4 0 PROTECT ENTER CANCEL SELECT Select t he im age t o prot ect w it h t he cont rol but t on, t hen press z.
-
Page 44: Deleting Images - Delete
k Various playback Delet ing im ages – DELETE You can delete all or selected images that you no longer want to keep. In single mode Set PLAY/STILL/M OVIE t o PLAY. Press v of t he cont rol but t on. The menu bar appears on the LCD screen. - Page 45 <When selecting ALL> Select OK with the control button, then press z. DELETE ALL ? SELECT CANCEL RETURN DELETE FILE SETUP SELECT <When selecting SELECT> 0 0 0 1 - 0 0 0 6 / 0 0 4 0 DELETE ENTER CANCEL SELECT...
-
Page 46: Copying Images - Copy
k Various playback Copying im ages – COPY In single mode Set PLAY/STILL/M OVIE t o PLAY. Press v of t he cont rol but t on. The menu bar appears on the LCD screen. Select FILE w it h t he cont rol but t on, t hen press z. The FILE menu appears on the screen. - Page 47 In INDEX mode Display t he INDEX screen. Select FILE w it h t he cont rol but t on, t hen press z. The FILE menu appears on the screen. Select COPY w it h t he cont rol but t on, t hen press Select ALL or SELECT.
-
Page 48: Copying All The Infomation In Your Floppy Disk - Disk Copy
k Various playback Copying all t he inf om at ion in your f loppy disk – DISK COPY You can copy to another disk not only the images you have recorded with your camera but also various files you have created in other software with your PC. -
Page 49: Formatting A Floppy Disk - Format
Form at t ing a f loppy disk – FORM AT Press v of t he cont rol but t on. The menu bar appears on the LCD screen. Select FILE w it h t he cont rol but t on, t hen press z. The FILE menu appears. -
Page 50: Writing A Print Mark On An Image
k Various playback Writ ing a print m ark on an im age You can specify the recorded still image to print out. This function is useful for printing out still images to print out. Your camera conforms with the DPOF (Digital Print Order Format) standard for specifying the still images to print out. - Page 51 In INDEX mode Display INDEX screen. Select FILE w it h t he cont rol but t on, t hen press z. The FILE menu appears on the screen. Select PRINT M ARK w it h t he cont rol but t on, t hen press z.
-
Page 52: Using Image Data With Other Equipment
k Various playback Using im age dat a w it h ot her equipm ent View ing t he im ages on TV Connect the camera to the TV that has a video and audio input jack. Adjust VIDEO OUT (NTSC/PAL) in the menu settings before viewing the images on TV. -
Page 53: Changing The Mode Settings
Changing the mode settings Press v of t he cont rol but t on. The menu bar appears on the LCD screen. Items in STILL or Items in PLAY mode Items in PLAY mode MOVIE mode (SINGLE screen) (INDEX screen) M V C - 0 11 S 1 9 9 9 7 4 1 2 : 3 0 P M SELF... -
Page 54: Setting The Mode Of Each Item
k Changing the mode settings Set t ing t he m ode of each it em z is set at the factory. Menu items that can be modified differ depending on the setting of the MODE selector. The LCD screen shows only the items you can operate at the moment. - Page 55 M enu Item1 Item2 Setting M eaning To record a 320 × 240 MPEG image 320 × 240 IMAGE To record a 160 × 112 MPEG image z 160 × 112 SIZE (in MOVIE mode) QUALITY FINE To give priority to image quality To record as a standard image z STANDARD quality...
- Page 56 k Changing the mode settings M enu Item1 Item2 Setting M eaning FLASH HIGH To make the flash level higher LEVEL than normal z NORMAL To record normally To make the flash level lower than normal EXPOSURE +1.5 to –1.5 To adjust exposure SETUP DEMO* z STBY/ON...
- Page 57 Items in PLAY (single) mode M enu Item1 Item2 Setting M eaning INDEX To display six recorded images at a time DELETE To delete a displayed image CANCEL To cancel deleting the image FILE DISK FORMAT To format the floppy disk loaded TOOL in the camera “FORMATTING”...
- Page 58 k Changing the mode settings M enu Item1 Item2 Setting M eaning SETUP VIDEO NTSC To set the video signal NTSC mode To set the video signal PAL mode z ENGLISH To display menu items in English LANGUAGE To display menu items in Japanese CLOCK To set the date and time BEEP...
- Page 59 M enu Item1 Item2 Setting M eaning To copy all images COPY To cancel copying the images CANCEL SELECT ENTER To copy selected images CANCEL To cancel copying the images To cancel copying the images CANCEL To delete print marks on all PRINT MARK images...
-
Page 60: Precautions
Precautions On cleaning Cleaning the LCD screen Wipe the screen surface with a LCD cleaning kit (not supplied) to remove fingerprints, dust, etc. Cleaning the camera surface Clean the camera surface with a soft cloth slightly moistened with water. Do not use any type of solvent such as alcohol or benzene as it may mar the finish of the casing. - Page 61 Operational temperature recommendations This camera’s operational temperature is between 32°F to +104°F (0°C to +40°C). Do not use this camera in extreme climates outside the operational temperature range. M oisture condensation If the camera is brought directly from a cold to a warm location, or is placed in a very damp room, moisture may condense inside or outside the camera.
-
Page 62: Troubleshooting
Troubleshooting Should any problem persist after you have made those checks, consult your nearest Sony dealer. If “C: ss : ss ” appears on the LCD screen, the self-diagnosis function has w orked. See page 64. Symptom Cause and/ or Solution The camera does not •... - Page 63 Symptom Cause and/ or Solution The battery life • The ambient temperature is too low. • Charging of the battery pack is not enough. deteriorates too fast. t Charge the battery pack fully. • The battery pack has served its time. t Replace the battery pack with a new one.
-
Page 64: Self-Diagnosis Display
(p. 9) C:61:ss •A camera malfunction which you can not E:61:ss reverse has occurred. tContact your Sony dealer or local E:63:ss authorized Sony service facility and E:91:ss inform them of the five digits. (example: E:61:10) 64-GB Downloaded from: https://www.usersmanualguide.com/... -
Page 65: Specifications
LCD screen Screen size 2.5 inch LCD panel Total dot number 84260 dots General Application Sony battery pack NP-F330/F550 Power requirements 7.2 V (battery pack) Power consumption (During shooting) 3.8 W Operation temperature 32°F to +104°F (0°C to +40°C) Storage temperature –4°F to 140°F (–20°C to 60°C) -
Page 66: Warning Messages
k Specifications BC-V615/ V615A battery charger Power requirements 100 – 240 V AC, 50/60 Hz Output voltage DC OUT: 8.4 V, 0.6 A Operation temperature 0°C to 40°C (32°F to 104°F) Storage temperature –20°C to 60°C (–4°F to 140°F) Approx. 56 × 44 × 107 mm (w/h/d) Dimensions (2 1/4 ×... -
Page 67: Index
Index L, M Manual focusing ..... 27 AC power adaptor ....14 Menu ......... 53 Adjusting brightness Moisture condensation ..61 LCD screen ......10 MPEG ......25, 34, 36 Image ........56 Adjusting the exposure ..56 N, P AE (auto exposure) .... - Page 68 Español M anual de inst rucciones Antes de utilizar la unidad, lea detenidamente este manual de instrucciones y consérvelo para futuras referencias. Las instrucciones de este manual son para dos modelos: MVC-FD83 y MVC-FD88. Para fines de ilustración, en este manual se utiliza el modelo MVC- FD88.
- Page 69 Cerciórese de leer esto antes de utilizar su cámara Grabación de prueba Antes de grabar acontecimientos irrepetibles, realice una grabación de prueba para comprobar si la cámara está trabajando correctamente. No se ofrecerá ninguna compensación por el contenido de la grabación El contenido de la grabación no podrá...
- Page 70 ÍNDICE Antes de utilizar su cámara ..............6 Identificación de partes ................7 Operaciones básicas Preparativos ..................10 1: Carga de la batería ............10 2: Instalación de la batería ..........11 3: Introducción de la fecha y la hora ......13 Grabación y reproducción de imágenes ........
- Page 71 Protección contra el borrado accidental – PROTECT ............... 39 Borrado de imágenes – DELETE ........... 42 Copia de imágenes – COPY ........... 44 Copia de toda la información en su disquete – DISK COPY ..............46 Formateo de un disquete – FORMAT ........47 Escritura de una marca de impresión en una imagen ..
-
Page 72: Antes De Utilizar Su Cámara
Antes de utilizar su cámara Esta cámara digital utiliza disquetes (discos floppy) como medio de grabación de imágenes. Utilice el tipo de disquete siguiente: •Tamaño: 3,5 pulgadas •Tipo: •Capacidad: 1,44 MB MS-DOS (512 bytes × 18 sectores) •Formato: Para utilizar un disquete de 3,5 pulgadas, 2HD, que no sea como el descrito arriba, formatéelo utilizando la cámara o su PC. -
Page 73: Identificación De Partes
Identificación de partes Para más detalles, consulte las páginas de ( ). M icrófono Objetivo No lo toque durante la grabación. Anillo de enfoque (25) Botón disparador Selector de enfoque (15, 16) automático/ manual Lámpara del (FOCUS AUTO/ autodisparador M ANUAL) (25) La lámpara parpadeará... - Page 74 k Identificación de partes Interruptor de Ganchos para la bandolera iluminación de fondo de la pantalla de cristal Colocación de la líquido (LCD BACK LIGHT) bandolera Normalmente déjelo en ON. Póngalo en OFF para ahorrar batería. Botón del brillo (BRIGHT +/ –) Pantalla de cristal Presiónelo para ajustar líquido...
- Page 75 Palanca del zoom Ventanilla de fotocélula para la pantalla de cristal líquido La pantalla de cristal líquido se volverá más brillante cuando la exponga al sol. Botón +/ – del volumen (VOLUM E +/ –) Ranura para Presiónelo para ajustar el el disquete volumen del altavoz.
-
Page 76: Preparativos
Carga de la bat ería Para cargar la batería, utilice el cargador de baterías. Su cámara solamente funcionará con baterías “InfoLITHIUM” (serie L). “InfoLITHIUM” es marca comercial de Sony Corporation. Conect e el cable de alim ent ación en un t om acorrient e. -
Page 77: 2: Instalación De La Batería
Inst alación de la bat ería Abra la cubiert a de la bat ería. Deslice la cubierta de la batería en el sentido de la flecha presionando el mando PUSH. (base) Inst ale la bat ería. Insértela con la marca V encarada hacia el compartimiento de la batería. - Page 78 Esta unidad es compatible con baterías “InfoLITHIUM” (serie L). Su cámara solamente funcionará con baterías “InfoLITHIUM”. Las baterías “InfoLITHIUM” poseen la amrca “InfoLITHIUM” es marca comercial de Sony Corporation. 12-ES Downloaded from: https://www.usersmanualguide.com/...
-
Page 79: 3: Introducción De La Fecha Y La Hora
Introducción de la fecha y la hora Antes de utilizar la cámara por primera vez, introduzca la fecha y la hora. La fecha y la hora serán necesarias para la grabación en formato MS-DOS. Si no están correctamente ajustadas, se grabarán la fecha y la hora incorrectas, y aparecerá... - Page 80 k Preparativos Seleccione la visualización deseada de la f echa con el m ando de cont rol, y después presione z. Y/M/D (año/mes/día) M/D/Y (mes/día/año) D/M/Y (día/mes/año) CLOCK SET Y / M / D M / D / Y D / M / Y 1999 1 12 00 ENTER...
-
Page 81: Grabación Y Reproducción De Imágenes
Grabación y reproducción de imágenes Grabación de im ágenes f ijas Para grabar imágenes, deslice el interrupotor POWER hacia abajo a fin de conectar la alimentación (se encenderá la lámpara indicadora POWER) e inserte un disquete hasta que chasquee. Lámpara indicadora POWER Lámpara ACCESS Ponga PLAY/STILL/M OVIE en STILL. -
Page 82: 2: Grabación De Imágenes En Movimiento
k Grabación y reproducción de imágenes Grabación de im ágenes en m ovim ient o Ponga PLAY/STILL/M OVIE en M OVIE. Presione m om ent áneam ent e a f ondo el bot ón disparador. Se grabarán la imagen y el sonido durante la duración seleccionada en el menú... - Page 83 Indicadores durante la grabación Los indicadores de la pantalla de cristal líquido no se grabarán. Indicador del tamaño de la Indicador de calidad de imagen la imagen Indicador del modo de grabación Número de imágenes almacenadas Indicador de bloqueo de exposición automática/ enfoque Indicador de enfoque...
-
Page 84: 3: Reproducción De Imágenes Fijas
k Grabación y reproducción de imágenes Reproducción de im ágenes f ijas Para contemplar las imágenes grabadas en la pantalla de cristal líquido, deslice POWER hacia abajo a fin de conectar la alimentación (se encenderá la lámpara POWER) e inserte el disquete hasta que chasquee. -
Page 85: 4: Reproducción De Imágenes En Movimiento
Reproducción de im ágenes en m ovim ient o Ponga PLAY/STILL/M OVIE en PLAY. La última imagen grabada aparecerá en la pantalla de cristal líquido. La imagen grabada en el modo MOVIE se visualiza en un tamaño más pequeño que las otras imágenes de tamaño normal. Presione v del m ando de cont rol para hacer que en la pant alla de crist al líquido aparezca la barra de m enú. - Page 86 k Grabación y reproducción de imágenes Indicadores durante la reproducción Durante la reproducción de imágenes fijas (STILL) Indicador de modo de grabación Indicador de tamaño de la imagen Calidad de la imagen Número de imagen Indicador de capacidad restante del disquete FINE 120min...
-
Page 87: Duración De La Batería/N.° De Imágenes Que Podrán Grabarse/Reproducirse
Duración de la bat ería/N.° de im ágenes que podrán grabarse/reproducirse M odo STILL Batería Duración de N.° de imágenes la batería (min.) (grabación/ reproducción) NP-F330 Grabación continua* 55 (50) 550 (500) (suministrada) Reproducción continua* * 65 (60) 1700 (1500) NP-F550 Grabación continua* 120 (110) - Page 88 k Grabación y reproducción de imágenes M odo M OVIE Batería Duración de la N.° de imágenes* batería (min.) (grabación) NP-F330 Grabación continua 75 (65) 55 (45) (suministrada) NP-F550 Grabación continua 160 (140) 120 (100) Minutos aproximados que puede grabarse a una temperatura de 25°C y tamaño de imagen de 160 ×...
-
Page 89: Contemplación De Imágenes Utilizando Un Pc
Cont em plación de im ágenes ut ilizando un PC Con esta cámara, los datos de las imágenes fijas se comprimen en el formato JPEG y los datos de las imágenes en movimiento se comprimen en el formato MPEG-1. Estos datos pueden verse empleando un PC que tenga instalado un programa para JPEG y MPEG. -
Page 90: Reproducción De Archivos Jpeg Con Microsoft Office
k Grabación y reproducción de imágenes Notas • Para reproducir un archivo MPEG, instale Active Movie Player (Direct Show). • Para reproducir un archivo grabado en el modo MOVIE o VOICE, cópielo primero al disco duro del PC. Si reproduce este archivo desde un disquete, es posible que se rompan la imagen y sonido. -
Page 91: Varias Funciones Para Grabación
Varias funciones para grabación FOCUS AUTO/ M ANUAL Anillo de enfoque PROGRAM AE PICTURE EFFECT Enf oque m anual Ponga FOCUS AUTO/M ANUAL en M ANUAL. En la pantalla de cristal líquido aparecerá 9. Gire el anillo de enf oque hast a enf ocar nít idam ent e. -
Page 92: Grabación De Imágenes En Macro
k Varias funciones para grabación Grabación de im ágenes en m acro Seleccione M ACRO de la barra de m enú con el m ando de cont rol, y después presione z. En la pantalla aparecerá SELF MACRO MACRO FILE CAMERA SETUP TIMER... -
Page 93: Ajuste Del Equilibrio Del Blanco
Ajust e del equilibrio del blanco El ajuste del equilibrio del blanco le permitirá hacer que un motivo blanco se vea blanco, y obtener un equilibrio natural entre los colores para la fotografía. Normalmente el equilibrio del blanco se ajustará de forma automática. Ajust e PLAY/STILL/M OVIE a STILL o M OVIE, y después presione v del m ando de cont rol. -
Page 94: Disfrute De Efectos De Imagen
k Varias funciones para grabación Disf rut e de ef ect os de im agen Presione repet idam ent e PICTURE EFFECT para seleccionar el m odo de ef ect o de im agen deseado. NEG. ART: El color y el brillo de la imagen se invierte. SEPIA: La imagen es de color sepia. -
Page 95: Utilización De La Función De Exposición Automática Programada (Program Ae)
Ut ilización de la f unción de exposición aut om át ica program ada (PROGRAM AE) Usted podrá seleccionar uno de seis modos de exposición automática programada (PROGRAM AE) de acuerdo con la situación, refiriéndose a los siguiente. Presione repet idam ent e PROGRAM AE para seleccionar el m odo de exposición aut om át ica program ada deseado. - Page 96 k Varias funciones para grabación Para cancelar la exposición aut om át ica program ada Presione repetidamente PROGRAM AE hasta que desaparezca el indicador de la pantalla de cristal líquido. Notas sobre los ajustes del enfoque • Usted solamente podrá enfocar motivos distantes en el modo de puesta del sol e iluminación lunar, y en el de paisaje.
-
Page 97: Selección De La Calidad De Las Imágenes (Quality)
Selección de la calidad de las im ágenes (QUALITY) Usted podrá seleccionar uno de dos modos de calidad de imágenes. El número de imágenes que podrá grabar dependerá del modo de calidad de imágenes que haya seleccionado. Ajust e PLAY/STILL/M OVIE a STILL, y después presione v del m ando de cont rol. -
Page 98: Selección Del Tamaño De La Imagen
k Varias funciones para grabación Selección del t am año de la im agen Usted podrá cambiar el tamaño de la imagen de acuerdo con su finalidad. Ajust e PLAY/STILL/M OVIE a M OVIE o STILL, y después presione v del m ando de cont rol. En la pantalla de cristal líquido aparecerá... -
Page 99: Selección Del Modo De Grabación (Rec Mode)
Selección del m odo de grabación (REC M ODE) Usted podrá grabar una imagen fija y sonido a la vez, o una imagen fija adecuada para la transmisión por correo electrónico (e-mail). Ajust e PLAY/STILL/M OVIE a STILL, y después presione v del m ando de cont rol. - Page 100 k Varias funciones para grabación Nombre de Núm. de imágenes M odo de Tamaño de Archivo archivo que podrán grabarse grabación imagen grabado (extensión)* en un disquete M VC– STANDARD FINE **1280 JPEG (1280 × 960) NORM AL 001F.JPG × Para la pantalla 6 –...
- Page 101 JPEG (1024 × 768) 001F.JPG MPEG audio 1024 con imagen fija 4 – 9 3 – 6 × 001A.MPG (320 × 240) 768 Para la pantalla de índice 001F.411 JPEG (640 × 480) 001F.JPG MPEG audio 640 con imagen fija 001A.MPG 5 –...
-
Page 102: Varias Funciones Para Reproducción
Varias funciones para reproducción Reproducción de m últ iples im ágenes al m ism o t iem po (INDEX) Usted podrá reproducir seis imágenes al mismo tiempo. También podrá seleccionar una imagen específica de entre esas seis y ampliarla completamente. Esta función será muy útil para buscar la imagen deseada de entre todas las grabadas. -
Page 103: Reproducción De Imágenes En Bucle Continuo - Slide Show
Reproducción de im ágenes en bucle cont inuo – SLIDE SHOW Presione v del m ando de cont rol para hacer que se visualice la barra de m enú. Seleccione “ FILE” con el m ando de cont rol, y después presione z. - Page 104 k Varias funciones para reproducción Para cancelar el ajuste de la reproducción de imágenes en bucle continuo Seleccione CANCEL con el mando de control en el paso 5, y después presione z. Operación durante la reproducción de imágenes en bucle continuo Pausa: Seleccione X con el mando de control, y después presione z.
-
Page 105: Protección Contra El Borrado Accidental - Protect
Prot ección cont ra el borrado accident al – PROTECT Para evitar el borrado accidental, podrá proteger todas las imágenes o la seleccionada. En el mode de pantalla única Ajust e PLAY/STILL/M OVIE a PLAY, y después haga que se visualicen las im ágenes que desee prot eger. - Page 106 k Varias funciones para reproducción Para desactivar la protección Seleccione OFF con el mando de control en el paso 5, y después presione z. En el modo INDEX Haga que se visualice la pant alla INDEX. Seleccione PROTECT del m enú FILE con el m ando de cont rol, y después presione z.
- Page 107 <Cuando haya seleccionado SELECT> Para proteger imágenes 0 0 0 1 - 0 0 0 6 / 0 0 4 0 PROTECT ENTER CANCEL SELECT Seleccione la im agen que desee prot eger con el m ando de cont rol, y después presione z. En la imagen seleccionada aparecerá...
-
Page 108: Borrado De Imágenes - Delete
k Varias funciones para reproducción Borrado de im ágenes – DELETE Usted podrá borrar todas las imágenes, o las seleccionadas que no desee conservar. En el modo de pantalla única Ajust e PLAY/STILL/M OVIE a PLAY. Presione v del m ando de cont rol. La barra de menú... - Page 109 <Cuando haya seleccionado ALL> Seleccione OK con el mando de control, y después presione z. DELETE ALL ? SELECT CANCEL RETURN DELETE FILE SETUP SELECT <Cuando haya seleccionado SELECT> 0 0 0 1 - 0 0 0 6 / 0 0 4 0 DELETE ENTER CANCEL...
-
Page 110: Copia De Imágenes - Copy
k Varias funciones para reproducción Copia de im ágenes – COPY En el modo de pantalla única Ajust e PLAY/STILL/M OVIE a PLAY. Presione v del m ando de cont rol. En la pantalla de cristal líquido aparecerá la barra de menú. Seleccione FILE con el m ando de cont rol, y después presione z. - Page 111 En el modo INDEX Haga que se visualice la pant alla INDEX. Seleccione FILE con el m ando de cont rol, y después presione z. En la pantalla de cristal líquido aparecerá el menú FILE. Seleccione COPY con el m ando de cont rol rem ot o, y después presione z.
-
Page 112: Copia De Toda La Información En Su Disquete - Disk Copy
k Varias funciones para reproducción Copia de t oda la inf orm ación en su disquet e – DISK COPY Usted podrá copiar en otro disco no solamente las imágenes tomadas con su cámara, sino diversos archivos que haya creado con otro software en su PC. Presione v del m ando de cont rol. -
Page 113: Formateo De Un Disquete - Format
Form at eo de un disquet e – FORM AT Presione v del m ando de cont rol. En la pantalla de cristal líquido aparecerá la barra del menú. Seleccione FILE con el m ando de cont rol, y después presione z. Aparecerá... -
Page 114: Escritura De Una Marca De Impresión En Una Imagen
k Varias funciones para reproducción Escrit ura de una m arca de im presión en una im agen Usted podrá especificar la imagen fija que desee imprimir. Esta función será muy útil para marcar las imágenes fijas que desee imprimir. Su cámara está... - Page 115 En el modo INDEX Haga que se visualice la pant alla INDEX. Seleccione FILE con el m ando de cont rol, y después presione z. En la pantalla de cristal líquido aparecerá FILE. Seleccione PRINT M ARK con el m ando de cont rol, y después presione z.
-
Page 116: Utilización De Datos De Imágenes Con Otros Equipos
k Varias funciones para reproducción Ut ilización de dat os de im ágenes con ot ros equipos Cont em plación de im ágenes en un t elevisor Conecte la cámara a un televisor que posea tomas de entrada de audio y vídeo. Antes de contemplar las imágenes en un televisor, ajuste VIDEO OUT (NTSC/ PAL) en los ajustes del menú. -
Page 117: Cambio De Los Ajustes De Los Modos
Cambio de los ajustes de los modos Presione v del m ando de cont rol. En la pantalla de cristal líquido aparecerá la barra de menú. Elementos en el modo Elementos en el modo Elementos en el modo STILL o MOVIE PLAY (pantalla PLAY (pantalla SINGLE) -
Page 118: Ajuste Del Modo De Cada Ítem
k Cambio de los ajustes de los modos Ajust e del m odo de cada ít em z es el ajuste de fábrica. Los ajustes que podrán modificarse diferirán de acuerdo con la posición del selector MODE. La pantalla de cristal líquido solamente mostrará... - Page 119 M enú Ítem 1 Ítem 2 Ajuste Significado 320 × 240 IMAGE Para grabar una imagen MPEG de 320 × 240 SIZE z 160 × 112 (en el Para grabar una imagen MPEG de 160 × 112 modo MOVIE) QUALITY FINE Para dar prioridad a la calidad de las imágenes...
- Page 120 k Cambio de los ajustes de los modos M enú Ítem 1 Ítem 2 Ajuste Significado Para aumentar más de lo normal el FLASH HIGH nivel del flash LEVEL Para grabar normalmente z NORMAL Para reducir más de lo normal el nivel del flash Para ajustar la exposición EXPOSURE...
- Page 121 Ítemes en el modo PLAY (pantalla única) M enú Ítem 1 Ítem 2 Ajuste Significado INDEX Para hacer que se visualicen seis imágenes grabadas al mismo tiempo Para borrar una imagen DELETE visualizada Para cancelar el borrado de una CANCEL imagen Para formatear el disco compacto FILE...
- Page 122 k Cambio de los ajustes de los modos M enú Ítem 1 Ítem 2 Ajuste Significado SETUP VIDEO NTSC Para activar el modo de videoseñal NTSC Para activar el modo de videoseñal z ENGLISH Para hacer que las indicaciones LANGUAGE aparezcan en inglés Para hacer que las indicaciones aparezcan en japonés...
- Page 123 M enú Ítem 1 Ítem 2 Ajuste Significado Para copiar las imágenes SELECT ENTER seleccionadas Para cancelar la copia de imágenes CANCEL Para cancelar la copia de imágenes CANCEL Para borrar marcas de impresión en PRINT todas las imágenes MARK Para cancelar el borrado de marcas CANCEL de impresión...
-
Page 124: Precauciones
Precauciones Sobre la limpieza Limpieza de la pantalla de cristal líquido Limpie la superficie de la pantalla de cristal líquido con un juego de limpieza para pantallas de cristal líquido (no suministrado) para eliminar las huellas dactilares, el polvo, etc. Limpieza de la superficie de la cámara Limpie la superficie de la cámara con un paño suave ligeramente humedecido en agua. - Page 125 Temperatura de funcionamiento recomendada Esta cámara ha sido diseñada para utilizarse a temperaturas comprendidas entre 0 y 40°C. No la utilice en climas extremados, fuera de la gama de temperaturas recomendada. Condensación de humedad Si traslada directamente la cámara de un lugar frío a otro cálido, o si la coloca en una sala muy húmeda, es posible que se condense humedad en su interior o exterior.
-
Page 126: Solución De Problemas
Solución de problemas Si después de haber realizado estas comprobaciones persiste cualquier problema, consulte a su proveedor Sony. Si en la pantalla de cristal líquido aparece “C: ss : ss ”, se habrá activado la función de autodiagnóstico. Consulte la página 62. - Page 127 Síntoma Causa y/ o solución La duración de la batería • La temperatura ambiental es demasiado baja. se acorta demasiado • No cargó suficientemente la batería. rápidamente. t Cargue completamente la batería. • La batería ha llegado al final de su duración útil. t Reemplace la batería por otra nueva.
-
Page 128: Visualización De Autodiagnóstico
•Ha ocurrido un mal funcionamiento en la E:61:ss cámara que usted no puede reparar. E:63:ss tPóngase en contacto con su proveedor Sony o con un centro de reparaciones E:91:ss Sony y notifíqueles los cinco dígitos. (Ejemplo: E:61:10) 62-ES Downloaded from:... -
Page 129: Especificaciones
Especificaciones Sistema Dispositivo de imagen FD83: Dispositivo de transferencia de carga (CCD) de 1/3 pulgadas FD88: Dispositivo de transferencia de carga (CCD) de 1/3,6 pulgadas Objetivo FD83: 3 aumentos FD88: 8 aumentos FD83: f=5,2 - 15,6 mm (37 - 111 mm, convertida al equivalente de una cámara fotográfica de 35 mm) FD88: f = 4,75 - 38 mm (41 - 328 mm, convertida al equivalente de una cámara fotográfica de 35 mm) -
Page 130: Mensajes De Aviso
k Especificaciones Cargador de baterías BC-V615/ V615A Alimentación 100 - 240 V CA, 50/60 Hz Tensión de salida DC OUT: 8,4 V, 0,6 A Temperatura de funcionamiento 0 a 40°C Temperatura de almacenamiento –20 a 60°C Aprox. 56 × 44 × 107 mm (an/al/prf) Dimensiones Masa Aprox. -
Page 131: Índice Alfabético
Índice alfabético Función de desconexión automática de la alimentación Adaptador de alimentación de ..........12 CA .......... 12 G, I AE (Exposición automática) .. 15 Ajuste de la exposición ..54 Grabación Ajuste del brillo Imagen en movimiento ..16 Imagen ........ - Page 132 Sony Corporation Printed in Japan Downloaded from: https://www.usersmanualguide.com/...
- Page 133 This file has been downloaded from: www.UsersManualGuide.com User Manual and User Guide for many equipments like mobile phones, photo cameras, monther board, monitors, software, tv, dvd, and othes.. Manual users, user manuals, user guide manual, owners manual, instruction manual, manual owner, manual owner's, manual guide, manual operation, operating manual, user's manual, operating instructions, manual operators, manual operator, manual product, documentation manual, user maintenance, brochure, user reference, pdf manual Downloaded from:...
Need help?
Do you have a question about the Mavica MVC-FD83 and is the answer not in the manual?
Questions and answers
is there sny way to hook this to a computer as 3.5 floppy drives are almost impossible to find