Table of Contents
Advertisement
Quick Links
Advertisement
Table of Contents

Related Manuals for Casio QV-4000EX


Summary of Contents for Casio QV-4000EX
- Page 1 LCD Digital Camera QV-4000 User’s Guide Congratulations upon your selection of the new CASIO Digital Camera. To get the most out of your new CASIO Digital Camera, make sure you read this manual carefully and keep it on hand for future...
-
Page 2: Table Of Contents
CONTENTS CONTENTS Monitor Screen Indicators ........E-22 INTRODUCTION REC mode E-22 PLAY mode E-23 Quick Reference ............E-6 Changing the Contents of the Monitor Screen E-24 Getting Ready Indicator display ............E-24 Recording an Image Viewing (Playing Back) an Image Operation Indicator Lamp ........ - Page 3 CONTENTS Setting the Current Date and Time ......E-43 Using the Flash ............E-55 Setting the Date and Time E-43 Selecting the Flash Mode E-55 Selecting the Date Format E-44 Flash Status Indicators E-56 Adjusting the Flash Intensity E-57 Changing the Sync Speed E-57 E-45 BASIC IMAGE RECORDING...
- Page 4 CONTENTS Specifying the Exposure Mode ....... E-82 Attaching a Conversion Lens, Full Auto E-82 Close-up Lens, or Filter ........E-106 Program AE E-83 Installing a Conversion Lens or Close-up Lens E-106 Aperture Priority AE E-84 Using a Filter E-108 Shutter Speed Priority AE E-85 Manual Exposure E-87...
- Page 5 CONTENTS Using a Memory Card to Transfer Image Data ..E-140 E-124 MANAGING IMAGES Memory Card Data E-141 DCF Protocol E-141 Folders and Files ........... E-123 Memory Card File Structure E-142 Folders E-123 Image Files Supported by the Camera E-143 Files E-124 Precautions when Using a Memory Card...
-
Page 6: Introduction
INTRODUCTION INTRODUCTION Quick Reference Getting Ready Load batteries. Insert the memory card. (page E-29) (page E-37) Set the current time and date. (page E-43) -
Page 7: Recording An Image
INTRODUCTION Recording an Image (page E-45) Point the camera at the subject, Remove the lens cap compose the image on the monitor from the lens. screen, and press the shutter re- lease button half way to focus the image. Align the exposure mode dial with (Full Auto Mode). -
Page 8: Viewing (Playing Back) An Image
INTRODUCTION Viewing (Playing Back) an Image (page E-109) Align the power/function switch with Rock the control button to the left or right to scroll through stored images on the monitor screen. -
Page 9: Deleting An Image
INTRODUCTION Deleting an Image (page E-119) Align the Double check to power/function make sure that you Rock the control switch with really want to button to the left or delete the image right to scroll through you selected. stored images and •... - Page 10 INTRODUCTION • CASIO COMPUTER CO., LTD. assumes no responsibility for any damage or loss resulting from the use of this manual. • CASIO COMPUTER CO., LTD. assumes no responsibility for any loss or claims by third parties which may arise through the use of the QV-4000.
-
Page 11: Features
INTRODUCTION • Focus area expansion Features Makes it easier achieve the focus you want. • High-resolution 4.13-megapixel CCD • Image preview Record images that capture everything from delicate skin Provides instant preview of an image you just recorded. tone nuances to all the fine detail of natural scenery. •... - Page 12 INTRODUCTION • DCF Data Storage DCF (Design rule for Camera File system) data storage protocol provides image inter-compatibility with printers and other digital cameras. • VIDEO OUT terminal Connects to your TV for big-screen viewing of images. • USB compatibility Connects to your computer for quick and easy image ex- change.
-
Page 13: Recording Features
INTRODUCTION Recording Features Best Shot Mode Movie Mode page E-76 page E-93 Auto Exposure Bracketing (AEB) Five focus modes Automatically records multiple images at different expo- sure settings. Multi-area AF, Spot AF, Manual, Infinity, Macro page E-62 to E-65 Three metering modes page E-89 Multi-pattern, Center-weighted, Spot page E-68... -
Page 14: General Precautions
After making sure there is no more smoke • Never try to take pictures or use the built-in display while coming from the camera, take it to your nearest CASIO ser- operating a motor vehicle or while walking. Doing so cre- vice provider for repair. -
Page 15: Operating Conditions
INTRODUCTION • Never open the battery compartment cover, disconnect the Operating conditions AC adaptor from the camera or unplug it from the wall • This camera is designed for use in temperatures ranging socket while recording images. Doing so will not only make from 0°C to 40°C. -
Page 16: Lens Precautions
• Should the LCD image appear abnormally dark, take the • The lens of this camera extends from its body when you camera to your dealer or an authorized CASIO service pro- turn on power and retracts when you turn off power. Take vider to have the light source replaced. -
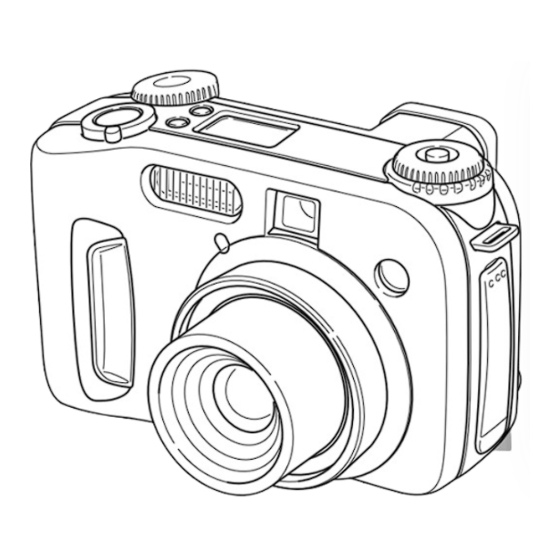
Page 17: Getting Acquainted
GETTING ACQUAINTED GETTING ACQUAINTED This section contains important information you should know when trying to operate the camera. General Guide The following illustrations show the names of each component, button, and switch on the camera. Front Indicator display Selector dial (page E-24) Shutter release button... -
Page 18: Back
GETTING ACQUAINTED Back Flash charge lamp MENU button (Self-Timer) button (page E-26) (page E-42) (page E-52) (Flash) button Operation/card (page E-55) access lamp (page E-25) Zoom controller (Enlarge/Nine Images) (Metering Mode) (pages E-49, 75, 112, 113) button (page E-68) WB (White balance) Control button button (page E-69) -
Page 19: Side
GETTING ACQUAINTED Side Bottom Tripod Battery compartment DIGITAL terminal Diopter dial screw hole cover lock (page E-29) (page E-103) (page E-51) VIDEO OUT terminal (page E-136) USB port (page E-138) Battery compartment DC IN 6V terminal cover (page E-29) (page E-33) External flash sync terminal Open Terminal Panel Cover... -
Page 20: Mode Dials
GETTING ACQUAINTED Drive mode dial Mode Dials Auto Exposure Bracketing (AEB) page Continuous Shutter recording page Drive mode dial 1-Image recording page Movie recording page Panorama recording page Exposure mode dial M Mode (Manual Exposure) page S Mode (Shutter Speed Priority AE) page A Mode (Aperture Priority AE) page... -
Page 21: Using The Control Button
GETTING ACQUAINTED Using the Control Button Control button The control button is used to select menu items and execute function. The following are the terms used in this manual to describe control button operations. Term Meaning Use your thumb to move the control button up, Rock down, left, or right. -
Page 22: Monitor Screen Indicators
GETTING ACQUAINTED Monitor Screen Indicators The following describes the different indicators and markings that appear on the camera’s monitor screen. REC mode Focus Mode indicator Self-timer 10 SEC, 2 SEC Multi-area Auto Focus Exposure Mode indicator Spot Auto Focus Drive Mode indicator M Mode: Manual Exposure Manual Focus 1-Image... -
Page 23: Play Mode
GETTING ACQUAINTED Flash Mode indicator PLAY mode None Auto Flash On Flash Off Folder number Red-eye reduction • Flash indicator indicates that the flash will fire (when auto flash is selected). Image protection indicator File number Image size Quality File name/ File number Date and time Battery... -
Page 24: Changing The Contents Of The Monitor Screen
GETTING ACQUAINTED Changing the Contents of the Monitor Indicator display Screen The indicator display located on the top of the camera also shows various camera status indicators during image re- Use DISP to cycle through monitor screen information set- cording. The indicator display comes in handy especially tings as shown below. -
Page 25: Operation Indicator Lamp
GETTING ACQUAINTED PLAY mode Operation Indicator Lamp Lamp Flashing Color Operation/card access lamp One of the following operations is in progress: The operation/card access lamp Green delete, format, battery alert, card browser shows the operational status of generation. the camera as described below. Memory card is defective. -
Page 26: Flash Charge Lamp
GETTING ACQUAINTED Flash Charge lamp AF Assist Light/Self-timer Lamp The flash charge lamp also lights Flash charge lamp The AF assist light operates automatically to assist the Auto and flashes during a record op- Focus operation whenever you are shooting where lighting is eration as described below. -
Page 27: Using The Bundled Accessories
GETTING ACQUAINTED Adjusting the Length of the Neck Strap Using the Bundled Accessories Use the buckle to adjust the length of the neck strap. Attaching the Neck Strap Attach the neck strap to the strap ring as shown in the illus- tration below. -
Page 28: Using The Lens Cap
GETTING ACQUAINTED Using the Lens Cap Attach the lens cap holder to the neck strap or the strap ring. This protects against accidental loss of the lens cap. Always keep the lens cap on the lens whenever you are not using the camera. -
Page 29: Power Requirements
GETTING ACQUAINTED Load the batteries so their Power Requirements plus (+) and minus (–) ends Your camera features a two-way power supply that lets you are facing as shown in the il- use either AA-size batteries or household AC current. lustration. - Page 30 GETTING ACQUAINTED Battery Life Guidelines — Recording one image per minute under the above con- The battery life guideline values given below indicate the ditions reduces battery life to about one sixth of that amount of time at standard temperature (25°C) until power noted above.
- Page 31 GETTING ACQUAINTED The following examples show how alkaline battery life About rechargeable batteries changes under different shooting conditions. Use only the nickel-metal hydride batteries (NP-H3) that are specifically recommended for this camera. Proper camera Example 1: Intermittent use of the camera shortens battery operation is not guaranteed when other rechargeable batter- life.
-
Page 32: Battery Handling Precautions
GETTING ACQUAINTED Battery Handling Precautions • Remove batteries from the camera if you do not plan to use it for more than two weeks. Incorrect use or handling of batteries can cause them to leak • Never recharge non-rechargeable type batteries, never al- or burst and create the danger of serious damage to your low direct connection between two ends of a battery, and camera. -
Page 33: Low Battery Indicator
GETTING ACQUAINTED Low Battery Indicator Using AC Power The following shows how the battery capacity indicator on Use the adaptor as shown below to power the camera from a the monitor screen and the indicator display changes as bat- household power outlet. tery power is used. - Page 34 Doing so creates the danger of fire and electrical shock. • Should the cord of the AC adaptor become damaged (exposed internal wiring), request a replacement from an authorized CASIO ser- vice provider. A damaged AC adaptor cord creates the danger of fire or electrical shock. E-34...
-
Page 35: Turning The Camera On And Off
GETTING ACQUAINTED Turning the Camera On and Off Power Save Settings Rotate the power/function switch to turn camera power on The settings described below let you specify sleep and auto and off. power off trigger times that help to conserve valuable battery power. - Page 36 GETTING ACQUAINTED To configure power save settings • In the PLAY mode, the Auto Power Off trigger time is fixed at five minutes. • Sleep is disabled in the PLAY mode. Align the power/function switch with • Performing any button operation while the monitor is Press MENU.
-
Page 37: Memory Cards
GETTING ACQUAINTED With the side of the memory card that has an Memory Cards arrow marked facing towards the memory card This camera supports use of a CompactFlash memory card slot cover, slide the card into the camera as far (CF TYPE I/II) or IBM Microdrive for image storage. -
Page 38: Removing A Memory Card From The Camera
AC adaptor, and contact your original retailer or nearest CASIO Service Provider. Eject button • Never eject the memory card while the card slot is fac- ing downwards. Doing so creates the danger of the... -
Page 39: Formatting A Memory Card
GETTING ACQUAINTED Formatting a Memory Card Align the power/function switch with You can format a memory card to delete all of the data Press MENU. stored on it. Select “Format” and then rock the control but- ton to the right (page E-42). IMPORTANT! •... -
Page 40: Memory Card Precautions
• Be sure to use only CASIO or SanDisk CompactFlash • Before starting a format operation, switch to AC adaptor cards, or an IBM Microdrive. Proper operation is not guar- power or load a new set of recommended batteries into the anteed with other memory cards. -
Page 41: Ibm Microdrive Precautions
Microdrive. • The Microdrive is a very high precision device. Dropping • Note that CASIO assumes no responsibility for any data the camera can result in malfunction of the Microdrive, loss you may suffer while using the Microdrive. -
Page 42: Menu Screens
GETTING ACQUAINTED If you want to do this: Do this: Menu Screens Rock the control button Select a menu item Pressing MENU displays the menu screen. The contents of up or down. the menu screen depend on whether you are in the PLAY Display details of the selected Rock the control button mode or REC mode. -
Page 43: Setting The Current Date And Time
GETTING ACQUAINTED Setting the Date and Time Setting the Current Date and Time Use the following procedures to set the current date and Align the power/function switch with time, and to select the date format. When you record an image, the time and date the image was Press MENU. -
Page 44: Selecting The Date Format
GETTING ACQUAINTED Selecting the Date Format If you want to do this: Do this: Rock the control button You can use the following procedure to select one of the Move the selection boundary to the left or right. three different date formats. Increase or decrease the value Rock the control button where the selection boundary is... -
Page 45: Basic Image Recording
BASIC IMAGE RECORDING BASIC IMAGE RECORDING This section describes the basic procedure for recording an Compose the image as you view it on the moni- image using the Full Auto Mode. It also explains about basic tor screen. camera settings. Using the Full Auto Mode The Full Auto Mode makes it easy even for complete novices to record good-looking digital images every time. - Page 46 BASIC IMAGE RECORDING • You can find out the status of After confirming that the Auto Focus operation by the image is in focus, checking the color of the press the shutter focus frame and the status of release button all the the operation/card access way down to record the lamp.
-
Page 47: Recording Precautions
BASIC IMAGE RECORDING IMPORTANT! Recording Precautions • In any of the following cases, the message “One mo- • Never remove the camera’s batteries, disconnect the AC ment please...” appears on the display after you adaptor, or remove the memory card from the camera record each image as it is saved to the memory card. -
Page 48: About Auto Focus
BASIC IMAGE RECORDING About Auto Focus Image Recording when the Batteries are Low Auto Focus tends not to work well with the types of subjects To protect against unexpected loss of image data, each im- listed below. age is recorded directly to the memory card (without going into the buffer) whenever battery level is indicated as •... -
Page 49: About The Rec Mode Monitor Screen
BASIC IMAGE RECORDING About the REC Mode Monitor Screen Using Optical Zoom • The actual image is recorded and saved in accordance Optical zoom enlarges the image by changing the focal dis- with the image quality setting currently selected on your tance of the lens. - Page 50 BASIC IMAGE RECORDING NOTES • Changing the optical zoom factor also affects the lens aperture value. • The lens aperture value indicated on the camera is the aperture when optical zoom is 1X. Using a higher opti- cal zoom setting results in a higher aperture value (smaller aperture).
-
Page 51: Using The Viewfinder For Recording
BASIC IMAGE RECORDING • You can use the Diopter Dial to adjust the image in Using the Viewfinder for Recording viewfinder screen to your eyesight. The illustrations below show what you see when you look through the viewfinder to compose an image for recording. Focus Frame Focus Range Diopter Dial... -
Page 52: Using The Self-Timer
BASIC IMAGE RECORDING Self-timer Time Settings: Using the Self-timer Each press of cycles through the available self- You can set the self-timer to either one of two starting times. timer settings described below. Align the power/function switch with To do this: Select this setting: Turn the self-timer off No display... -
Page 53: Camera Orientation Detection
BASIC IMAGE RECORDING — When recording portrait orientation images, position Camera Orientation Detection the camera so it is standing up as straight as possible, The camera automatically as shown in the illustration below. Holding the camera detects whether it is at an angle can cause sensor errors.
Need help?
Do you have a question about the QV-4000EX and is the answer not in the manual?
Questions and answers