Table of Contents
Advertisement
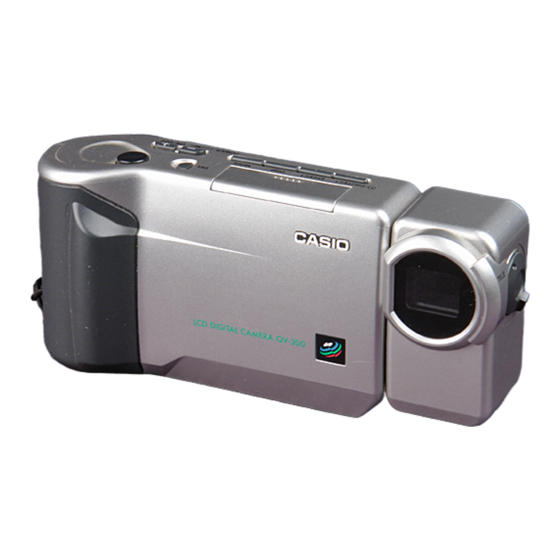
Liquid Crystal Digital Camera
QV-300
Owner's Manual
Contents
Precautions .......................................................... 5
Unpacking ............................................................. 9
General Guide .................................................... 10
Top and Display .................................................................. 10
Lens .................................................................................... 10
Bottom ................................................................................ 11
Terminals ............................................................................ 11
Power Supply ..................................................... 13
To load batteries ................................................................. 13
Using AC Power ................................................................. 17
Recording Images .............................................. 19
To record an image ............................................................. 19
How to avoid hand movement... ......................................... 21
Fluorescent Lighting ........................................................... 21
Infrared Light ....................................................................... 22
Shooting Images Outdoors ................................................. 22
Changing the Lens Orientation ........................................... 22
NORMAL/MACRO Switch .................................................. 24
Switching Between Lenses ................................................. 24
Resolution Modes ............................................................... 25
Exposure Adjustment .......................................................... 25
Changing the Aperture Setting ........................................... 27
Record Mode Displays ........................................................ 27
Using the Self-Timer ........................................................... 30
Playing Back Images ......................................... 31
Displaying Images on the Camera's LCD ........................... 31
Displaying Images on a TV Screen .................................... 32
Page Status Indicators ........................................................ 33
Producing a Multi-Page Display .......................................... 34
If you need help
with your camera,
please call:
1(800)435-7732
英
3
Introduction
Congratulations upon your selection of the QV-300 Liquid Crystal
Digital Camera. The QV-300 comes with its own built-in liquid crystal
color monitor that let's you instantly view the pictures you take.
To get the most out of the QV-300, be sure to carefully read this
manual and follow the instructions contained in it.
2
Using the Zoom Function .................................................... 36
Using Auto Play .................................................................. 38
Protecting Memory Pages .................................................. 41
Unprotecting Memory Pages .............................................. 43
Hiding Protected Memory Pages ........................................ 45
Deleting Memory Pages .................................... 46
Deleting Images From Memory .......................................... 46
Resolution Conversion ...................................... 50
Connecting to Other Devices ............................ 51
The camera terminals ......................................................... 51
Troubleshooting ................................................. 59
Specifications ..................................................... 65
About the camera's backlight... ....................... 66
• CASIO COMPUTER CO., LTD. assumes no responsibility for any
damage or loss resulting from the use of this manual.
• CASIO COMPUTER CO., LTD. assumes no responsibility for any
loss or claims by third parties which may arise through the use of
the QV-300.
• CASIO COMPUTER CO., LTD. assumes no responsibility for any
damage or loss caused by deletion of data as a result of malfunc-
tion, repairs, or battery replacement. Be sure to back up all impor-
tant data on other media to protect against its loss.
4
Advertisement
Table of Contents

Related Manuals for Casio QV-300


Summary of Contents for Casio QV-300
-
Page 1: Table Of Contents
QV-300 color monitor that let’s you instantly view the pictures you take. Owner's Manual To get the most out of the QV-300, be sure to carefully read this manual and follow the instructions contained in it. If you need help... -
Page 2: Precautions
After making sure there is no more as soon as possible. smoke coming from the unit, take it to your nearest CASIO service provider for repair. Never attempt your own maintenance. • If the unit’s case should ever become cracked due to dropping it or... -
Page 3: Unpacking
Unpacking General Guide Getting Acquainted Check to make sure that all of the items shown below are included The following illustrations show the names of each component, but- with your camera. If something is missing, contact your dealer as ton and switch on the camera. soon as possible. -
Page 4: Power Supply
Power Supply Getting Acquainted Battery Handling Precautions The camera features a two-way power supply that lets you use either batteries (AA-size Alkaline or Lithium) or household AC current. Incorrect use or handling of batteries can cause them to leak or burst and seriously damage your camera. -
Page 5: Using Ac Power
• Should the cord of the AC adaptor tor from the AC outlet. become damaged (exposed internal wiring or shorts), request a replace- ment from an authorized CASIO service provider. A damaged AC adaptor cord creates the danger of fire or electrical shock. -
Page 6: How To Avoid Hand Movement
Recording Images Operation Caution Infrared Light • Never open the battery compartment cover, disconnect the Infrared light generated by a flash or other source can create image AC adaptor from the camera or unplug it from the wall color problems, such as red areas being recorded as green. Such socket while the “WAIT”... -
Page 7: Resolution Modes
Recording Images Operation Resolution Modes Use the [+] and [–] buttons to manually adjust the exposure. In addition to a Normal Mode, this camera also has a Fine Mode for • Pressing [+] makes the image on the LCD brighter. Use it to saving images using higher resolution. -
Page 8: Using The Self-Timer
Recording Images Operation Using the Self-Timer Important! • The exposure warning indicators also appear when lighting is out- With the Self-Timer, the shutter is released 10 seconds after you side the range of the camera. In such a case, changing the aperture press the /PROTECT button. -
Page 9: Page Status Indicators
Playing Back Images Operation Producing a Multi-Page Display Important! • Note that only images already stored in camera memory can be Four or nine memory pages can be displayed at the same time. This viewed on the TV screen. If you change to the camera’s Record feature can be used to display multiple memory pages on the cam- Mode, the image picked up by the camera’s lens will not appear on era's built-in LCD, or on the screen of a connected TV. -
Page 10: Using Auto Play
Playing Back Images Operation Notes Press the shutter button. • If the page number is displayed in the upper right corner of the • At this time the image is doubled in size. The portion that screen when you perform a zoom operation, the number is replaced appears on the screen is the center of the image. -
Page 11: Protecting Memory Pages
Playing Back Images Operation Protecting Memory Pages Display the page you want to protect. • Use [+] and [–] to scroll through the pages until the one you You can protect specific memory pages to ensure that they are not want to protect is displayed. -
Page 12: Hiding Protected Memory Pages
Deleting Memory Pages Playing Back Images Operation Hiding Protected Memory Pages Use the procedures described in this section to delete memory pages. You can delete individual pages, or all the pages currently This function makes it possible for you to hide protected memory stored in memory. -
Page 13: Resolution Conversion
DIGITAL – Use this terminal to connect to a personal computer (re- Video Tape Deck VIDEO quires optional Connection Kit), another CASIO Digital You can use the video tape deck to record images from the camera. Camera, or a QV Color Printer. The illustration below shows how to connect to another digital camera. - Page 14 DIGITAL you do not want them in the taped images. You can connect the camera to another CASIO digital camera and • If the low battery indicator (page 29) is displayed while you are re- exchange image data between them. Connect the DIGITAL terminals cording to video tape, it will also be recorded with the image.
-
Page 15: Troubleshooting
Connecting to a QV color Printer DIGITAL Important! You can connect this camera to a CASIO QV color Printer and print- out images that are in camera memory. Use the communication cable • With this configuration, you cannot send images from the personal that comes with the QV Color Printer to connect camera's DIGITAL computer to the camera. - Page 16 Problem with internal memory. Contact your dealer or MEMORY ERROR [–] while turning power #1~#4 an authorized CASIO service provider. on (page 45). CONSULT THE 5. Low battery (indicated 5. Replace batteries or OWNER’S MANUAL! use the AC adaptor (page 13).
-
Page 17: Specifications
• Should the LCD image appear abnormally dark, take the camera to Shutter Speed ..1/8 to 1/4000 second your dealer or an authorized CASIO service provider to have the White Balance ..Automatic light source replaced. Note that you will be charged for this replace- ment.
Need help?
Do you have a question about the QV-300 and is the answer not in the manual?
Questions and answers