
Related Manuals for Meinberg microSync 10 Series


Summary of Contents for Meinberg microSync 10 Series
- Page 1 MANUAL microSync NTP/PTP Time Source January 19, 2023 Meinberg Funkuhren GmbH & Co. KG...
-
Page 3: Table Of Contents
......6.2.3 Network Configuration via Meinberg Device Manager ..... - Page 4 ..... . 6.3.2 Start of Operation with Meinberg Device Manager Software ....
- Page 5 ......... . 207 11.8.1 Format of the Meinberg Standard Time String .
-
Page 6: Copyright And Liability Exclusion
Meinberg reserves the right to make changes of any type to this document at any time as is necessary for the purpose of improving its products and services and ensuring compliance with applicable standards, laws &... -
Page 7: The Microsync System
2 The microSync System 2.1 microSync - Brand and Device Type The registered trademark microSync describes a product family of Meinberg radio clocks for the synchronization of time and frequency signals in networks and directly connected systems such as signal distributors. -
Page 8: Returning Products
Support Service. Do not attempt to repair the device yourself. To submit a repair order for a Meinberg device, first call Meinberg’s Technical Support service to review the shipping options and obtain an RMA (Return Material Authorization) number for shipping. -
Page 9: Microsync System Description
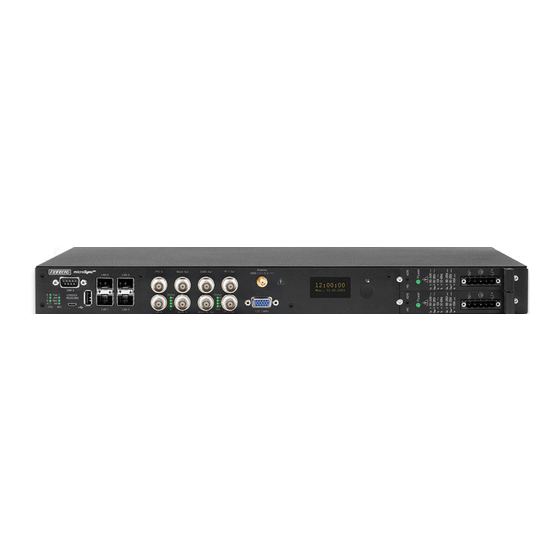
3 microSync System Description 3.1 Device Design, Functions and Area of Application The microSync product family is a range of high-performance synchronization systems available in 9.5-inch (Half-Rack) and 19-inch models. All microSync models offer a wide range of output signals including 1PPS, 10 MHz, IRIG timecodes, pro- grammable pulses, and fiber optic signals. -
Page 10: System Variants Microsync
3 microSync System Description 3.2 System Variants microSync The microSync synchronization system is available in different versions. Two housing variants are available - the space-efficient HR housing (Half Rack, 1HE/9.5 inch built-in housing) and the RX housing variant as 1HE/19 inch built-in rackmount chassis. The RX enclosure offers the option of redundant power with a second power supply unit as an option. - Page 11 1x PPS input (TTL) 1x Word Clock input (TTL) 2 – Receiver ——————————————————————————————- GNS: L1 Multi-GNSS (GPS, GLONASS, Galileo, BeiDou) GPS: Meinberg GPS GNS-UC: Meinberg Multi-GNSS (GPS, Galileo) BB(B) – Oscillator ——————————————————————————————- OCXO SQ OCXO MQ OCXO HQ OCXO DHQ ——————————————————————————————-...
- Page 12 3 microSync System Description microSync Model Code Samples ———————————————————————————————————————————— HR101HQ Half rack chassis of I/O-type 10 with Meinberg GPS receiver, OCXO HQ oscillator. HR701SQ 70 series half-rack enclosure with Meinberg GPS receiver, OCXO SQ oscillator. RX300DHQ/AD10DC20 Full rack chassis of I/O-type 30 with Multi GNS receiver, OCXO SQ oscillator and redundant power supplies (AD10 and DC20).
-
Page 13: Hardware Specifications
3.3 Hardware Specifications 3.3.1 Chassis Specifications 3.3.1.1 HR: Half-Rack Chassis The microSync system is a space-saving synchronization solution in a 9.5-inch/1U half rack housing. It is possible to mount two systems side by side in a 19-inch server rack. A special mounting bracket is available in the supplied mounting kit for mounting a single microSync device. - Page 14 3 microSync System Description 3.3.1.2 RX: 19 Inch Chassis The microSync system from Meinberg is a synchronization solution in a 19-inch/1HE housing, with the option of redundant power supplies with AC/DC or DC voltage. Physical Dimensions: 482.6 mm [ 19 inch ] 465.1 mm [ 18.31 inch ]...
-
Page 15: Available Power Supplies
3.3.2 Available Power Supplies ————————————————————————————————————————– microSync ————————————————————————————————————————– 100-240 V AC / 100-200 V DC Input parameters —————————————————————————————– Nominal Voltage Range 100-240 V 100-200 V Max. Voltage Range 90-254 V 90-240 V Nominal Current 1.0 A 0.6 A Nominal Frequency 50-60Hz Max. - Page 16 3 microSync System Description ————————————————————————————————————————– microSync Broadcast ————————————————————————————————————————– 24 V DC via desktop AC adapter Input parameters —————————————————————————————– Input Voltage Range 10-36 V Max. Voltage Range 9-36 V Nominal current 1.25 A Output parameters —————————————————————————————– Max. Power 30 W Maximum heat emission 108.00 kJ/h (102.37 BTU/h) therm microSync...
-
Page 17: Available Receiver And Oscillator Options
3.3.3 Available Receiver and Oscillator Options Receiver Type Signal Type Value Connector —————————————————————————————————————————- IF (Meinberg Antenna) 15 V DC (12 Channel) GNS-UC GPS, Galileo IF (Meinberg Antenna) 15 V DC (72 Channel) GNSS GPS, GLONASS, L1/E1/B1 band 5 V DC... -
Page 18: Type Tests / Compatibilities
3 microSync System Description 3.4 Type Tests / Compatibilities 3.4.1 Electromagnetic Compatibility - Emission CISPR 16-1-2 and Conducted disturbance voltage measurements CISPR 16-2-1 ————————————————————————————————– CISPR 16-2-3 Radiated radio disturbance ————————————————————————————————– CISPR 32 Conducted disturbance current measurements ————————————————————————————————– FCC 47 CFR Part 15 Conducted emission section 15.107 (b) [3] RSS-Gen Issue 4 section 8.8 [4]... -
Page 19: Electromagnetic Compatibility - Immunity (Microsync Models 1Xx, 2Xx, 3Xx And 4Xx)
3.4.2 Electromagnetic Compatibility - Immunity (microSync models 1xx, 2xx, 3xx and 4xx) The tests were performed according to IEC 61000-6-5 and IEC 61850-3 referring to the following standards: IEC 61000-4-2 Immunity test to electrostatic discharges 6 kV contact discharge 8 kV air discharge IEC 61000-4-3 Immunity test to radiated, radio-frequency, 10 V/m... -
Page 20: Electromagnetic Compatibility - Immunity (Microsync Models 5Xx, 6Xx, 7Xx And 8Xx)
3 microSync System Description 3.4.3 Electromagnetic Compatibility - Immunity (microSync models 5xx, 6xx, 7xx and 8xx) The tests were performed according to IEC 61000-6-5 and IEC 61850-3 referring to the following standards: IEC 61000-4-2 Immunity test to electrostatic discharges 4 kV contact discharge 8 kV air discharge IEC 61000-4-3 Immunity test to radiated, radio-frequency,... -
Page 21: Environmental Tests - Microsync Models 1Xx, 2Xx, 3Xx And 4Xx
3.4.5 Environmental Tests - microSync models 1xx, 2xx, 3xx and 4xx The tests were performed according to IEC 61850-3 referring to the following standards: IEC 60068-2-1 Cold –40 C (-40 F), 16 h IEC 60068-2-2 Dry heat 85 C (185 F), 16 h IEC 60068-2-14 Change of temperature –20 to 55 C (-4 to 131 F), 5 cycles, (1 C/min) -
Page 22: Environmental Tests - Microsync Models 5Xx, 6Xx, 7Xx And 8Xx
3 microSync System Description 3.4.6 Environmental Tests - microSync models 5xx, 6xx, 7xx and 8xx The tests were performed according to IEC 61850-3 referring to the following standards: IEC 60068-2-1 Cold –5 C (23 F), 16 h IEC 60068-2-2 Dry heat 55 C (131 F), 16 h IEC 60068-2-14 Change of temperature... -
Page 23: Important Safety Information
4 Important Safety Information 4.1 Important Safety Information and Safety Precautions The following safety information must be observed whenever the device is being installed or operated. Failure to observe this safety information and other special warnings or operating instructions in the product manuals constitutes improper usage and may violate safety standards and the manufacturer’s requirements. -
Page 24: Used Symbols
4 Important Safety Information 4.2 Used Symbols The following symbols and pictograms are used in this manual. Pictograms are used in particular to indicate potential hazards in all hazard categories. Symbol Beschreibung / Description IEC 60417-5031 Gleichstrom / Direct current IEC 60417-5032 Wechselstrom / Alternating current IEC 60417-5017... -
Page 25: Product Documentation
Detailed product documentation is provided on a USB flash drive delivered with the system. The manuals can also be downloaded from the Meinberg website at https://www.meinbergglobal.com, where you can enter your system name into the search box at the top of the page to find the relevant manual. If you have any questions or problems, our support team will be pleased to help you. -
Page 26: Safety During Installation
4 Important Safety Information 4.4 Safety During Installation WARNING! Pre-Operation Procedures and Preparation for Use This mountable device has been designed and examined in accordance with the requirements of the standard IEC 62368-1 "Audio/Video, Information and Communication Technology Equipment - Part 1: Safety Requirements". When the mountable device is to be used as part of a larger unit (e.g., electrical enclosure), there will be additional requirements in the IEC 62368-1 standard that must be observed and complied with. - Page 27 = 90 - 250 V Faulty shielding or cabling and improperly connected plugs are a health & safety risk (risk of injury or death due to electrical shock) and may damage or even destroy your Meinberg device or other equipment.
- Page 28 4 Important Safety Information AC Power Supply DC Power Supply The device is a Protection Class 1 device and In accordance with IEC 62368-1, it must be • • may only be connected to a grounded outlet possible to disconnect the appliance from the (TN system).
-
Page 29: Connection Of Protective Earth Conductor/Grounding
4.5 Connection of Protective Earth Conductor/Grounding ATTENTION! In order to ensure that the device can be operated safely and to meet the requirements of IEC 62368-1, the device must be correctly connected to the protective earth conductor via the protective earth connection terminal. If an external ground connection is provided on the housing, it must be connected to the grounding busbar (earthing busbar) for safety reasons before connecting the power supply. -
Page 30: Safety During Operation
4 Important Safety Information 4.6 Safety During Operation WARNING! Avoiding Short-Circuits Protect the device against all ingress of solid objects or liquids. Ingress presents a risk of electric shock or short-circuiting! Ventilation Slots Ensure that ventilation slots are clean and uncovered at all times. Blocked ventilation slots may cause heat to be trapped in the system, resulting in overheating. -
Page 31: Safety During Maintenance
(approx. 60 N) presents a risk of injury to the hands. Information on which components are approved for installation can be obtained from Meinberg Technical Support. The device must not be opened. Repairs to the device may only be performed by the manufacturer or authorized personnel. -
Page 32: Handling Of Batteries
The battery is used to power components such as the RAM and the reserve real-time backup clock for the reference clock. If the battery voltage drops below 3 V DC, Meinberg recommends having the battery replaced. If the battery voltage drops below the specified minimum, the following behavior may be... -
Page 33: Safety Information For Sfp Modules
fiber optic or electrical connection. The safety information below must be read and heeded before installing an SFP module in a Meinberg device, before setting up a Meinberg device equipped with SFP modules for use, or before performing maintenance on such a Meinberg device. -
Page 34: Cleaning And Care
4 Important Safety Information 4.10 Cleaning and Care ATTENTION! Never clean the device using liquids! Water ingress is a significant safety risk for the user (e.g., electric shock). Liquids can cause irreparable damage to the electronics of the device! The ingress of liquids into the device chassis may cause short circuits in the electronic circuitry. -
Page 35: Return Of Electrical And Electronic Equipment
When disposing of your old equipment, please use the national return or collection systems available to you. Alternatively, you may contact Meinberg, who will provide further assistance. The return of electronic waste may not be accepted if the device is soiled or contaminated in such a way that it potentially presents a risk to human health or safety. -
Page 36: Before You Start
5 Before you start 5 Before you start 5.1 Text and Syntax Conventions This chapter briefly describes the text and syntax conventions used in this manual. Meinberg Device Manager: Example "Network Settings" menu Submenu "Network Settings Interfaces" Tab in a submenu "Monitoring Settings... -
Page 37: Abbreviation List
5.2 Abbreviation List AFNOR Association Francaise de Media Access Control Normalisation Message-Digest Algorithm 5 Alternating Current Management Information Base ASCII American Standard Code for Multi Reference Source Information Interchange Time signal transmitter in Anthorn, UK Best Master Clock NIST National Institute of Bayonet Neill-Conselman connector Standards and Technology Bytes per second... -
Page 38: Required Tools
5 Before you start 5.3 Required Tools microSync HR microSync RX Haltewinkel Torx T10 Torx T10 Rack-Einbau Erdungsanschluss Torx T20 Torx T20 Netzteil Torx T8 Figure: Required tools from left to right: TORX T20, TORX T10, TORX T8 microSync Date: January 19, 2023... -
Page 39: Additional Software
5.4 Additional Software Meinberg Device Manager We provide "Meinberg Device Manager" free of charge as an alternative for setting up, configuring, and moni- toring your device. This is a graphical desktop application that you can use to manage and monitor multiple Meinberg devices concurrently over an encrypted network connection. -
Page 40: Preparing Installation
5 Before you start 5.5 Preparing Installation Meinberg microSync systems are designed for installation in 19-inch racks. Rack systems come with all neces- sary accessories (mounting brackets, screws, adapters for power supply ...). For installations in regions outside of Germany that have other standards (e.g. for power supply connections), please specify exactly which adapters or cables you need to put the device into operation when ordering. -
Page 41: Unboxing The Device
Carefully unpack the system and all accessories and put them aside. Check the scope of delivery with the pack- ing list to ensure that no parts are missing. If any of the listed contents are missing, please contact Meinberg Funkuhren. -
Page 42: Disposal Of Packaging Materials
Check the system for shipping damage. If the system is damaged or cannot be put into operation, contact Meinberg Funkuhren immediately. Only the recipient (the person or company receiving the system) can assert a claim against freight forwarder for shipping damage. -
Page 43: System Installation
6 System Installation 19 inch Rackmount Mounting brackets and fixing screws are included in the scope of delivery of a half or full rack system. If the system is supplied with an antenna and antenna cable, it is advisable to first mount the antenna in a suitable location (see chapter Antenna Mounting) and lay the antenna cable. -
Page 44: Connecting The System
The following section describes how you can initially put a microSync system into operation with the help of the Meinberg Device Manager Software. The supplied USB stick contains an installation file for the Mein- berg Device Manager software. If you do not want to perform an installation on your local PC, you can start the "portable"... -
Page 45: Initial Network Configuration
There are three ways to perform the basic network configuration of your microSync: • Configuration via a serial connection, see Chapter 6.2.1. • Configuration via the Web Interface, see Chapter 6.2.2. • Configuration via Meinberg Device Manager, see Chapter 6.2.3. Date: January 19, 2023 microSync... -
Page 46: Network Configuration Via Serial Connection
6 System Installation 6.2.1 Network Configuration via Serial Connection The initial network configuration of the microSync can also be performed via a serial USB connection. You can connect the USB port on the PC with the micro-USB port of the microSync using a standard USB cable (Micro-USB Type B to USB-A). - Page 47 Web Interface or Meinberg Device Manager. Information: If the microSync’s network configuration has already been previously performed using the Web Interface or Meinberg Device Manager, you will not be able to do this using mbgOSWizard.sh. Date: January 19, 2023 microSync...
-
Page 48: Network Configuration Via Web Interface
6 System Installation 6.2.2 Network Configuration via Web Interface The network configuration for the microSync can be performed via the Web Interface. In its factory-shipped state, the microSync has the following network configuration: Network Port LAN 0 192.168.19.79 IPv4 Address: 255.255.255.0 Subnet Mask: Gateway:... - Page 49 As soon as the Dashboard appears, click on the "Configuration" section in the Header Bar, then select the "Network" tile. Be sure in particular to correctly configure the network settings for the intended management interface ("Interfaces" tab) to ensure that it is accessible within the subnet. Once you have performed the configuration, click on "Save"...
-
Page 50: Network Configuration Via Meinberg Device Manager
DHCP: Disabled The PC on which Meinberg Device Manager is used must be able to establish a network connection with the above address in the appropriate subnet. If the PC’s network configuration or the network’s topology or addressing prevent a connection from being established with the microSync, the network configuration of the PC will need to be (temporarily) changed and a different physical connection may need to be established (e.g. - Page 51 If the inserted microSync cannot be found via the automatic search, the Add Device button can be used to set up the connection manually. Manual Setup Select the connection type microSyncHR, microSyncRX (Network). Then enter the IPv4 address of the microSync (192.168.19.79).
-
Page 52: Initial Start Of Operation
(Figure 6.1). The default settings are: admin Username: Password: timeserver Further information about the meinbergOS web interface in the chapter "The meinbergOS Web Interface" to be found in the microSync installation manual: https://www.meinberg.de/download/docs/manuals/english/microsync.pdf microSync Date: January 19, 2023... -
Page 53: Start Of Operation With Meinberg Device Manager Software
6.3.2 Start of Operation with Meinberg Device Manager Software First install the Meinberg Device Manager software supplied on the USB stick. After the setup, start the program. If you do not want to perform a setup on your computer, you can start the portable version of the Meinberg Device Manager software directly on the USB stick: USB Drive/Software/MbgDevMan/mbgdev- man_portable/mbgdevman.exe. - Page 54 User and Password fields are already filled out. Silent Login You have the option that the Meinberg Device Man- ager does not ask for a user name and password every time you log in. Custom Alias Assign a custom alias for better identification of indi-...
-
Page 55: Security Guide
7 Security Guide This chapter illustrates how to securely configure meinbergOS for the microSync series of products. It contains a general overview of the context in which security should be considered when managing your microSync, as well as sections on securing management interfaces, securing time services, log management, and keeping your microSync up to date with the latest firmware updates. - Page 56 Web Interface over a HTTPS session, or using the RestAPI. The microSync can also be configured using Meinberg Device Manager via an SSH tunnel. Alternatively, the microSync can also be configured from the command line via an SSH terminal. However, this alternative method does not provide the same range of configuration options as Meinberg Device Manager or the Web Interface.
-
Page 57: Securing Management Access
Once the system has the latest firmware installed, you will need to provide a valid certificate for the web server or Web Interface. Currently, this needs to be done using Meinberg Device Manager using the "Upload Date: January 19, 2023... - Page 58 You can then disable the services that are not required. The services also need to be configured using Meinberg Device manager, as shown in Figure 7.2. The Web Interface, NTP, and SNMP can be stopped and started using the Services menu item. PTP will only be enabeld if an instance is actually created via the PTP menu item.
- Page 59 Meinberg Device Manager. Figure shows what this form contains. Figure 7.3: Configuring SNMP in Meinberg Device Manager The next step is to create a new user and set a new password. This is necessary to ensure that the pub- licly known username/password combination can no longer be used.
-
Page 60: User Management
• To view the system log files, the user requires the "read state System" permission and Shell channel access. • Write permissions also include read permissions via the RESTful API. The following table shows which permissions are required for which functions in the Web interface, RESTful API or Meinberg Device Manager. microSync Date: January 19, 2023... - Page 61 Effects of permissions on configuration via the Web Interface or RESTful API: Note: The system of notation used here (e.g., "admin/maintenance/inventory,firmware") refers to the address of the selected menu item as located in the meinbergOS Web Interface - "https://[MICROSYNC.IP]/admin/maintenance/inventory#firmware" Read State Read Configuration Write Configuration Database...
- Page 62 7 Security Guide Read State Read Configuration Write Configuration Sensors No effect Not available Not available Ref.Sources /state/references displayed /configuration/references /configuration/references in WebUI and readable in displayed in WebUI and modifiable in WebUI and readable in API Serial Ports No effect No effect No effect Services...
- Page 63 Effects of permissions on configuration via Meinberg Device Manager: Read State Read Configuration Write Configuration Database No effect Function ”Show GNSS No effect Statistics” enabled Firmware Not available /configuration/firmware /configuration/firmware displayed modifiable IO Ports /state/IOPorts displayed /configuration/IOPorts /configuration/IOPorts displayed modifiable...
- Page 64 7 Security Guide Read State Read Configuration Write Configuration Serial Ports Not available /configuration/clock/ /configuration/clock/ serialports displayed serialports modifiable Services /state/services displayed /configuration/services /configuration/services displayed modifiable System /state/system and /configuration/system, /configuration/system, /state/clock/system /configuration/clock/ /configuration/clock/ displayed system, and system, /configuration/clock/ /configuration/clock/ timezone displayed timezone modifiable, ”Save as Startup”...
- Page 65 Figure shows an example of a configuration form in the Web Interface for a user’s permissions. This form can be found at "Admin Configuration Users". Figure 7.4: Management of a User’s Permissions A microSync in its factory-shipped state has three users: admin, info, and status. Because these usernames/- password combinations are quoted in publicly available documentation, the users will need to be replaced.
- Page 66 7 Security Guide Figure 7.6: New User Page You can set not only the username and password here, but also the user level to be used as a template for the permissions. The "admin" user level is recommended as the template for the new admin user. Once the page has been completed, the user can be created by pressing the "Create User"...
-
Page 67: Securing The Ntp Time Service
7.4 Securing the NTP Time Service The NTP time service provides several methods for authenticating and ensuring the integrity of packet trans- missions. The NTP Autokey method is considered to be insecure, which is why this guide illustrates how to configure the symmetric key method. - Page 68 7 Security Guide If the microSync is to act as a client and will be synchronized with another NTP server, an external NTP server will need to be specified using the "Client" form. This connection can also be secured using symmetric keys.
-
Page 69: Event Logs
When using services other than SNMPv3, however, it is important to note that there is a risk of information being intercepted due to the lack of encryption. External syslog servers can be configured using Meinberg Device Manager under "Monitoring Syslog" as shown in Figure 7.9. -
Page 70: Updating The Firmware And Backing Up The Configuration
7 Security Guide 7.6 Updating the Firmware and Backing Up the Configuration Firmware files can be uploaded to the microSync via the Web Interface using the button Install New Firmware on the page "Maintenance Inventory Firmware" as shown in Figure 7.10. The update process can then be triggered by selecting a file and clicking on "Install Firmware"... - Page 71 It is possible to create a backup of the entire configuration via Meinberg Device Manager using the button Save Multiple Subject Configurations. In the window that then appears, all of the configuration subjects can be selected and backed up. The button Load Multiple Subject Configurations can be used to restore a config- uration backup.
-
Page 72: The Meinbergos Web Interface
8 The meinbergOS Web Interface 8 The meinbergOS Web Interface 8.1 Introduction: meinbergOS Web Interface microSync systems with meinbergOS Version 2022.05.1 or later provide a feature-rich Web Interface that can be used to perform most configuration processes easily and also allows you to monitor your device’s status and condition. - Page 73 Information: In the interest of optimizing the security of your meinbergOS device, it is recommended to carefully study not only this manual but also the meinbergOS Security Guide, which is available from Meinberg if you do not already have it.
-
Page 74: Terminology Of Navigation Elements In The Meinbergos Web Interface
8 The meinbergOS Web Interface 8.1.1 Terminology of Navigation Elements in the meinbergOS Web Interface The following terminology is used to describe the display and navigational elements that are employed in the meinbergOS Web Interface: The Web Interface (always capitalized) denotes the entirety of the meinbergOS configuration and monitor- ing interface accessible via a conventional web browser. -
Page 75: Formatting And Structural Principles Of This Manual
8.1.2 Formatting and Structural Principles of this Manual This manual applies the following formatting and structural conventions in relation to the meinbergOS Web Interface: Structure Sections of the meinbergOS Web Interface are described in first-level chapters, specifically Chapters (Dashboard), (Configuration), (State), and (Maintenance). -
Page 76: Basic Configuration Principles
8 The meinbergOS Web Interface 8.1.3 Basic Configuration Principles meinbergOS operates on the basis of a dual-configuration system: the Running Configuration and the Startup Configuration. Figure 8.2: meinbergOS Web Interface: Saving Changes to the Running Configuration The Running Configuration is the configuration that is currently active on the meinbergOS device. Whenever a change to the configuration is applied using a Save button, that change will be confirmed using the green dialog box shown in the screenshot above, which confirms that it has been applied to the Running Configuration. - Page 77 Figure 8.4: meinbergOS Web Interface: Detailed Indication of an Error in Configuration If a configuration cannot be saved due to an error in an entry or a conflict between two settings, the red dialog box shown in Fig. will appear and the source of the conflict or error will be identifiable by a red frame and red alert symbol around the relevant panels and/or fields.
-
Page 78: Header Bar
8 The meinbergOS Web Interface Figure 8.6: meinbergOS Web Interface: Header Bar 8.2 Header Bar The Header Bar (Fig. 8.6) is the primary method of navigation throughout the meinbergOS Web Interface. It can be used to navigate to any of the Web Interface’s four main sections, and provides a Find Anything tool for locating a certain option in the Web Interface’s many sections, subsections, and tabs. - Page 79 Network Summary Figure 8.8: meinbergOS Web Interface: Network Summary The Network Summary (Fig. 8.8) displays the current hostname of the meinbergOS device (os-target-0310 in the example above) and can be selected to display an overview of the currently configured network interfaces. User Menu Figure 8.9: meinbergOS Web Interface: User Menu The User Menu (Fig.
-
Page 80: Dashboard
8 The meinbergOS Web Interface 8.3 Dashboard Figure 8.10: meinbergOS Web Interface Dashboard The Dashboard (Figure 8.10) provides an overview of the most important system information, including: Clock Status: The synchronization status of the receiver currently in use. The color of this tile makes the synchronization status of the meinbergOS device immediately apparent. - Page 81 NTP: This tile briefly indicates the state of the internal NTP service, and if synchronized with external NTP servers, the state of the main NTP server. PTP: This tile shows the state of the PTP service, indicating the virtual interface, protocol in use, and the current PTP profile.
-
Page 82: Configuration
8 The meinbergOS Web Interface 8.4 Configuration Figure 8.11: meinbergOS Web Interface: "Configuration" Section The Configuration section (Figure 8.11) is where the fundamental system parameters are configured and managed. References: This is where you can configure the reference sources supported by your system. It also provides options for the prioritization of references, the ability to compensate for propagation delays, and an option to manually define static precision values for each reference. -
Page 83: Configuration - References
Figure 8.12: meinbergOS Web Interface: "Configuration References" Tab 8.4.1 Configuration - References This list in this subsection (Fig. 8.12) allows you to prioritize the handling of input signals; the priorities dictate how clock switching is handled if a master reference ceases to be available. The prioritization of the input signals should be in descending order with respect to the accuracy of the signals. - Page 84 8 The meinbergOS Web Interface Figure 8.13: meinbergOS Web Interface: Expanded Reference Source The configuration options for each reference source can be displayed by clicking on the panel or the corre- sponding Expand button (Fig. 8.12). This panel enables the available references of your meinbergOS device to be configured in detail.
- Page 85 reference will continue to be used. If, on the other hand, there is a time reference available with a higher priority and better precision value, it will be switched to immediately. If the precision value is 0, no holdover period will be calculated and the reference will be switched immediately.
- Page 86 8 The meinbergOS Web Interface Is Phase Source: Designates the source as a reference for phase synchronization. Statistics Only: Prevents the source from being automatically selected as a synchronization reference so that it is used only for statistical analysis. Asymmetry Asymmetry Step Detection is used to detect clock jumps.
-
Page 87: Configuration - Network
8.4.2 Configuration - Network In this subsection you can perform all of the main network configuration processes for your meinbergOS device. Main: These are the main parameters for the general network configuration, notably the hostname, default gateways, and DNS servers. Interfaces: This is where the physical network interfaces and associated virtual interfaces are managed. - Page 88 8 The meinbergOS Web Interface 8.4.2.1 Configuration - Network - Main Figure 8.14: meinbergOS Web Interface: "Configuration Network Main" Tab The "Configuration Network Main" tab (Fig. 8.14) is used to modify the essential network configuration for your meinbergOS device that enables it to actually reach other devices in the network. Hostname: The hostname under which the meinbergOS device is advertised and can be found in the network.
- Page 89 8.4.2.2 Configuration - Network - Interfaces Figure 8.15: meinbergOS Web Interface: "Configuration Network Interfaces" Tab The physical and virtual network interfaces and Synchronous Ethernet functionality are configured in this tab (Fig. 8.15). Physical Network Interfaces The available physical network interfaces are listed here and can be selected. MAC Address: The Media Access Control (MAC) address—the unique identifier for a Network Interface Controller (NIC).
- Page 90 8 The meinbergOS Web Interface Front LED Indication: Specifies whether the state of this network interface should be indicated via the LED link indicator on the front of the device or not. It is possible to have the link status of individual interfaces indicated visually via the LED on the front.
- Page 91 This is used to locally prioritize clocks in Master mode that have the same Local Priority: Quality Level and identical datasets. This can be done, for example, to manually prioritize a certain physical Ethernet port for SyncE even if Quality Levels are consistent among multiple sources.
- Page 92 8 The meinbergOS Web Interface VLAN: This checkbox enables VLAN tagging. VLANs ensure that network applications remain isolated from one another, despite being connected to the same physical network, without the need for multiple sets of cables and multiple devices. VLAN ID: A 12-bit value (0–4096) that enables VLAN network traffic to be separated into discrete VLANs so that VLAN packets can be uniquely assigned to their...
- Page 93 8.4.2.3 Configuration - Network - PRP Figure 8.16: meinbergOS Web Interface: "Configuration Network PRP" Tab PRP (Parallel Redundancy Protocol) is a network protocol standard for Ethernet networks that provides seam- less failover to a redundant network in the event of the failure of any network component. This redundancy is invisible to applications.
- Page 94 8 The meinbergOS Web Interface 8.4.2.4 Configuration - Network - Bonding Figure 8.17: meinbergOS Web Interface: "Configuration Network Bonding" Tab The tab "Network Bonding" (Fig. 8.17) enables two or physical network connections to be bonded (grouped) into a single, joint interface. Bonding mode is used to ensure physical interface redundancy or optimize the bandwidth usages of the inter- faces.
- Page 95 Bonding Modes Active Backup: A physical interface in the bonding group acts as an "active slave". All network traffic in a meinbergOS device’s bonding group passes through this interface. The other physical interfaces in the bonding group are passive. If the active interface loses its link-up, the bond will switch seamlessly to the passive interface, in which case the MAC address of the network interface will also remain unchanged.
- Page 96 8 The meinbergOS Web Interface 8.4.2.5 Configuration - Network - Extended Configuration Figure 8.18: meinbergOS Web Interface: "Configuration Network Extended Network Configuration" Tab The Extended Configuration tab (Fig. 8.18) is a basic text editor for an Extended Network Configuration Bash script that enables custom network parameters to be specified.
-
Page 97: Configuration - Ntp
8.4.3 Configuration - NTP This subsection provides the means to configure your meinbergOS device’s NTP functionality. The type and number of configurable parameters depends on the module or device selected. Server: This is where the meinbergOS device is configured in relation to how it operates as an NTP server. - Page 98 8 The meinbergOS Web Interface 8.4.3.1 Configuration - NTP - Server Figure 8.19: meinbergOS Web Interface: "Configuration Server" Tab Information: These options relate to how your meinbergOS device operates as an NTP server or peer and not to your meinbergOS device as a client. For the configuration of NTP server/client relationships where your meinbergOS device is the client, please open the subsection "Configuration Client"...
- Page 99 Reference Clocks The NTP reference clocks to be used to synchronize this device. Time 2: Driver-specific Time 2 for the reference clock (e.g., Trust Time). For the Parse driver, this value specifies the Trust Time (provided that flag1 = 1 in /etc/ntpd.conf ). The Trust Time specifies how long the NTP service will continue to ’trust’...
- Page 100 8 The meinbergOS Web Interface 8.4.3.2 Configuration - NTP - Client Figure 8.20: meinbergOS Web Interface: "Configuration Client" Tab Information: These options relate to how your meinbergOS device operates as an NTP client and not to clients connected to your meinbergOS device (in its capacity as a server). For the configuration of NTP server/client relationships where your meinbergOS device is the server, please open the subsection "Configuration Server"...
- Page 101 External Servers NTP servers to be used for synchronization of this device. Hostname / Address: Hostname or IP address of the server. Initial Burst (iburst): If enabled, the device will initially send a burst of eight packets instead of the usual one packet in order to speed up the synchronization acquisition.
- Page 102 8 The meinbergOS Web Interface 8.4.3.3 Configuration - NTP - Symmetric Keys Figure 8.21: meinbergOS Web Interface: "Configuration Symmetric Keys" Tab This tab (Fig. 8.21) can be used to configure symmetric keys to provide authenticated NTP clock synchro- nization. The keys can be used both for communication with NTP clients and for communication with external servers.
- Page 103 8.4.3.4 Configuration - NTP - Extended Configuration Figure 8.22: meinbergOS Web Interface: "Configuration Extended Configuration" Tab This tab (Fig. 8.22) enables you to add any custom configuration parameters that are not provided in the other configuration subsections. These parameters will be appended to ntp.conf after application of the main configuration.
-
Page 104: Configuration - Ptp
8 The meinbergOS Web Interface 8.4.4 Configuration - PTP This subsection enables you to configure all of the main PTP parameters for your module or device. The level of configurability will depend on the interface/license. Interfaces: This tab hosts the PTP-specific configuration options for the virtual network interfaces to be used for PTP applications. - Page 105 Information: The Hardware Packet Generator is only compatible with one-step PTP and Layer 3 network protocols (UDP/IPv4 and UDP/IPv6). It can therefore not be used with any PTP profile that requires Layer 2 IEEE 802.3 communication. Hybrid Mode: If enabled, Delay Request and/or Delay Response messages will be sent in unicast transmissions, while all other PTP messages will be sent as multicast transmissions.
- Page 106 8 The meinbergOS Web Interface 8.4.4.2 Configuration - PTP - Instances Figure 8.24: meinbergOS Web Interface: "Configuration Instances" Tab This tab (Fig. 8.24) is where the PTP instances are created, assigned to a pre-defined virtual interface, and (re)configured. Specifically, the configuration options listed here relate to the transmission and handling of PTP messages in the network functions.
- Page 107 Log Level: Information: The PTP stack logs are not accessible via the Web Interface or Meinberg Device Manager. The files must be acquired manually by logging into the meinbergOS device through a terminal, be it through SSH or a wired connection to the console interface. The log files are located at /var/log and have the filename ptpstack_<virtualinterfacename>.log.
- Page 108 8 The meinbergOS Web Interface PTPv2 Additional configuration parameters for PTPv2 instances. Profile: Enables the selection of a specific PTP profile that sets specific operating parameters for defined PTP performance requirements. The IP addressing protocol used for UDP/IP communication. This can be UDP/IPv4 Networking Protocol: or UDP/IPv6 communication (OSI Layer 3 communication).
- Page 109 PTPv2 Fixed Quality If Master or Auto mode is selected, the Fixed Quality parameters can be opened within the PTPv2 panel to enable the quality parameters to be forced for the Best Master Clock algorithm. These settings do not appear or apply in Slave mode. Information: It is possible to have only individual quality parameters forced and the remainder calculated automat- ically.
- Page 110 8 The meinbergOS Web Interface 8.4.4.3 Guide: Creating a PTP Instance Because the process of setting a PTP instance on an interface is rather more involved than the configuration of NTP or other signal outputs, this chapter will briefly explain how to create a PTP instance and assign it to a virtual interface.
-
Page 111: Configuration - Io Ports
8.4.5 Configuration - IO Ports Figure 8.25: meinbergOS Web Interface: "Configuration IO Ports" Subsection This subsection (Fig. 8.25) provides an overview of the available interfaces and visual status indicators on the front of your meinbergOS device (e.g., a microSync). Selecting a interface, plug, or socket will open the corresponding panel or subsection used to configure that connector (if configurable). -
Page 112: Configuration - Users
8 The meinbergOS Web Interface 8.4.6 Configuration - Users The "Configuration Users" subsection can be used to create new users and to edit or delete existing users. oder gelöscht werden. Accounts: This tab is where the meinbergOS device’s user accounts are managed. It provides functions for creating and deleting accounts as well as assigning or revoking permissions. - Page 113 (0 = Never). Allow Multiple Sessions: Specifies whether the account can be used to log in more than once at the same time (for example, one via Meinberg Device Manager, another via the Web Interface). Channels: Specifies the channels via which this account can connect to the device:...
- Page 114 Web Interface: Allows access to the meinbergOS Web Interface via a web browser. Device Manager: Allows access to the meinbergOS device using Meinberg Device Manager. Shell: Allows access to the Linux command line interface (CLI) via terminal software. This channel is also required for viewing the system log and kernel log, even through the meinbergOS Web Interface.
- Page 115 Meinberg Device Manager and is currently not possible in the meinbergOS Web Interface. Read State: This currently has no function. Information: Access to the satellite statistics database in Meinberg Device Manager also requires access to the Shell channel and the Allow "sudo" in Shell permission. Date: January 19, 2023 microSync...
- Page 116 Web Interface. Write Configuration: Allows the user to modify the settings of the Monitoring configuration tab in Meinberg Device Manager, allowing it to modify the SNMP, syslog, and events monitoring config- urations through Meinberg Device Manager. This is currently not possible through the meinbergOS Web Interface.
- Page 117 Web Interface. Write Configuration: Allows the user to modify options related to the internal clock module in Meinberg Device Manager. This permission does not affect access to configuration options in the meinbergOS Web Interface; some of these options (simulation mode, compensation for cable length) are also available via the IO Ports permission.
- Page 118 IO Ports permissions, which govern access to the I/O ports in general, provide access to different options when using Meinberg Device Manager, but these options are combined in a single subsection in the meinbergOS Web Interface. It is therefore necessary to have both Read Config and/or both Write Config permissions activated if a user is intended to access and/or make changes in the IO Ports...
- Page 119 Information: With the exception of the Restart NTP function provided in the Maintenance subsection, the functions that the Services permissions relate to are currently only accessible from Meinberg Device Manager and are currently not accessible via the meinbergOS Web Interface.
- Page 120 8 The meinbergOS Web Interface Users: Read State/Read Configuration: Specifies whether the user is permitted to view configuration information for all users on the system. Write Configuration: Specifies whether the user is permitted to create new users and modify the configuration of existing users.
- Page 121 8.4.6.2 Configuration - Users - Levels Figure 8.28: meinbergOS Web Interface: "Configuration Users Accounts" Tab The "Configuration Users Levels" tab (Fig. 8.28) is used to define or modify user levels to enable more efficient creation of user accounts. User levels are essentially customized user profiles that serve as templates for the creation of new user accounts.
- Page 122 Web Interface: Allows access to the meinbergOS Web Interface via a web browser. Device Manager: Allows access to the meinbergOS device using Meinberg Device Manager. Shell: Allows access to the Linux command line interface (CLI) via terminal software. This channel is also required for viewing the system log and kernel log, even through the meinbergOS Web Interface.
-
Page 123: State
8.5 State Figure 8.29: meinbergOS Web Interface: "State" Section The State section of the meinbergOS Web Interface (Fig. 8.29) provides you with a wealth of information about the status of your microSync device, including an overview of the various reference sources, network connectivity and redundancy, NTP and PTP functionality, I/O ports, and user access. -
Page 124: State - References
8 The meinbergOS Web Interface 8.5.1 State - References The "State References" subsection provides general information about the system’s reference clocks, includ- ing the signal availability and phase lock, accuracy, and jitter status. Overview: This tab provides a list of all available references, both enabled and disabled, showing their availability, offset, and other states. - Page 125 Name The designation of the clock source. The interface connector is shown in parentheses: CLK1: Signal transmitted through internal reference clock. (e.g., GPS antenna, PPS, time string) lan: NTP data communication over any configured Ethernet interface. lan2: PTP data communication over the input-enabled PTP interface. Information: As of Version 2022.05.1, lan2 is the only input-enabled PTP interface and is therefore the only interface that can be operated as a PTP slave.
- Page 126 8 The meinbergOS Web Interface State This column may show any number of tags indicating the status of the clock and its signal: Is Locked: The clock is locked with the external reference signal and is using it to adjust the oscillator.
- Page 127 8.5.1.2 State - References - Global Figure 8.31: meinbergOS Web Interface: "State References Global" Tab The "State References Global" tab (Fig. 8.31) provides a summary of your general clock status. Master Reference: Indicates the source of the external master clock signal. The information in parentheses is the interface through which this clock signal is being passed.
- Page 128 8 The meinbergOS Web Interface Clock State Details This provides detailed information on the status of the master clock. Time Not Verified: While the clock is synchronized with this reference source, meinbergOS is not using the time from it as the trustworthiness of it is in question. Clock Synchronized: The clock is synchronized with the reference signal.
- Page 129 8.5.1.3 State - References - Sources Figure 8.32: meinbergOS Web Interface: "State References Sources" Tab The "State References Sources" tab (Fig. 8.32) provides more detailed information on each of the refer- ence sources. Click on the panel of a specific reference to expand it and display the information. Click on the name or arrow again to collapse the panel and hide the information.
- Page 130 8 The meinbergOS Web Interface Name: The reference source name and interface through which it is provided. Offset: Difference in time between the time source and the main reference. SSM: Synchronization Status Message. Specifies the quality of the time source and is relevant for SyncE.
-
Page 131: State - Network
8.5.2 State - Network The "State Network" subsection provides general information about your network connectivity, including PRP network path redundancy and network bonding. Main: This tab shows the main general network configuration parameters, notably the hostname, default gateways, and DNS servers. Interfaces: This tab provides information on the physical network interfaces and associated virtual interfaces. - Page 132 8 The meinbergOS Web Interface 8.5.2.1 State - Network - Main Figure 8.33: meinbergOS Web Interface: "State Network Main" Tab The "State Network Main" tab (Fig. 8.33) provides a summary of your primary network configuration. Hostname: The current hostname of the meinbergOS device, as defined under "Configuration Network Main".
- Page 133 8.5.2.2 State - Network - Interfaces Figure 8.34: meinbergOS Web Interface: "State Network Interfaces" Tab The "State Network Interfaces" tab (Fig. 8.34) provides details of the status of each individual Ethernet interface in your meinbergOS device. Each interface panel can be opened and closed by selecting it. Interface Name: The internal system designation for the Ethernet interface.
- Page 134 8 The meinbergOS Web Interface PRP Path: If PRP is enabled for this interface, this specifies which of the two paths in the PRP configuration this Ethernet interface is used for. Virtual Interfaces: The virtual interfaces configured for this physical interface are displayed in this panel, showing the interface name, DHCP state, set or assigned IP address, and prefix bits for the netmask.
- Page 135 8.5.2.4 State - Network - Bonding Figure 8.36: meinbergOS Web Interface: "State Network Bonding" Tab The "State Network Bonding" tab (Fig. 8.36) provides information on aggregated (’bonded’) network connections. Bonded network connections are used to increase throughput and provide redundancy by various means in case one of the links fails.
-
Page 136: State - Ntp
8 The meinbergOS Web Interface 8.5.3 State - NTP The "State NTP" subsection provides general information about the system’s NTP functionality, both as a server and as a client. Main: This tab provides general information about the meinbergOS device’s own NTP service. - Page 137 8.5.3.1 State - NTP - Main Figure 8.37: meinbergOS Web Interface: "State Main" Tab The "State Main" tab (Fig. 8.37) provides general information about the meinbergOS device’s own NTP service. Implementation: The NTP implementation being used by the system. This should always read "Network Time Protocol daemon (ntpd)".
- Page 138 8 The meinbergOS Web Interface Sync Source: The "source" of the signal used to synchronize the system. This will usually read "VHF/UHF radio/satellite" due to how the NTP service operates within the meinbergOS device. The actual reference source for the NTP service can be identified under "State References".
- Page 139 8.5.3.2 State - NTP - Server Figure 8.38: meinbergOS Web Interface: "State Server" Tab Information: This information relates to how your meinbergOS device operates as an NTP server or peer and not to your meinbergOS device as a client. For information on NTP server/client relationships where your meinbergOS device is the client, please open the subsection "State Client"...
- Page 140 8 The meinbergOS Web Interface Reference Clocks State of the configured NTP reference clocks. Persistent: If this source is configured as a persistent server (i.e., not accessed as part of a pool server), this entry will show Yes. Association ID: The unique association ID for this source assigned by NTP.
- Page 141 Leap Indicator: The latest leap indicator announcement of this source. The leap indicator may specify if a leap second is to be inserted or removed, or if leap indicators cannot be acquired due to loss of synchronization ("Alarm"). Stratum: The current stratum level of this NTP server in relation to its own NTP client. This will always be a fictitious 0 and has no bearing on the actual stratum of the meinbergOS device in use as an NTP server.
- Page 142 8 The meinbergOS Web Interface 8.5.3.3 State - NTP - Client Figure 8.39: meinbergOS Web Interface: "State Client" Tab Information: This information relates to how your meinbergOS device operates as an NTP client and not to clients that your meinbergOS device may be a server to. For information on NTP server/client relationships where your meinbergOS device is the server, please open the subsection "State Server"...
- Page 143 External Servers Shows the state of the external servers configured for the meinbergOS device’s NTP client. Persistent: If this source is configured as a persistent server (i.e., not accessed as part of a pool server), this entry will show Yes. Association ID: The unique association ID for this source assigned by NTP.
- Page 144 8 The meinbergOS Web Interface Root Delay: The total estimated round trip delay (time to transmit messages to current system peer of this source, plus time to receive acknowledgement of receipt). Root Dispersion: The additional dispersion time in communication with the system peers of this source, representing delays caused by other factors such as clock frequency inaccuracy.
-
Page 145: State - Ptp
8.5.4 State - PTP The "State PTP" subsection provides general information about the system’s PTP functionality, both as a master and a slave. It also provides two tabs—Interfaces, which provides information on the PTP-related states of the PTP-enabled virtual interfaces, and Instances, which provides information on the configured PTP instances and comprehensive readouts of the relevant datasets. - Page 146 8 The meinbergOS Web Interface 8.5.4.1 State - PTP - Interfaces Figure 8.40: meinbergOS Web Interface: "State Interfaces" Tab The tab "State Interfaces" (Fig. 8.40) provides information about the physical PTP interfaces (times- tampers) supported by your meinbergOS device. Interface Name: The name of the physical PTP interface of the meinbergOS device.
- Page 147 8.5.4.2 State - PTP - Instances Figure 8.41: meinbergOS Web Interface: "State Instances" Tab The tab "State Instances" (Fig. 8.41) provides information about the defined PTP instances. Virtual Interface: The virtual interface (i.e., IP address) that the instance is using. Alias: A manually assigned descriptive alias of this instance (if configured).
- Page 148 8 The meinbergOS Web Interface Default Dataset These are the status values of the default dataset as defined in IEEE 1588-2008. Number Ports: The number of PTP ports on the device. Is Two-Step: Indicates whether the clock is a two-step clock (sync and timestamp are sent in two separate PTP messages).
- Page 149 Current Dataset These are the status values of the current dataset as defined in IEEE 1588-2008. Offset From Master: The current difference between the master time and slave time. Mean Path Delay: The current mean propagation time for messages between the master and slave. Steps Removed: The number of hops between the local clock and the PTP grandmaster.
- Page 150 8 The meinbergOS Web Interface Time Properties Dataset These are the status values of the time properties dataset as defined in IEEE 1588-2008. Is UTC Offset Valid: Specifies whether the current UTC offset is known to be valid. If this is Yes, the last minute of the current UTC day will last 61 seconds (thus Is Leap 61: adding a leap second).
- Page 151 Unicast Slaves Unicast slaves connected to this meinbergOS device (serving as the PTP unicast master) are listed here. Packet Counters This list provides detailed packet counter statistics for all types of PTP messages, both incoming and outgoing. Is Enabled: Specifies if packet counting is enabled for this PTP instance. Announce Receipt This counts how many Announce receipt timeouts there have been so far.
- Page 152 8 The meinbergOS Web Interface Peer Delay Request The number of Peer Delay Request messages currently being received/sent per Messages Per Second: second. Peer Delay The total number of Peer Delay Response messages that have been received/sent. Response Messages: Peer Delay Response The number of Peer Delay Response messages currently being received/sent per Messages Per Second: second.
-
Page 153: State - Io Ports
8.5.5 State - IO Ports Figure 8.42: meinbergOS Web Interface: "State IO Ports" Subsection The "State IO Ports" subsection (Fig. 8.42) provides a graphical representation of your physical mein- bergOS device (for example, a microSync). Hovering with the mouse over any indicator or connector (or, in the case of multi-pin connectors, over an individual pin of a connector) will provide a brief explanation of the purpose of that component. -
Page 154: State - Clock Module
8 The meinbergOS Web Interface 8.5.6 State - Clock Module Figure 8.43: meinbergOS Web Interface: "State Clock Module" Subsection The Clock Module subsection provides information about the receiver integrated into the meinbergOS device. Time The Time panel provides status information regarding the time provided by the receiver. Timestamp: The current time provided by the receiver. - Page 155 GPS Week Number: This is the current GPS week number; this scale runs from the time the GPS system first entered service. GPS Week Second: This is the current second in the current GPS week as of the last page refresh. Antenna The Antenna panel provides information on the connection between the clock module and the antenna.
-
Page 156: State - Users
8 The meinbergOS Web Interface 8.5.7 State - Users Figure 8.44: meinbergOS Web Interface: "State Users" Subsection The "State Users" subsection (Fig. 8.44) provides a summary of all users currently configured on the system. Click on the user name or the "Expand" or "Collapse" buttons to expand or collapse the panel for that user account accordingly. - Page 157 User Permissions The permissions listed here show the permissions assigned to the user to view and/or modify various as- pects of the meinbergOS device’s configuration. Read State refers to the ability to view the corresponding status information in the State section. Read Configuration refers to the ability to view the corresponding configuration in the Configuration section.
-
Page 158: Maintenance
8 The meinbergOS Web Interface 8.6 Maintenance Figure 8.45: meinbergOS Web Interface: "Maintenance" Section The Maintenance section (Fig. 8.45) hosts general system-related monitoring, diagnostic, logging, and man- agement functions that are not directly related to your meinbergOS device’s function as a timekeeping or clock management system and are, as the name suggests, purely related to the maintenance and care of your system. -
Page 159: Maintenance - Inventory
The brand name of this meinbergOS device under which it is marketed. Serial Number: The unique serial number of the device. This information is relevant when contacting Meinberg for support or downloads. Processor Type: The type of central processing unit (CPU) in the device. - Page 160 files, and general device information that is often useful for diagnosing system issues. The diagnostics file is provided as a .tar.gz archive. When contacting Meinberg Technical Support for assistance with your meinbergOS device, you may be prompted to download and send this archive for further analysis.
- Page 161 8.6.1.2 Maintenance - Inventory - Modules Figure 8.47: meinbergOS Web Interface: "Maintenance Inventory Modules" Tab This tab provides information about the hardware and firmware of the modules integrated into your meinbergOS device, specifically the clock module and any other I/O modules that your device may feature. Date: January 19, 2023 microSync...
- Page 162 8 The meinbergOS Web Interface Clock Module Information on the receiver module integrated in the meinbergOS device. Firmware Version (Legacy): This is the version number of the clock module firmware. FPGA Version This is the version number of the integrated FPGA. (Legacy): Hardware Model Code:...
- Page 163 8.6.1.3 Maintenance - Inventory - Firmware Figure 8.48: meinbergOS Web Interface: "Maintenance Inventory Firmware" Tab This tab (Fig. 8.48) provides information on the currently installed and activated firmware version, as well as any other installed versions that are not active. It also provides the ability to install a new firmware version, to re-activate a previously installed and disabled version, and to remove old versions that are no longer needed.
- Page 164 FPGA Version: The version of the FPGA firmware currently running. Recommended The version of Meinberg Device Manager that is recommended for the configuration mbgdevman Version: and monitoring of this device. Meinberg Device Manager is a freely available tool designed to facilitate the management of multiple Meinberg devices in a single network.
- Page 165 You may have a maximum of five meinbergOS versions installed at any one time. Firmware updates are provided by Meinberg for your meinbergOS device in the form of files with a .ufu exten- sion. If you wish, you may install a meinbergOS firmware update by clicking on the Install New Firmware...
- Page 166 8 The meinbergOS Web Interface 8.6.1.5 Guide: Removing a Firmware Version from the Inventory Figure 8.50: meinbergOS Web Interface: Removing a Firmware Version If you wish to remove an old firmware version from your inventory, you can do so by clicking on the red Remove from Device button under the corresponding firmware version in the list.
- Page 167 Older versions of meinbergOS prior to 2022.05.1 did not feature a Web Interface and were only accessible using Meinberg Device Manager or over SSH/Telnet. Activating a version of meinbergOS older than 2022.05.1 that pre-dates the introduction of the Web Interface will cause you to lose access to the Web Interface.
-
Page 168: Maintenance - System Log
(both successful and failed), file system access, and cryptographic pro- cesses. This information can be useful for security and other analyses, and when contacting Meinberg Technical Support, you may be prompted to provide a copy of it. -
Page 169: Maintenance - Kernel Log
Kernel Log" (Fig. 8.53) subsection provides access to the device’s Linux Kernel log, which mainly provides hardware-related information. This information can be useful for system diagnosis, and you may be prompted to provide a copy of it when contacting Meinberg Technical Support. Information: The user must have the Shell channel permission to be able to read the Kernel Log. -
Page 170: Maintenance - Restart Ntp
8 The meinbergOS Web Interface 8.6.4 Maintenance - Restart NTP Figure 8.54: meinbergOS-Webinterface: Restart NTP-Service If the meinbergOS device’s NTP service is malfunctioning in any way and you do not wish to disrupt the other timekeeping or clock synchronization functionality, you may restart the internal NTP service individually using this button. -
Page 171: Maintenance - Reboot Device
8.6.5 Maintenance - Reboot Device Figure 8.55: meinbergOS Web Interface: Reboot Device The Reboot Device button can be used to restart the meinbergOS device as needed (Fig. 8.55). A reboot may help to resolve certain problems and can reset certain other states; for example, if a short-circuit has been detected in the antenna connection, the meinbergOS device will need to be rebooted once the cause of the short-circuit has been eliminated. -
Page 172: Maintenance - Factory Reset
8 The meinbergOS Web Interface 8.6.6 Maintenance - Factory Reset Figure 8.56: meinbergOS Web Interface: Factory Reset This option will perform a full factory reset of the meinbergOS device and restore the configuration as it was at the time of shipping. This will cause the erasure of all data, namely the system configuration (including the Startup Configuration), almanac data, system and kernel logs. -
Page 173: Maintenance - Api Reference
HTTPS. 8.6.8 Maintenance - SNMP MIBs This provides access to the Meinberg root and meinbergOS-specific MIB files (Management Information Base); these are downloadable directly from the meinbergOS device and define the network objects usable by a suitable SNMP management solution for the purpose of remotely monitoring the meinbergOS device. -
Page 174: Configuration And Monitoring With Meinberg Device Manager
9 Configuration and Monitoring with Meinberg Device Manager Meinberg Device Manager: Management and Monitoring Software for Windows and Linux The Meinberg Device Manager software is available for free download on the Meinberg homepage. You can download the software here: https://www.meinbergglobal.com/english/sw/mbg-devman.htm... -
Page 175: Maintenance, Servicing And Repairing
Web-UI is available, via which you can also perform firmware updates. However, you still have to copy this version to your system with the Meinberg Device Manager software and activate it so that you can use the web interface. -
Page 176: Troubleshooting And Alarming
file of the microSync system concerned. You can create this diagnostic file with the Meinberg Device Manager software. Select the menu "Config- ure Device(s) -> System Settings" and then use the button Get Diagnostics File. - Page 177 9.1.2.1 System Error Messages Event Log In the menu "Show Device(s) Status Clock Event Log" you are able to display the last 20 events regis- tered by the receiver. Here you can see the exact time and date when the event occurred. In addition, the severity of the event and the event type is displayed (e.g.
-
Page 178: Support Information
10 Support Information In this chapter you will learn about different levels of support at the Meinberg Company. In general, the Basic Customer Support level is included in the price you pay for your Meinberg product and demands no additional costs. -
Page 179: Support Ticket System
10.2 Support Ticket System Meinberg assists you quickly and directly on questions regarding the initial setup of your devices, troubleshoot- ing or if you want to update the hard- or software. We offer free support for the whole lifetime of your Meinberg product. -
Page 180: How To Download A Diagnostic File
System and finding possible errors. Therefore we recommend that you attach your Diagnostic File when sending a ticket request to our support department. Figure: Download of the diagnostic file via the Meinberg Device Manager menu "System" and via the web in- terface under "Maintenance Inventory". -
Page 181: Self-Help Online Tools
10.4 Self-Help Online Tools Here is the list of some informative websites where you can query different information about the Meinberg Systems. Meinberg Homepage - general: https://www.meinbergglobal.com/ NTP Download: https://www.meinbergglobal.com/english/sw/ntp.htm NTP Time Server Monitor: https://www.meinbergglobal.com/english/sw/ntp-server-monitor.htm microSync firmware update request online form: https://www.meinbergglobal.com/english/sw/firmware.htm... -
Page 182: The Meinberg Academy Introduction And Offerings
10 Support Information 10.6 The Meinberg Academy Introduction and Offerings Meinberg Sync Academy (MSA) is an institution within the Meinberg Company which takes care for education and expert knowledge dissemination in the field of time and frequency synchronization. The academy offers tutorials and courses on the latest synchronization technologies such as NTP, IEEE 1588-PTP, synchronization networks for different industries: telecom, power, broadcasting, professional audio/video, finance, IT and Enter-... -
Page 183: Technical Appendix
11 Technical Appendix 11.1 meinbergOS Software Specifications Network Protocols: IPv4, IPv6 NTPv3, NTPv4 PTPv2 IEC 62439-3 (PRP) DHCP, DHCPv6 DSCP IEEE 802.1q VLAN filtering/tagging IEEE 802.1p QOS SNMPv1/v2/v3 Remote Syslog Support (UDP) PTP Profiles: IEEE 1588v2 Default Profile IEEE C.37.238-2011 Power Profile IEEE C.37.238-2017 Power Profile IEC/IEEE 61850-9-3 Power Utility Profile Enterprise Profile... -
Page 184: Antenna And Receiver Information
11.2.1 Reference Time Sources 11.2.1.1 Meinberg GPS Receiver The satellite radio clock was developed with the aim of providing users with a highly accurate time and fre- quency reference. High accuracy and the possibility of worldwide use, 24 hours a day, are the main features of this system, which receives its time information from the satellites of the Global Positioning System. - Page 185 11.2.1.2 Meinberg GNSS Receiver (GPS, GLONASS, Galileo, BeiDou) High accuracy and the possibility of the world wide operation around the clock are the main features of the system, which receive his time information from the satellites of the American GPS (Global Positioning System), the European Galileo, the Russian GLONASS (Global Navigation Satellite System) and the Chinese BeiDou.
- Page 186 The microSync unit has a special receiver concept which is able to capture GPS and Galileo signals using a standard Meinberg antenna/converter unit. The configuration supports to select one of these to be used exclusively or the combination of the sources.
-
Page 187: Gnss Signal Reception
Since the satellite orbits are located between latitudes 55 North and 55 South, this allows for the best possible reception. Meinberg provides their own GPS receivers which operate with an antenna/converter unit and thus allow for very long antenna cables, but some devices also include GNSS receivers which support other satellite sys- tems like GLONASS, or Galileo in addition to GPS. - Page 188 11.2.2.1 Meinberg GPS Antenna/Converter 11.2.2.2 Introduction The Meinberg GPS antenna/converter unit combines a standard GPS patch antenna with a frequency converter which translates the original 1.5 GHz signal received from the GPS satellites to an intermediate frequency, so a standard coaxial cable type like RG58 can be used for antenna cable lengths up to 300 meters (1000 ft). If a low-loss cable type like RG213 is used then even 700 meters (2300 ft) between receiver and antenna are possible without requirement for an additional amplifier.
- Page 189 GPS Antenna N-Norm female N-Norm male Cable Slot N-Norm male N-Norm female as short as possible N-Norm female Meinberg GPS N-Norm male N-Norm male female Ground lead to PE rail or BNC male female (Protective Earth) Cable ca. 1,5 mm Ø...
- Page 190 11 Technical Appendix Danger! Do not work on the antenna system during thunderstorms! Danger of death from electric shock! • Do not carry out any work on the antenna system or the antenna cable if there is a risk of lightning strike.
- Page 191 Some Meinberg devices use alternate GNSS receivers which support other satellite systems like GLONASS, Galileo or BeiDou, in addition to GPS. These receivers can’t be operated directly with the standard Meinberg antenna/converter unit described in chapter "Meinberg GPS Receiver", so they require a different kind of antenna.
- Page 192 Mounting and Installation of the GNSS/L1 Antenna Multi GNSS Antenna free view to the sky! Type-N female Type-N male as short as possible MEINBERG GNSS Type SMA male female Connection to earth rail (Protective Earth) cable diameter ca. 1,5 mm Ø...
- Page 193 11.2.2.6 GNSS Antenna for Mobile Applications The RV-76G is an active GNSS antenna which can receive the signals of the GPS, GLONASS, and Galileo satellite systems. It operates with a 5V DC supply voltage provided by the receiver, and should be preferred for mobile applications.
- Page 194 In this case the accuracy of the output frequency and pulses is also reduced until the receiver’s control loops have settled again. Via the Meinberg Device Manager software (menu "Status Clock Satellites") you can check the num- ber of satellites that are in view (i.e.
-
Page 195: Cable Types
11.2.3 Cable Types Antenna Type Cable Type Maximum Cable Length Meinberg GPS Antenna RG58 300 m / 1000 ft Meinberg GPS Antenna RG213 700 m / 2300 ft Multi GNSS Antenna Belden H155 70 m / 230 ft Long Wave Antenna *... -
Page 196: Technical Specifications Of Used Modules
11 Technical Appendix 11.3 Technical Specifications of used Modules 11.3.1 Technical Specifications - CPU CPU: 825 MHz Cortex A9 Dual Core on SOC Ethernet Interfaces: 4 x GBIT SFP - Slot LAN 0, 1: Management / NTP 10/100/1000Mbit RJ45 or 1000FX LAN 2, 3 Management / NTP / PTP 10/100/1000Mbit RJ45 or 1000FX... - Page 197 Network IPv4, IPv6 Protocols: DHCP, DHCPv6 DSCP IEEE 802.1q VLAN filtering/tagging IEEE 802.1p QOS LED Indicators R (Receiver) green: the reference clock (e.g. build-in GNSS) provides a valid time red: the reference clock does not provide a valid time T (Time Service) green: NTP is synchronized to the reference clock, e.g.
-
Page 198: Technical Specifications Gnss Receiver
Framing: 7E1, 7E2, 7N2, 7O1, 7O2, 8E1, 8N1, 8N2, 8O1 Default Setting: COM 0: 19200, 8N1 Meinberg Standard time string, per second Time Code Outputs: Unbalanced modulated sine wave signal: (MARK), 1 V (SPACE) into 50 PWM DCLS-signal: TTL into 50... - Page 199 GNS Receiver (GNS181) Type of receiver: GPS/GLONASS/Galileo/BeiDou receiver Number of channels: 72 Frequency band: GNSS L1 GPS: 1575.42 10 MHz GLONASS: 1602-1615 MHz Galileo: 1542.5 MHz BeiDou: 1561.09 MHz Antenna: Combined GPS/GLONASS antenna 3 dB Bandwidth: 1590 30 MHz Impedance: Gain: 4 dB Cable length:...
-
Page 200: Network Time Protocol (Ntp)
11 Technical Appendix 11.4 Network Time Protocol (NTP) The public domain software package called NTP (Network Time Protocol) is an implementation of the same named TCP/IP network protocol. NTP has been initiated in the 1980’s by Dave L. Mills who was trying to achieve a high accuracy time synchronization for computers across the network. -
Page 201: The Precision Time Protocol (Ptp) / Ieee 1588
11.5 The Precision Time Protocol (PTP) / IEEE 1588 Precision Time Protocol (PTP or IEEE 1588) is a time synchronization protocol that offers sub-microsecond accuracy over a standard Ethernet connection. This accuracy can be achieved by adding a hardware times- tamping unit to the network ports that are used for PTP time synchronization. -
Page 202: Functionality In Master Systems
11 Technical Appendix 11.5.1 Functionality in Master Systems After power up, the module accepts the absolute time information (PTP seconds) of a reference time source (e.g. GNSS reference clock) only once, and the PTP nanoseconds are set to zero. If the oscillator frequency of the reference time source has reached its nominal value, the nanoseconds are reset again. -
Page 203: Ptpv2 Ieee 1588-2008 Configuration Guide
11.5.3.2 Network Layer 2 or Layer 3 PTP/IEEE 1588-2008 offers a number of so-called mappings on different network communication layers. For Meinberg products you can choose between running PTP over IEEE 802.3 Ethernet connections (network Layer 2) or UDP/IPv4 connections (Layer 3). - Page 204 11 Technical Appendix 11.5.3.3 Multicast or Unicast The initial version of PTP (IEEE 1588-2002 also known as PTPv1) was a multicast-only protocol. Multicast mode has the great advantage that the master clock needs to send only one SYNC packet to a Multicast address and it is received by all slave devices that listen to that multicast address.
- Page 205 11.5.3.6 Mode Recommendations Meinberg recommends to set up your PTP infrastructure to use Layer 3, Multicast, Two-Step and End-To- End Delay measurements if that is possible. This will provide the largest possible compatibility and reduces interoperability problems.
- Page 206 11 Technical Appendix 11.5.3.7 Message Rate Settings The decision between the different general mode options is mainly dictated on the network environment in which the PTP infrastructure is installed. In addition to the mode selection, a number of intervals for certain types of PTP network messages needs to be defined.
- Page 207 (oscillator) very often due to its instability. Meinberg slave devices will limit the effect of an outdated path delay measurement by using filters and opti- mized PLL algorithms. This avoids that a clock “jumps around” and basically monitors the time difference to the master clock carefully for a certain amount of time before adjusting its own clock.
-
Page 208: Description Of Time Code Formats
Each IRIG format carries a designation comprising a letter followed by three numerical digits. The letter and each of the digits represents a characteristic property of the corresponding IRIG code. Depending on your Meinberg product, more or less time code formats are supported. A002:... - Page 209 Abbreviations: BCD = Binary-Coded Decimal, SBS = Straight Binary Seconds In addition to the original IRIG standards, there are also other specifications issued by other bodies that define specific extensions. AFNOR: Code according to NF S87-500, 100 pps, AM sine-wave signal, 1 kHz carrier frequency, BCD time of year, complete date, SBS time of day, signal level specified by standard.
-
Page 210: Description Of Programmable Pulse Outputs
AND the internal timebase is synchro- nized to the GPS timing. DCLS Time Code DC Level Shift Time Code. The selection of the time code is done by the Meinberg Device Manager menu "Outputs Settings". microSync... - Page 211 10 MHz Frequency This mode is used to output a fixed frequency of 10 MHz, using a PPS signal as an absolute phase reference (i.e., the falling edge of the 10 MHz signal is synchronized with the rising edge of the PPS signal). DCF77-like M59 A 500 ms pulse is sent at the 59-second mark.
-
Page 212: Available Time Telegrams
11.8 Available Time Telegrams 11.8.1 Format of the Meinberg Standard Time String The Meinberg Standard Time String is a sequence of 32 ASCII characters starting with the <STX> (start-of- text) character and ending with the <ETX> (end-of-text) character. The format is as follows: <STX>D:dd.mm.yy;T:w;U:hh.mm.ss;uvxy<ETX>... -
Page 213: Format Of The Meinberg Gps Time String
<ETX> (end-of-text) character. Unlike the Meinberg Standard Time String, the Meinberg GPS Time String does not carry any local time zone or UTC data; it simply carries the direct GPS time without any conversion into UTC. The format is as follows: <STX>D:dd.mm.yy;T:w;U:hh.mm.ss;uvGy;lll<ETX>... -
Page 214: Format Of The Meinberg Capture String
11 Technical Appendix 11.8.3 Format of the Meinberg Capture String The Meinberg Capture String is a sequence of 31 ASCII characters terminated by a <CR>/<LF> (Carriage Return/Line Feed) combination. The format is as follows: CHx_dd.mm.yy_hh:mm:ss.fffffff <CR><LF> The letters printed in italics are replaced by ASCII-formatted numbers, whereas the other characters are directly part of the time string. -
Page 215: Format Of The Sat Time String
11.8.4 Format of the SAT Time String The SAT Time String is a sequence of 29 ASCII characters starting with the <STX> (start-of-text) character and ending with the <ETX> (end-of-text) character. The format is as follows: <STX>dd.mm.yy/w/hh:mm:ssxxxxuv<ETX> The letters printed in italics are replaced by ASCII-formatted numbers, whereas the other characters are directly part of the time string. -
Page 216: Format Of The Uni Erlangen String (Ntp)
11 Technical Appendix 11.8.5 Format of the Uni Erlangen String (NTP) The Uni Erlangen String (NTP) of a GPS clock is a sequence of 66 ASCII characters starting with the <STX> (start-of-text) character and ending with the <ETX> (end-of-text) character. The format is as follows: <STX>dd.mm.yy;... - Page 217 ‘S’ South of Equator lll.llll Geographical longitude of receiver position in degrees Leading characters padded by Space characters (20h) Longitudinal hemisphere, with the following characters possible: ‘E’ East of Greenwich Meridian ‘W’ West of Greenwich Meridian hhhh Altitude above WGS84 ellipsoid in meters Leading characters padded by Space characters (20h) <ETX>...
-
Page 218: Format Of The Nmea 0183 String (Rmc)
West of Greenwich Meridian 0.0,0.0 Speed over the ground in knots and track angle in degrees. With a Meinberg GPS clock, these values are always 0.0, With GNS clocks, the values are calculated by the receiver for mobile applications ddmmyy... -
Page 219: Format Of The Nmea 0183 String (Gga)
11.8.7 Format of the NMEA 0183 String (GGA) The NMEA 0193 GGA String is a sequence of characters starting with the string ‘$GPGGA’ and ending with the characters <CR> (Carriage Return) and <LF> (Line Feed). The format is as follows: $GPGGA,hhmmss.ff,bbbb.bbbbb,n,lllll.ll,e,A,vv,hhh.h,aaa.a,M,ggg.g,M„0*cs<CR><LF>... -
Page 220: Format Of The Nmea 0183 String (Zda)
11 Technical Appendix 11.8.8 Format of the NMEA 0183 String (ZDA) The NMEA 0183 ZDA String is a sequence of 38 ASCII characters starting with the string ‘$GPZDA’ and ending with the characters <CR> (Carriage Return) and <LF> (Line Feed). The format is: $GPZDA,hhmmss.ss,dd,mm,yyyy,HH,II*cs<CR><LF>... -
Page 221: Format Of The Abb Spa Time String
11.8.9 Format of the ABB SPA Time String The ABB SPA Time String is a sequence of 32 ASCII characters starting with the characters ">900WD" and ending with the <CR> (Carriage Return) character. The format is as follows: >900WD:yy-mm-tt_hh.mm;ss.fff:cc<CR> The letters printed in italics are replaced by ASCII-formatted numbers, whereas the other characters are directly part of the time string. -
Page 222: Format Of The Computime Time String
11 Technical Appendix 11.8.10 Format of the Computime Time String The Computime Time String is a sequence of 24 ASCII characters starting with the T character and ending with the <LF> (Line Feed, ASCII code 0Ah) character. The format is as follows: T:yy:mm:dd:ww:hh:mm:ss<CR><LF>... -
Page 223: Format Of The Racal Standard Time String
11.8.11 Format of the RACAL Standard Time String The RACAL Standard Time String is a sequence of 16 ASCII characters started by a X (58h) character and ending with the <CR> (Carriage Return, ASCII code 0Dh) character. The format is as follows: <X><G><U>yymmddhhmmss<CR>... -
Page 224: Format Of The Sysplex-1 Time String
11 Technical Appendix 11.8.12 Format of the SYSPLEX-1 Time String The SYSPLEX-1 time string is a sequence of 16 ASCII characters starting with the <SOH> (Start of Header) ASCII control character and ending with the <LF> (Line Feed, ASCII code 0Ah) character. Please note: To ensure that the time string can be correctly output and displayed through any given terminal program, a singular "C"... -
Page 225: Format Of The Ion Time String
11.8.13 Format of the ION Time String The ION time string is a sequence of 16 ASCII characters starting with the <SOH> (Start of Header) ASCII control character and ending with the <LF> (Line Feed, ASCII code 0Ah) character. The format is as follows: <SOH>ddd:hh:mm:ssq<CR><LF>... -
Page 226: Format Of The Ion Blanked Time String
11 Technical Appendix 11.8.14 Format of the ION Blanked Time String The ION Blanked Time String is a sequence of 16 ASCII characters starting with the <SOH> (Start of Header) ASCII control character and ending with the <LF> (Line Feed, ASCII code 0Ah) character. The format is as follows: <SOH>ddd:hh:mm:ssq<CR><LF>... -
Page 227: Format Of The Irig-J Timecode
11.8.15 Format of the IRIG-J Timecode The IRIG-J timecode consists of a string of ASCII characters sent in "701" format: • 1 Start Bit • 7 Data Bits • 1 Parity Bit (odd) • 1 Stop Bit The on-time marker of the string is the leading edge of the start bit. The timecode consists of 15 characters, sent once per second at a baud rate of 300 or greater. -
Page 228: Supported Ptpv2 Profiles
11 Technical Appendix 11.9 Supported PTPv2 Profiles This is a list of the PTPv2 profiles supported by meinbergOS and the settings that meinbergOS applies to ensure compliance with these profile specifications. Default 0–255 2–10 0 (1/s) 0–7 except (1/2s) (1/s– IEEE1588- Mixed 1/128s) -
Page 229: Ssm Quality Levels
11.10 SSM Quality Levels When using SyncE, the following flags are used to denote or set the recognized SSM Quality Levels: QL-STU/UKN: Quality unknown QL-PRS: Primary Reference Source QL-PRC: Primary Reference Clock QL-INV3: Not used QL-SSU-A/TNC: Synchronization Supply Unit A or Transit Node Clock QL-INV5: Not used QL-INV6:... -
Page 230: Third Party Software
11 Technical Appendix 11.11 Third Party Software 11.11.1 Network Time Protocol Version 4 (NTP) The NTP project, lead by David L. Mills, can be reached in the internet at www.ntp.org. There you will find a wealthy collection of documentation and information covering all aspects of the application of NTP for time synchronization purposes. -
Page 231: Your Opinion Matters To Us
12 Your Opinion Matters to Us This user manual is intended to assist you with the setup and use of software for use with your Meinberg product. We hope that it provides you with all of the information that you require to properly and efficiently use your Meinberg product to its fullest potential. -
Page 232: List Of Illustrations
....... . Uploading a Certificate using Meinberg Device Manager ..... . . - Page 233 8.35 meinbergOS Web Interface: "State Network PRP" Tab ..... 129 8.36 meinbergOS Web Interface: "State Network Bonding" Tab ....130 8.37 meinbergOS Web Interface: "State Main"...
Need help?
Do you have a question about the microSync 10 Series and is the answer not in the manual?
Questions and answers