Advertisement
OVERVIEW

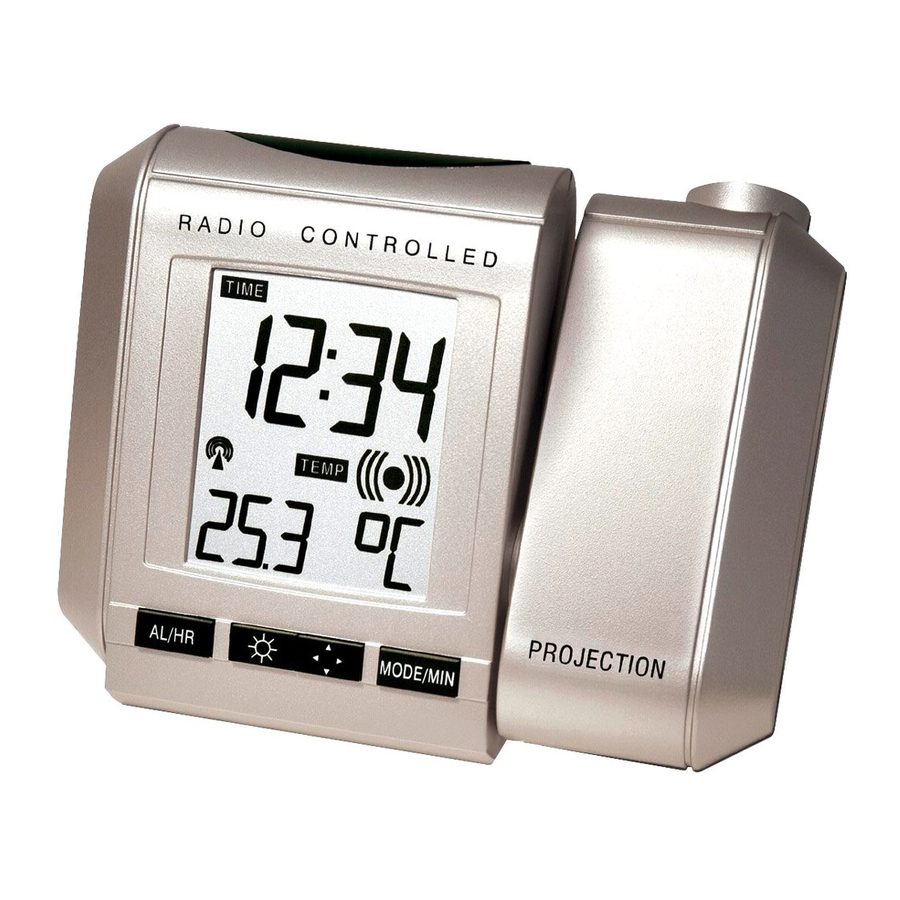
FEATURES
DCF-77 Radio controlled time with manual setting option
24 hours time display (hour, minutes, seconds)
Time projection (hour and minute)
Projection with adjustable brightness and projection orientation possible
Calendar display (weekday, date, month)
Alarm setting with snooze function
Time zone (±9 hours)
Indoor temperature display in degree Celsius
LED back-light
SETTING UP
The Projection clock can be batteries operated or powered by the provided AC/DC adapter.
BATTERIES INSTALLATION
The Projection Clock uses 2 x AA, IEC LR6, 1.5V batteries. To install and replace the batteries, please follow the steps below (the battery cover is located at the back of the unit):
- Press down at the arrow mark on top of the battery cover and pull to open to reveal the battery compartment
- Observing the correct polarity, insert the batteries (see markings inside the battery compartment)
- After inserting the batteries, replace the battery cover by clicking into place
![]()

Or
- Using a finger or other suitable object in the space at the bottom center of the battery cover and pull to remove
- Observing the correct polarity, insert the batteries (see markings inside the battery compartment)
- After inserting the batteries, replace the battery cover by clicking into place
![]()
- When the batteries are inserted, all the segments of the LCD will light up briefly and a "beep" will sound. The Projection clock will now start receiving the DCF time signal. After approximate 3 to 5 minutes, the DCF time and 'DCF-77 Tower' icon will be displayed.
- If reception is not successful within approximately 10 minutes, either manually set the time or wait for the clock to receive DCF time. Usually, the Projection clock will attempt to receive the DCF signal in the next following hour. When this is successful, the received DCF time will override the manually set time. The date is also updated with the received DCF time (Please refer also to notes on "Radio Controlled Time" and "Manual Time Setting").
Your Projection clock is now operational.

Note:
If the batteries are used as the main power source:
- Projected image brightness, alarm volume and back-light strength would be weaker.
- Battery life time would be much less than 1 year.
TO USE THE PROJECTOR POWER ADAPTER
The unit comes with an adapter unit for using the projector for an extended period of time, such as throughout the night.
TO CONNECT THE ADAPTER


Make sure that your household voltage is 230V! Otherwise it can result in damaging your Projection clock.
- Connect the power adapter to a wall socket.
- Insert the adapter into the jack at the bottom of the clock.
- The Projection clock will now start receiving the DCF time signal. After approximate 3 to 5 minutes, the DCF time and 'DCF-77 Tower' icon will be displayed.
- If reception is not successful within approximately 10 minutes, either manually set the time or wait for the clock to receive DCF time. Usually, the Projection clock will attempt to receive the DCF signal in the next following hour. When this is successful, the received DCF time will override the manually set time. The date is also updated with the received DCF time (Please refer also to notes on "Radio Controlled Time" and "Manual Time Setting").
Your Projection clock is now operational.
Note:
If the Projection clock is powered through the adapter, the projection will be constantly ON at the highest brightness level unless the brightness level is manually changed to a lower brightness level afterwards. And the brightness of the projection can be change accordingly to enhance the clarity of the projected time by pressing the  key.
key.
If the Projection clock is battery operated, the projection will be ON at the highest brightness level only when the SNOOZE key is pressed. The intensity of the brightness level of the projection cannot be changed. If the SNOOZE is released, the projection will be turned OFF.
If the DCF-77 signal is not being received, no keys functions can be used. In that case, either wait for the next reception of the DCF signal or proceed to manual time setting after reset of the clock for activation of the keys function.
BATTERIES POWERED WITH THE USE OF AC/DC ADAPTER
If the Projection clock is first powered by batteries and the power adapter is subsequently used for extended period of time, the main power source of the Projection clock will switch to AC/DC power. The batteries will then act as a backup power source in case of power failure.
TO RESET THE PROJECTION CLOCK
To reset the Projection clock to the factory default setting or in case of a malfunction, please remove all batteries from the unit and unplug the AC/DC adapter from any power source. Wait at least for 3 minutes before powering up the Projection clock again.
FUNCTION KEYS
The radio-controlled Projection clock uses the following keys:
| SNOOZE | : Activate or deactivate snooze function Alarm snooze function |
| : Activate the projection brightness at the highest level | |
| : Exit the setting modes | |
| : Back-light-On | |
| AL/HR | : Enter alarm setting mode |
| : Activate or deactivate alarm | |
| : Stop alarm and snooze function | |
| : Set the hours and day | |
| : Back-light-On | |
| MODE/MIN | : Enter manual time setting mode |
| : Toggle between indoor temperature, seconds, alarm time, and date display | |
| : Enter time zone setting mode | |
| : Set the minutes, weekday and month | |
| : Stop alarm and snooze function | |
| : Back-light-On | |
 (BRIGHTNESS key) | : Set the brightness level of the projection (in A/C power mode) (4 levels: High, Medium, Low, OFF) |
| : Back-light On | |
 (DIRECTION key) | : Project the image direction (can display 4 different orientations) |
| : Back-light On |
HOW TO USE THE PROJECTOR
The projector projects the current time onto a wall or ceiling, preferably within a darkened room. It can be adjusted forwards and backwards 180º for maximum projection range. The projection image can also be adjusted to 4 upright positions, each with a rotation of 90º.
To project the time onto a flat surface
- Point the projection lens in the appropriate direction (max. distance of the projection is 2 meters)
- Adjust the intensity of the projector light with the
![]() key
key - Adjust the projection image in an upright position with the
![]() key
key
Note:
The projector will only project the current time. It will not project the seconds, date or temperature information.
RADIO CONTROLLED TIME
The time base for the radio-controlled time is a Cesium Atomic Clock operated by the Physikalisch Technische Bundesanstalt Braunschweig which has a time deviation of less than one second in every one million years.
The time is coded and transmitted from Mainflingen near Frankfurt via frequency signal DCF-77 (77.5 khz) and has a transmitting range of approximately 1,500 km. The Projection clock receives this signal and converts it to show the precise time and so when within this range the received time is completely accurate.
CHECKING FOR DCF-77 RECEPTION
The Projection clock will automatically start scanning for the DCF-77 frequency signal after the battery is inserted. In normal surroundings (for example away from interfering sources such as TV sets), it takes between 3-5 minutes to receive the signal. If after 10 minutes after having inserted the batteries into the alarm clock and the DCF-77 signal is not received, then check the following list before manually setting the time (see Manual time setting):
- The distance of the Projection clock should be at least 1.5-2.0 meters away from interfering sources such as computer monitors or TV sets.
- Avoid placing the alarm clock onto or in the immediate proximity of metal, doors, windows frames or structures.
- Within thick concrete rooms such as basements and tower blocks, the DCF-77 signal is naturally weaker. In extreme cases, place the alarm clock closer to a window and/or point its front or rear towards the general direction of the Frankfurt/Main transmitter (avoid positioning within close proximity of metal frames or structures).
Note:
Users may be located in areas where atmospheric disturbances are the direct cause for not receiving the DCF77 frequency signal. During nighttime, atmospheric disturbances are usually less severe and reception is possible in most cases. With a single daily reception, it is adequate for the alarm clock to keep time deviation to below 0.5 seconds in a period of 24 hours.
When the clock is trying to receive the DCF signal, the reception and the time icons will flash on the LCD. Once the signal is "locked", the DCF-77 tower icon will stay fixed on LCD and the received time will automatically correct the manually set time. As well as the time, the date will also be received by the Projection clock and will be displayed accordingly in the calendar section of the LCD.
If the clock is not able to receive the DCF signal, the reception and the time icons will not be displayed.
ALARM SETTING

To set alarm:
- Press and hold the AL/HR key, the ((( ))) icon will appears and the AL icon on the LCD starts flashing.
- Set the hours and minutes of the desired alarm time by use of the AL/HR (hours) or the MODE/MIN (minutes) keys respectively.
- Once the alarm time is set, press the SNOOZE key to confirm and exit or wait approximately 8 seconds for automatic timeout.
TO ACTIVATE / DEACTIVATE THE ALARM:
Press the AL/HR key. The alarm icon ((( ))) will appear/disappear indicating that it is ON or OFF.
Note: the maximum duration of the alarm ringing is 1 minute 36 seconds.
SNOOZE SETTING
The snooze time is set as default for 5 minutes by the manufacturer. The snooze mode will be activated from the start of next minute after the SNOOZE key was pressed – it does not count the current minute that it was pressed in.
To use the snooze feature, simply press the SNOOZE key when the alarm is sounding and the alarm will snooze for 5 minutes before automatically sounding again. When the alarm is snoozing, the alarm icon ((( ))) will start flashing indicating that the alarm is active but is in Snooze mode.
To stop the snooze function, press the AL/HR or the MODE/MIN key once.
LCD SCREEN
The Projection clock can display information of date, indoor temperature, seconds and alarm time on the LCD only. The projection will only display the time.
The clock LCD can alternate between the 4 display modes when pressing and the MODE/MIN key:

MANUAL TIME SETTING

In some cases after inserting the batteries, the Projection clock may not be able to receive the DCF-77signal. In this situation, the time should be manually set (before manual setting see Checking DCF-77 Reception above).
- Press and hold the MODE/MIN key firmly while inserting the batteries until the time digits start flashing.
- Set the time by using the AL/HR and the MODE/MIN keys respectively.
- Press the SNOOZE key to enter the Calendar setting mode or wait for about 8 seconds for automatic timeout.
Note: The Projection clock will still try and receive the signal despite the time being manually set. When it receives the signal, then the DCF tower icon will stay fixed on the LCD. If reception has been unsuccessful, then the DCF tower icon will disappear but reception will still be attempted the following hour.
CALENDAR SETTING
The date default of the Projection Alarm clock is MO 1.1. in the year 2000. Once the radio-controlled time signals are received, the date is automatically updated. However, if the signals are not received, you can adjust the date manually. To do this:
- The year digits start flashing. Use the MODE/MIN key to set the year (the range runs from 2000 to 2029).
- Press the SNOOZE key again to enter the month and date setting (flashing).
- Use the AL/HR key to set the day and the MODE/MIN key to set the month
- Press the SNOOZE key again to enter the weekday setting (flashing).
- Use the MODE/MIN key to set the weekday.
- Press the SNOOZE key once more to confirm all settings and to exit or do not touch any buttons for around 8 seconds. The mode will return to normal.
TIME ZONE SETTING
Central Europe = "0" hour

To change to a different time zone (±9 hours):
- In normal mode display, press and hold down the MODE/MIN key to enter the time setting mode.
- Use the MODE/MIN key again to select the desired time zone. Each press changes the digits by 1 hour.
- When the desired time zone is selected, press the SNOOZE key to confirm and exit or wait for about 8 seconds for automatic return to the normal mode display.
Note: If the time zone is changed to another time zone other than "0", the calendar will not be displayed.
BACK-LIGHT
The LED back-light is automatically switched ON when any keys are pressed. The back-light will be switched on for approximately 2 seconds before automatically switching OFF. However, if any of the keys are pressed and held down, then LED back-light will remain ON constantly unit the key is released.
BATTERY CHANGE
It is recommended to replace the batteries in the unit on an annual basis.

Please help in the preservation of the environment. Return used batteries to an authorised depot.
SPECIFICATIONS
Recommended operating temperatures: 0°C to +49°C with 0.1ºC resolution
Power source:
Batteries: 2 x AA, IEC LR6, 1.5V
Battery life: Approximately 12 months
(Alkaline battery recommended)
Or
AC power: INPUT 230VAC 50HZ (use the provided AC/DC adapter only)
Projection distance: max. 2 meters
MAINTENANCE
Avoid placing the alarm clock in areas prone to vibration and shock as this may damage and inaccurate readings.
Avoid exposure to sudden changes in temperature such as direct sunlight, extreme cold and wet or moist conditions.
When cleaning the display and casing, only use a soft damp cloth.
Do not use solvents or souring agents as they may mark the LCD and casing.
Do not submerge the alarm clock in water.
Do not attempt to make any repairs to the alarm clock. Return it to its original point of purchase for repair by a qualified engineer. Opening and tampering with the unit may invalidate its guarantee.
R&TTE Directive 1999/5/EC
To be used in EC Member and EFTA States.
Summary of the Declaration of Conformity: We hereby declare that this wireless transmission device does comply with the essential requirements of R&TTE Directive 1999/5/EC.
Documents / ResourcesDownload manual
Here you can download full pdf version of manual, it may contain additional safety instructions, warranty information, FCC rules, etc.
Download Technoline WT 535 - Radio Clock With Digital Thermometer Manual
Advertisement


Need help?
Do you have a question about the WT 535 and is the answer not in the manual?
Questions and answers