Table of Contents
Advertisement
Available languages
Available languages
Quick Links
Advertisement
Table of Contents

Related Manuals for Technoline WT 482


Summary of Contents for Technoline WT 482
- Page 1 BEDIENUNGSANLEUTUNG VON WT 482 DIGITALER FUNK-RADIOWECKER MIT DOPPELALARM...
-
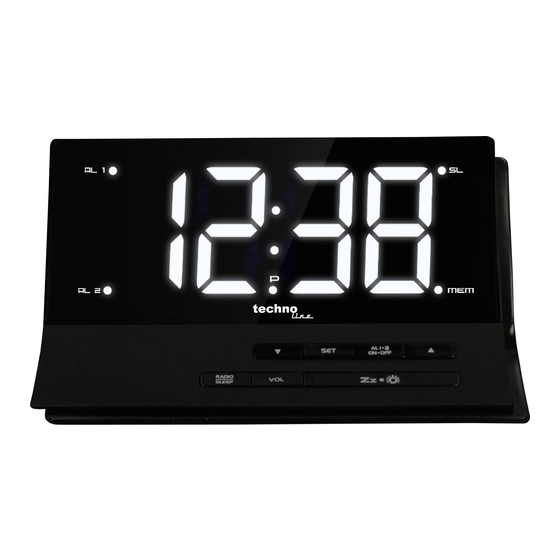
Page 2: Front View
Words in the figure: ENGLISH German FRONT VIEW VORDERANSICHT Alarm 1 ON Alarm 1 AN Alarm 2 ON Alarm 2 AN Down Runter Radio/ Sleep Radio / Sleep Volume Lautstärke Radio Controlled Signal LED Funksignal-LED Sleep ON Sleep ON Radio Memory Radiospeicherung Alarm 1.2 Set/ On.Off Alarm 1.2 Set/ On.Off... - Page 3 INBETRIEBNAHME Stecken Sie das Netzteil in die Wandsteckdose und stecken Sie das Netzteil in die Rückseite des Weckers. Ihr Radiowecker ist nun betriebsbereit. EINLEGEN DER BACKUP-BATTERIE Ihr Radiowecker benötigt eine CR2032 Lithium-Batterie (nicht im Lieferumfang enthalten), um im Falle einer vorübergehenden Unterbrechung der Stromversorgung das Gerät mit Ersatzstrom zu versorgen.
- Page 4 Drücken Sie die / WAVE Taste während des Empfangs. Der Empfangsmodus und die Signalstärke werden angezeigt. Hinweis:- Bei einen starken DCF-Funksignal werden 3 Balken angezeigt Bei einen schwachen oder keinen DCF-Funksignal werden oder angezeigt Während des Empfangs kann die Signalstärke zwischen 1, 2 und 3 Balken wechseln. Dies ist normal, da der Wecker neben dem Funksignal auch andere Signale aus der Umgebung empfängt.
- Page 5 Drücken Sie die SET Taste und “24Hr” blinkt. Drücken Sie die oder die Taste um zwischen “12Hr” oder “24H” als Zeitformat zu wählen. Drücken Sie die SET Taste und “05” blinkt. Drücken Sie die oder die Taste um eine Schlummerdauer von 5 bis 60 Minuten auszuwählen. Drücken Sie die SET Taste oder drücken Sie keine Taste für 10 Sekunden um die Einstellung zu verlassen.
- Page 6 Hinweis: Der zweite Alarm kann den ersten Alarm überschreiben, wenn der zweite Alarm ausgelöst wird während der erste Alarm aktiv oder im Schlummermodus ist. (Der erste Alarm wird für den nächsten Tag zurückgesetzt. NUTZUNG DES HI-LO DIMMER Drücken Sie die Taste um die Helligkeit (LO / HI ) der LED-Anzeige anzupassen.
-
Page 7: Fehlerbehebung
Drücken Sie die oder die Taste um einen weiteren Sender auszuwählen. Halten sie die SET Taste gedrückt bis die “MEM” LED angezeigt wird und “01” blinkt. Drücken Sie die Taste und “02” blinkt. Drücken Sie die SET Taste um den Sender unter Memory 02 zu speichern. -
Page 8: Technische Daten
BATTERIE-SICHERHEITSHINWEISE Verwenden Sie nur Alkali-Batterien, keine wiederaufladbaren Batterien. Legen Sie die Batterien unter Beachtung der Polarität (+/-) richtig ein. Ersetzen Sie stets einen vollständigen Batteriesatz. Mischen Sie niemals alte und neue Batterien. Entfernen Sie erschöpfte Batterien sofort. Entfernen Sie die Batterien bei Nichtnutzung. Laden Sie die Batterien nicht auf und werfen Sie sie nicht ins Feuer. - Page 9 Hinweispflicht nach dem Elektronikgerätegesetz Laut Elektro- und Elektronikgerätegesetz (ElektroG) gehört Elektroschrott nicht in den Hausmüll, sondern ist zu recyceln oder umweltfreundlich zu entsorgen. Entsorgen Sie ihr Gerät in einen Recycling Container oder an eine lokale Abfallsammelstelle.
- Page 10 INSTRUCTION MANUAL OF WT 482 LED DIGITAL FM CLOCK RADIO WITH DUAL ALARM...
- Page 11 Words in the figure: ENGLISH Other Language FRONT VIEW Alarm 1 ON Alarm 2 ON Down Radio/ Sleep Volume Radio Controlled Signal LED Sleep ON Radio Memory Alarm 1.2 Set/ On.Off Snooze/ Dimmer SIDE VIEW Low dime brightness tuner BACK VIEW Back up battery (not included) AC/ DC adaptor AC wall socket...
-
Page 12: Backup Battery Installation
INSTALLATION Plug the AC/DC adaptor to an AC household outlet, and then plug the DC jack to the back of the unit. Your clock radio is ready to work for you. BACKUP BATTERY INSTALLATION Your clock radio requires one CR2032 lithium battery (not included) to provide backup power to the clock in the event of a temporary power interruption. - Page 13 During reception, press / WAVE once will display reception mode and signal strength Indication:- When strong DCF signal is detected, display shows with 3 bars When weak or no DCF signal is detected, display shows During reception, the signal strength may move from 1 bar to 2 bars to 3 bars. This is normal since the clock is detecting DCF signal and other signals in the air at the same time.
-
Page 14: Setting The Alarms
Press SET again or if no key pressed for approx. 10 seconds to exit the setting mode. Note: when 12-hour time format is selected, the PM LED will appear on the lower middle time display to indicate the afternoon time; there is no AM indicator. SETTING THE ALARMS Press AL 1.2 / ON.OFF once, the A1 LED and the hour digits flash. -
Page 15: Listening To The Fm Radio
ADJUSTABLE LO DIM LED BRIGHTNESS When LO dim brightness is selected by pressing once, turn the knob at the right side to adjust your desired LO dim LED brightness. Rotate downwards to reduce and upwards to increase the Lo dim brightness. Note: HI LED brightness is not adjustable. SETTING UP THE FM ANTENNA Extend the FM wire antenna fully and vary the direction for best FM reception. -
Page 16: Troubleshooting
Press the RADIO/SLEEP again as needed to adjust the sleep timer from 5,15, 30, 45, 60, 75, 90 or OFF. When the display changes back to show the time, press the RADIO/SLEEP twice to show the sleep time remaining. The radio will play for the programmed sleep time and then shut off. To turn off the radio before the sleep time has elapsed, press once. -
Page 17: Specifications
SPECIFICATIONS Alarm duration 1 hour Snooze duration 5 to 60 minutes Sleep timer selections 5, 15, 30, 45, 60, 75, 90 minutes to OFF Volume L01 (minimum) to L15 (maximum) Preset Memories of radio 10 Default settings:- Time format 24 hour Time 0:00 Alarm 1 and 2... - Page 18 GUIDE D’UTILISATION DE WT 482 RADIORÉVEIL FM DOUBLE ALARME À AFFICHAGE LED...
-
Page 19: Side View
Words in the figure: ENGLISH French FRONT VIEW VUE DE FACE Alarm 1 ON Alarme 1 activée Alarm 2 ON Alarme 2 activée Régler Down Vers le bas Radio/Sleep Radio/Veille Volume Volume Radio Controlled Signal LED Témoin signal radio-piloté Sleep ON Dormir sur Radio Memory Mémorisation de stations radio... -
Page 20: Installation Des Piles De Secours
INSTALLATION Branchez l'adaptateur secteur dans une prise secteur, puis branchez la fiche CC à l'arrière de l'appareil. Le radioréveil est prêt à l'emploi. INSTALLATION DES PILES DE SECOURS Votre radioréveil nécessite une pile au lithium CR2032 (non incluse) pour assurer une alimentation de secours en cas de coupure temporaire du courant. - Page 21 Pendant la réception, appuyez une fois sur /WAVE pour afficher le mode de réception et l'indication de la force du signal : Lorsqu'un fort signal DCF est détecté, l'écran affiche 3 barres Lorsqu'un faible signal DCF est détecté, l'écran affiche Pendant la réception, la force du signal peut varier entre 1 barre, 2 barres et 3 barres.
- Page 22 Appuyez de nouveau sur SET, «05» se mettent à clignoter. Utilisez pour fixer le délai de rappel d'alarme de 5 à 60 minutes. Pour quitter le mode réglage, appuyez sur SET ou n'appuyez sur aucune touche pendant environ 10 secondes. Remarque : lorsque le format 12 heures est sélectionné, le témoin PM apparaît juste en dessous des deux points de l'heure pour indiquer l'heure de l'après-midi, il n'y a pas d'indicateur AM.
-
Page 23: Réglage Du Rétroéclairage
Remarque : si votre deuxième alarme est activée pendant que la première alarme est déclenchée ou en mode rappel d’alarme, la deuxième alarme l'emporte sur la première alarme (la première alarme sera réinitialisée pour se déclencher le lendemain). RÉGLAGE DU RÉTROÉCLAIRAGE Utilisez pour régler la luminosité... -
Page 24: En Cas De Panne
Répétez les étapes 2 et 3 pour mémoriser dans les positions 3 à 10. Pour écouter une station préréglée à tout moment, appuyez sur SET lorsque la radio est allumée. Pour modifier une station mémorisée, sélectionnez une autre station, puis répétez les étapes 2 à... -
Page 25: Spécifications
Installez les piles en respectant le sens des polarités (+/-). Remplacez toujours toutes les piles en même temps. Ne combinez pas des piles usagées avec des piles neuves. Retirez immédiatement les piles déchargées de l'appareil. Retirez les piles lorsque vous n'envisagez pas d'utiliser votre appareil avant longtemps. N'essayez pas de recharger des piles qui ne sont pas rechargeables et ne jetez aucune pile dans le feu (elle risque d'exploser). - Page 26 Noter l'obligation de la Loi sur les appareils électriques Ce symbole signifie que les appareils électriques ne doivent pas être jetés aux ordures ménagères à la fin de leur vie utile. Ramenez votre appareil à votre point local de collecte de déchets ou à...
- Page 27 MANUALE DI ISTRUZIONI DELLA WT 482 RADIOSVEGLIA FM DIGITALE A LED CON DOPPIO ALLARME...
-
Page 28: Vista Laterale
Words in the figure: ENGLISH Italian FRONT VIEW VISTA ANTERIORE Alarm 1 ON Allarme 1 ATTIVO Alarm 2 ON Allarme 2 ATTIVO Impostazioni Down Giù Radio/Sleep Radio/Sospensione Volume Volume Radio Controlled Signal LED Led di segnale a controllo radio Sleep ON Modalità... -
Page 29: Installazione
INSTALLAZIONE Collegare l'alimentatore CA/CC alla presa domestica CA e quindi collegare il jack CC al retro dell'unità. La radiosveglia è pronta a funzionare. INSTALLAZIONE BATTERIA DI BACK-UP La radiosveglia richiede una batteria al litio CR2032 (non inclusa) per fornire alimentazione di riserva all'orologio in caso di interruzione temporanea dell'alimentazione. - Page 30 Durante la ricezione, premere il pulsante WAVE per visualizzare l'indicazione della modalità di ricezione e della potenza del segnale: Quando la ricezione del segnale DCF è forte, lo schermo mostra un indicatore di intensità a 3 barre Quando la ricezione del segnale DCF è debole o assente, lo schermo mostra Durante la ricezione, l'intensità...
-
Page 31: Impostazione Della Sveglia
Premendo il tasto SET di nuovo, lo schermo mostra l'indicazione “24Hr” lampeggiante. Premere per scegliere il formato orario “12Hr” o “24H”. Premendo il tasto SET di nuovo, lo schermo mostra l'indicazione “05” lampeggiante. Premere per selezionare il tempo di snooze da 5 a 60 minuti. Premere SET di nuovo, o non premere tasti per circa 10 secondi per uscire dalla modalità... -
Page 32: Impostazione Dell'antenna Fm
Quando la sveglia suona, premendo una volta, la sveglia smette di suonare e si riattiva dopo la durata di snooze impostata. Nota: Se si attiva una seconda sveglia mentre la prima sta suonando o si è in modalità snooze, la seconda sveglia sostituisce la prima (la prima sveglia è... -
Page 33: Utilizzo Del Timer Di Spegnimento
Premere per selezionare un'altra stazione che si desidera memorizzare. Quindi tenere premuto il tasto SET finché non appare il LED “MEM” e l'indicazione “01” inizia a lampeggiare sullo schermo. Premendo una volta, appare l'indicazione “02”. Premere una volta SET per memorizzare la stazione in posizione di Memoria 02. Ripetere i passi da 2 a 3 per preimpostare le posizioni di memoria da 3 a 10. - Page 34 AVVERTENZE PER L’USO SICURO DELLE BATTERIE Uilizzare solo batterie alcaline. Non utilizzare batterie ricaricabili. Installare le batterie correttamente rispettando le polarità (+/-). Sostituire sempre il set completo di batterie. Non mescolare mai batterie usate e nuove. Rimuovere immediatamente le batterie scariche. Rimuovere le batterie quando non sono utilizzate.
- Page 35 MANUAL DE INSTRUCCIONES DE WT 482 RADIORELOJ FM LED DIGITAL CON ALARMA DUAL...
-
Page 36: Front View
Words in the figure: ENGLISH Spanish FRONT VIEW VISTA FRONTAL Alarm 1 ON Alarma 1 CONECTADA Alarm 2 ON Alarma 2 CONECTADA Fijar Down Abajo Radio/Sleep Radio/Retardo Volume Volumen Radio Controlled Signal LED LED por señal por radio control Sleep ON Retardo CONECTADO Radio Memory Memoria de la radio... -
Page 37: Instalación
INSTALACIÓN Conecte el adaptador CA/CC a una toma doméstica CA y posteriormente conecte el enchufe CC a la parte posterior de la unidad. El radioreloj está listo para funcionar. INSTALACIÓN DE LAS PILAS DE RESPALDO El radioreloj requiere una pila de litio CR2032 (no incluida) para proporcionar alimentación de respaldo al reloj en caso de una interrupción temporal de la alimentación. - Page 38 Durante la recepción, pulsar /WAVE una vez mostrará el modo de recepción e identificación de fuerza de señal:- Cuando se detecta una señal DCF fuerte, la pantalla muestra 3 barras Cuando se detecta una señal DCF débil o no se detecta la señal, la pantalla muestra Durante la recepción, la fuerza de la señal puede cambiar entre 1 barra, 2 barras o 3 barras.
-
Page 39: Configuración De La Alarma
Vuelva a pulsar SET; la pantalla muestra “05” y parpadea. Pulse para seleccionar su tiempo de retardo de 5 a 60 minutos. Pulse SET de nuevo, o no pulse ninguna tecla durante unos 10 segundos, para salir del modo de ajuste. Nota: cuando se selecciona el formato de hora 12 hora, el LED PM aparecerá... - Page 40 USO DE ATENUEADOR ALTO-BAJO Pulse para ajustar el brillo (ALTO/BAJO) de la pantalla LED. Esto solo puede hacerse cuando la radio está apagada. BRILLO LED TENUE MENOR AJUSTABLE Cuando se selecciona menos brillo tenue pulsando una vez, gire el dial hacia el lado derecho para ajustar el brillo LED tenue bajo que desee.
-
Page 41: Solución De Problemas
USIO DEL TEMPORIZADOR DE RETARDO En modo de pantalla normal de hora, pulse dos veces RADIO/SLEEP para entrar en el modo de retardo. Aparece el LED SL LED y la hora de retardo “05” (5 minutos) parpadea en la pantalla. Vuelva a pulsar RADIO/SLEEP según sea necesario para ajustar el temporizador de retardo de 5, 15, 30, 45, 60, 75, 90 u OFF. -
Page 42: Especificaciones
Compruebe que guarda las baterías alejadas de objetos metálicos ya que un contacto con estos puede causar un cortocircuito. Evite exponer las baterías a altas temperaturas, humedad o a los rayos directos del sol. Guarde las baterías lejos del alcance de los niños. Pueden atragantarse con ellas. ESPECIFICACIONES Duración de la Alarma 1 horas... - Page 43 GEBRUIKSAANWIJZING VOOR DE WT 482 DIGITALE FM LED-WEKKERRADIO MET DUBBEL ALARM...
- Page 44 Words in the figure: ENGLISH Dutch FRONT VIEW VOORAANZICHT Alarm 1 ON Alarm 1 AAN Alarm 2 ON Alarm 2 AAN Instellen Down Omlaag Radio/Sleep Radio/Slapen Volume Volume Radio Controlled Signal LED Radiogestuurde signaalaanduiding Sleep ON Slapen AAN Radio Memory Geheugen radio Alarm 1.2 Set/On.Off Alarm 1 2 instellen/aan uit...
- Page 45 INSTALLATIE Steek de AC/DC adapter in een AC-stopcontact en steek vervolgens de DC-stekker in de achterzijde van het apparaat. Uw klokradio is nu gereed voor gebruik. BACK-UPBATTERIJEN INSTALLEREN Uw klokradio gebruikt één CR2032 lithiumbatterij (niet inbegrepen) als back-upvoeding in het geval van een tijdelijke stroomonderbreking.
- Page 46 Druk tijdens ontvangst eenmaal op /WAVE om de ontvangstmodus en signaalsterkte te controleren:- Als er een sterk DCF-signaal wordt gedetecteerd, worden er 3 balkjes op het scherm weergegeven Als er een zwak of geen DCF-signaal wordt gedetecteerd, wordt er weergegeven De signaalsterkte kan tijdens de ontvangst variëren van 1 balkje tot 2 of 3 balkjes.
- Page 47 Druk nogmaals op SET; op het scherm wordt knipperend: '24Hr' weergegeven. Druk op om het tijdsformaat '12Hr' of '24H' te selecteren. Druk nogmaals op SET en “05” zal op de display knipperen. Druk op om de gewenste sluimerduur in te stellen op 5 tot 60 minuten. Druk nogmaals op SET of druk voor ca.
-
Page 48: Naar De Fm-Radio Luisteren
Wanneer het alarm klinkt, kunt u eenmaal op drukken om het alarm tijdelijk te dempen en na de ingestelde sluimerduur weer te laten klinken. Opmerking: Als uw tweede alarm activeert terwijl het eerste alarm klinkt of op sluimermodus is ingesteld, dan heeft het tweede alarm prioriteit over het eerste alarm (het eerste alarm wordt weer ingesteld om de volgende dag te klinken). - Page 49 Druk op om een ander station te selecteren dat u wilt opslaan. Houd vervolgens SET ingedrukt totdat de MEM-LED verschijnt en “01” knippert. Druk eenmaal op ; er verschijnt '02'. Druk eenmaal op SET om Geheugen 02 op te slaan. Herhaal Stap 2 tot 3 om geheugens 3 tot en met 10 op te slaan.
- Page 50 Installeer batterijen correct volgens de polariteitmarkeringen (+/-). Vervang altijd een volledige set batterijen. Combineer nooit gebruikte en nieuwe batterijen. Verwijder onmiddellijk uitgeputte batterijen. Verwijder batterijen wanneer niet in gebruik. Batterijen nooit opladen of in vuur werpen om ontploffing te voorkomen. Houd de batterijen niet in de nabijheid van metalen voorwerpen.
- Page 51 INSTRUKCJA OBSŁUGI WT 482 CYFROWY RADIOBUDZIK FM LED Z PODWÓJNYM ALARMEM...
-
Page 52: Widok Z Boku
Words in the figure: ENGLISH Polish FRONT VIEW WIDOK Z PRZODU Alarm 1 ON Alarm 1 WŁ. Alarm 2 ON Alarm 2 WŁ. Ustawienia Down W dół Radio/Sleep Radio/sen Volume Głośność Radio Controlled Signal LED Sygnał sterowany radiowo LED Sleep ON Sen WŁ. - Page 53 MONTAŻ Podłączyć adapter AC/DC do gniazdka AC w domu, a następnie włożyć wtyczkę DC z tyłu urządzenia. Radiobudzik jest gotowy do pracy. ZAPASOWA INSTALACJA NA BATERIE Aby doprowadzić zasilanie rezerwowe do zegara w przypadku tymczasowej przerwy w zasilaniu, w radiobudziku potrzebna jest jedna bateria litowa CR2032 (nie jest dołączona). Ustawić...
- Page 54 Podczas odbioru, jednokrotne naciśnięcie przycisku /WAVE spowoduje wyświetlenie trybu odbioru i wskaźnika siły sygnału: - Po wykryciu sygnału DCF, na wyświetlaczu pojawią się 3 kreski Jeśli nie zostanie wykryty sygnał DCF lub zostanie wykryty słaby sygnał, na wyświetlaczu pojawi się Podczas odbioru siła sygnału może zmieniać...
-
Page 55: Ustawianie Alarmu
Nacisnąć SET ponownie, na wyświetlaczu pojawia się „05” i miga. Nacisnąć , aby wybrać czas drzemki od 5 do 60 minut. Z trybu ustawień wychodzi się po ponownym naciśnięciu SET lub jeśli żaden przycisk nie zostanie naciśnięty w ciągu ok. 10 sekund. Uwaga: jeżeli wybrano 12-godzinny format czasu, dioda PM pojawi się... -
Page 56: Słuchanie Radia Fm
Nacisnąć , aby wyregulować jasność (NISKĄ/WYSOKĄ) wyświetlacza LED. Można to wykonać tylko wtedy, gdy radio jest wyłączone. REGULACJA NISKIEJ JASNOŚCI LED Jeżeli wybrano niską jasność po naciśnięciu jeden raz, należy obrócić pokrętło z prawej strony, aby wyregulować żądaną niską jasność LED. Należy obracać w dół, aby zmniejszyć niską jasność... -
Page 57: Rozwiązywanie Problemów
KORZYSTANIE Z LICZNIKA CZASU SNU W trybie zwykłego wyświetlania czasu należy nacisnąć RADIO/SLEEP dwa razy, aby przejść do trybu snu. Dioda LED SL i czas snu „05” (5 minut) migają na wyświetlaczu. Nacisnąć RADIO/SLEEP ponownie według potrzeby, aby ustawić czas snu na 5, 15, 30, 45, 60, 75, 90 lub WYŁ. - Page 58 Unikać narażania baterii na działanie bardzo wysokich temperatur lub wilgotności bądź bezpośredniego nasłonecznienia. Baterie należy trzymać w miejscu niedostępnym dla dzieci. Powodują one zagrożenie udławieniem. SPECYFIKACJA Czas trwania alarmu 1-godzinny Czas drzemki 5 do 60 minut Wybór czasu snu 5, 15, 30, 45, 60, 75, 90 minut lub WYŁ Głośność...
- Page 59 NÁVOD K POUŽITÍ DIGITÁLNÍHO FM RADIOBUDÍKU WT 482 S LED DISPLEJEM, HODINAMI A DVOJITÝM BUZENÍM...
- Page 60 Words in the figure: ENGLISH Czech POHLED ZEPŘEDU FRONT VIEW Alarm 1 ON Buzení 1 ZAPNUTO Alarm 2 ON Buzení 2 ZAPNUTO Nastavit Down Dolů Radio/Sleep Rádio/spánek Volume Hlasitost Radio Controlled Signal LED Rádiem řízená signální LED Sleep ON Spánek ZAPNUTO Radio Memory Paměť...
- Page 61 INSTALACE Zastrčte AC/DC adaptér do domácí zásuvky se střídavým proudem a potom zastrčte DC konektor do zadní části zařízení. Vaše rádio s hodinami je připraveno k použití. INSTALACE ZÁLOŽNÍCH BATERIÍ Pro zajištění záložního elektřiny pro hodiny v případě dočasného výpadku elektřiny potřebuje vaše rádio s hodinami jednu lithiovou baterii CR2032 (nepřiloženo).
- Page 62 Během příjmu jedním stiskem tlačítka /WAVE zobrazíte režim příjmu a sílu signálu Indikace:- Když je zjištěn silný DCF signál, displej ukáže tři čárky Když je DCF signál slabý nebo není vůbec nalezen, na displeji se zobrazí nebo Během příjmu se síla signálu může pohybovat od 1 do 2 čárek až do 3 čárek. To je normální protože hodiny zjišťují...
-
Page 63: Nastavení Buzení
Režim nastavení ukončíte dalším stisknutím tlačítka SET, režim se také ukončí, pokud po dobu přibližně 10 sekund nestisknete žádné tlačítko. Poznámka: Pokud vyberete 12hodinový časový formát, objeví se ve středu spodní části displeje LED PM označující odpolední čas. Pro zobrazení dopoledne není žádný indikátor. NASTAVENÍ... -
Page 64: Poslech Fm Rádia
Stiskněte tlačítko a upravte jas (LO/HI) LED displeje. Lze provést pouze u vypnutého rádia. NASTAVITELNÝ JAS SVĚTLOSTI LED Když jedním stisknutím tlačítka vyberete ztlumení jasu LO, otočte regulátorem na pravé straně a upravte požadovaný jas LED displeje. Otočením dolů jas snížíte, otočením nahoru jej zvýšíte. -
Page 65: Řešení Problémů
POUŽITÍ ČASOVAČE SPÁNKU V režimu zobrazení normálního času dvakrát stiskněte tlačítko RADIO/SLEEP a otevřete režim spánku. Objeví se LED SL a na displeji začne blikat čas spánku „05“ (5 minut). Pro změnu nastavení časovače spánku na 5, 15, 30, 45, 60, 75, 90 nebo VYP znovu podle potřeby stiskněte tlačítko RADIO/SLEEP. - Page 66 Nevystavujte baterie extrémním teplotám nebo vlhkosti nebo přímému slunečnímu záření. Ukládejte baterie mimo dosah dětí. Existuje riziko udušení. SPECIFIKACE Doba buzení 1 hodina Doba opakovaného buzení 5 až 60 minut Výběr časovače spánku 5, 15, 30, 45, 60, 75, 90 minut do vypnutí Hlasitost L01 (minimální) až...
Need help?
Do you have a question about the WT 482 and is the answer not in the manual?
Questions and answers