Advertisement
Important notice
- This product is intended for use in motor vehicle only. Do not install the camera where it might block the driver's view of road (including the mirrors) or the deployment of the air bags.
- Before using this camera, please insert the memory card first, and format the memory card in camera menu first.
- This camera records video at high resolution, Be sure to use high speed Micro SD card, Class 10 or above, 16GB or 32GB cards are recommended.
- This camera features Built-in battery as internal power, it's used only for saving the video file after external power supply cuts off (car turns off). This camera will not turn on without external power supply.
- Be sure the camera lens is clean and there is noting blocking the lens.
- Do not leave the camera in direct sunlight for a long period of time or where the temperature could go above 170°F (75°C).
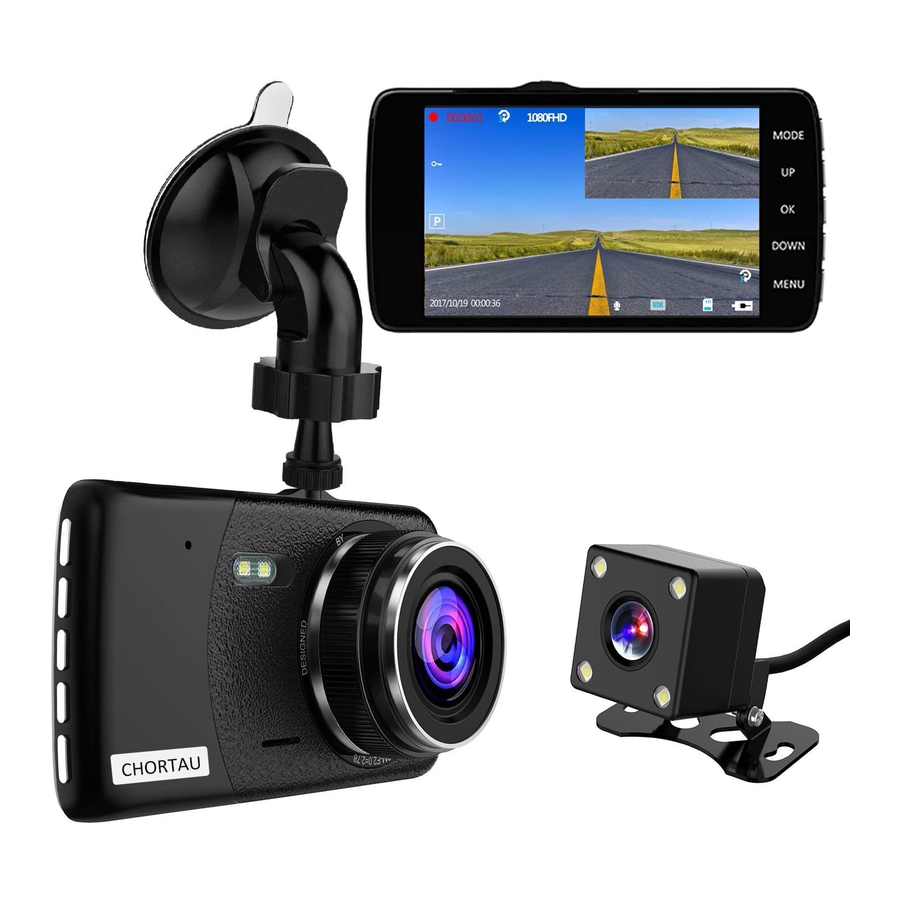
Interface and button function

- Reset
- LED Light
- Speaker
- Lens

- Mode Button
- Power Indicator
- Up Button
- Ok Button
- Down Button
- Menu Button
- Micro SD Card Slot

- Mount Connector
- Mini USB Power Port
- Rear view camera connector


Basic Key Function
| Mode Button |
| |
| Up Button |
| |
| OK Button |
| |
| Down Button |
| |
| Menu Button |
| |
Indicator
There are 2 indicators, red for power, and blue for working status. Red indicator stays on means the camera is powered with external power supply, and red off means it's running on battery. Blue indicator flashing means the camera is recording.
Installation Guide
- Before installation, please check the camera's normal function, and make sure you are using a high speed Micro SD card (speed Class 10 or above.),and format the card in the camera menu before recording.
- Power off the camera, Connect the suction cup mou-nt to the camera with the screw mount.
- Apply the suction cup mount to the windshield, and press down the clip on the mount, the ideal installatio -n position should be near the center of the windshield and up high.
- Adjust the angle of the camera, make sure you get max recording range of the road, and fasten all screws.
- Connect the power to the camera and the cigarette lighter, hide the rest of the cable in the gap of the Interior trim board.
- The rear camera should be installed above the number plate, screw pad upward, connect the red power cable to the reverse lamp.
- Route the camera cable to the front of the car, and connect the rear camera to the main device. There are 2 pictures for reference.
- Start the engine and have a test run.
Rear Lens installation method A:

Rear Lens installation method B:

Function introduction
Auto Recording Feature
When the car engine starts, the camera will automatically power on and start recording, the red power indicator lights and blue indicator lights blinking. If the engine stops, the camera automatically saves record files and power off. Recorded files will be saved on the Micro SD card.
Standby Mode
You can press "OK" button when the camera is recording to enter the standby mode. Standby mode means that there is no ongoing operation.
Attention
- Video recorded by the front camera is named with an "A" in the end, and the rear camera video ends with a "B".
- If you turn off cyclic recording, the camera will stop recording when storage is full.


Operating mode
The machine has three operating modes: Recording mode /Photo/Playback mode.
Repeatedly press the MODE button to switch between three modes.
In the three modes (Recording mode / Photo / Playback mode), Press the MENU button to enter the current mode setting, and also Press again to enter the system settings. The system settings are the same in all modes.
Recording Mode
When the machine is turned on, the recording starts automatically.
- Video Recording Mode Interface:

- Recording Status (Red is - being recorded)
- Video Lock
- Parking Monitor
- Date/Time
- Video Sound
- WDR
- Mini SD Card
- Charging icon
- Motion Detection
- Resolution
- Cyclic Record
- Recording Time
- Recording Mode Menu Setting


In standby mode, press the "MENU" button to enter the setting menu of recording mode, press the "MENU" button twice to enter the system setting menu.
Resolution: Adjust recording video resolution, 1080F-HD 1920*1080; 1080P 1440*1080; 720P 1280*720; WVGA 848*480; VGA 640*480.
Cyclic Recording / Loop recording
This function will keep the camera recording even when the memory is full, turn on the function, and the camera will keep recording video in seamless 1/2/3/5/10 (adjustable) minutes clips, when the memory gets full, it will automatically overwrite the first clip and keep recording. (Locked video will not be covered.)
 NOTE: we recommend normal users to set the recording length to 3 or 5minutes, 10 minutes clips recording has higher requirement for storage speed and capacity.
WDR
It's a technique used to combine high light and low light in a picture to get a proper exposure image effect, so there will not be overexposed or underexposed. Recommend to turn on to get a better video quality.
Exposure
Adjustable exposure value, used to change the image brightness, you can set from +2 to -2.
Motion Detection
When motion detection is on, the camera will only start recording when it detects movement in the video, and stop recording when video is still.
NOTE: We do not recommend turning on this function, it's better to keep the camera recording all the time in case of emergency.
Audio
Audio recording switch, turn on / off audio recording in video.

Date Stamp
Date stamp switch, turn on / off date and time stamp in the video.
Gravity Sensing / G-Sensor lock
When the car takes collision, the G-sensor will be triggered and current video clip will be locked to save evidence, so it won't be deleted in loop recording mode. Sensitivity can be adjusted to Low / Medium / High.
Parking Monitor
It's used to protect your car after parking, with this function on, after you stop the car and the camera powers off, it will stay in standby, when camera detects shocking, it will automatically turn on and take a 30 seconds video, then shut down automatically. The sensor sensitivity can be adjusted to Low /Medium / High.
Rear Camera Mirroring
It's used to flip the rear camera image in mirroring dire -ction to suit some special need for installation.
Photo Mode
In standby mode, short press to switch between Photo mode, Press the "OK" button to take a picture.
- Photo Mode Interface

- Photo mode icon
- Photo remaining storage
- Resolution
- Charging icon
- Setting Menu of Photo Mode
In standby mode, press the "MENU" button to enter the setting menu of photo mode, press the "MENU" button twice to enter the system setting menu.

Capture mode: OFF / 2S timer / 5S timer / 10S timer.
Resolution: Set the photo resolution, 18M 5000×3750; 12M 4032×3024; 10M 3648×2736; 8M 3264×2448; 5M 2592×1944 available.
Photographed pixels: 18M 5000×3750; 12M 4032×3024; 10M 3648×2736; 8M 3264×2448; 5M 2592×1944.
Sequesce: Continuous shooting switch, turn on / off t -hree continuous shooting.
Quality: Optional image quality: Fine, Normal, Econo -my.
Sharpness: Strong, Normal, Soft.
White Balance: AUTO / Daylight / Cloudy / Tungsten / Fluoresent.

Color: Normal / B&W / Sepia.
ISO: Auto/100/200/400
Exposure
Adjustable exposure value, used to change the image brightness, you can set from +2 to -2.
Anti-Shaking: OFF / ON.
Quick Review: OFF / 2 Secoonds / 5 Seconds.
Date Stamp: OFF, Date, Date/Time.
Playback Mode
This mode allows you to play back recorded video or view photos.
- Stop video recording, and press "MODE" button twice to enter Playback Mode.
- Use "UP" and "DOWN" button to scroll through the r-ecorded files/photos, and press "OK" to view recorded video.
- Setting Menu of Playback Mode
In standby mode, press the "MENU" button to enter the setting menu of Playback mode, press the "MENU" button twice to enter the system setting menu.

Delete: Deletc Current / Delete all.
Protect: Lock One / Unlock One / Lock All / Unlock All.
Slide Show: 2 Seconds / 5 Seconds / 8 Seconds.
System Settings
In standby mode, press "MENU" button twice to access System Setting Menu in any mode.

Date/Time
Set current date and time here.
Auto Power Off
Set the camera to power off without action for some ti -me, off / 3 / 5 10 minutes available.
Beep Sound
Turn ON / OFF the beep sound notification for button operation.
Language
Set camera system language, English, French, Spanish, Portuguese, German, Italian, Chinese, Russian, Japanese, Korean are available.
Frequency
Light frequency setting, 50Hz / 60Hz available.
Screen saver
In order to guarantee safe driving, not to be effected by the light of the camera, you can set the screen saver to shut off the display after 1 / 3 / 5 minutes, you can press any key to turn it back on.

Light Set
Turn ON / OFF the front LED light.
Format
Format the memory card in this menu, we highly reco -mmend formatting your card before recording.
Default Setting
Reset the camera to factory default setting, when the camera malfunctions some time, use it to reset the camera.
Version
Firmware version
Specification
| Display | 4.0 inch IPS screen |
| Lens | Dual 130 degree viewing angle glass lens |
| Lens aperture | F2.0 aperture |
| Front camera Resolution | 1920*1080P / 1440*1080P / 1280*720P / WVGA / VGA |
| Rear camera Resolution | 720*480P |
| Loop recording | 1min / 2min / 3min / 5min / 10min /off |
| Video format | MOV |
| Audio | Built in MIC and speaker |
| Parking monitoring | High / Middle / Low / off |
| Motion detection | ON / OFF |
| ISO | Auto |
| WDR | Supported |
| G-sensor | High / Middle / Low / off |
| LED light | Supported |
| PC interface | USB 2.0 |
| Rear camera cable length | 6 meters / 20 feet |
| Power Interface | 5V / 2A |
| Language | English, Chinese, Japanese, Russian, Portuguese, French, German, Italian, Latvian, Polish, Korean, Spanish |
| Storage | Support Micro SD card up to 32 GB (above Class 10) |
Common Problems and Solutions
The dash cam will stop automatically while recording?
Solution:
- Check whether the memory is full.
- Check the loop recording function of the camera.
- Check whether the Micro SD card is high-speed above Class 10.
- Check the memory card, there might be too many locked video that the loop recording won't work right, and in this case, you should adjust the sensitivity of the G-sensor.
If the video played on the computer is somehow not fluent or jammed.
- Format your Micro SD card in the camera.
- Try some other player software.
Without external power supply, the camera only lasts very short time, or it just can't turn on.
The built-in battery is very small for safety reasons, not designed to work alone, so please keep it connected to external power supply.

Documents / ResourcesDownload manual
Here you can download full pdf version of manual, it may contain additional safety instructions, warranty information, FCC rules, etc.
Download CHORTAU B-T002 - Full HD 1080P 4 Inch Dual Lens Dash Cam Manual
Advertisement


Need help?
Do you have a question about the B-T002 and is the answer not in the manual?
Questions and answers