Advertisement
Quick Links
Advertisement

Related Manuals for CHORTAU B-T27


Summary of Contents for CHORTAU B-T27
- Page 1 CHORTAU Dual 1080P Dash Cam Front and Inside User Manual Model: B-T27...
- Page 3 1. What's in the packing box? A. CHORTAU B-T27 dual lens dash cam B. Car charger power cord C. Suction cup mount D. Type C data cable E. B-T27 dual dash cam user manual F. Pin (use to insert/remove the micro sd card)
-
Page 4: Very Important
After enter setup, short click M button again enter system settings menu, then click down button to highlight format option, click OK button to confirm, finally click down button to select OK option, then click OK button to confirm format, card formatted. support@chortau.cc... - Page 5 140°F (60°C) inside car. In cold winter, like -22°F (-30°C) or lower, detach the camera from the windshield when not in use, and store in the glove box. support@chortau.cc...
-
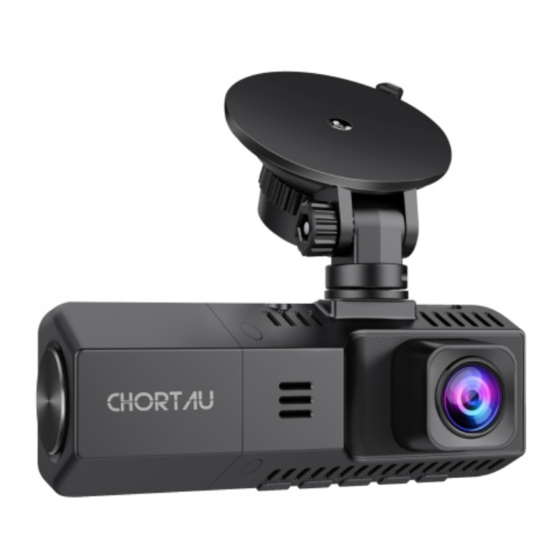
Page 6: Dash Cam Overview
Dash cam overview support@chortau.cc... - Page 7 support@chortau.cc...
- Page 8 4 display mode, picture in picture /half front and half inside Up button /only front /only inside.Long press up button to turn on /off IR LED light. Long press up button to turn on /off IR LED light. support@chortau.cc...
- Page 9 Type C port Mount connector Connect to the dash cam suction cup mount Use a pin to click/poke to force reset the Reset button camera Insert micro SD card, provide storage space Micro SD card slot up to 32GB support@chortau.cc...
- Page 10 2. Clean the car windshield. 3. Wipe the suction mount pad clean on the suction cup mount. 4. Attach the suction cup mount to the windshield, then rotate the locking clamp on the mount 90° upward until it clicks. support@chortau.cc...
- Page 11 5. Route the power cord around the windscreen and tuck/hide it under the trim. support@chortau.cc...
- Page 12 6. Insert car charger into the car’s cigarette lighter port. 7. Start the car, the power cord car charger red indicator will light up. The dash cam will auto power on and start recording. support@chortau.cc...
-
Page 13: Get Started
10 or higher. Turn off dash cam, then use the supplied pin, carefully insert the micro SD card into the camera’ s card slot until it clicks then turn on dash cam. If you need remove the card, please power off the camera first. support@chortau.cc... -
Page 14: Operating Mode
Operating Mode: The B-T27 operates in 3 modes: A: Video Recording Mode, B: Photo Mode, C: Playback Mode, These modes also have menus to help you configure recording and taking photos, press Mode Button to access the mode you want. Watch the icon on top right corner of the screen for each mode. - Page 15 5. Audio on 6. Date /Time (current date, YY/MM/DD,24H) 7. Recording time(current clip) 8. Resolution 9. Parking mode on 10. Gravity sensor on 11. HDR on 12. IR light on 13. Memory card inserted or not 14.Current battery level support@chortau.cc...
-
Page 16: Video Recording Menu
System Setting Menu. Press to scroll through the various settings and press OK to select, Press Menu button again to exit the setting menu. Video recording menu: support@chortau.cc... - Page 17 Recommend to turn on to get a better video quality. Exposure: Adjustable exposure value, used to change the image brightness, Default is 0. Pressing OK gives the following options: 0, -1, -2, -3, 0,+1, +2, +3. support@chortau.cc...
- Page 18 “Video /EMR” folder, and cannot be automatically overwritten. It will need you delete them manually. The gravity sensitivity is adjustable with 3 settings: Low /Medium /High. It is set to medium by default. The gravity sensing can also be deactivated in video setup. support@chortau.cc...
- Page 19 To ensure the camera is able to function in parking mode, please keep it powered with a mobile power bank or use hard wire kit install it directly to the car battery. We do not recommend running the camera continuously for more than 12 hours. support@chortau.cc...
- Page 20 “M” button again to enter the system setting menu. If camera is in recording situation, click OK button to stop recording first, then long press M button to enter video setting menu. support@chortau.cc...
- Page 21 8752 pictures) 12. Anti shaking Menu of Photo Taking Mode : In standby mode, long press the “M” button to enter the setting menu of video recording mode, short press the “M” button again to enter the system setting menu. support@chortau.cc...
- Page 22 Sharpness: Defines the clarity of details in the photos, Optional: Strong /Normal /Soft. White balance: Establishes the condition to capture an image based on the option given. Optional: Auto /Daylight /Cloudy /Tungsten /Fluorescent. Color: Normal /Black and White /Sepia ISO: Auto /100 /200 /400 support@chortau.cc...
- Page 23 Exposure: Default is 0. Pressing OK gives the following options: 0, -1, -2,-3, 0,+1, +2, +3 Anti-shaking: Press OK and select Off /On. Date stamp: Press Up /Down and OK button to set the current date and time. Press the Menu button to exit. support@chortau.cc...
-
Page 24: C.playback Mode
If camera is not recording which in standby mode, just short click twice of “M” button to enter playback mode directly. Use and to scroll through the recorded files / photos, and press OK to view recorded video. support@chortau.cc... - Page 25 support@chortau.cc...
- Page 26 M button to enter system setup.(If the camera is recording video, press the OK button to stop recording first, then long press M button enter the video setup, short press M button to enter system setup) support@chortau.cc...
- Page 27 Press the OK button to select the duration in minutes: 1 /3 / 5, or Off to disable it. Frequency: Default is 50Hz. Press OK button to toggle between 50Hz/60Hz. Beep Sound: Turn on sounds when you press any buttons. support@chortau.cc...
- Page 28 OK button to set the Date/Time. Navigate up or down button to select date and time values. Press OK to confirm and proceed. To finish setup, just press the M button to exit. Date format is DD/MM/YY with the time in 24 hour format. support@chortau.cc...
- Page 29 When you select “Auto”, the image of inside camera will auto in colour or black and white, according to the light environment.) Format: Press Up/Down and OK button to select format card. support@chortau.cc...
- Page 30 Default Setting: Press OK and select OK to reset the device back to stock factory settings. Press the Menu button to exit and complete the setup. Version: Press OK to check the camera firmware version. support@chortau.cc...
- Page 31 1920x1080P.It can be switched to single front camera recording mode/single inside recording mode/both front and inside dual lens recording mode by press down button directly. support@chortau.cc...
- Page 32 The loop recording standard files are stored in the “DCIM-FRONT /INSIDE” folder. When the micro SD card is full, the camera will overwrite the older files automatically.The dual dash cam automatically store front and inside video in different 2 fold of memory card. support@chortau.cc...
- Page 33 When you turn on this function, the image of inside camera will turn into black and white. When you switch this function to “AUTO”, the image of inside camera will in colour or in black and white according to the light environment. support@chortau.cc...
- Page 34 Low /Medium /High. It is set to medium by default. The gravity sensing can also be deactivated in video setup. Warm Tips: Because the sensor is very sensitive, to avoid card easily get full, we suggest you adjust gravity sensor to "Low" option. support@chortau.cc...
- Page 35 Default setting the voice recording is On. It can be turned Off using below 2 methods: (1)Go to “Video Setup” to find “Audio” then press OK button and select Off, press OK to confirm. (2)While recording video, press the DOWN button to toggle voice recording Off/On. support@chortau.cc...
- Page 36 The sensor sensitivity can be adjusted to Low /Medium/ High. support@chortau.cc...
- Page 37 7). Taking a Snapshot When the camera is recording video, pressing the OK button to stop recording, click M button,the left top corner will appear a camera icon, then press OK button to take picture will capture a snapshot. support@chortau.cc...
- Page 38 And you can shor press the “Power” button to turn off the screen when the camera is recording. support@chortau.cc...
- Page 39 Up/Down button to select the video/picture and press OK button confirm to playback or pause. Long press M button to enter video setting page, click up/down button to select to delete or protect(lock) this single video by click OK button. support@chortau.cc...
- Page 40 Storage” status, standard camera setup and operations will be disabled. 2.Some mac system computer player do not support MOV/MP4 video, if view playback video on mac computer the video could not be played, just download "VLC" player which could view playback video easily. support@chortau.cc...
-
Page 41: Specifications
Specifications Model B-T27 Image Sensor Front/Rear High Resolution CMOS Sensor Display 1.5 inch LCD Display Front: 170° wide viewing angle, full 6 layer glass lens with F/1.8 wide aperture. Lens Inside: 140° wide viewing angle, F/2.0 wide aperture lens. Video... - Page 42 Built-in microphone & speaker Micro SD Card (up to 32GB) Memory storage USB Interface Type C Built-in Battery,150mAh 3.7V Polymer Battery Li-ion battery External power DV 5V / 2A supply Storage -86°F~+158°F (-20°C ~ 75°C) temperature Operating -86°F~+149°F (-20°C ~ 65°C) temperature support@chortau.cc...
-
Page 43: Common Problems And Solutions
file after external power supply cuts off (car turn off). This camera will not turn on without external power supply.Check the power supply, make sure they are connected properly, power indicator on the power adapter is on, and the connectors are tight. support@chortau.cc... - Page 44 Removed the protective film of the suction mount. Please kindly soak suction mount to warm water for a moment. If it is still not working, just contact us at support@chortau.cc to get a replacement. Q: The recorded video is unclear? A: Make sure there are no fingerprints or dirt on the...
- Page 45 Warranty & Support (After-Sales Service) Warranty CHORTAU B-T27 Dual dash cam comes with a full 12 months warranty. Support If you have any questions regarding this dash cam, please do not hesitate to contact us at support@chortau.cc , we will get back to you within 24hours.
Need help?
Do you have a question about the B-T27 and is the answer not in the manual?
Questions and answers