Table of Contents
Advertisement
Advertisement
Table of Contents

Related Manuals for Vivosun Grow Tent Series


Summary of Contents for Vivosun Grow Tent Series
- Page 1 Grow Tent Series USER MANUAL...
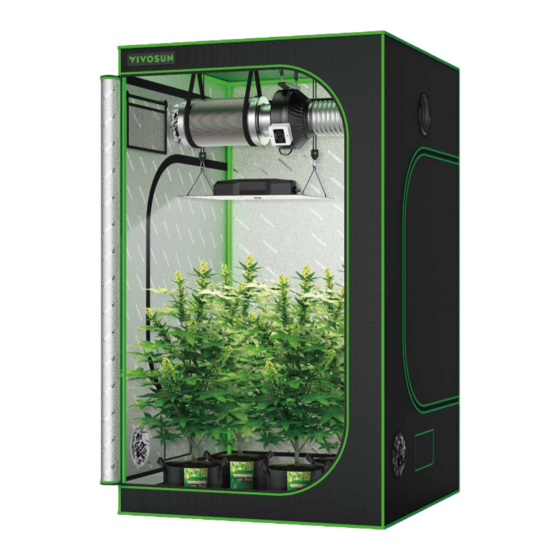
- Page 2 PRODUCTS INCLUDED IN THIS MANUAL: Product Standard Grow Tent 4FTx4FT WEB-304113-44NJ VS4000 LED Grow Light WEB-LED-400J 6-Inch 440 CFM Inline Duct Fan WEB-306101S-6 6-Inch Carbon Filter WEB-306143-0616 6-Inch 8 ft Ducting WEB-306104-68J 6-Inch Clamps WEB-306104-68J 7-Day Digital Timer WEB-DT-001J 5 Gallon Grow Bags 5-Pack WEB-311001-5x5NJ Gardening Hand Pruner Pruning Shear WEB-311003-4J...
-
Page 3: Table Of Contents
CONTENTS PRODUCT CONTENTS Product Contents Grow Tent Key Features Installation Specifications Grow Tent VS Grow Light Inline Fan x 1pc x 1pc x 1pc LED Grow Light Key Features Installation Specifications Application Inline Fan Carbon Filter Elastic Trellis Net 5 gal. Grow Bags Installation x 1pc x 1pc... -
Page 4: Key Features
KEY FEATURES INSTALLATION Frame Poles & Ceiling Bars 1. High Light Reflectivity and Containment Professional-grade canvas designed with 600D Oxford nylon fabric that prevents light leaks and an interior 8 pcs. Mylar lining featuring our specialized ''lychee'' patterning that is more reflective than other patterns. - Page 5 INSTALLATION INSTALLATION STEP 1 STEP 3 Connect four Poles (A) to four Corner Supports (4) to form base frame of the Connect four Poles (C) to the Poles (B). tent. STEP 2 STEP 4 Connect four Poles (B) to the Corner Supports (4) of the tent base. Connect the other four Corner Supports (4) to the Poles (C).
- Page 6 INSTALLATION INSTALLATION STEP 5 STEP 7 Connect the other four Poles (A) to the Corner Supports (4) to form the top Pull the tent roof and cover on the top frame. frame of the tent. STEP 6 STEP 8 Unfold the Tent Coat (1) and put the base frame in the bottom of the Tent Coat Put the Ceiling Bars (E, F) on the top frame for hanging devices.
-
Page 7: Specifications
INSTALLATION SPECIFICATIONS STEP 9 Place the Floor Tray (2) into the tent. Dimensions 48" x 48" x 80" Weight 28.9 lbs. Warranty 1 Year Package Size 49.2'' x 10.2'' x 6.5'' Suggested Plant 6-8 plants in Suggested VS4000/4bar Count 3 gallon pots Lighting Recommended 6'' Inline Fan... -
Page 8: Led Grow Light
KEY FEATURES INSTALLATION 1. SAMSUNG LED Diodes Powered by Samsung high-efficiency diodes designed to provide the perfect spectrum for growing plants LED Grow Light Rope Hanger 2. High Efficacy x 1pc x 2pcs High-quality diodes and power supply mean high PPE, up to 2.7 umol/J. 3. - Page 9 INSTALLATION INSTALLATION CONNECTING MULTIPLE LIGHTS 1. Pass the rope hangers' carabiners through the hooks attached to the LED light fixture and then attach the other end of the rope hangers to the roof of the tent or the ceiling. Controlled Light Main Control Light Controlled Light 2.
-
Page 10: Specifications
SPECIFICATIONS APPLICATION SUGGESTED HANGING DISTANCE & SUGGESTED LIGHTING TIME LED Source Samsung LM301D Frequency 50-60Hz Distance Stage Time Inch (In.) Centimeter (cm.) Input Voltage 120-277V Input Power 100W Germination 24-30 61-76 18 Hours ON Seeding 24-30 61-76 16 Hours ON >0.9 Power Factor Weight... -
Page 11: Installation
INSTALLATION INSTALLATION INLINE DUCT FAN INSTALLATION DIRECTIONS INSTALLATION INSTRUCTIONS Our Inline Duct Fan is specially designed for easy installation, compatibility and efficiency. Please install the inline fan as shown in installation diagrams. We designed the inflow and outflow openings to be the same size to eliminate the When installing or transporting the inline fan, C X 53.33 cmald the blades or allow them need for complicated ducting arrangements and installation. -
Page 12: Specifications
Storage temperatures:-40°C/-104°F to +65°C/+149°F Storage humidity: 0% to 85%RH Please read the following warnings carefully before initial use. Failure to observe these safty warnings may result in serious injury or accidents and will release VIVOSUN of all liability and void all product warranties. -
Page 13: Instructions
WARNING INSTRUCTION The fan and motor must be operated only within the prescribed scope of temperature This timer has a built-in backup battery that saves the user's presets and programs. (-40°C/-104°F to +65°C/+149°F) and humidity (5% to 95%RH) otherwise the device The timer is designed for indoor use so please ensure that the timer stays dry and is kept may give users an electrical shock upon contact or cause unexpected damage. -
Page 14: Timer Setting
TIMER SETTING TIMER SETTING 1. INITIAL SETTINGS c. Setting ''minute'' While pressing the ''CLOCK'' button, press the ''MIN'' button to Press Reset button ''R'' to reset the timer. The screen will turn blank and show reset display. adjust the current minute. For example, the current hour is Note: 08:30. - Page 15 TIMER SETTING TIMER SETTING Press the ''HOUR'' button and choose the working hour you Press the ''CLOCK'' button to exit the program setting and need. Long press the ''HOUR'' button (about 3 seconds) to return to the current time. change the hour number. NOTE: Press the ''PROG'' button repeatedly to review the program settings you have created.
- Page 16 TIMER SETTING TIMER SETTING 5. DAYLIGHT SAVINGS TIME Random function setting: Check and ensure that the programs have been set and the timer in AUTO mode. This function allows the timer to adjust the current time on the timer one hour ahead to Note: If the timer is not in AUTO mode, please set it accord- accommodate daylight savings.
- Page 17 TIMER SETTING TIMER SETTING 1. Countdown setting: 3. Cancel countdown mode a. Keep press ''WEEK'' and ''DEL'' to enter countdown setting, Keep press ''WEEK''and ''DEL'' to cancel the countdown mode at ''dOFF 00:00:00'' will show on display. any time and display will back to current time. b.
- Page 18 INSTRUCTION INSTRUCTION SPECIFICATIONS TOUCH SCREEN THERMO HYGROMETER Measuring range: -10~70°C (-32~158°F)/10%~99%RH Our thermometer has been designed andconstructed by US using innovative components. Accuracy:±1°C(±2°F)/±5%RH Displaying 24 hour/all-time high/ low records and current trends for both humidity and Display resolution: 0.1°C (0.1°F)/1%RH temperature and humidity level icons that indicate if your home is too humid, too dry or just Power supply: 3V right!
-
Page 19: Equipment Setup
EQUIPMENT SETUP EQUIPMENT SETUP Ducting Opening VENTILATION OF GROW TENT TYPICAL SETUP Inline Fan & Carbon Filter: Choose an appropriate The grow tent has multiple ducting openings and intake holes for ventilation. inline fan suitable for your grow tent. Hang the inline fan on the ceiliing bar of the tent and connect with Ducting Opening: Install a necessary ducting ductings on the air outlet side of the fan. -
Page 20: Safety Information
Please read the following information carefully before using. Failure to observe VIVOSUN will be free from defects in manufacturing for a period of two years from the date these safety instructions may result in serious injury and will release VIVOSUN of purchase.
Need help?
Do you have a question about the Grow Tent Series and is the answer not in the manual?
Questions and answers