Table of Contents
Advertisement
Available languages
Available languages
Quick Links
Advertisement
Table of Contents

Related Manuals for Franke FGC 906 I


Summary of Contents for Franke FGC 906 I
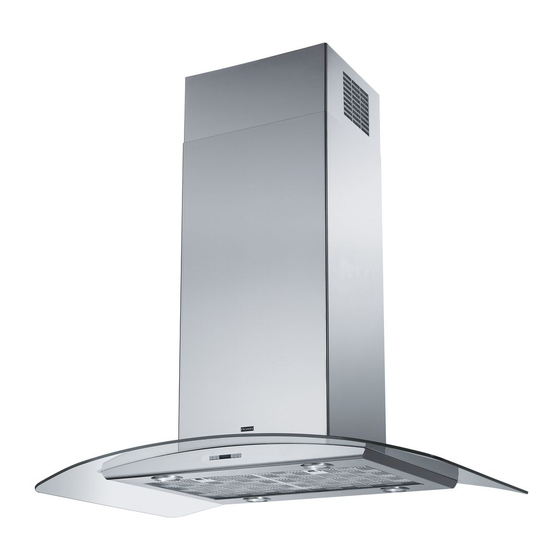
- Page 1 Instructions for use and installation Cooker Hood Istruzioni per l’uso e l’installazione Cappa Mode d’emploi et installation Hotte de Cuisine Bedienungsanleitung und Einrichtung Dunstabzugshaube Kullanım ve montaj talimatları Davlumbaz Uživatelská Pøíruèka Odsavač par FGC 906 I...
-
Page 2: Table Of Contents
INDEX RECOMMENDATIONS AND SUGGESTIONS ........................3 CHARACTERISTICS ................................4 INSTALLATION..................................6 USE ...................................... 10 MAINTENANCE ................................... 11 INDICE CONSIGLI E SUGGERIMENTI............................12 CARATTERISTICHE................................13 INSTALLAZIONE ................................. 15 USO...................................... 19 MANUTENZIONE ................................20 SOMMAIRE CONSEILS ET SUGGESTIONS............................21 CARACTERISTIQUES................................. 22 INSTALLATION..................................24 UTILISATION .................................. - Page 3 RECOMMENDATIONS AND SUGGESTIONS The Instructions for Use apply to several versions of this appliance. Accord- ingly, you may find descriptions of individual features that do not apply to your specific appliance. INSTALLATION • The manufacturer will not be held liable for any damages resulting from in- correct or improper installation.
- Page 4 CHARACTERISTICS Dimensions Min. Min. 500mm 650mm...
- Page 5 Components Ref. Q.ty Product Components Hood Canopy complete with: Controls, Lights, Filters Telescopic chimney made up of: Upper chimney Lower chimney Telescopic frame complete with Suction fan, made up 7.1a 7.1a Upper frame 7.1b Lower frame Reduction flange ø 150-120 mm Flange ø...
- Page 6 INSTALLATION Drilling the Ceiling/shelf and fixing the frame DRILLING THE CEILING/SHELF • Use a plumb line to mark the centre of the hob on the ceiling/support shelf. • Place the drilling template 21 provided on the ceiling/support shelf, making sure that the template is in the correct position by lining up the axes of the template with those of the hob.
- Page 7 Fixing the frame • Loosen the two screws fastening the lower chimney and re- move this from the lower frame. • Loosen the two screws fastening the upper chimney and re- move this from the upper frame. If you wish to adjust the height of the frame, proceed as follows: •...
- Page 8 Recirculation version air outlet • Fix the connection 15 to the frame using the 4 screws pro- vided. • Fix the flange 10 to the lower opening of the connection 15. • Connect the hood air outlet to the flange in the lower part of the junction using a rigid or flexible ø...
- Page 9 ELECTRICAL CONNECTION • Connect the Hood to the Mains power sup- ply, inserting a two-pole Switch with a con- tact aperture of at least 3 mm. • Remove the Metal grease filters (see par. on “Maintenance”) and make sure that the power supply Cable is properly inserted in the Suction fan socket.
- Page 10 Control panel TOUCH CONTROL FUNCTION ON/OFF Motor Switches the hood motor on and off. The latest selected speed appears on the display. Decreases the suction speed: V3 → V2 → V1 Speed - Increases the suction speed: V1 → V2 → V3 Speed + Intensive speed Activates the intensive speed from any previously selected...
- Page 11 MAINTENANCE Grease filters CLEANING METAL SELF- SUPPORTING GREASE FILTERS • The filters must be cleaned every 2 months of operation, or more frequently for particularly heavy usage, and can be washed in a dishwasher. • Remove the filters one at a time holding them up with one hand and pulling the handle downwards with the other hand at the same time.
- Page 12 CONSIGLI E SUGGERIMENTI Questo libretto di istruzioni per l'uso è previsto per più versioni dell' apparecchio. É possibile che siano descritti singoli particolari della dotazione, che non riguar- dano il Vostro apparecchio. INSTALLAZIONE • Il produttore declina qualsiasi responsabilità per danni dovuti ad installazione non corretta o non conforme alle regole dell’arte.
- Page 13 CARATTERISTICHE Ingombro Min. Min. 500mm 650mm 1 13...
- Page 14 Componenti Rif. Q.tà Componenti di Prodotto Corpo Cappa completo di: Comandi, Luce, Filtri Camino telescopico formato da: Camino superiore Camino inferiore Traliccio telescopico completo di Aspiratore, formato 7.1a 7.1a Traliccio superiore 7.1b Traliccio inferiore Flangia di riduzione ø 150-120 mm Flangia ø...
- Page 15 INSTALLAZIONE Foratura Soffitto/Mensola e Fissaggio Traliccio FORATURA SOFFITTO/MENSOLA • Con l’ausilio di un Filo a piombo riportare sul Soffitto/Mensola di supporto il centro del Piano di Cottura. • Appoggiare al Soffitto/Mensola la Dima di Foratura 21 in dotazione, facendo coincidere il suo centro al centro proiettato e allineando gli assi della Dima agli assi del Piano di Cottura.
- Page 16 Fissaggio Traliccio • Svitare le due viti che fissano il camino inferiore e sfilarlo dal traliccio (dalla parte inferiore). • Svitare le due viti che fissano il camino superiore e sfilarlo dal traliccio (dalla parte superiore). Nel caso in cui si voglia regolare l’altezza del traliccio procedere come segue: •...
- Page 17 Uscita aria Versione Filtrante • Fissare il Raccordo 15 al traliccio utilizzando le 4 Viti in dota- zione. • Incastrare la flangia 10 nell’apposito foro inferiore del Raccor- do 15. • Collegare l’uscita aria della cappa con la flangia posta sotto al raccordo per mezzo di un tubo rigido o flessibile ø...
- Page 18 CONNESSIONE ELETTRICA • Collegare la Cappa all’Alimentazione di Rete interponendo un Interruttore bipolare con apertura dei contatti di almeno 3 mm. • Rimuovere i Filtri antigrasso (vedi par. “Manutenzione”) e assicurarsi che il con- nettore del Cavo di alimentazione sia cor- rettamente inserito nella...
- Page 19 Quadro Comandi TASTO FUNZIONI ON/OFF Motore Attiva e arresta il motore d’aspirazione. Sul display viene visualizzato lo step di velocità precedentemente impostata. Decrementa la velocità del motore: V3 →V2 → V1 Velocità Velocità + Incrementa la velocità del motore: V1→V2→ V3 Velocità...
- Page 20 MANUTENZIONE Filtri antigrasso PULIZIA FILTRI ANTIGRASSO METALLICI AUTOPORTANTI • Sono lavabili anche in lavastoviglie, e necessitano di essere lavati ogni 2 mesi circa di utilizzo o più frequentemente, per un uso particolarmente intenso. • Togliere i Filtri uno alla volta,sostenendoli con una mano men- tre con l’altra si tira la leva verso il basso.
-
Page 21: Conseils Et Suggestions
CONSEILS ET SUGGESTIONS La présente notice d'emploi vaut pour plusieurs versions de l'appareil. Elle peut conte- nir des descriptions d'accessoires ne figurant pas dans votre appareil. INSTALLATION • Le fabricant décline toute responsabilité en cas de dommage dû à une installation non correcte ou non conforme aux règles de l’art. -
Page 22: Caracteristiques
CARACTERISTIQUES Encombrement Min. Min. 500mm 650mm 2 22... - Page 23 Composants Réf. Q.té Composants de Produit Corps Hotte équipé de: Comandes, Lumière, Filtres Cheminée Télescopique formée de : Cheminée Supérieure Cheminée Inférieure Treillis télescopique avec Aspirateur, formé par: 7.1a 7.1a Treillis supérieur 7.1b Treillis inférieur Flasque ø 150 Raccord Sortie Air Boîte connexions Colliers de serrage serre-tube (non compris) 7.1b...
-
Page 24: Installation
INSTALLATION Perçage Plafond/Étagère et Fixation Treillis PERÇAGE PLAFOND/ETAGERE • À l’aide d’un Fil à plomb, reporter sur le Plafond/Étagère de support le centre du Plan de Cuisson. • Poser contre le Plafond/Étagère le Gabarit de Perçage 21 fourni avec l’appareil, en faisant coïncider son centre avec le centre projeté... - Page 25 FiXATION TREILLIS • Dévisser les deux vis qui fixent la cheminée inférieure et sortir cette dernière du treillis (depuis la partie inférieure). • Dévisser les deux vis qui fixent la cheminée supérieure et sortir cette dernière du treillis (depuis la partie supérieure). Si l’on souhaite régler la hauteur du treillis, effectuer les opéra- tions suivantes: •...
- Page 26 Sortie air version Recyclage • Fixer le raccord 15 au Treillis à l’aide des 4 Vis fournies avec l’appareil. • Bloquer la bride 10 dans le trou inférieur de le raccord 15. • Joindre la sortie d’air de la hotte avec la bride placée sous la rallonge par un tuyau rigide ou flexible ø...
- Page 27 BRANCHEMENT ÉLECTRIQUE • Brancher la hotte au réseau électrique en interposant un interrupteur bipolaire ayant une ouverture des contacts d’au moins 3 • Retirer les filtres à graisse (voir par. “Entre- tien”) et s’assurer que le connecteur du câ- ble d’alimentation est branché de façon cor- recte dans la prise de l’aspirateur.
-
Page 28: Utilisation
UTILISATION Tableau des commandes TOUCHE FONCTIONS ON/OFF Moteur Actionne et arrête le moteur d’aspiration. Sur l’afficheur est visualisé le pas de la vitesse précédemment sélectionnée. Réduit la vitesse du moteur: V3 → V2 → V1 Vitesse - Augmente la vitesse du moteur: V1 → V2 → V3 Vitesse + Vitesse intensive Actionne la vitesse intensive en partant d’une vitesse quel-... -
Page 29: Entretien
ENTRETIEN Filtres anti-graisse NETTOYAGE FILTRES ANTI-GRAISSE METALLIQUES AUTOPORTEURS • Lavables au lave-vaisselle, ils doivent être lavés environ tous les 2 mois d’emploi ou plus fréquemment en cas d’emploi par- ticulièrement intense. • Enlevez les filtres l’un après l’autre en les soutenant avec une main et en tirant en même temps la poignée vers le bas avec l’autre main. -
Page 30: Empfehlungen Und Hinweise
EMPFEHLUNGEN UND HINWEISE Diese Gebrauchsanleitung gilt für mehrere Geräte-Ausführungen. Es ist möglich, dass einzelne Ausstattungsmerkmale beschrieben sind, die nicht auf Ihr Gerät zutreffen. MONTAGE • Der Hersteller haftet nicht für Schäden, die auf eine fehlerhafte und unsachgemäße Mon- tage zurückzuführen sind. •... -
Page 31: Charakteristiken
CHARAKTERISTIKEN Platzbedarf Min. Min. 500mm 650mm 3 31... - Page 32 Komponenten Bez. Menge Produktkomponenten Haubenkörper komplett mit: Steuerungen, Beleuch- tung, Filter Teleskopkamin, bestehend aus: Oberer Kaminteil Unterer Kaminteil 7.1a Teleskopgitter komplett mit Sauggerät, bestehend aus: 7.1a Oberes Gitterteil 7.1b Unteres Gitterteil Reduktionsflansch ø 150-120 mm Flansch ø 150 7.1b Anschluss Luftaustritt Anschlussdose Rohrschellen (nicht enthalten) Kabeldurchgänge...
-
Page 33: Montage
MONTAGE Bohren der Decke/Trägerplatte und Montage des Teleskopgerüsts Achtung: Bitte beachten Sie bei der Montage das Gewicht der kompletten Haube. Die Tragfä- higkeit der Decke oder alternativ der Trägerplatte für diese Zugbelastung muss vor der Mon- tage geprüft und gegebenenfalls durch die Anbringung von geeigneten Befestigungs- oder Stabilisierungselementen hergestellt werden. - Page 34 Montage des Teleskopgerüsts • Die beiden Schrauben lösen, die den unteren Gerüstteil fixieren und diesen aus dem Gerüst ziehen (an der Unterseite) • Die beiden Schrauben lösen, die den oberen Gerüstteil fixieren und diesen aus dem Gerüst ziehen (an der Oberseite). Für eine eventuelle Regulierung der Gerüsthöhe folgendermaßen vorgehen: •...
- Page 35 Anschluss in Umluftversion • Der Anschluß 15 an das Teleskopgerüst mit den 4 beiliegenden Schrauben befestigen. • Den Flansch 10 an die untere Bohrung des Anschluß 15 an- bringen. • Den Haubenluftaustritt mit Hilfe eines Rohres oder Schlauches Ø 150 (die Wahl bleibt dem Installateur überlassen) mit dem Flansch, der sich unter dem Umlenkteil befindet, verbinden.
- Page 36 ELEKTROANSCHLUSS Vor der Installation die Netzspannung durch herausdrehen der Sicherung oder ausschalten des Hauptschalters stromlos machen. • Die Haube an die Stromversorgung an- schließen. Einen Zweipolschalter mit Kon- taktöffnungsweite von mindestens 3 mm dazwischensetzen. • Die Fettfilter entfernen (siehe Abschnitt “Wartung”).
-
Page 37: Bedienung
BEDIENUNG Bedienfeld TASTE FUNKTIONEN T1 Motor ON/OFF Schaltet den Gebläsemotor ein und aus. Auf dem Display wird die zuvor eingestellte Geschwindigkeitsstufe angezeigt. Erhöht die Geschwindigkeit des Motors: V3 → V2 → V1 T2 Geschwindigkeit - Verringert die Geschwindigkeit des Motors: V1 → V2 → V3 T3 Geschwindigkeit + T4 Intensivstufe Aktiviert die Intensivstufe von jeder Geschwindigkeitsstufe aus... -
Page 38: Wartung
WARTUNG Fettfilter SELBSTTRAGENDER METALLFETTFILTER REINIGUNG • Sie müssen nach 2-monatigem Betrieb bzw. bei starkem Ein- satz auch häufiger gereinigt werden, was im Geschirrspüler möglich ist. • Einen Filter nach dem anderen entfernen. Halten Sie den Filter mit einer Hand fest und ziehen Sie den Griff mit der anderen Hand gleichzeitig nach unten. -
Page 39: Tavsiyeler Ve Öneriler
TAVSIYELER VE ÖNERILER Bu kullanma talimatι birden fazla cihaz modeli için geçerlidir. Cihazιnιza uymayan bazι donanιm özellikleri tarif edilmiş olabilir. MONTAJ • Yalnιş veya eksik montajdan doğan herhangi bir zararιn sorumluluğu üreticiye ait değildir. • Davlumbaz ile pişirici cihazιn ocak kιsmι arasιndaki minimum güvenlik mesafesi 650 mm.dir (bazı... -
Page 40: Özellikler
ÖZELLIKLER Boyutlar Min. Min. 500mm 650mm 4 40... - Page 41 Bileşenler Ref. Miktar Ürün Bileşenleri Kumandalar, lambalar, filtrelerle birlikte komple Siperlikli kaput Aşağıdakilerden yapılmış teleskopik baca: Üst baca Alt baca 7.1a Emme fanı ile birlikte aşağıdakilerden yapılmış teleskopik çerçeve: 7.1a Üst çerçeve 7.1b Alt çerçeve Redüksiyon Flanşı ø 150-120 mm 7.1b Flanş...
-
Page 42: Montaj
MONTAJ Tavan / Konsol delme işlemi ve Kafesin Sabitlenmesi TAVANIN YADA KONSOLUN DELİNMESİ • Bir şakül yardımıyla tavana ya da destek konsolüne pişirme tezgahının merkezini işaretleyi- niz. • Tavana veya konsola donanımla birlikte verilen delik delme şablonunu (21) dayayınız ve bunun merkeziyle işaretlenen merkezi birbirine çakıştırınız. - Page 43 Kafesin Sabitlenmesi • Alt bacayı sabitleyen iki adet vidayı söküp kafesten çıkarınız (alt kısımdan). • Üst bacayı sabitleyen iki adet vidayı söküp kafesten çıkarınız (üst kısımdan). Kafesin yüksekliği ayarlanmak istenirse, şu şekilde hareket edil- melidir: • Kafesin iki yanında bulunan sütunları birleştiren adet metrik vidayı...
- Page 44 FİLTRE VERSİYONUNDA BAĞLANTILAR • Rakoru cihaz donanımındaki 4 adet Vida ile kafese sabitleyiniz. • Flanşı 10 Rakorun 15 bu işe ayrılmış alt deliğine geçiriniz. • Davlumbazın flanşlı hava çıkışını, tercihi monitöre kalmış sert ya da rijit 150 mm çapında bir boru ile rakora bağlayınız. Baca montajı...
- Page 45 ELEKTRİK BAĞLANTISI • En az 3 mm’lik bir temas ucuyla birlikte iki kutuplu bir anahtar yerleştirerek, Kaputu şebekeye bağlayın. • Metal gres filtrelerini (Bkz. “Bakım” bölü- mü) çıkarın ve güç besleme kablosunun emme fanının soketine uygun şekilde ta- kılmış olmasına dikkat edin. •...
-
Page 46: Kullanim
KULLANIM Kumanda Tablosu TUŞ FONKSİYONLARI Motor ON/OFF Aspiratör motorunu açar-kapatır. Ekranda daha önce ayar- lanmış olan hız kademesi görüntüye gelir. Motorun hızını kademeli olarak azaltır: V3 → V2 → V1 Hız - Motorun hızını kademeli olarak arttırır: V1 → V2 → V3 Hız + Yoğun Hız Herhangi bir hızdayken, ya da motor kapalı... -
Page 47: Bakim
BAKIM Yağ tutucu filtreler METALİK YAĞ TUTUCU FİLTRELERİN TEMİZLENMESİ • Bu filtreler bulaşık makinasında da yıkanabilir ve normal kul- lanıldıklarında iki ayda bir, yoğun kullanım halinde ise daha sıkça yıkanmalarıı gereklidir. • Filtreleri teker teker çıkarınız ve bunu yaparken kolu aşağı doğru çektiğiniz sırada diğer elinizle filtreleri tutunuz. -
Page 48: Rady A Doporučení
RADY A DOPORUČENÍ Tento návod k použití je společný pro několik verzí přístroje. Je tedy možné, že bude obsahovat popis některých komponentů, které jsou součástí vybavení jiného přístroje než je Váš. INSTALACE • Výrobce odmítá jakoukoli odpovědnost za škody způsobené nesprávnou insta- lací, která... -
Page 49: Hlavní Parametry
HLAVNÍ PARAMETRY Prostorový rozměr Min. Min. 500mm 650mm 4 49... - Page 50 Díly Č. Poč. Díly spotřebiče Těleso digestoře s ovládáním, osvětlením, filtry Teleskopický komín tvořený: Horním komínem Dolním komínem Teleskopická kostra s odsávačem tvořená: 7.1a 7.1a Horní kostrou 7.1b Dolní kostrou Redukční příruba ø 150-120 mm Příruba ø 150 Přípojka výstupu vzduchu 7.1b Skříňový...
-
Page 51: Instalace
INSTALACE Děrovací schéma strop/konzola a připevnění kostry DĚROVACÍ SCHÉMA STROP/KONZOLA • Pomocí olověného drátu vyznačte na stropě/podpůrné konzole střed varné desky. • Na strop/konzolu položte přiloženou vrtací šablonu 21 tak, aby její střed odpovídal vyznačenému středu a vyrovnejte osy šablony osy s osami varné desky. •... - Page 52 Upevnění kostry • Odšroubujte dva šrouby, které upevňují dolní komín a vytáhně- te jej z kostry (ze spodní části). • Odšroubujte dva šrouby, které upevňují horní komín a vytáhněte jej z kostry (z horní části). V případě, že budete chtít seřídit výšku kostry, postupujte násle- dujícím způsobem: •...
- Page 53 Výstup vzduchu u filtračního provedení • Připevněte přípojku 15 ke kostře pomocí čtyř šroubů, které jsou součástí vybavení. • Zasuňte přírubu 10 do příslušného dolního otvoru přípojky 15. • Spojte výstup vzduchu digestoře s přírubou pod přípojkou po- mocí pevné trubice nebo pružné hadice ø 150mm, kterou zvolí instalační...
- Page 54 ELEKTRICKÉ PŘIPOJENÍ • Připojte digestoř k napájecí síti za použití dvoupólového vypínače s nejméně 3 mm vzdáleností mezi kontakty. • Odstraňte tukové filtry (viz kap. “Údržba”) a zkontrolujte, zda je konektor napájecího kabelu správně zapojen v zásuvce odsáva- če. • Vezměte kabely uvedené na obr.1 a protáh- něte je otvorem na pozinkované...
-
Page 55: Použití
POUŽITÍ Ovládací pole TLAČÍTKO FUNKCE Motor ON/OFF Vypíná a zapíná motor odsavače. Na displeji se zobrazuje nastavený rychlostní stupeň. Rychlost - Snižuje rychlost motoru: V3 → V2 → V1 Rychlost + Zvyšuje rychlost motoru: V1 → V2 → V3 Intenzivní stupeň Z kteréhokoli stupně... -
Page 56: Údržba
ÚDRŽBA Tukové filtry ČIŠTĚNÍ KOVOVÝCH TUKOVÝCH SAMONOSNÝCH FILTRŮ • Tyto filtry lze mýt i v myčce. Je třeba je mýt zhruba každé 2 měsíce používání, při obzvláště intenzivním používání i častěji. • Vyjměte filtry jeden po druhém, při této operaci je jednou rukou přidržujte a druhou táhněte za páčku směrem dolů. - Page 60 Franke S.p.a. Via Pignolini,2 37019 Peschiera del Garda (VR) www.franke.it 436002960_ver7...
Need help?
Do you have a question about the FGC 906 I and is the answer not in the manual?
Questions and answers