
Subscribe to Our Youtube Channel
Related Manuals for lavina 25-X


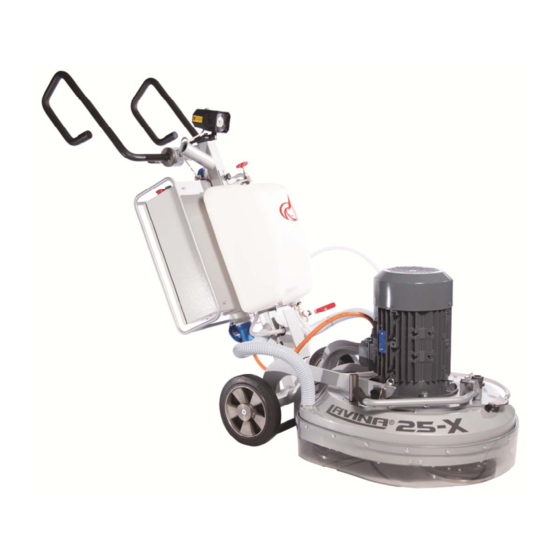
Summary of Contents for lavina 25-X
- Page 1 LAVINA 25-X User Manual ® Tech Support Line: 800-987-8403 | www.superabrasive.com | info@superabrasive.us...
- Page 2 Superabrasive User Manual Original Language Lavina® 25-X 9/2018...
-
Page 3: Warranty And Returns
RETURN POLICY FOR LAVINA® X MACHINES The LAVINA® X machines may be returned, subject to the following terms: In no case, a machine is to be returned to Superabrasive Inc. for credit or repair without prior authorization. Please contact Superabrasive Inc. -
Page 4: Table Of Contents
FOAM PLATE ..................11 11. LAVINA®25-X CARRIAGE PARTS........... 32 SECURITY PLATE FOR QUICKCHANGE PADS ........11 12. LAVINA® 25-X CONTROL BOX PARTS 200-240 VOLT ...... 33 6. POPULAR TOOLS ................12 12.LAVINA® 25-X CONTROL BOX PARTS 200-240 VOLT ..... 33 7. -
Page 5: General Information
1. GENERAL INFORMATION This owner’s manual is intended for the operator of the Lavina® X machine, the servicing technician as well as anyone involved with operating or servicing the machine. We recommend that you read the instructions very carefully and follow them strictly. The manual includes information about assembling, using, handling, adjusting and maintaining your Lavina®... -
Page 6: Vacuum Connection
VACUUM CONNECTION A connection for a vacuum dust extractor is located on the carriage. The Lavina® X machine does not include a vacuum dust extractor. The customer must purchase the vacuum dust extractor separately. The hose of the vacuum extractor must be Ø 50 mm and can be glided over the pipe. -
Page 7: Protection Devices
• Operating Machine A protection skirt and a hood for protecting the tool plates. When operating the Lavina® X, make certain that there is no one These devices protect the operator and/or others persons from but you around the machine. -
Page 8: Handling And Transportation
(Fig.3.3), and dismount the head from the carriage (Fig.3.5). The head of the LAVINA® X machine has one bar for support, which can be used as a handle for easier transportation. LIFT THE MACHINE FROM WORKING TO TOOL MOUNTING POSITION Push the lock the handle down and swivel it to the front (Fig.3.6.1). -
Page 9: Storage
ADJUSTING AND MOUNTING TOOLS The Holder A41 in LAVINA® X can work with either 3 or 6 buffers, which will alter its range of motion. You can make the change after dismounting the holder as per the instructions in TROUBLESHOOTING. In the Lavina 25‐X‐Е, the holder is initially mounted with 3 buffers. -
Page 10: The Control Board
Superabrasive User Manual Original Language Lavina® 25-X 9/2018 THE CONTROL BOARD Power cable plug Digital RPM indicator Indicates the revolution per minute of the grinding plates (not the revolution per minute of the entire head). Polishing/Grinding switch In “grinding” position, the operator has the ability to control the rpm from 300 to 700 rpm. -
Page 11: Tools And Accessories
Superabrasive User Manual Original Language Lavina® 25-X 9/2018 5. TOOLS AND ACCESSORIES WEIGHTS Superabrasive offers additional weights used to increase the productivity of the machine (Fig.5.1). Each additional weight weighs about 64 lbs or 29kg. Each individual application, type and condition of surface, power capacity of the outlet, etc. -
Page 12: Popular Tools
Superabrasive User Manual Original Language Lavina® 25-X 9/2018 6. POPULAR TOOLS QuickChange System and Tooling feature extremely fast and convenient tool changes, and a long tool life, providing for great long‐term cost savings. The QuickChange pads are produced in four different bonds for super hard, hard, medium and soft concrete, in a variety of grit sizes. -
Page 13: Maintenance And Inspection
Most importantly, check and clean the tool plate connections, power cords, plugs, vacuum hoses, and water tank. CHECK DAILY After operating the Lavina®X machine, the operator should conduct a visual inspection of the machine. Any defect should be solved immediately. Pay attention to power cords, plugs, vacuum hoses, loose bolts or screws. -
Page 14: Lavina® 25-X Electrical Schemes With Yaskawa Inverter
Superabrasive User Manual Original Language Lavina® 25-X 9/2018 LAVINA® 25-X ELECTRICAL SCHEMES WITH YASKAWA INVERTER 200-240 Volt Figure 7.4 /scheme 1/ LAVINA® 25-X ELECTRICAL SCHEMES YASKAWA CONNECTION MAIN CIRCUIT TERMINALS Figure 7.6 /scheme 2/ The motor is connected in “Delta”... -
Page 15: Troubleshooting
Superabrasive User Manual Original Language Lavina® 25-X 9/2018 8. TROUBLESHOOTING INDEX OF PROBLEMS AND SOLUTIONS 8.1 REPLACING POWER CORD AND PLUGS When replacing the power cord or plugs, always use cords and plugs with the same specifications as the original ones. Do not use lower quality or different types of cords or plugs. - Page 16 Superabrasive User Manual Original Language Lavina® 25-X 9/2018 Figure 8.3.2 Figure 8.3.3 Figure 8.3.1 Figure 8.3.6 Figure 8.3.4 Figure 8.3.5 Figure 8.3.7 Figure 8.3.8 Figure 8.3.9 Make sure the four bolts holding the adaptor (Fig.8.3.12) are reliably tighten. Mount the holder on the machine using the same socket as mentioned in 8.2 (Fig.8.3.10;Fig.8.3.11).
-
Page 17: Correcting Sag Of The Used Planetary Chain
Superabrasive User Manual Original Language Lavina® 25-X 9/2018 8.4 CORRECTING SAG OF THE USED PLANETARY CHAIN Unscrew the eight bolts (Fig.8.4.1) and remove the cover (Fig.8.4.2). Pull the hose out of the water sprayer(Fig.8.4.3). Put the machine in position to change the tools. Manually turn the holders in order to turn the main head, stop when the chain tensioner can be seen through the window (Fig.8.4.4). -
Page 18: Replacing The Planetary Driving Chain Wheel And Planetary Tensioner
Superabrasive User Manual Original Language Lavina® 25-X 9/2018 Loosen the two nuts(Fig.8.4.6) and unscrew the two screws of the tensioner (Fig.8.4.5)(Fig.8.5.4)(Fig.8.5.5). Remove the chain tensioner(Fig.8.5.6). Pull out the split pin (Fig.8.5.7) and the chain link pin (Fig.8.5.8) (Fig.8.5.9). Remove the chain, and install the new chain in the same manner, and then insert the chain link pin and split pin (Fig.8.5.9) (Fig.8.5.8) (Fig.8.5.7). -
Page 19: Tensioning And Replacing The Belts
Superabrasive User Manual Original Language Lavina® 25-X 9/2018 8.7 TENSIONING AND REPLACING THE BELTS Figure 8.7.1 Figure 8.7.2 Figure 8.7.3 The transmission of the machine runs two timing belts (a main belt that rotates the plates (and tools) and an auxiliary planetary belt which propels the rotation of the head as a whole). - Page 20 Superabrasive User Manual Original Language Lavina® 25-X 9/2018 Figure 8.7.7 Figure 8.7.8 Figure 8.7.9 Figure 8.7.11 Figure 8.7.10 The reassembly is the same process in reverse. It is important to match the threads of the conical sleeve and the belt washer(Fig.8.7.13).
-
Page 21: Replacing The Driven Planetary Gear (Sprocket)
Superabrasive User Manual Original Language Lavina® 25-X 9/2018 8.8 REPLACING THE DRIVEN PLANETARY GEAR (SPROCKET) Remove the planetary chain and tensioner (see Fig.8.5 ‐ MOUNTING NEW PLANETARY CHAIN). Dismount the tool holders, sealers, and bottom cover (see Fig.8.7 ‐ TENSIONING AND REPLACING THE BELTS). Unscrew the cap to access the fastening bolts of the driven gear (Fig.8.8.1)(Fig.8.8.2). -
Page 22: Replacing The Planetary Unit
Superabrasive User Manual Original Language Lavina® 25-X 9/2018 8.10 REPLACING THE PLANETARY UNIT Figure 8.10.3 Figure 8.10.1 Figure 8.10.2 Unscrew the six bolts (Fig.8.10.1)(Fig.8.10.2) and press down the planetary unit. When mounting back secure with sealant (fig.8.10.3). 8.11 MOTOR CONNECTION In case the motor is being replaced, please follow the cable connections in the figures below (Fig.8.11.1). -
Page 23: Fault Diagnosis Inverter Yaskawa V1000
Superabrasive User Manual Original Language Lavina® 25-X 9/2018 8.12 FAULT DIAGNOSIS INVERTER YASKAWA V1000 Pages are referring to Yaskawa Electric SIEP C710606 18A YASKAWA AC Drive – V1000 Technical Manual... - Page 24 Superabrasive User Manual Original Language Lavina® 25-X 9/2018...
-
Page 25: Disposal
Superabrasive User Manual Original Language Lavina® 25-X 9/2018 9. DISPOSAL If your machine after time is not usable or needs to be replaced, send the machine back to Superabrasive or a local distribut or, where a professional disposal complying with the environment laws and directives is guaranteed. -
Page 26: Spare Parts
Clamp for Vacuum Hose MAR8.85 Tube MAR8.110 Tube L25SPS-07.03.00.00 Pin Assembly 10** L25GX-05.00.00 Guard Assembly **for machines with serial No1711L25X2161 and bigger . 2. LAVINA® 25-X TOP COVER 1 PARTS Item No. Description Pcs. L25SPS-07.00.00.02-L Left Fork L25SPS-07.00.00.02-R Right Fork M8X16DIN912 Screw M8X20DIN7991 Screw L25X-19.00.00... -
Page 27: Lavina®25-X Top Cover Parts 2
Superabrasive User Manual Original Language Lavina® 25-X 9/2018 3. LAVINA®25-X TOP COVER PARTS 2 Item No. Description Pcs. L25X-19.00.01 Top Cover L25GS-19.10.00 Vacuum Port L25X-19.20.00 Water Fitting M12DIN985 M5DIN125A Washer M5DIN127B Spring Washer M5DIN934 L25SPS-04.01.00.00 Vacuum Port M5X16DIN84A Screw 25-X 4.1.1 LAVINA®... -
Page 28: Lavina® 25-X Bottom Cover 1 Parts
Superabrasive User Manual Original Language Lavina® 25-X 9/2018 5. LAVINA® 25-X BOTTOM COVER 1 PARTS Item No. Description Pcs. A41.00.00 Tool Holder A41 M6X10DIN7991 Screw L25LS-14.00.03 Outer Cover A42.03.00 Adaptor М8х16DIN6921 Bolt 110X90X8.5 Felt Ring TWVA00800 V-Ring Type A L25LS-14.00.02 Flange М6х16DIN6921... -
Page 29: Lavina® 25-X Planetary Drive Parts
Superabrasive User Manual Original Language Lavina® 25-X 9/2018 6. LAVINA® 25-X PLANETARY DRIVE PARTS Item No. Description Pcs. M6X16DIN912 Screw L25X-03.00.00 Pulley For machines with serial No see tabl.10 17.01…. and bigger M10X25DIN7991 Screw L25X-10.00.55 Front Washer L25GX.10.10.00 Central Pulley... -
Page 30: Lavina® 25-Xpulley Unit Assembly
Pulley Unit Assembly For machines with serial No see tabl.10 17.01…. and bigger L25X-10.00.44 Front Washer M5X12DIN912 Screw 7. LAVINA® 25-X BOTTOM COVER 2 PARTS Item No. Description Pcs. HP645 5MHP15 Timing Belts For machines with serial No see tabl.10 17.01…. -
Page 31: Lavina®25-X Water Tank Parts
Self Locking Nut M6X40DIN7991 Screw M6X30DIN7991 Screw A41.21.00 Set of plates М8х16DIN6921 Bolt A41.20.01 Flange 10. LAVINA® 25-X PLANETARY BELT REVISION KIT Item No. Description Pcs. L25X-14.00.06 Pad 2 L25X-14.00.04 Sealer Inspection Cover L25X-04.00.00 Pulley Unit Assembly HP6455MHP25 Timing Belts... -
Page 32: Lavina®25-X Carriage Parts
Superabrasive User Manual Original Language Lavina® 25-X 9/2018 11. LAVINA®25-X CARRIAGE PARTS Item No. Description Pcs. Item No. Description Pcs. L25Х-21.00.00 Frame See table12 pos.14 Water Pump L25Х-21.00.00-1 Frame L25S-20.00.26 Guard L25S-23.10.00 Handle Assembly M5DIN985 L25S-23.00.02 End Cover M5X20DIN933 Bolt L25S-23.00.06-K... -
Page 33: Lavina® 25-X Control Box Parts 200-240 Volt
Superabrasive User Manual Original Language Lavina® 25-X 9/2018 12. LAVINA® 25-X CONTROL BOX PARTS 200-240 VOLT 12.LAVINA® 25-X CONTROL BOX PARTS 200-240 VOLT Item No. Description Pcs. Item No. Description Pcs. L20NS-30.30.00 Lamp Unit Incl. Cable L20NS-30.11.08 Rectifier L20NS-30.10.01 Cable Gland L20NS-30.10.03...
Need help?
Do you have a question about the 25-X and is the answer not in the manual?
Questions and answers