Table of Contents
Advertisement
Quick Links
Advertisement
Table of Contents

Related Manuals for Blyss Shelon 3663602523741


Summary of Contents for Blyss Shelon 3663602523741
- Page 1 EAN: 3663602523741 Shelon V20919...
- Page 2 Safety Sécurité Bezpieczeństwo Sicherheit Siguranță Güvenlik Product description Description du Opis produktu produit Produktbeschreibung Descrierea Ürün açıklaması produsului Installation Installation Montaż Installation Instalare Montaj Utilisation Użytkowanie Nutzung Utilizare Kullanım Care & Entretien et Czyszczenie i maintenance maintenance konserwacja Pflege und Îngrijire și Bakım ve muhafaza Wartung...
-
Page 3: Safety And Warnings
Safety Sécurité Bezpieczeństwo Sicherheit Siguranţă Güvenlik Security 1. Handling and transport: Do not drop device or subject it to severe shock or vibrations. 2. Information on misusage: During cleaning the device it should be powered off, do not use any liquids, cleaning should be performed with a use of brush or hoover. -
Page 4: Technical Data
Technical Data Working voltage 12 V Video signal 1Vp-p 75 Ohm CCIR Connecting wire Number of apartments Monitor power consumption - standby / working 1,5 W / 5 W Screen size 4.3” Monitor screen Color LCD Resolution monitor 480 x 272 pixels Resolution camera 700 TVL Camera angle view... - Page 5 Warranty Period and Conditions At Blyss we take special care to select high quality materials and use manufacturing techniques that allow us to create ranges of products incorporating design and durability. That’s why we offer a 2 year guarantee against manufacturing defects on our Video intercom.
-
Page 6: Sécurité Et Avertissements
Safety Sécurité Bezpieczeństwo Sicherheit Siguranţă Güvenlik Sécurité 1. Manipulation et transport : Ne pas faire tomber l’appareil et ne pas le soumettre à des vibrations ou chocs importants. 2. Informations concernant la mauvaise utilisation de l’appareil : Lors du nettoyage de l’appareil, l’éteindre et ne pas utiliser de liquides. Le nettoyage doit être effectué à l’aide d’une brosse ou d’un aspirateur. -
Page 7: Données Techniques
Données techniques Tension de fonctionnement 12 V Signal vidéo 1 Vp-p 75 Ohms CCIR Câble de connexion Nombre d’appartements Consommation électrique du moniteur : veille/en 1,5 W / 5 W fonctionnement Taille de l’écran 4,3 pouces Écran du moniteur LCD couleur Résolution du moniteur 480 x 272 pixels Résolution de la caméra... - Page 8 Période de garantie et conditions Chez Blyss, nous veillons tout particulièrement à sélectionner des matériaux de haute qualité et à utiliser des techniques de fabrication qui nous permettent de créer des gammes de produits à la fois design et durables. Pour cette raison, nous offrons une garantie de 2 ans contre les défauts de fabrication de notre vidéo interphone.
- Page 9 Safety Sécurité Bezpieczeństwo Sicherheit Siguranţă Güvenlik Bezpieczeństwo 1. Przenoszenie i transport: Urządzenia nie wolno narażać na upadki, potężne wstrząsy ani drgania 2. Informacja o niewłaściwym użytkowaniu: Na czas czyszczenia urządzenia należy je wyłączyć; nie używać żadnych płynów, a czyszczenie przeprowadzać za pomocą szczotki lub odkurzacza.
-
Page 10: Dane Techniczne
Dane techniczne Napięcie robocze 12 V Sygnał wideo 1 Vp-p, 75 Ω, CCIR Przewód połączeniowy Liczba mieszkań Pobór mocy przez monitor — tryb gotowości / 1,5 W / 5 W praca Rozmiar ekranu 4,3” Ekran monitora Kolorowy wyświetlacz LCD Rozdzielczość monitora 480 ×... - Page 11 Gwarancja handlowa Marka Blyss przykłada szczególną wagę do tego, aby wybierać materiały wysokiej jakości i stosować techniki produkcyjne, które umożliwiają tworzenie wytrzymałych, a zarazem atrakcyjnych produktów. Dlatego oferuje 2-letnią gwarancję obejmującą wady produkcyjne na swoje domofony. Domofon jest objęty gwarancją przez 2 lata od daty zakupu (zakup w sklepie) lub dostawy (zakup przez Internet) w przypadku normalnego (nieprofesjonalnego i niekomercyjnego) użytku domowego bez dodatkowych opłat.
-
Page 12: Sicherheit Und Warnungen
Safety Sécurité Bezpieczeństwo Sicherheit Siguranţă Güvenlik Sicherheit 1. Handhabung und Transport: Lassen Sie das Gerät nicht fallen und setzen Sie es keinen starken Erschütterungen oder Vibrationen aus 2. Informationen über missbräuchliche Verwendung Während der Reinigung sollte das Geräts ausgeschaltet sein. Verwenden Sie keine Flüssigkeiten. Die Reinigung sollte mit Hilfe einer Bürste oder einem Staubsauger durchgeführt werden. -
Page 13: Technische Daten
Technische Daten Betriebsspannung 12 V Videosignal 1 Vp-p 75 Ohm CCIR Verbindungskabel Anzahl der Wohnungen Stromverbrauchs des Monitors -Standby/Betrieb 1,5 W/5 W Displaygröße 4,3” Monitorbildschirm Farb-LCD Auflösung des Monitors 480 × 272 Pixel Auflösung der Kamera 700 TVL Kamera-Bildwinkel Anzahl der Relaisausgänge Klingeltöne Lautsprecher Menüsprache... - Page 14 Kommerzielle Garantie Bei Blyss legen wir besonderen Wert auf qualitativ hochwertige Materialien und Herstellungsmethoden, mit denen wir Produktreihen erstellen können, die durch Design und Haltbarkeit hervorstechen. Daher gewähren wir 2 Jahre Garantie auf Fertigungsmängel an unseren Gegensprechanlagen. Diese Gegensprechanlage verfügt über eine Garantie von 2 Jahren ab Kaufdatum, wenn sie in einem Geschäft gekauft wurde, oder ab Lieferdatum, wenn sie online gekauft wurde und für den normalen (nicht gewerbsmäßigen oder kommerziellen)
- Page 15 Safety Sécurité Bezpieczeństwo Sicherheit Siguranţă Güvenlik Siguranţă 1. Manevrare și transport: Nu scăpați dispozitivul și nu îl supuneți unor șocuri sau vibrații puternice 2. Informații privind întrebuințarea greșită: În timpul curățării, dispozitivul trebuie să fie oprit; nu folosiți lichide, curățați cu o perie sau un aspirator. 3.
-
Page 16: Date Tehnice
Date tehnice Tensiune de operare 12 V Semnal video 1Vp-p 75 ohmi CCIR Fir de conectare Număr de apartamente Consumul de energie al monitorului – inactiv / în 1,5 W / 5 W funcțiune Dimensiunea ecranului 4,3” Ecranul monitorului LCD color Rezoluție monitor 480 ×... - Page 17 Kommerzielle Garantie Bei Blyss legen wir besonderen Wert auf qualitativ hochwertige Materialien und Herstellungsmethoden, mit denen wir Produktreihen erstellen können, die durch Design und Haltbarkeit hervorstechen. Daher gewähren wir 2 Jahre Garantie auf Fertigungsmängel an unseren Gegensprechanlagen. Diese Gegensprechanlage verfügt über eine Garantie von 2 Jahren ab Kaufdatum, wenn sie in einem Geschäft gekauft wurde, oder ab Lieferdatum, wenn sie online gekauft wurde und für den normalen (nicht gewerbsmäßigen oder kommerziellen)
- Page 18 Safety Sécurité Bezpieczeństwo Sicherheit Siguranţă Güvenlik Güvenlik 1. Kullanım ve taşıma: Cihazı düşürmeyin veya şiddetli darbeye ya da titreşimlere maruz bırakmayın 2. Yanlış kullanım hakkında bilgi: Temizlik sırasında cihaz kapatılmalıdır. Herhangi bir sıvı kullanmayın. Temizlik, fırça veya elektrikli süpürge kullanarak gerçekleştirilmelidir.
-
Page 19: Teknik Veriler
Teknik veriler Çalışma Gerilimi 12 V Video sinyali 1 Vp-p 75 Ohm CCIR Bağlantı kablosu Daire sayısı Monitör güç tüketimi -beklemede / çalışma 1,5 W / 5 W Ekran boyutu 4,3 inç Monitör ekranı Renkli LCD Monitör çözünürlüğü 480 × 272 piksel Kamera çözünürlüğü... - Page 20 Ticari Garanti Blyss’te yüksek kaliteli malzemeler seçmeye ve tasarım ile dayanıklılığı bir arada sunan ürün yelpazeleri oluşturmamızı sağlayan üretim tekniklerini kullanmaya özen gösteririz. Bu yüzden de Sesli interkom cihazımızda üretim hatalarına karşı 2 yıllık garanti süresi sunuyoruz. Bu Sesli interkom, normal (profesyonel veya ticari olmayan) evde kullanım amacıyla mağazadan satın alındıysa satın alım tarihinden;...
- Page 21 IMPORTANT - IMPORTANT - WAŻNE - Przed użyciem WICHTIG - Vor der Please read carefully the Lisez attentivement należy się dokładnie zapoznać Verwendung die separaten separate safety guide le guide de sécurité z dołączonymi oddzielnie Sicherheitshinweise lesen before use. avant utilisation informacjami dotyczącymi bezpieczeństwa IMPORTANT - Citiți cu...
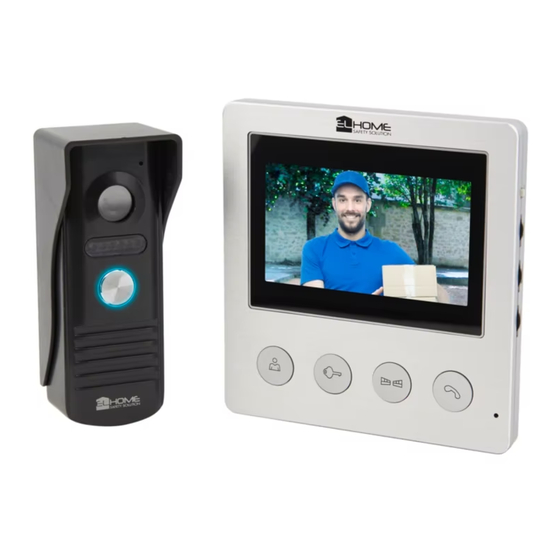
- Page 22 Product description Description du produit Opis produktu Vorbereitung Descrierea produsului Ürün Açıklaması This monitor is equipped with a 4.3 inch colour LCD display. In addition to the standard communication functions with the visitor, the camera preview and controlling the entrance to the property, the monitor can control the second entrance.
- Page 23 1. Monitor button 2. Unlock button 3. Gate button 4. Talk button 5. Brightness 6. Saturation 7. Volume 8. Microphone 9. Microphone 10. Camera 11. LED lights 12. Call button 13. Power adapter 14. Melody selection button 1. bouton moniteur 2. bouton de déverrouillage 3. bouton de porte 4. bouton de conversation 5.
- Page 24 Installation Installation Instalacja Installation Instalare Montaj Before assembling, wiring and setting up of device the user should carefully read given manual. In case of any troubles with understanding the content the user should contact the producer. Unassisted assembling and start of the device can be done only with the use of proper tools.
- Page 25 Înainte de asamblarea, cablarea și configurarea dispozitivului, utilizatorului i se recomandă să citească cu atenție manualul furnizat. În cazul oricăror probleme de înțelegere a conținutului, utilizatorul este rugat să contacteze producătorul. Asamblarea și pornirea neasistată a dispozitivului se pot efectua doar prin utilizarea uneltelor potrivite.
- Page 26 The electric strike and gate operator are not included Use a 12 V 350 mA max. strike Use a 24 V 1 A max. gate operator Distance between outdoor & indoor units Cable type 0 – 50 m 4 x 0.5 mm 50 m –...
-
Page 27: Outdoor Unit Installation
Zăvorul electric și brațul pentru poartă nu sunt incluse Folosiți un zăvor electric de max. 12 V 350 mA Folosiți un braț pentru poartă de max. 24 V Distanța dintre unitatea de exterior și unitatea de interior Tip de cablu 0 –... - Page 28 Installation der Außeneinheit So installieren Sie die Außenstation ordnungsgemäß: 1. Lösen Sie die untere Befestigungsschraube und trennen Sie die Außeneinheit von der Regenabdeckung. 2. Markieren Sie mit den 3 Löchern an der Unterseite der Regenabdeckung die Stellen für die Dübel an der Wand. 3.
- Page 29 1. Using 3 mounting screws, secure the rain cover to the wall. 2. Connect to the unit 4-wire from the monitor – please have a look at master schema. 3. Place the outdoor unit in the previously secured rain cover and tighten the bottom fixing screw, in a way not to destroy the internal elements.
- Page 30 [02] [02] x 1...
-
Page 31: Indoor Unit Installation
Indoor unit installation Use the screws to fix the mounting bracket on the mounting box in a way that provides easy and aesthetic connection for the power cord and connection wires. The standard height at which the monitor screen should be stand on the frame is approximately 145 cm, but its position can be adjusted to the individual needs of the user. - Page 32 [03] [03] x 1 63 mm Ø7 mm Caution: Before you start hanging the monitor you have to connect the wires into the connection terminal. To do that properly please have a look at master schema. Avertissement : avant de suspendre le moniteur, il est nécessaire de connecter les câbles à...
- Page 33 63 mm [04] x 1 [05] [04] [05] x 1...
- Page 34 Utilisation Użytkowanie Benutzung Utilizare Kullanım Control & settings buttons 1. Preview 6. Brightness adjustment potentiometer 2. Gate 1 open (e.g. electric strike) 7. Saturation adjustment potentiometer 3. Gate 2 open (e.g. gate opener) 8. Talk / Ring volume adjustment 4. Call receive / Talk potentiometer 5.
- Page 35 Preview function It is possible to discreetly watch what is happening in front of the gate without a call from the outside. Start this function by pressing the preview button. At this point, a preview image is displayed on the monitor, which will disappear automatically after approx. 40 seconds. During this operation, the outdoor module speaker remains off.
- Page 36 Gates opening function Device offers the possibility to control two gates. The person inside the room has the possibility to open the door remotely (releasing the electromagnetic strike) by pressing the button on the monitor or remotely activating the outdoor gate. Additional info for connecting the second gate: Terminals 7 and 8 are used to connect the gate drive on the back of the monitor Terminals 7 and 8 are N.O type relay outputs (Normally Open), so the door operator should also be able to trigger a short short-circuit of the input...
- Page 37 Utilisation Użytkowanie Benutzung Utilizare Kullanım Boutons de contrôle et réglages 1. Aperçu 6. Potentiomètre de réglage de la luminosité 2. Ouvrir la porte 1 (par ex. gâche électrique) 7. Potentiomètre de réglage de la saturation 3. Ouvrir la porte 2 (par ex., le dispositif 8.
- Page 38 Fonction d’aperçu Il est possible de regarder discrètement ce qui se passe devant la porte sans un appel de l’extérieur. Lancer cette fonction en appuyant sur le bouton d’aperçu. À ce stade, un aperçu s’affiche sur le moniteur. Celui-ci disparaît automatiquement au bout d’environ 40 secondes. Pendant cette opération, le haut- parleur du module extérieur reste désactivé.
- Page 39 Fonction d’ouverture de la porte L’appareil offre la possibilité de contrôler deux portes. La personne à l’intérieur de la pièce a la possibilité d’ouvrir la porte à distance (en relâchant la gâche électromagnétique) en appuyant sur le bouton du moniteur ou en activant à distance la porte extérieure. Informations supplémentaires pour connecter la deuxième porte : Les bornes 7 et 8 servent à...
- Page 40 Utilisation Użytkowanie Benutzung Utilizare Kullanım Przyciski sterowania i ustawień 1. Podgląd 6. Potencjometr regulacji jasności 2. Brama 1 otwarta (np. elektrozaczep) 7. Potencjometr regulacji nasycenia 3. Bramka 2 otwarta (np. napęd otwierania 8. Potencjometr regulacji głośności bramy) mikrofonu/dzwonka 4. Odbieranie połączenia / rozmowa 9.
- Page 41 Funkcja podglądu Można dyskretnie obserwować, co dzieje się przed bramą, bez konieczności odebrania połączenia z zewnątrz. Funkcję tę uruchamia się, naciskając przycisk podglądu. W tym momencie na monitorze zostanie wyświetlony obraz podglądu, który zniknie automatycznie po około 40 sekundach. Podczas tej operacji głośnik modułu zewnętrznego pozostaje wyłączony.
- Page 42 Funkcja otwierania bram Urządzenie umożliwia sterowanie dwiema bramami. Osoba znajdująca się w pomieszczeniu może zdalnie otworzyć bramę (zwalniając elektrozaczep), naciskając przycisk na monitorze lub zdalnie uruchamiając zewnętrzną bramę. Dodatkowe informacje dotyczące podłączania drugiej bramy: Zaciski 7 i 8 służą do podłączania napędu bramy do tylnej części monitora.
- Page 43 Utilisation Użytkowanie Benutzung Utilizare Kullanım Bedien-und Einstellungstasten 1. Vorschau 6. Potentiometer zur Helligkeitseinstellung 2. Tor 1 offen (z. B. elektrischer Türöffner) 7. Potentiometer zur sättigungsanpassung 3. Tor 2 offen (z. B. Torantrieb) 8. Potentiometer zur Einstellung der Sprech-/ 4. Gesprächsannahme/Sprechen Klingeltonlautstärke 5.
- Page 44 Vorschaufunktion Es ist möglich, diskret zu beobachten, was vor dem Tor geschieht, ohne dass ein Anruf von außen erfolgt. Starten Sie diese Funktion, indem Sie die Vorschautaste drücken. Zu diesem Zeitpunkt wird eine Vorschau auf dem Monitor angezeigt, die nach ca. 40 Sekunden automatisch ausgeblendet wird.
- Page 45 Toröffnungs-funktion Das Gerät bietet die Möglichkeit, zwei Tore zu steuern. Die Person im Raum hat die Möglichkeit, die Tür per Fernzugriff zu öffnen (wodurch der elektromagnetische Türöffner ausgelöst wird), indem sie die Taste auf dem Monitor drückt oder das Außentor ferngesteuert aktiviert.
- Page 46 Utilisation Użytkowanie Benutzung Utilizare Kullanım Butoane pentru comenzi și setări 1. Previzualizare 5. Selectarea melodiei 2. Deschidere poartă 1 (de ex., zăvor 6. Potențiometru reglare luminozitate electric) 7. Potențiometru reglare saturație 3. Deschidere poartă 2 (de ex., braț pentru 8. Potențiometru reglare volum sonerie/ poartă) vorbire 4.
- Page 47 Funcția de previzualizare Există posibilitatea de a urmări discret ceea ce se întâmplă în fața porții fără a primi un apel de afară. Activați această funcție apăsând pe butonul de previzualizare. În acest moment, pe monitor este afișată o imagine de previzualizare, care va dispărea automat după aproximativ 40 de secunde.
- Page 48 Funcția de deschidere poartă Dispozitivul oferă posibilitatea de a controla două porți. Persoana din încăpere are posibilitatea de a deschide ușa de la distanță (eliberând zăvorul electromagnetic) prin apăsarea butonului de pe monitor sau de a activa poarta exterioară de la distanță. Informații suplimentare pentru conectarea celei de a doua porți: Terminalele 7 și 8 sunt utilizate pentru a conecta angrenajul porții pe spatele monitorului.
- Page 49 Utilisation Użytkowanie Benutzung Utilizare Kullanım Kontrol ve ayarlar düğmeleri 1. Önizleme 6. Parlaklık ayarı potansiyometresi 2. Kapı 1 açık (ör. elektrikli kapı dili) 7. Doygunluk ayarı potansiyometresi 3. Kapı 2 açık (ör. kapı açıcı) 8. Konuşma/Zil sesi düzeyi ayarı 4. Çağrı alma/Konuşma potansiyometresi 5.
- Page 50 Önı̇ zleme ı̇ şlevı̇ Dışarıdan çağrı gerçekleşmediğinde kapının önünde olan biteni fark edilmeden izlemek mümkündür. Bu işlevi, önizleme düğmesine basarak başlatabilirsiniz. Bu noktada, monitörde önizleme görüntüsü gösterilir ve yaklaşık 40 saniye sonra otomatik olarak kaybolur. Bu işlem sırasında dış mekan ünitesi hoparlörü kapalı kalır.
- Page 51 Kapi açma ı̇ şlevı̇ Cihaz, iki kapıyı kontrol etme olanağı sunar. Odanın içindeki kişi, monitördeki düğmeye basarak veya dış kapıyı uzaktan etkinleştirerek kapıyı uzaktan açabilir (elektromanyetik kapı dili serbest bırakılır). İkinci kapıyı bağlamak için ek bilgi: Terminal 7 ve 8, monitörün arka kısmındaki kapı tahrikini bağlamak için kullanılır.
- Page 52 Entretien et Pielęgnacja & Care & maintenance maintenance konserwacja Pflege und Îngrijire şi întreţinere Bakım ve Onarım Wartnung...
- Page 53 Manufacturer: Fabricant: Kingfisher International Products Limited, Kingfisher International Products Limited, 3 Sheldon Square, London, W2 6PX, 3 Sheldon Square, London, W2 6PX, United Kingdom United Kingdom Kingfisher International Products B.V. Rapenburgerstraat 175E Distributeur: Castorama France C.S. 1011 VM Amsterdam 50101 Templemars The Netherlands 59637 Wattignies CEDEX Distributor: B&Q plc,...
Need help?
Do you have a question about the Shelon 3663602523741 and is the answer not in the manual?
Questions and answers