Table of Contents
Advertisement
Quick Links
Heat Stroke Checker
WBGT-301 / WBGT-302
Operation Manual
Please read this manual thoroughly before using this product for the best
performance of it.
The pictorial illustrations shown in this manual are images.
Contents
2
3
4
6
9
AN 59-00615
Ver.01
Advertisement
Table of Contents

Related Manuals for KEM WBGT-301


Summary of Contents for KEM WBGT-301
-
Page 1: Table Of Contents
Heat Stroke Checker WBGT-301 / WBGT-302 Operation Manual The pictorial illustrations shown in this manual are images. Contents 1. About WBGT-300 series 2 2. For proper usage 3 3. Safety precautions 4 4. Parts configuration and accessories 6 5. Operation buttons 9... -
Page 2: About Wbgt-300 Series
1. About WBGT-300 series ⚫ Conform to JIS B 7922: Electronic Wet-bulb globe temperature (WBGT) index meter - in conformity with Class 1.5. ⚫ Dustproof and waterproof (JIS C 0920): Equivalent for IP6X of dustproof and IPX5 of waterproof ⚫ Memory capabilities: Up to 30,000 measurement data can be stored on the internal memory. -
Page 3: For Proper Usage
The temperature/humidity sensor will be gradually degraded ⚫ under the influence of the water vapor in the atmosphere. Therefore, it is recommended that you have an annual inspection by KEM representative. Please contact your KEM representative for inspection. 3... -
Page 4: Safety Precautions
3. Safety precautions Please be sure to follow the safety precautions in order to prevent harm to users and others and loss of property: There may be a risk of death or serious injury if Warning precautions are not observed. There may be a risk of injury or material damage if Caution precautions are not observed. - Page 5 However, should you find anything unclear, erroneous description, or any omissions in this manual, contact your KEM representative. 3. Reproduction, duplication or translation of this manual in whole or in part is strictly prohibited without permission of KEM. 5...
-
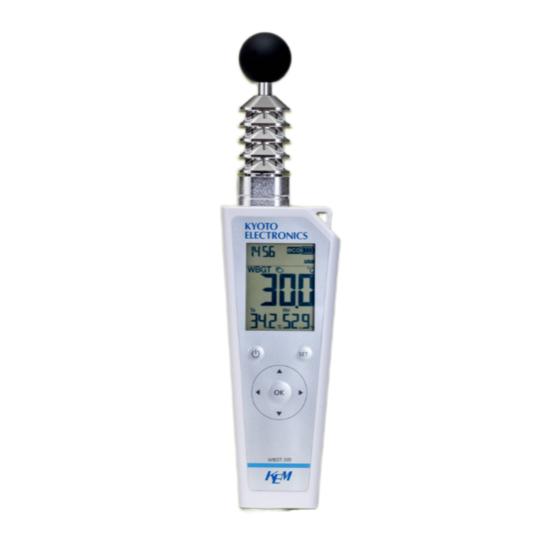
Page 6: Parts Configuration And Accessories
4. Parts configuration and accessories < Front view > < Side view > Globe Temperature/ humidity Sensor unit sensor (inside) USB port Display Power ON-OFF button OK button Setting button Control button < Rear view > < Bottom view > Clip for battery cover Sensor cap B Strap hole for hanging... - Page 7 < Display > Remaining Time display battery life Icon WBGT reading Temperature (Ta)/ Relative Globe temperature (Tg) humidity (RH) Measurement mode (without sunlight) Measurement mode (under sunlight) Minimum value Maximum value Temperature display Globe temperature display Date/time setting Memory Alarm Contrast External device connection External alarm is active:blinking...
- Page 8 AA size alkaline battery Carrying case Index sticker Inspection Certificate /Warranty China-RoHS DECLARATION OF CONFORMITY(WBGT-301/WBGT-302) Contact In the case that some accessories are short of quantity or damaged, contact your KEM representative. 8...
-
Page 9: Operation Buttons
5. Operation buttons * Description of buttons: Power ON-OFF button: Press and hold this button for more than 3 seconds to turn the power ON or OFF. Setting/data transmission button: Press and hold this button for 2 seconds to proceed to the parameter settings. -
Page 10: Measuring Method
6. Measuring method About Heat Index (WBGT) Heat index (WBGT) is the index which focuses on heat balance - the exchange of heat between human body and outside air. This index adopts three factors – humidity that has a large effect on the heat balance of the human body, the surrounding thermal environment such as sunlight and solar radiation, and temperature - that considerably affect the heat balance on human body. -
Page 11: How To Use
7. How to use Measurement in hand When measuring WBGT with this product in hand, try to keep the main unit away from the operator’s body as far as possible. * When the operator’s body is so close to the temperature/humidity sensor unit that the heat of the body may affect the sensor, resulting in incorrect readings. -
Page 12: Measurement
8. Measurement 1. Press and hold the power ON-OFF button for more than 3 seconds. 2. Measurement starts immediately after the power is on. * The screen for Date/time setting is displayed in the initial start-up time after batteries are first loaded. A measurement is performed once every 1 second and the display will be updated. -
Page 13: Display Switching
9. Display switching This function can be used on the measurement screen. 1. Press up/down arrow button to switch the display of temperature (Ta) or globe temperature (Tg). 2. Press left/right arrow button to switch the measured value of minimum (MIN) or maximum (MAX). Switching temperature (Ta) or globe temperature (Tg) Measurement screen (Ta) Measurement screen (Tg) -
Page 14: Date/Time
10. Date/time 1. Put the batteries in, then press and hold the power ON-OFF button for more than 3 seconds. 2. When the power is turned on for the first time after replacing the battery, the screen for setting Date/time will be displayed first after startup. The setting method is described below. - Page 15 Set time (Example) When setting to 13:48: (24-hour clock) [Set hour/minute] Set the value to ‘1’ Move the digit to be selected Set the value to ‘3’ Set the value to ‘4’ Move the digit to be selected Move the digit to be selected Set the value to ‘8’...
-
Page 16: Change Settings
11. Change settings This product features the following setting items. The contents of setting items are displayed with icons shown as below.: Item Icon Content Date/time Set date and time Set memory function for stored data Memory (Also used in connecting with an LED indicator. - Page 17 How to select setting items Select an item to be set. Long press Parameter setting screen Move the icon to be selected (to the right) Move the icon to be selected (to the right) Move the icon to be selected (to the right) Move the icon to be selected (to the right) Move selection icon (to the right) Move the icon to be selected (to the upper)
- Page 18 Setting up connections to peripheral devices Switch the setting switch to change the connection mode depending on the device to be connected to this product. USB connection:Use it to connect to your computer. Please prepare a USB2.0 cable (A to C). UART connection:Use this cable to connect to peripheral devices such as PATLITE and LED indicators.
-
Page 19: Memory
12. Memory The memory function features recording measurement data. Up to 30,000 measurement data can be stored in the memory. The settable memory interval is from 1 min to 999 min. (Default: OFF) Select the memory icon from the screen of changing settings. Select ON/OFF When ‘ON’... - Page 20 Notice About the contents of the memory of the WBGT main unit Csv files will be created in the WBGT folder. File name: WBGT_ Serial No._Date of file creation Example: WBGT_32602009_210716 5,000 data will be stored in one csv file. In addition, the following items will be recorded for each case.
-
Page 21: Alarm
13. Alarm This function features to inform with an alarm sound when the measured data exceeds the preset WBGT reading. The alarm function is effective only for WBGT reading. Configurable range of alarm: 15.0°C to 40.0°C (Default: 28.0°C) The setting needs to be set to OFF in the screen of changing settings to stop the alarm sound. -
Page 22: Other Settings
14. Other settings Contrast settings This function is to change the contrast of the screen. Use this when having difficulty seeing the screen. Select the contrast icon from the screen of changing settings. The contrast can be set on a scale of 1 to 5. -
Page 23: Connect To External Devices
15. Connect to external devices This icon lights up when the connection mode is UART connection. This function should be effective when connecting to the optional interface converter. The function of connecting to the external devices enables to switch the relay contact output of the interface converter according to the measured WBGT reading. - Page 24 Select the icon for ‘Connect to external devices’ from the screen of changing settings. Default: ‘OFF’ When ‘ON’, go to ‘Level 1’ setting Level 1 Level 2 Set the threshold of ‘Level 1’ and Set the threshold of ‘Level 2’and press press “OK”...
-
Page 25: Usb Communication
16. USB communication This function features the settings of USB communication. This icon lights up when the connection mode is set to USB connection, and blinks when RS connection is set. Refer to page 18 for more information on connection modes. Change the settings according to the device to be connected to this product. -
Page 26: Replace Batteries
17. Replace batteries The icon for remaining battery life is displayed in the upper right corner of the display. Replace batteries according to the display described below: Display Remaining battery life description Battery fully charged. Battery partially discharged. Battery becoming low. Replace batteries. - Page 27 How to replace batteries 1. Press down the ※ part and slide the battery cover (②) to remove it while pulling up the battery cover clip on the back of this product (①). clip 2. Remove the packing after wiping the inside of it off if it is wet. 3.
- Page 28 The waterproof performance cannot be maintained if the packing is damaged, and it may cause a malfunction. Replace the packing if it is damaged. (Refer to page 36.) 28...
-
Page 29: Storage, Maintenance, And Handling
18. Storage, maintenance, and handling * Handling and storage ⚫ Never disassemble this product. ⚫ Do not give a shock or vibration to the instrument. ☞ There may cause a risk of malfunction. ⚫ Do not use or store this product in a corrosive gas environment. - Page 30 Caution: Dustproof and Waterproof This product is designed to meet JIS IP65 (dustproof and waterproof performance), however, we cannot guarantee this. In addition, it may be difficult to maintain the dustproof and waterproof performance depending on circumstances. Further, some mishandling described below will cause the breakage or malfunction of this product, resulting in being unable to take a correct measurement.
- Page 31 [Removal of globe and sensor cap B] Globe 1. Hold the globe and the main unit, Serial No. and turn the globe counterclockwise to remove it. Back side Be careful not to drop the globe when removing it. 2. Slide the sensor cap B on the back Sensor cap B of the main unit slightly upward and remove it.
-
Page 32: Part Replacement
(Refer to page 31.) Pickup inspection is necessary when a calibration certificate is required. Please contact your KEM representative. If the temperature/humidity sensor is not installed correctly, JIS Warning standard IP65 (dustproof and waterproof performance) will not be satisfied. -
Page 33: Troubleshooting
☞ Wait at least 15 seconds before installing the batteries after removing them. If the error message is still displayed after the power is turned on again, contact your KEM representative. Communication error was detected in the temperature/humidity sensor unit. - Page 34 ☞ If the error message is still displayed even after wiping dust and waterdrops off, remove the batteries and install them after at least 15 seconds. If the error message is still displayed even after the power is turned on again, contact your KEM representative. Failure in reading the setup file.
- Page 35 The sensor calibration data has not been input to the temperature/humidity sensor. ☞ If the error message is displayed when replacing the temperature/humidity sensor unit, contact your KEM representative. Please inform us the serial No. of the temperature/humidity sensor. The serial No. can be found by removing the globe.
-
Page 36: Optional/Consumable Parts
Rubber Chip 20-13243 Packing 20-13246 Sensor Cap B 20-13248 Globe Packing 20-13256 Battery Cover 20-13313 Carrying Case 12-08394 Replacement Globe 12-08395 Replacement Temperature/humidity Sensor 63-01227 Vent Filter * For the purchase of the above parts, contact your KEM representative. 36... -
Page 37: Heat Stroke Index
Please affix the sticker on the battery cover on the back of the main unit, as needed. Guidebook for the Prevention of Heatstroke During Sports Activities (WBGT-301) Heat Index Guides to how much exercise can be safely performed (WBGT) At a WBGT of 31°C or above... - Page 38 WBGT Criteria According To Physical Work Load (WBGT-302) WBGT criteria Example of physical work load Category Heat Heat (metabolite rate level) Acclimated Unacclimated Complete rest, Comfortable sitting position 33°C 32°C Rest Light handwork (writing, typing, drawing, sewing, bookkeeping); Hand and arm movements (small bench tool, inspection, assembly or sorting light materials);...
-
Page 39: Specifications
0.0°C to 50.0°C(in 0.1°C) Temperature: 0.0°C to 50.0°C(in 0.1°C) Measuring range Relative humidity: (Display resolution) 10.0% to 90.0%RH(in 0.1%) Globe temperature: WBGT-301:0.0°C to 60.0°C(in 0.1°C) WBGT-302:0.0°C to 80.0°C(in 0.1°C) WBGT : ±1.5°C (15°C to 40°C) ※1 Accuracy Temperature : ±0.6°C (20°C to 50°C) (Under natural draft) Relative humidity : ±3.0% (30% to 90%RH) -
Page 40: Warranty And After-Sale Services
This product passed the strict inspections of KEM and, except for consumables, KEM warrants this product, under normal use, for one (1) year from the date of receipt of this product or the date of installation by KEM service personnel or by authorized personnel. - Page 41 KEM is not held liable, during or after the warranty period, regardless of whether loss or damage is caused by any event beyond control of KEM, or it is the user’s opportunity loss and/or lost earnings caused by failure or malfunction of KEM...
Need help?
Do you have a question about the WBGT-301 and is the answer not in the manual?
Questions and answers