Advertisement
Available languages
Available languages
Quick Links
ENGLISH
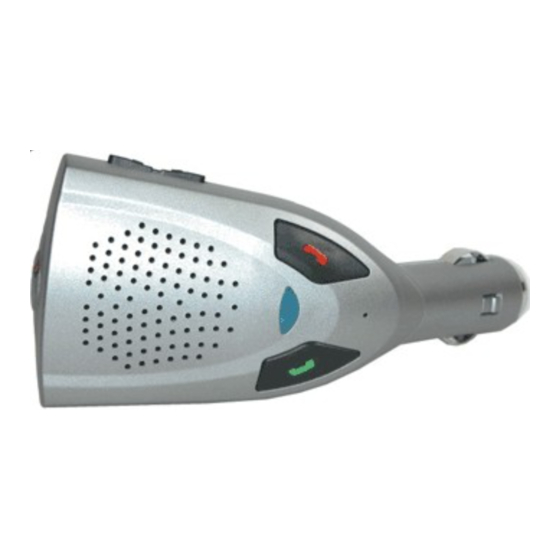
Thank you for purchasing Parrot DriveBlue, the hands-free kit with voice recognition equipped with Bluetooth
technology.
Parrot Driveblue offers you the following functions:
Wireless radio connection with your telephone via Bluetooth;
Full duplex hands-free conversation with echo cancellation and digital signal processing (DSP)
Background noise reduction;
Voice recognition for up to 200 voice tags *;
* Only with specific phones
The DriveBlue functions available for most phones are:
- answering a call
- hanging up,
- making a call
- redialing
- dual calls
- setting the volume
- private mode
Additional functions such as phonebook synchronization and multiple phone management depend on the specific phone
used.
OVERVIEW AND INSTALLATION
The DriveBlue works:
- in half-duplex when the external microphone is not used
- in full-duplex when the external microphone is used.
Both modes of communication are included in the system.
With the internal microphone, the separation between the microphone and the speaker is small and allows for half-duplex
only. The driver has the priority over the party at the other end.
With the external microphone, the jack has to be fully plugged in to transfer from half-duplex to full-duplex. The separation
between the external microphone and the DriveBlue unit should be sufficient to remove echos (approximately 12 inches
depending on orientation, separate more if the echo remains). The communication channels for the driver and the other
party are available at the same time.
Removing the jack of the microphone restores the half-duplex
Use your normal voice, as you would with someone sitting next to you. Do not raise your voice, because the performance of
the DriveBlue will be diminished.
Microphone:
The microphone should be directed towards the driver and should preferably be installed in between the visor and rear-view
mirror. Other central positions may be used. Positions on the door side are to be avoided. Also check that the ventilation
(or air conditioning system) does not blow directly into the microphone.
Extender:
The Driveblue operates in all cars. However, in some rare occasions ( some models of Ford Bronco, for exampleo),
because the depth at which the cigarette-lighter is placed, it is convenient to add an extender, so that the driver has the
DriveBlue in full view. You may get an extender by asking your store or by ordering it from any distributor listed on our
Website.
Finding the software version of the DriveBlue:
If you want to find which is the software version of the unit, check which devices have been discovered when you do a
pairing. On the display of your phone, you willl see the list of devices found. For example, DriveBlue v3.10 indiactes that the
software version installed in your DriveBlue unit is v3.10.
TM
radio
1
Advertisement

Related Manuals for Parrot DriveBlue


Summary of Contents for Parrot DriveBlue
- Page 1 DriveBlue in full view. You may get an extender by asking your store or by ordering it from any distributor listed on our Website.
- Page 2 Procedure : Check that the blue light on top of the DriveBlue is on. You should hear the « Please pair device » instruction for the first time. If not, reset your DriveBlue by pressing the green and the red buttons at the same time, and wait for « Please pair device »...
- Page 3 Use the phone keypad to dial the number. Your call will be connected automatically, in hands-free mode. The green and red buttons of your DriveBlue are your principal tool for making and receiving manual calls. To redial last number called: Press and hold green button.
- Page 4 Procedure : Check that the blue light on top of the DriveBlue is on. You should hear the « Please pair device » instruction for the first time. If not, reset your DriveBlue by pressing the green and the red buttons at the same time, and wait for « Please pair device »...
- Page 5 Procedure : Check that the blue light on top of the DriveBlue is on. You should hear the « Please pair device » instruction for the first time. If not, reset your DriveBlue by pressing the green and the red buttons at the same time, and wait for « Please pair device »...
- Page 6 Procedure : Check that the blue light on top of the DriveBlue is on. You should hear the « Please pair device » instruction for the first time. If not, reset your DriveBlue by pressing the green and the red buttons at the same time, and wait for « Please pair device »...
- Page 7 Procedure : Check that the blue light on top of the DriveBlue is on. You should hear the « Please pair device » instruction for the first time. If not, reset your DriveBlue by pressing the green and the red buttons at the same time, and wait for « Please pair device »...
- Page 8 Procedure : Check that the blue light on top of the DriveBlue is on. You should hear the « Please pair device » instruction for the first time. If not, reset your DriveBlue by pressing the green and the red buttons at the same time, and wait for « Please pair device »...
- Page 9 In order to assign voice tags to the names in your phonebook, go into your phone menu and follow the instructions below in order to go to the “Parrot Menu”. Enter the menu and select “Phone book”. You will see the list of your phone book entries.
- Page 10 Use the keys on the handset to adjust the volume of the conversation. Private mode : You can activate Private mode and transfer the conversation from the DriveBlue to the phone. This can be done during a call : • Go to Menu to “Calls”, “Yes” and press “Retrieve call in phone?"...
-
Page 11: Phone Configuration
• Availability of the "MultiTel" option (see details on "MultiTel" option below) The advantages of the use of the HandsFree profile are : • Use of the vocal recognition of the phone (no voice tags in the DriveBlue) • Three-way calling and Private mode transfers by using the green button •... - Page 12 Confirm by pressing "Yes" and "Memory erasing in progress. Please wait!" - is announced. To cancel, press "No". It is possible to erase the memory and reset the system without using the Parrot menu. To do this, hold the red and the green buttons together.
-
Page 13: Troubleshooting
ENGLISH TROUBLESHOOTING PROBLEMS Your telephone does not detect the hands-free kit Your telephone is not detected. Your telephone does not detect the hands-free kit Your telephone is detected too slowly when switched on. The person you are calling complains of an echo during communication. - Page 14 Procedure : Check that the blue light on top of the DriveBlue is on. You should hear the « Please pair device » instruction for the first time. If not, reset your DriveBlue by pressing the green and red button at the same time, and wait for « Please pair device »...
- Page 15 Procedure : Check that the blue light on top of the DriveBlue is on. You should hear the « Please pair device » instruction for the first time. If not, reset your DriveBlue by pressing the green and the red buttons at the same time, and wait for « Please pair device »...
- Page 16 Example: press green button, [beep], Nicholas. Making a call manually: Use the phone keypad to dial the number. When the call is started, press the green button on the DriveBlue keypad to switch the call in hands-free mode. To redial last number called: Press and hold green button.
- Page 17 Installation des Gerätes Stecken Sie die DriveBlue in Ihre Zigarettenanzünder-Buchse und starten Sie die Zündung. Die LED-Anzeige zeigt blaues Licht und sie hören die Aufforderung „Please pair device“ (bitte ddie Geräte koppeln). Wir empfehlen Ihnen die DriveBlue in Richtung des Fahrers auszurichten.
- Page 18 Achtung: Bei einigen Fahrzeugen steht auch bei abgeschalteter Zündung Strom auf der Zigarettenanzünder-Buchse zur Verfügung. Sollte die DriveBlue bei ausgeschalteter Zündung im StandBy-Modus bleiben, so ziehen Sie bitte das Gerät bei längerem Stillstand des Fahrzeuges aus der Zigarrettenanzünder-Buchse, um ein entleeren der Fahrzeugbatterie zu vermeiden.
- Page 19 DER AUFBAU DER VERBINDUNG DES NOKIA 6310, 6310 und 8910 Beim ersten Einschalten muss die Verbindung zwischen Ihrem Telefon und Ihrem Drive Blue hergestellt werden. WICHTIG : Die Freisprecheinrichtung DRIVE BLUE ist nur einsatzbereit, wenn der Kontaktschlüssel des Fahrzeugs eingesteckt ist. Ihr Telefon ist eingeschaltet ;...
- Page 20 Wiederholung des letzten Anrufs: l Drücken Sie lange auf die grüne Taste. Wenn ein Anruf ankommt: l Drücken Sie die grüne Taste, um abzuheben. l Drücken Sie die rote Taste, wenn Sie den Anruf nicht annehmen wollen, Ihr Korrespondent wird dann auf Ihren Anrufbeantworter verwiesen.
- Page 21 Konferenz abhalten : Wenn Sie während eines Gesprächs ein „piep“ im Hintergrund hören, drücken Sie die Rufannahmetaste (grün) Ihrer Fernbedienung um das aktive Gespräch zu halten und das wartende Gespräch anzunehmen. Drücken sie die Rufannahmetaste (grün) ein weiteres mal, um zwischen den Anrufern hin und her zu wechseln. Drücken Sie die Beenden-Taste (rot) um den wartenden Anruf zu verwerfen.
- Page 22 Kommunikation : • Tätigen eines Anrufes mit Hilfe der Spracherkennung: Drücken Sie den Knopf mit dem grünen Hörersymbol auf der Fernbedienung. Sie hören ein Signal der Freisprecheinrichtung. Sprechen Sie nun den gewünschten Kontaktnamen. • Manuelles Wählen: Wählen Sie die Rufnummer normal mit dem Telefon. Für das Fisio 820 müssen Sie den Anruf manuell auf die Freisprecheinrichtung umlegen.
- Page 23 KOPPLUNG DER ERICSSON R520,T39 ,T68 und T68i Beim ersten Einschalten muss eine Kopplung zwischen Ihrem Telefon und Ihrer Drive Blue durchgeführt werden. WICHTIG : Die Freisprecheinrichtung DRIVE BLUE ist nur funktionsfähig, wenn die Zündung Ihres Fahrzeugs eingeschaltet ist. Bei den Geräten Ericsson R520m, T68 und T39 muss das Infrarot (IrDA) unbedingt deaktiviert werden, damit die DRIVE BLUE funktioniert.
- Page 24 Drücken Sie auf è bis " Extras ", für das T39 und das R520, oder « Verbinden » für das T68 und das T68i ê bis " Zubehör " und tippen Sie " Yes ". Positionieren Sie sich auf " Parrot Menü" oder HBH und klicken Sie " Yes ". Die Rubriken des Menüs werden angezeigt. Telefonbuch :...
- Page 25 Auf " Yes " drücken. Es erscheint " Speicherlöschung im Gange. / Bitte warten ! ". Der Speicher kann ohne Verwendung des Parrot-Menüs gelöscht werden. Dafür lange gleichzeitig auf die rote und grüne Taste drücken. ACHTUNG : nach dem Löschen des Speichers muss eine neue Verbindung hergestellt werden.
- Page 26 KOPPLUNG DES ERICSSON P800 Vor der ersten Anwendung muss eine Kopplung zwischen Ihrem Telefon und Ihrer Freisprecheinrichtung Drive Blue durchgeführt werden. Wichtig: Die Freisprecheinrichtung Drive Blue ist nur funktionsfähig, wenn die Zündung Ihres Fahrzeugs eingeschaltet ist! Kopplungsvorgang : Schalten Sie Ihr Handy ein; betätigen Sie die Zündung Ihres Fahrzeugs. Auf dem Ericsson P800 folgende Eingaben machen.
- Page 27 Sprachsteuerung : Die Option „Sprachsteuerung“ ermöglicht es Ihnen, Anrufe mithilfe Ihrer Stimme zu verwalten. Mit der Sprachantwortfunktion können Sie aufgenommene Wörter verwenden, im einen eingehenden Anruf entgegenzunehmen oder ein Besetztzeichen zu senden. Mit der Sprachwahlfunktion können Sie einen Kontakt durch Aussprechen seines Namens anrufen. Sprechen Sie ein „Zauberwort“...
- Page 28 Schalten Sie das Radio und die Belüftung aus. Schließen Sie die Türen und die Fenster. Parrot Menü, Telefonbuch, und Liste Positionieren sie Namen und tippen sie Yes Vor den Namen , die mit der Spracherkennung verbunden sind, erscheint ein Stern (*).
-
Page 29: Installazione
Vi ringraziamo per aver scelto Parrot DRIVEBLUE, il viva voce a riconoscimento vocale dotato della tecnologia radio BluetoothTM. INSTALLAZIONE Connettare il DriveBlue sul’accendisigari. La luce blue deve ascendersi e “Please pair device” é pronunciato dal driveblue. Raccomendiamo di dirigere il microfono verso il conduttore. - Page 30 COMUNICARE Trasferire una chiamata in modalità manuale : Comporre il numero utilizzando la tastiera del telefo no. La conversazione passa automaticamente in modalità viva voce. pulsanti forniti con il kit viva voce sono i dispositivi principali per emettere e ricevere chiamate. Per trasferire una chiamata in modalità...
- Page 31 , poi scorrere fino a « chiamata da auricolare » poi confermare. Modalità del volume: Il volume pué essere cambiato usando il menu del telefono o il tasto del volume del driveblue. Modo Discreto: Premere il tasto sul telefono poi è « Sul telefono », confermare.
- Page 32 In occasione della prima messa sotto tensione, è necessario effettuare un collegamento tra il vostro telefono ed il vostro DRIVEBLUE. IMPORTANTE : Il kit viva voce DRIVEBLUE è operativo soltanto quando il contatto dell'autovettura è attivo. Accedere al Menu, ? Régolazioni e confermare premendo Selez.
-
Page 33: Modi Di Funzionamento
In occasione della prima messa sotto tensione, è necessario effettuare un collegamento tra il vostro telefono ed il vostro DRIVEBLUE. IMPORTANT : il viva voce DRIVEBLUE è operativo soltanto quando il contatto dell'autovettura è attivo. Per gli Ericsson R520m, T68 e T39, è indispensabile disattivare l'infrarosso (IrDa) affinché il DRIVEBLUE funzioni. - Page 34 Qualora la modalità " Risposta automatica " sia già stata attivata, la comunicazione si stabilisce automaticamente dopo 2 squilli. Modalità discreta È possibile attivare la mo dalità Discreta e trasferire così la comunicazione del DRIVEBLUE verso il proprio telefono. Questa operazione si effettua quando si è in comunicazione : R520, T68 et T68i : - premere il "Tasto opzione "...
- Page 35 " Sì ". Parametri : Volume: Questa funzione serve per regolare il volume del DRIVEBLUE. Fare clic su Sì e regolare con ç ou è. Fare clic su Sì per convalidare. Risposta auto: Questa funzione consente di attivare o di disattivare lo sgancio automatico. Fare clic su Sì, poi scegliere tra "...
-
Page 36: Risoluzioni Dei Problemi
Convalidare premendo " Sì ", il kit viva voce pronuncia " Cancellamento memoria in corso. Attendere ! " . Per annullare, premere " No ". E’ possibile cancellare la memoria senza utilizzare il menu Parrot. Per far ciò, premere lungo sui rosso e verde contemporaneamente.
Need help?
Do you have a question about the DriveBlue and is the answer not in the manual?
Questions and answers