Table of Contents
Advertisement
Available languages
Available languages
Quick Links
USA office: Fontana
AUS office: Truganina
GBR office: Ipswich
If you're having difficulty, our friendly
customer team is always here to help.
FRA office: Saint Vigor d'Ymonville
USA:cs.us@costway.com
AUS:cs.au@costway.com
GBR:cs.uk@costway.com
FRA:cs.f r @costway.com
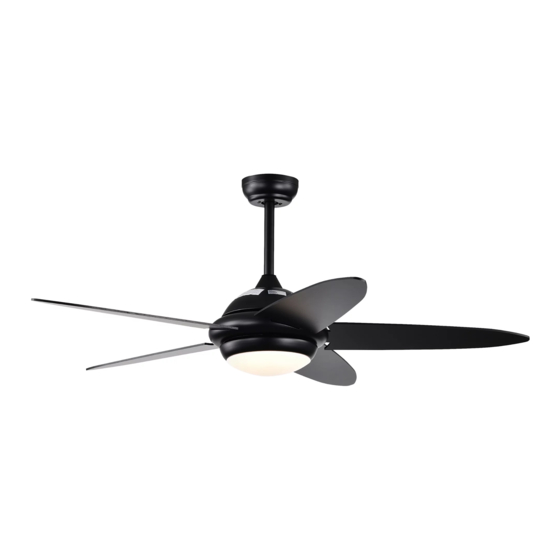
52" Ceiling Fan with Lights
132 cm Ventilateur de Plafond avec Éclairage
ES10179US
THIS INSTRUCTION BOOKLET CONTAINS IMPORTANT SAFETY INFORMATION. PLEASE READ AND KEEP FOR FUTURE REFERENCE.
Advertisement
Table of Contents

Related Manuals for Costway ES10179US


Summary of Contents for Costway ES10179US
- Page 1 GBR office: Ipswich FRA office: Saint Vigor d'Ymonville USA:cs.us@costway.com If you're having difficulty, our friendly AUS:cs.au@costway.com customer team is always here to help. GBR:cs.uk@costway.com THIS INSTRUCTION BOOKLET CONTAINS IMPORTANT SAFETY INFORMATION. PLEASE READ AND KEEP FOR FUTURE REFERENCE. FRA:cs.f r @costway.com...
-
Page 2: Safety Information
Before You Start Please read all instructions carefully. Retain instructions for future reference. Safety Information Separate and count all parts and hardware. 1. To reduce the risk of electric shock, the electricity has been turned Read through each step carefully and follow the proper order. off at the circuit breaker or fuse box before begin. -
Page 3: Tools Required
The above data are for reference only, actually the motor speed of WARNING each ceiling fan is a little different. Any products, subject to actual To reduce the risk of personal injury, do not bend the blade brackets products as standard. (also referred to as flanges) during assembly or after installation. - Page 4 Pre-Installation(continued) Installation of the hanging bracket (suspension part) PACKAGE CONTENTS Mounting Bracket Remote control (Transmitter) Remote control (receiver) Self tapping screw Slide-on mounting bracket For wooden ceiling, use wood screw to drill on the wooden beam or Canopy the "junction box" to fix the hanging bracket (selection is made according to actual requirements of the customers) 4.9"...
-
Page 5: Electrical Outlet Box
Electrical Outlet Box WARNING: Contact a qualified electrician to replace the outlet box if it is not suitable for ceiling fans. Mounting Bracket □ If there is an existing outlet box, ensure that it is clearly marked “Suitable for Fan Support”. If not, it must be replaced with an Expansion Bolts approve one. -
Page 6: Install Canopy
Assembly - Hanging the Fan Install remote receiver Install downrod assembly □ Insert the receiver into the mounting bracket with the flat side of □ Insert the motor cover into the motor assembly, align the hole, and the receiver facing the ceiling. then lock the motor cover with screws. - Page 7 Fastening the blade arms Assembly-Attaching the Lights to the motor □Put the LED light source into the disc (The LED light source has a magnet, which can be directly magnetized on the disc). □ Attach a blade to the fan motor housing by first inserting the blade □Pass the LED lead of the motor through the hole in the middle of into the in the side of the fan motor housing.
-
Page 8: Making The Electrical Connections
Install the hanging part of the 1. Making the electrical connections ceiling fan WARNIN: Each wire not supplied with this fan is designed to accept up to one 12-gauge house wire and two wires from the 1. Install downrod assembly fan. -
Page 9: Preparing For Mounting
Assembly - Hanging the Fan (continued) Preparing for mounting Med Level Install remote control Low Level Hi Level LIGHT ON/OFF Fan On/Off Auto off after 1hr~8hr 1. Carefully push the canopy to the bottom of the mounting bracket, make two sliding holes aligned to the two prominent screws on the mounting bracket, and then turn clockwise until tight. -
Page 10: Troubleshooting
Troubleshooting Problem Solution ▪ Check the main and branch circuit fuses or breakers. ▪ Check the line wire connections to the fan and switch wire connections in the switch housing. Informations sur la Sécurité 1. Pour réduire le risque de choc électrique, l'électricité a été coupée au ▪... -
Page 11: Outils Requis
Les données ci-dessus sont à titre de référence seulement, en fait AVERTISSEMENT la vitesse du moteur de chaque ventilateur de plafond est un peu Pour réduire le risque de blessure, ne pliez pas les supports de différente. Tous les produits, sous réserve des produits réels en lame (également appelés brides) pendant le montage ou après standard. - Page 12 Pré-Installation(suite) Installation du support de suspension (partie suspension) CONTENU DE L'EMBALLAGE PLAFOND EN BOIS Support de montage Télécommande (émetteur) Télécommande (récepteur) Vis autofileteuses Support de montage coulissant Pour les plafonds en bois, utilisez une vis à bois pour percer la poutre Baldaquin en bois ou la «...
- Page 13 Boîte de Prise Électrique PLAFOND EN BÉTON AVERTISSEMENT : Contactez un électricien qualifié pour Support de remplacer la boîte de prise si elle n'est pas adaptée aux montage ventilateurs de plafond. □ S'il y a une boîte de prise existante, assurez-vous qu'elle porte Boulons clairement la mention «...
- Page 14 Assemblage - Suspension du Ventilateur Installer le récepteur à distance Installer l'ensemble du tube à genouillère Insérez le couvercle du moteur dans l'ensemble du moteur, alignez □ Insérez le récepteur dans le support de montage avec le côté plat le trou, puis verrouillez le couvercle du moteur avec des vis. du récepteur face au plafond.
- Page 15 Fixation des pales au moteur Assemblage- Fixation des lampes □ Fixez une pale au boîtier du moteur du ventilateur en insérant □ Mettez la source de lumière LED dans le disque (La source de d'abord la pale dans le dans le côté du boîtier du moteur du lumière LED a un aimant, qui peut être directement magnétisé...
- Page 16 Installer la partie suspendue du 1. Effectuer des connexions électriques ventilateur de plafond AVERTISSEMENT: Chaque fil non fourni avec ce ventilateur est conçu pour accepter jusqu'à un fil domestique de calibre 12 et deux 1. Installer l'assemblage du le tube à genouillère fils du ventilateur.
-
Page 17: Préparation Du Montage
Assemblage - Suspendre le Ventilateur (suite) Préparation du montage Niveau Moyen Installer la télécommande Niveau Bas Niveau Élevé Ventilateur LUMIÈRE MARCHE/ARRÊT MARCHE/ARRÊT Arrêt automatique après 1 heure~8 heures 1. Poussez délicatement le baldaquin vers le bas du support de montage, faites glisser les deux trous alignés sur les deux vis proéminentes du support de montage, puis tournez dans le sens des aiguilles d'une montre jusqu'à... -
Page 18: Dépannage
Dépannage Problème Solution ▪ Vérifiez les fusibles ou les disjoncteurs du circuit principal Return / Damage Claim Instructions et de la branche. ▪ Vérifiez les connexions des fils de ligne au ventilateur et les DO NOT discard the box / original packaging. connexions des fils de l'interrupteur dans le boîtier de In case a return is required, the item must be returned in original box.
Need help?
Do you have a question about the ES10179US and is the answer not in the manual?
Questions and answers