Table of Contents
Advertisement
Quick Links
3.5
QUICK START GUIDE 3.5 0.03-0.2%
SAFETY
Warning:
!
During operation, the operator must stay in front of the MixRite
3.5 pump and wear protective eyewear, clothing and gloves.
Be extremely careful in the presence of hazardous substances
(e.g. corrosives, toxins, solvents, acids, caustics, flammable, etc.).
The user must adhere to the recommendations given by the
manufacturer of the chemical product.
Caution:
!
Use proper tools. DO NOT USE METALLIC TOOLS.
It is the responsibility of the owner/operator to make sure water
flow and pressure do not exceed the MixRite specifications.
Before applying any aggressive chemicals, please consult your
distributor to confirm compatibility with the dosing pump.
Notes:
Change the suction tube as soon as it appears damaged by
the chemical.
It is advised to relieve the pressure after use.
An air penetration, contamination or chemical damage to a seal
can disrupt the dosing function.
It is recommended to periodically check that the additive is
being correctly drawn up into the MixRite.
INSTALLATION
Installation on a Direct Line
Note:
MixRite 3.5 can also be installed on a bypass line.
Scan the QR Code to go to the user manual.
Valve
Filter
Manometer
Backflow
Preventer
Additive
Tank
Note:
The arrow on the pump must be
in the direction of water flow.
Caution:
When connecting MixRite 3.5 to a public/private water
!
supply, regulations concerning the force and protection (i.e.
backflow preventer) of the source must be respected.
Copyright © 2022 Tefen, all rights reserved.
Anti-siphon
Valve
10 cm
Inlet height above
tank floor
SYSTEM OVERVIEW
System Information
Water Pressure
Flow Rate
0.2 – 8 bar
10 - 3500 l/h
(0.04 - 15.4 GPM)
(2.9 – 116 psi)
Coupling
Working temp.
3/4"
4-40˚ C
(39.2-104˚ F)
Wall Mount
Main Water Inlet
Additive Suction Inlet
Scan the QR Code
0.03-0.2% Installation and Operation Guide
Connecting and Mounting MixRite 3.5
1. Attach the main pipe to MixRite using two fittings/record fittings
2. Insert top end of suction tube onto MixRite and tighten the hose nut
3. Insert the other end of the suction tube into the additive tank
4. Verify the height of suction tube inside the additive tank
5. Attach the bracket to a wall using two screws
6. Snap MixRite onto bracket
5
1
2
3
4
Note:
Tighten manually,
No tools needed.
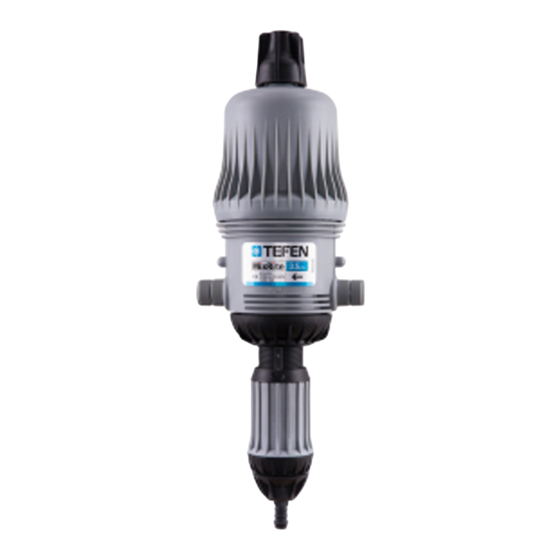
On/Off Knob
Solution Outlet
Adjustment Sleeve Nut
for the full MixRite 3.5
10 cm
6
Advertisement
Table of Contents

Subscribe to Our Youtube Channel
Related Manuals for tefen MixRite 3.5


Summary of Contents for tefen MixRite 3.5
- Page 1 1. Attach the main pipe to MixRite using two fittings/record fittings Note: MixRite 3.5 can also be installed on a bypass line. 2. Insert top end of suction tube onto MixRite and tighten the hose nut Scan the QR Code to go to the user manual.
- Page 2 Scan the QR Code for instructions on how to 3. Gently pull out the check valve replace the seals on MixRite 3.5 0.03-0.2% 4. Detach the check valve and rinse its components thoroughly Cleaning MixRite 3.5 5. Apply silicone grease to the O-rings and re-assemble the check valve 6.
Need help?
Do you have a question about the MixRite 3.5 and is the answer not in the manual?
Questions and answers