Table of Contents
Advertisement
Advertisement
Table of Contents

Related Manuals for Concord Camera Eye-Q Mini


Summary of Contents for Concord Camera Eye-Q Mini
-
Page 2: Table Of Contents
Table of Contents Important Information...2 Precautions ...3 1. Product Overview ...4 Getting started...5 Minimum System Requirements ...5 Camera features ...5 Package Contents ...5 Important battery information...6 Turning the camera on and off and learning the LCD display ...7 Selecting the power supply...9 Inserting the batteries ...9 2. -
Page 3: Important Information
IMPORTANT INFORMATION FCC Statement This device complies with part 15 the FCC Rules. Operation is subject to the following two conditions: (i) This device may not cause harmful interference, and (ii) this device must accept any interference received, including interference that may cause undesired operation. -
Page 4: Precautions
PRECAUTIONS Test Shots Always take a test photograph to check that the camera is functioning normally. The liability for any incidental losses (such as the cost of photography or the loss of income from photography) incurred as a result of fault with this product cannot be accepted. -
Page 5: Product Overview
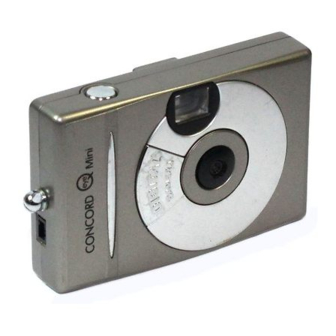
1. Product overview FRONT BACK 5. Viewfinder 6. Battery Compartment 7. LCD display 8. Mode button 1. Shutter Button 2. Viewfinder 3. USB plug-in 4. Lens... -
Page 6: Getting Started
Getting started Congratulations on your purchase of the Concord Eye-Q Mini digital camera. This camera features 8 MB of internal SD RAM memory allowing you to store still images or short video clips in the camera. Please read this manual before operating the camera to become more familiar with the features of this versatile digital camera. -
Page 7: Important Battery Information
Important battery information The Eye-Q Mini camera uses a type of memory that continually draws power to retain the pictures in the camera’s internal memory even if the camera is powered off. If the battery power is depleted and you have not transferred your images to the computer, you will lose them. -
Page 8: Turning The Camera On And Off And Learning The Lcd Display
The self-timer mode is represented by St in the LCD. Clear Last Image The Eye-Q Mini has the ability to delete all images or to just delete the last image capured. CL in the LCD indicates clear last or delete last image. - Page 9 High Resolution Mode Your camera can capture VGA (640 x 480) images. Hr in the LCD represents the high resolution mode Low Resolution Mode VGA images are compressed 4:1 in the low resolution mode which is represented by Lr in the LCD. Memory Full A flashing CF in the LCD indicates that the camera’s internal memory is full.
-
Page 10: Selecting The Power Supply
Selecting the power supply To extend the battery life, remove the batteries from the camera when it is not in use. Remember to transfer your pictures to your computer first or you will lose them. Note: • Do not use different types of batteries together. •... -
Page 11: Taking Pictures
2. Taking Pictures Press the Mode button once to turn the camera on. When a number appears in the LCD you are ready to take pictures by pressing the shutter button. A beeping sound indicates that the image has been captured and the number of pictures taken will be updated in the LCD. -
Page 12: Changing The Resolution
Changing the resolution To change the resolution, press the Mode Button until the resolution option is displayed in the LCD. The resolution is noted by HR for high resolution and Lr for Low resolution. When the resolution you would like to select appears in the LCD, press the shutter button to confirm your choice. -
Page 13: Delete Funtion
Delete Funtion Press the Mode Button until either CA or CL appears in the LCD. • CA stands for clear all and is used to delete all images. • CL stands for clear last and is used to delete the last image. When the mode you want appears in the LCD, press the Shutter button. -
Page 14: Installing The Drivers And Software
3. Installing the Drivers and Software Before beginning the installation, please note that the camera should not be connected to your PC via the supplied USB cable. Insert the CD into the CD-Rom drive. The Autorun screen will appear. If it does not, click on setup.exe on the CD-ROM. Exit Setup 1. -
Page 15: Transferring Pictures To Your Pc
3. Type the file name and then click on Save. 4. After OK is displayed in the status line, close the window. Web Camera Mode The Eye-Q Mini can be used as a web cam with different videoconference and video capturing software available in the market. -
Page 16: Application Software
VCR, a laser disc player, a camcorder, etc. You can also create new AVI files and write to Digital Video Camcorder tape using the powerful functions included in the software. - Page 17 NewSoft Presto ! Image Folio v4.2 Image Folio is a comprehensive multimedia image-processing program for Windows 95/98/ME/2000/XP or Windows NT 4.0. It enables you to process photographs, graphics, and drawin gs captured from scanners, VCRs, laser discs, digital cameras, video capture boxes, etc.
-
Page 18: Cleaning And Maintenance
4. Cleaning and maintenance Be sure to read this information to ensure that you use your camera correctly. Places to Avoid Do not store or use the camera in the following places or locations: • Very humid, dirty or dusty places. •... -
Page 19: Storing The Camera
Storing the camera If you do not intend to use the camera for a long period of time, remove the batteries before storing the camera. Cleaning your Camera Use a blower brush to remove dust from the lens and LCD surface and then wipe lightly with a soft, dry cloth. -
Page 20: Troubleshooting
For Windows® User: SYMPTOM PROBLEM All the images I You have lost power to your CONCORD EYE-Q Mini by either: have taken do not appear. Insufficient battery power. The battery was removed before the camera was connected to the PC. - Page 21 SYMPTOM PROBLEM My CD installation The auto installation file wizard does not is switched to off or the work. CD ROM is not in the drive. The image The camera is processing counter on the the image. LCD flashed after I took my last image.
-
Page 22: Getting Help
6. Getting Help If you need help with your camera, refer to the Troubleshooting section of this manual. If you still cannot find the solution, visit our Web site at www.support.concordcam.com. answered in the Frequently Asked Questions (FAQ) section. Toll Free in the US and Canada: •... -
Page 23: Warranty Information
7. Warranty Information LIMITED WARRANTY The manufacturer warrants your Concord Eye-Q Mini camera for a period of 1 year from the date of purchase to be free from defects in material and workmanship. The warranty period shall be extended accordingly if applicable mandatory legislation in effect on the date of purchase requires a longer warranty period. -
Page 24: Technical Suppor T Hot Line
Technical Suppor t Hot Line: Toll Free In the USA & Canada 1-866-522-6372 Toll Free In Europe UK: 0800-169-6482 BELGIUM: 0800-787-57 FRANCE: 0800-917-599 GERMANY: 0800-1800-563 SPAIN: 900-973-195 ITALY: 800-781-883 All Other Countries - Toll 31-53-482-9779...
Need help?
Do you have a question about the Eye-Q Mini and is the answer not in the manual?
Questions and answers