Table of Contents
Advertisement
Advertisement
Table of Contents

Related Manuals for Omega Spacemaster Z-33


Summary of Contents for Omega Spacemaster Z-33
- Page 1 OPERATING INSTRUCTIONS...
-
Page 3: Table Of Contents
OMEGA international warranty (valid for U.S.A. only) ..4 OMEGA international warranty .....6 DESCRIPTION AND USE . -
Page 4: Introduction
INTRODUCTION Special recommendations What must I do to ensure that my OMEGA watch provides me with excel- lent service for many years? Magnetic fi elds: avoid placing your watch on loudspeakers or refrigera- tors since they generate powerful magnetic fi elds which may damage it. -
Page 5: Environmental Protection
Who should I contact for a maintenance service or battery replace- ment? We recommend that you contact an approved OMEGA service centre or authorised OMEGA retailer. They are equipped with the tools and ap- paratus required to carry out the work and the necessary checks in a pro- fessional manner. -
Page 6: Omega International Warranty (Valid For U.s.a. Only)
OMEGA watch ("defects"). The warranty only comes into force if the warranty certifi cate is dated, fully and correctly completed and stamped by an offi cial OMEGA dealer ** ("valid warranty certifi - cate"). During the warranty period and by presenting the valid warranty certifi... - Page 7 OTHER GUARANTEES. The OMEGA customer service ensures the perfect working order of your OMEGA watch. If your watch needs maintenance, rely on an offi cial OMEGA dealer or an authorized OMEGA Service Center as set forth in the enclosed list: they can guarantee service according to OMEGA SA’s standards.
-
Page 8: Omega International Warranty
OMEGA watch ("defects"). The warranty only comes into force if the warranty certifi cate is dated, fully and correctly completed and stamped by an offi cial OMEGA dealer ** ("valid warranty certifi - cate"). During the warranty period and by presenting the valid warranty certifi... - Page 9 The OMEGA SA customer service ensures the perfect maintenance of your OMEGA watch. If your watch needs attention, use an offi cial OME- GA dealer or an authorised OMEGA Service Centre. They can guaran- tee a service which corresponds to OMEGA SA's standards.
-
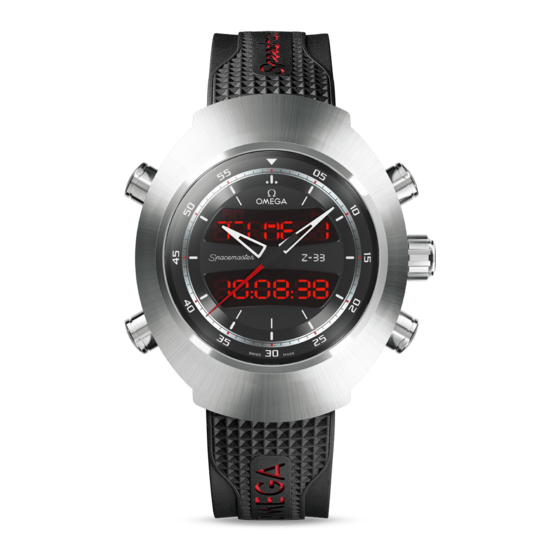
Page 10: Description And Use
DESCRIPTION AND USE The information contained in this document is for stand- this model more information, consult Internet site (www.omegawatches.com/spacemaster-z33). Watch components Displays am/pm display Flight log (AM or PM) Flight being recorded When the 12h mode is (page 24) selected (page 12) Function display According to mode... - Page 11 Pushers and crown Chrono/Timer Start/stop Favourite functions (page 22 and page 27) (page 11) Setting mode Validation of the setting and access to the next setting Alarm On/Off (page 18) General Press once = to light up and clear the hands (page 11) Selection of the Press twice = to record a fl...
-
Page 12: Special Functions
SPECIAL FUNCTIONS First use Before using the fl ight log for the fi rst time, you must: • choose the fl ight log operating mode, page 12; • set the time (TIME 1), page 14; • set the UTC time difference, page 17; •... -
Page 13: Favourite Functions
Favourite functions This allows you to quickly access two favourite functions. Display the desired function. Press for 3 seconds to record the function. Press to move between the two favourite functions. Energy saving mode This allows you to save the battery by blocking the hands and deactivat- ing the display. -
Page 14: Functions And Settings
FUNCTIONS AND SETTINGS Synchronising hands and setting display modes (neutral display) This function allows you to: • control and set the synchronization of the hands; • set the time display mode (24h or 12h); • set the day and month display mode (day/month or month/day);... - Page 15 To move the minute hand. In half-minute intervals. To validate the minutes. To access the set seconds function. To move the second hand. In 1 second intervals in the clockwise direction only. To validate the synchroniza- tion and access the set time display mode.
-
Page 16: Local Time (Time 1)
To select the fl ight log operat- ing mode: BLOCK UTC "BLOCK TO BLOCK" with UTC time; BLOCK LOCAL = "BLOCK TO BLOCK" with local time; FLT UTC "Flight time" with UTC time; FLT LOCAL "Flight time" with local time. The fl... - Page 17 Setting To access the setting mode. To set the hours. To validate the hours. To access the set minutes function. To set the minutes. To validate the minutes. To access the set seconds function. To set the seconds. To validate the settings. You are asked if you want to set the UTC time difference.
-
Page 18: Second Time Zone (Time 2)
Second time zone (TIME 2) Displaying and setting the second time zone. Display To display the second time zone. Setting To access the setting mode. To set the time of the second time zone. In 30 minute intervals. Return to the local time (TIME 1). To validate the settings. -
Page 19: United Time Coordinated / Time Difference
United Time Coordinated / time difference Displaying the United Time Coordinated (UTC). Display To display the UTC. Setting The setting corresponds to the difference between the local time and the UTC. The value may be negative if the UTC is behind the local time. -
Page 20: Alarm
Alarm Displaying, activating and setting the alarm. Display To display the alarm time. Activation Press to switch the alarm ON or OFF. Activation = beep! Setting To access the setting mode. To set the alarm hour. To validate the hour. To access the set minutes function. - Page 21 To select the days. ALL/DAYS = every day of the week. MO/FR = From Monday to Friday. SA/SU = Saturday and Sunday only. To validate the settings. To switch on the alarm. The alarm is automatically switched on when the setting mode is exited.
-
Page 22: Calendar
Calendar Displaying and setting the day of the week and the date. Refer to setting the display mode (month/day - day/month), page 12. 's perpetual calendar is programmed up to 2199. Display To display the date. Setting This setting is not possible when a fl ight sequence is being record- ed ( ). -
Page 23: Calendar Week
To validate the month. To access the set day func- tion. To set the day. To validate the settings. To display the day of the week and the date. Calendar week Displaying the numbers of the day of the year (DAY) and of the week (WK). -
Page 24: Chronograph
Chronograph Measuring short periods of time to within 1/100th of a second with a split time function. Display To display the chronograph. Use in manual mode To start the chronograph. To stop/restart the chrono- graph (total time). To reset to zero. When the chronograph has been stopped. - Page 25 Use with "SPLIT" time To start the chronograph. To display the "SPLIT" time. The chronograph contin- ues to operate. To redisplay the elapsed time. To stop/restart the chrono- graph (total time). To reset to zero. When the chronograph has been stopped.
-
Page 26: Flight Log
Flight log The fl ight log allows you to record the sequences of a fl ight. You can record up to ten fl ights (0 to 9). When you record the 11th fl ight, the fi rst fl ight is automatically erased. General information There are 2 modes for saving fl... - Page 27 To consult the fl ight sequences To display the function. The display varies according to the mode and action carried out: NO FLT = no fl ight recorded To access the consultation mode. To display the sequences. Flight sequences (block to block): B0 OFF = time and date of start of taxiing from the fi...
- Page 28 To delete a fl ight To access the consultation mode. Select the fl ight. Initiate the deletion of the fl ight. Confi rm the deletion of the fl ight. To exit consultation mode. To delete all the fl ights To access the consultation mode.
-
Page 29: Timer
TIMER The TIMER function allows you to count down a pre-defi ned time period. Countdown from 99h59m59s to 1s Display To display the TIMER. Setting To access the setting mode. To set the hour. To validate the hour. To access the set minutes function. - Page 30 A special function allows you to adjust to the nearest minute (for example for the start of a regatta). To start the timer. To stop/restart the timer. To return to the nearest minute, only while the timer is counting down. Last 5 seconds = short beeps and fl...
-
Page 31: Glossary
• The face is equipped with a light detector and adapts the brightness of the display to the ambient light. The second hand makes 5-second jumps: • The battery is at the end of its service life (the battery must be re- placed by an authorised OMEGA dealer). -
Page 32: Pictograms
PICTOGRAMS Quartz Thermocompensated movement Perpetual calendar Easy time zone change Split-time counter End of battery life Sapphire glass Double anti-refl ective treatment inside and outside Water-resistant to a depth of 30 m (3 bar) WEEE (RoHS) quartz ª Button-type lithium-manganese dioxide battery cell... - Page 33 Protection de l’environnement ..... .3 Garantie internationale OMEGA ....4 DESCRIPTION ET UTILISATION .
- Page 34 Printed in Switzerland © Omega SA 01/12 – 03090940M...
Need help?
Do you have a question about the Spacemaster Z-33 and is the answer not in the manual?
Questions and answers