Table of Contents
Advertisement
Quick Links
Advertisement
Table of Contents

Related Manuals for Rear view safety RVS-97QUAD-DVR


Summary of Contents for Rear view safety RVS-97QUAD-DVR
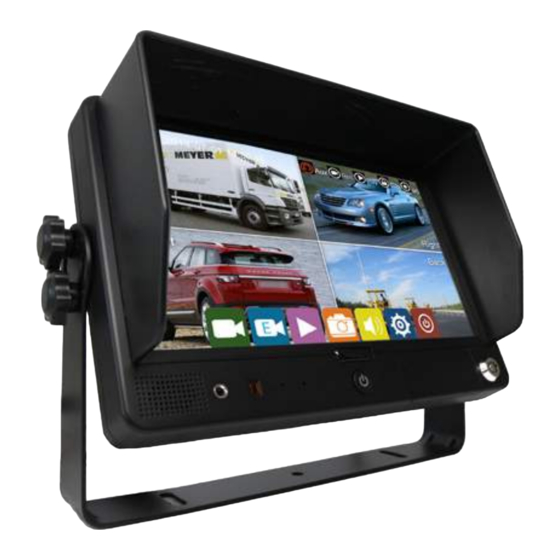
- Page 1 Instruction Manual 9” TFT LCD Digital Quad View Color Monitor With Built-In DVR RVS-97QUAD-DVR Please read this manual before using this monitor. The product may be different from how it is described in the manual depending on what software version you are using.
-
Page 2: Table Of Contents
System......26-30 Notes....... . . 31 Rear View Safety... -
Page 3: Introduction
NOTE! Please read all of the installation instructions carefully before installing the product. Improper installation will void manufacturer’s warranty. Congratulations on purchasing a Rear View Backup Camera System! With this manual you will be able to properly install and operate the unit. The Backup Camera System is intended to be installed as a supplement aid to your standard rear view mirror that already exists in your vehicle. -
Page 4: Safety Information
Rear View Camera System. If you back up while looking only at the monitor, you may cause Rear View Safety... - Page 5 INSTALLATION: • Electric shock or product or disconnected wire may cause a malfunction may occur if this fire. product is installed incorrectly. • While installing the Rear View System be careful with the wire • Use this product within positioning in order to avoid wire the voltage range specified.
- Page 6 If you have questions about this product, contact: Rear View Safety 1797 Atlantic Avenue Brooklyn, NY 11233 Tel: 1.800.764.1028 IN NO EVENT SHALL SELLER OR MANUFACTURER BE LIABLE FOR ANY DIRECT OR CONSEQUENTIAL DAMAGES OF ANY NATURE, OR LOSSES OR EXPENSES RESULTING FROM ANY DEFECTIVE PRODUCT OR THE USE OF ANY PRODUCT.
-
Page 7: Before Beginning Installation
Before drilling please check that no cable or wiring is on the other side of the wall. Please clamp all wires securely to reduce the possibility of them being damaged while vehicle is in use. Keep all cables away from hot or moving parts and electrical noisy components. We recommend doing a benchmark test before installation to insure that all components are working properly. -
Page 8: Precautions
7. Do not place cables where they may be pinched or stepped on. 8. Leave at least a 2” space between the monitor and walls, cabinets or other objects to allow adequate air circulation around the device. 9. The monitor is not designed to be waterproof. Rear View Safety... - Page 9 Operating Precautions 1. The device may be powered by a 12 or 24 volt battery, as well as the vehicle's electrical system. 2. Make sure all cables are connected properly. Improper cable con- nections may damage the monitor. Remove the power cable connections when not using the device.
-
Page 10: Maintenance
This symbol reminds the user not to waste electronic equipment. CAUTION Any changes or modifications not expressly approved in this manual could void your warranty and lead to expensive repairs. Rear View Safety... -
Page 11: Accessories
Accessories Special Notice: Accessories may vary on certain devices. Reverse With Confidence ™... -
Page 12: Connections
E: Camera 4 Brown 5 PIN Female / 4 PIN Female 5 Orange: HDMI trigger F: Video Out Yellow RCA Female 6 Purple: Speed G: Audio Out White RCA Female 7 Black : Ground 8 Red: VCC Rear View Safety... -
Page 13: Remote Control
Remote Control Mute Menu Standby Display Mode Selection Recording Language Selection Volume Decrease HDMI Switch Volume Increase Event Recording Snapshot Reverse With Confidence ™... -
Page 14: Controls
Controls AUX Input Emergency Reset Remote Receiver Micro SD Slot LDR (Light Dependent Resistor) HDMI Input Recording Indicator Insert Direction Power Slot Number Lock Sketch of slots/microSD card direction Rear View Safety... -
Page 15: Operation
Power Function A) Short press the power button to turn on the monitor when the panel LED is red. B) Hold the power button for 5 seconds, then enter the password in the pop-up window to turn off the monitor. C) When the monitor is on, short press the power button to turn off the backlighting. - Page 16 “Unable to record in play mode! Continue?” Click OK to view the recording calendar menu. Video files are available as green highlighted dates. Click the date to select, play or delete video files/snapshots. Multiple video files can be set to play in sequence. Snapshots must be played individually. Rear View Safety...
- Page 17 Reverse With Confidence ™...
- Page 18 Press this icon to enter the setup menu. A prompt dialog will display “Unable to record in setup mode! Continue?” Click OK to continue. Press this icon and enter the password in the pop-up window to turn off the monitor. Rear View Safety...
-
Page 19: Record
Record Power On Rec: Start recording automatically when power is on. Select ON/OFF. Cyclic Rec: With this setting on, new video files will overwrite previous files after SD cards fill up. When this setting is off, all recording will stop after SD cards fill up. Event Mode files will never be overwritten. -
Page 20: Display
Motion Sensitivity: When motion reaches this threshold, it will start recording. The options are Low/Middle/High. G-sensor Sensitivity: The options are Low(+/-1g)/Middle(+/-2g)/High(+/-4g). Video Quality: Video resolution options are Low/Middle/High. The default quality is High. Display Rear View Safety... - Page 21 Press this icon to edit the camera names. Press this icon to change how long the menu will dis- play. Press Menu Lock to set password. Default Password is 123456 Reverse With Confidence ™...
- Page 22 5 is the highest priority. First connect vehicle speed wire with monitor speed wire. Use this menu to select which camera will display a warning when the vehicle is over/under pre-set speed. Rear View Safety...
- Page 23 Speed Range/Calibration Setup Press the Calibrate icon to calibrate the your monitor's current speed. Select a range using the high/low speed cursors. A warning will ap- pear when the vehicle is over/under this range. Press this icon to change black- light brightness.
- Page 24 Press this icon to change how long the screen and bat- tery will remain on after external pow- er is turned off. Press this icon to select video system in camera mode or HDMI input in non-camera mode. Rear View Safety...
-
Page 25: Storage
In the mirror sub-menu, each video input can be set to display either a mirror or a non-mirror image. Storage ALL: Total capacity and free capacity for all cards. TF1~4: Total capacity and free capacity for each individual microSD card. Format : Format microSD card. -
Page 26: System
System Rear View Safety... - Page 27 Reverse With Confidence ™...
- Page 28 * If Event Mode is activated (trigger signal, motion detection, collision etc.), scheduled recording will be paused and will resume when event recording is finished. Scheduled recording will not resume if the pre- set time has passed. Rear View Safety...
- Page 29 Press this icon to change file type Update: Press this icon to update software. Note: System will reboot after being upgraded. Do not turn off device during reboot (approx. 40s of dark screen) or the monitor will not start because of upgrade failure. Factory Default: Will display “Confirm to reset?”...
- Page 30 The 3 levels of resolution corresponding to the image quality options are listed in the chart below. The high image quality has the same resolution as the middle image quality, but also has twice the bit rate. Rear View Safety...
-
Page 31: Notes
NOTES Reverse With Confidence ™... - Page 32 If you have any questions about this product, contact: Rear View Safety, Inc. 1797 Atlantic Avenue Brooklyn, NY 11233 800.764.1028 Better Cameras. Better Service. IT’S OUR GUARANTEE. Rear View Safety...
Need help?
Do you have a question about the RVS-97QUAD-DVR and is the answer not in the manual?
Questions and answers