Table of Contents
Advertisement
Quick Links
®
Technaxx
* User Manual
PV Micro Inverter 800W TX-242
Before using the appliance for the first time, please read the instructions for use and
safety information carefully.
This appliance is not intended for use by persons (including children) with reduced
physical, sensory or mental capacities, or by persons lacking in experience or
knowledge, unless they are supervised or instructed on the use of this device by a
person responsible for their safety. Children should be supervised to ensure they do
not play with this device.
Keep this user manual for future reference or product sharing carefully. Do the same
with the original accessories for this product. In case of warranty, please contact the
dealer or the store where you bought this product.
Enjoy your product. * Share your experience and opinion on one of the well-
known internet portals.
Specifications are subject to change without notice - please be sure to use the latest
manual available on the manufacturer's website.
1
Model:TX-242 Article No. 5065, 03/2023
Advertisement
Table of Contents

Related Manuals for Technaxx TX-242


Summary of Contents for Technaxx TX-242
- Page 1 ® Technaxx * User Manual PV Micro Inverter 800W TX-242 Before using the appliance for the first time, please read the instructions for use and safety information carefully. This appliance is not intended for use by persons (including children) with reduced...
-
Page 2: Table Of Contents
Technical specifications ....18 Product variants: ......9 Support ..........19 Product overview ......9 Declaration of Conformity ....19 Preparation ........9 Disposal ........... 19 Requirements for the operation of a photovoltaic system ......9 Model:TX-242 Article No. 5065, 03/2023... -
Page 3: Important Notes At The Start
Therefore, contact a specialist electrical company if your installation exceeds 600W! Explanation of the pictograms used Read the user manual. Warning Caution, risk of electric shock. Caution, hot surface Model:TX-242 Article No. 5065, 03/2023... -
Page 4: Note
⚫ Never use the device after a malfunction, e.g. if the device has been dropped into water or damaged in any other way. ⚫ The manufacturer assumes no responsibility in the event of incorrect use resulting from failure to follow the instructions for use. Model:TX-242 Article No. 5065, 03/2023... - Page 5 ⚫ Mount the micro inverter in such a way that accidental contact is not possible. ⚫ Do not touch hot surfaces. When working on the micro inverter, wait until the surface has cooled down sufficiently. Model:TX-242 Article No. 5065, 03/2023...
-
Page 6: Intended Use
Wieland plug to the public power grid. The micro inverter is not intended for mobile use. Modifications to the micro inverter are generally prohibited. For changes in the environment, you must always consult a qualified electrician. Assembly, installation and electrical connection. Model:TX-242 Article No. 5065, 03/2023... -
Page 7: Caution Measures During Installation
Disclaimer ⚫ In no event shall Technaxx Deutschland be liable/responsible for any direct, indirect punitive, incidental, special consequential danger, to property or life, improper storage, whatsoever arising out of or connected with the use or misuse of their products. -
Page 8: Features
⚫ MC4 connector for solar panel connection ⚫ Max. solar panel power 320-540W ⚫ Integrated MPPT charge controller for solar panels: particularly efficient power yield ⚫ MPPT voltage range: DC34-48V ⚫ Meets highest safety standards ⚫ Waterproof IP67 Model:TX-242 Article No. 5065, 03/2023... -
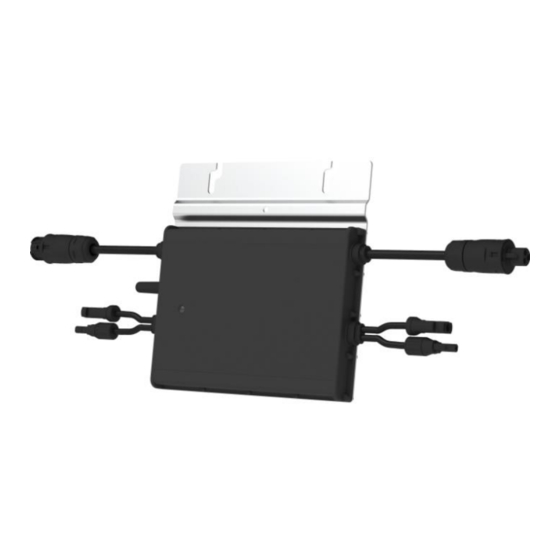
Page 9: Product Details
1x Female Betteri adapter 1x AC input end cap 1x User manual Product overview PV Micro Inverter 800W TX-242 Betteri socket BC01 (input 230V AC) 4 Betteri plug BC01 (output 230V AC) Mounting holes Input solar panel (MC4 connector) Ground connection... -
Page 10: Connecting The Micro Inverter
AC connection. When connecting, connect the AC terminal first to ensure grounding of the micro inverter. Then connect the DC terminals. When disconnecting, disconnect the AC first by opening the branch circuit breaker but keeping the protective Model:TX-242 Article No. 5065, 03/2023... -
Page 11: Mount The Micro Inverter
4. Hang the micro inverter on the screw (shown as picture below), and tighten the screw. The silver cover side of the micro inverter should be facing the panel. TX-242 mounted to a racking system CAUTION! Before installing the micro inverter: Check that the supply mains voltage at the common connection point matches the rated voltage of the micro inverter. -
Page 12: Connect Micro Inverter In Parallel
2m, use an AC extension cable between two micro inverters (As picture indicated below). TX-242 AC connection with extension cable 2. Install the AC end cap on the open AC connector of the last micro inverter in the AC branch circuit. -
Page 13: Install Protective Ac End Cap
2. Insert the AC cable from Part 3 to Part 2, and complete the wiring for the L, N and Ground (PE) inside Part 1 AC port accordingly: Note: L: Brown wire; N: Blue wire; PE: Green/Yellow wire Use 3x1.5mm² (H07RN-F) cable as AC grid connection cable. Model:TX-242 Article No. 5065, 03/2023... -
Page 14: Connect The Solar Panels (Dc Connection)
"click" sound. The connectors of some solar panels have the polarity (+, -) printed on them, which is valid for the panels. The DC cable of the TX-242 with the plus marking (+) is connected to the - pole of the panel, the negative marked cable (-) to the + pole. -
Page 15: Connecting The Micro Inverter To The Ac Grid (Ac Connection)
Connecting the micro inverter to the AC grid (AC connection) A maximum of 1x TX-242 may be connected to an EU / 50Hz / 230V installation with 10A automatic circuit breaker. The connection to the mains is made with a suitable power cable. Only use 3-core cables that are also approved for outdoor installation and have a conductor cross- section adapted to the amperage (preferably 1.5mm²... -
Page 16: Led Status
Maintenance work and troubleshooting on the micro inverter may only be carried out by qualified personnel. Modifications to the micro inverter are generally prohibited. The micro inverter is potted, the electronics cannot be repaired. The TX-242 micro inverter draws its supply voltage from the DC side. To restart the micro inverter, the solar panels must be disconnected from the micro inverter. - Page 17 Avoid temporary repairs. All repairs should be made only with original spare parts. Each micro inverter should be protected by a circuit breaker, but central disconnect protection is not required unless specified by national standards, or by the responsible network operator. Model:TX-242 Article No. 5065, 03/2023...
-
Page 18: Technical Specifications
55-65 (under 60Hz @ 220 V & 230 V) Power factor >0.99 standard 0.8 leading..0.8 delayed Output current harmonic distortion ≤3% Maximum number of devices in series Efficiency, safety and protection Peak efficiency 96.70% CEC weighted efficiency 96.50% MPPT rated efficiency 99.80% Model:TX-242 Article No. 5065, 03/2023... -
Page 19: Support
The support hotline is available Mon-Fri from 9am to 1pm & 2pm to 5pm Declaration of Conformity The EU Declaration of Conformity can be requested at the following address: www.technaxx.de/ (in the lower bar "Declaration of Conformity"). Disposal Disposal of the packaging. Sort packaging materials by type upon disposal. - Page 20 For this reason, electrical devices are marked with the symbol shown here. Made in China Distributed by: Technaxx Deutschland GmbH & Co. KG Konrad-Zuse-Ring 16-18, 61137 Schöneck, Germany PV Micro Inverter 800W TX-242 Model:TX-242 Article No. 5065, 03/2023...
Need help?
Do you have a question about the TX-242 and is the answer not in the manual?
Questions and answers