
Subscribe to Our Youtube Channel
Related Manuals for YOSUDA RW207-01


Summary of Contents for YOSUDA RW207-01
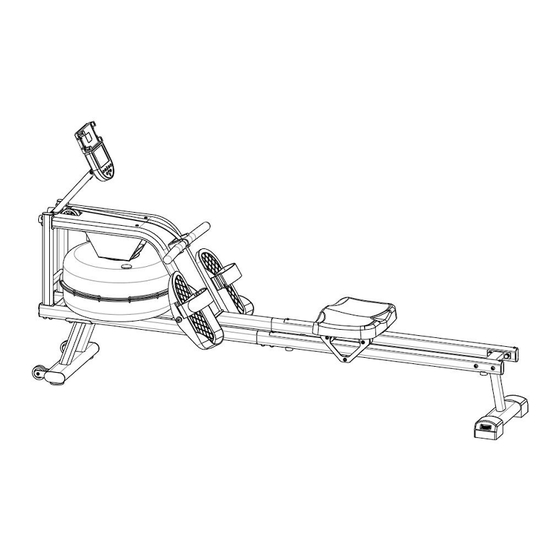
- Page 1 YOSUDA Water Rowing Machine-RW207-01 Installation & Operation Instructions Please read the instruction manual before installing and using the product...
-
Page 2: Table Of Contents
TABLE OF CONTENTS Safety Attentions & Warning Descriptions............3 Container Loading List..................4 Installation instructions..................5 Training instruction chart...................10 Training Introductions..................11 MONITOR......................13 Accessory Kit......................15 Explosion Diagram....................16 Parts List .......................17 2... -
Page 3: Safety Attentions & Warning Descriptions
Safety Attentions & Warning Descriptions Please keep the instruction manual properly for future inquiry. 1. Before assembling and using the training equipment, it is very important to carefully read all the contents of the instruction manual. Only the correct installation, maintenance and use of the training equipment can achieve a safe and effective training effect. -
Page 4: Container Loading List
Container Loading List Main frame assembly Front stabilizer assembly Rear stabilizer assembly Electronic monitor support assembly Left and right foot pedal Cushion assembly Limit mat Right-slide rail assembly E-meter Accessory kit Left -slide rail assembly Water pump Funnel 4... -
Page 5: Installation Instructions
Installation instructions 1. Take out the screw M8*40 (50) 4PCS, washer (13) 4PCS, spring washer φ 8 (51) 4PCS, nut M8 (52) 4PCS from the accessory kit, use the allen wrench #5 (86), and cross wrench (85) to lock the right-slide rail (H), left-slide rail (K), and rear stabilizer (C) together, please note not to lock them too tightly. - Page 6 3. After installed the cushion assembly (F) in step 2, turn it upside down. Then take out the limit mat (G) and the hexagonal socket head screws M6*16 (55) 2PCS from the kit. Install the limit mat to the slide rail with allen wrench #5 (86).
- Page 7 5. Take out the hexagonal pan head screw M8*30 (87)4PCS, spring washer φ 8 (51)4PCS, and wave gaskets (35)4PCS from the accessory kit. Lock the front assembly and rear assembly together with allen wrench # 5 (86), and lock the unlocked screws in step 1 tightly at the same time. 6.
- Page 8 7. Install left and right pedals. Take out the foot p (45) 2PCS from the accessory kit, then use edal spindle allen wrench # 5 (86) to install the left and right foot pedals (E) to the main frame. Please note the difference between the left and right pedals.
- Page 9 9. Remove the tank plug(S) from the upper tank. 10. Fill water according to the diagram shows. Insert the pump (R) into the tank, then fill the tank with the pump (R) and the bucket. Measure the amount of water in the tank by referring to the digit mark on the side of the tank.
-
Page 10: Training Instruction Chart
Training instruction Chart Starting position Straighten your arms forward, relax your shoulders, raise your head, look forward, and compress your feet and lower legs vertically. Sliding process Grasp the arm with your hands, keep your body in the correct position and angle , slowly open your legs and climb forward. -
Page 11: Training Introductions
Training Introductions The use of this product can not only enhance the physique and exercise muscles, but also through a reasonable diet with the effect of weight loss. 1. Warm-up before training This stage of warm-up exercises can enhance the blood circulation of the trainer's body , make the muscles reach a good training condition, while reducing the risk of cramping or muscle strain during training. - Page 12 To keep the heart rate within the corresponding target range, train for at least 12 minutes. Most people start training for 15-20 minutes. Recovery phase after training In this recovery stage, repeat the activities done in the preparation stage. In the process, the amplitude and speed of exercise can be appropriately reduced for about 5 minutes.
-
Page 13: Monitor
MONITOR 1: Display Effect Diagram: 2: Key Function: Switch on and off (long press for 3 seconds to power off, short press to power on) NO/OFF MODE Set mode switch ▲(UP) Set value increased ▼(DOWN) Set value reduced Short press to clear the current value, and long press for 3 seconds to clear all RESET values Displays cumulative calories burned... - Page 14 4: Function shortcut buttons: (1) Press and hold the KM/ML button for 3 seconds to switch the sports mile mode. (2) Press and hold the RESET button for 3 seconds to clear the last exercise data, and short press the RESET button to clear the current setting data.
-
Page 15: Accessory Kit
Accessory Kit 15... -
Page 16: Explosion Diagram
Explosion Diagram 16... -
Page 17: Parts List
PARTS LIST Part Name Instruction Water tank mouth plug silica gel/A-φ30.5black Cross recessed pan head screws M3x20xΦ6 Stainless steel grade 8.8 with gasket Water tank top cover φ440*100 (with two round holes) Paddle φ391.3*132 Water tank seal ring φ423*7 Hardness 80 degrees Water tank lower cover φ440*100 (No round holes) Nylon nut... - Page 18 Front support assembly End cap Equipped with an 80 * 40 elliptical tube Adjust the foot pad Internal hexagonal head screw M8×65×25×S5 Pedal spindle Left foot Tie foot woven belt combination Right foot Main frame assembly Screw M8*40 M8*40*S5 Spring washer φ8 Nut M8 Edgings Limit pad...
- Page 19 Screw M8*30 M8*30*S5 Open-type core rivet 3.2*9 19...
Need help?
Do you have a question about the RW207-01 and is the answer not in the manual?
Questions and answers