Advertisement
Quick Links
012-07227A
Introduction
Due to problems of technique and apparatus, demonstrations of electrostatic phenomenon have
traditionally been limited to the simplest experiments using the most elementary equipment.
Moreover, the traditional demonstrations usually gave qualitative rather than quantitative results.
PASCO has attempted to remedy this by designing the complete ES-9079 Basic Electrostatics
system. This guide will give the instructor enough of a step-by-step explanation to master
demonstration techniques. The range of demonstrations in this guide more than covers the material
usually presented in an undergraduate unit on electrostatics.
There are several essential principles of electrostatic demonstrations that should be remembered.
• Read the first section of this manual regarding theory and use of the electrostatic accessories.
• Equipment orientations - Arrange the apparatus to be used so that it is sufficiently separated and
neatly arranged to insure that the students can clearly see the set-up. Each demonstration
includes a diagram of suggested equipment set-up. A preferred set-up would also use a
computer with a Science Workshop interface to display the readings from the Electrometer (ES-
9078) in a computer screen that all can easily see. (You can use an analog display, for example,
to show the deflections of the needle; or a digits display to show the voltage.) If a computer is
not available, set the demonstration electrometer upright to allow the meter to be seen more
easily. Always consider how the equipment arrangement may affect charge distributions. For
example, a misplaced power supply can easily change the charge distribution on a nearby
sphere. Finally, always stand behind the demonstration table to avoid obstructing anyone's
view.
• Earth grounds - Although it is not always strictly necessary, the demonstrator should be
connected to an earth ground. Stray charges on the demonstrator can cripple an experiment.
Also keep the electrometer grounded unless specific instructions are given to the contrary.
• Avoid unnecessary movement - If the demonstrator walks around or waves his/her arms
excessively, charge can build up in clothing and affect the results.
• Humidity - The PASCO demonstration electrometer has been designed to minimize the effects
of humidity. However, a particularly humid day can cause charges to leak off various apparatus,
radically changing the charge distribution. To help minimize leakage, keep all equipment free of
dust and oil (e.g. from fingerprints). On the other hand, a particularly dry day can cause charge
to easily build up in any moving object, including people. Minimize all movement when
demonstrating on a very dry day.
• Practice - Nothing can ruin the instructive value of a demonstration more than failure due to a
demonstrator unfamiliar with the equipment and procedure.
Before presenting a series of electrostatic demonstrations, the student (and of course, the instructor)
should be made aware of the following:
Basic Electrostatics System
1
Advertisement

Related Manuals for Pasco Scientific ES-9079


Summary of Contents for Pasco Scientific ES-9079
- Page 1 Moreover, the traditional demonstrations usually gave qualitative rather than quantitative results. PASCO has attempted to remedy this by designing the complete ES-9079 Basic Electrostatics system. This guide will give the instructor enough of a step-by-step explanation to master demonstration techniques.
- Page 2 Equipment Included: • ES-9078* Basic Electrometer • ES-9077* Electrostatics Voltage Source • ES-9079* Basic Variable Capacitor • ES-9057B Charge Producers and Proof Plane • ES-9042A Faraday Ice Pail and Shield • ES-9059B Conductive Spheres...
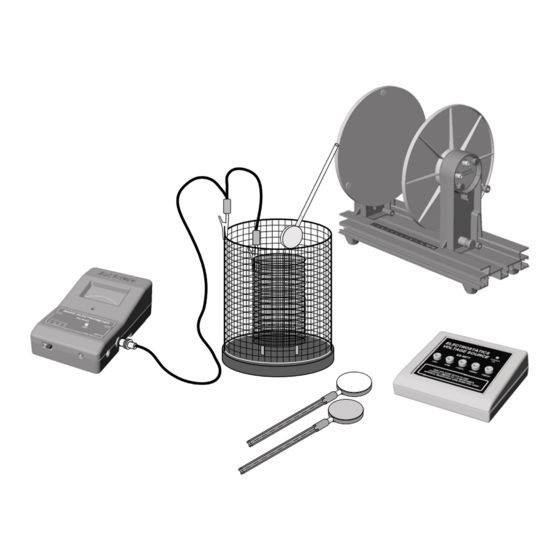
- Page 3 012-07227A Basic Electrostatics System Theory ES-9042A Faraday Ice Pail The PASCO Faraday Ice Pail (ES-9042A) is shown shield in Figure 1. Originally designed by Michael Faraday, it works on the principle that any charge placed pail inside a conducting surface will induce an equal insulators charge on the outside of the surface.
- Page 4 Basic Electrostatics System 012–07227A sphere and insulating rods should be kept free of dirt, grease, and fingerprints to minimize leakage of charge from the sphere. ES-9077 Electrostatics Voltage Source The ES-9077 is a high voltage, low current power supply designed exclusively for experiments in ground electrostatics.
-
Page 5: Operation
012–07227A Basic Electrostatics System ES-9078 Electrometer ZERO button, ground meter display The Model ES-9078 is a voltmeter used for and remove excess charge direct measurements of voltage and indirect measurements of current and charge. Because W, it of its high (“infinite”) impedance of 10 mechanical zero output signal is especially suited for measuring charge in... - Page 6 Basic Electrostatics System 012–07227A Setup 1. Before turning on the electrometer, check that the meter reads zero. If not, turn the Mechanical Zero Adjust screw, located just below the meter face, until it does. 2. Connect the test lead to the input connector of the electrometer. 3.
- Page 7 012–07227A Basic Electrostatics System Here are some guidelines in the proper use and care of the charge producers that are important to remember: • If a zero charge is desirable, discharge the charge producers by touching the conductive disk to ground. To be sure the disk is fully discharged, gently breathe on the non conductive neck.
- Page 8 YES! Variable Capacitor (ES-9079) surface of the surface of the The PASCO experimental variable capacitor...
-
Page 9: Demonstration 1: Faraday Ice Pail And Charge Production
012–07227A Basic Electrostatics System Demonstration 1: Faraday Ice Pail and Charge Production EQUIPMENT NEEDED: —Electrometer —Faraday Ice Pail —Charge Producers —Test Leads —Earth Ground Connection —Proof Plane (optional) Suggestions for Introducing the Experiment Start by showing that the electrometer is directly measuring potential difference by connecting a battery to it and measuring its voltage. - Page 10 Basic Electrostatics System 012–07227A convenient to keep yourself grounded, by touch both at lift from pail, then continuously resting one hand on the upper the same time from shield edge of the shield, or by direct contact with the earth-ground connector. NOTE: Make sure the electrom- eter is connected to an earth- ground, or the pail will not be...
- Page 11 012–07227A Basic Electrostatics System 6. Push the zero button to remove any residual charge. Now insert the object again, but let it touch the ice pail. Make sure your students know and see that you are touching the ice pail with the charged disk this time. 7.
-
Page 12: Demonstration 2: Charge Distribution
Basic Electrostatics System 012–07227A 3. Try rubbing the blue material with a proof plane. Measure the magnitude and polarity of the charges produced. 4. Construct a list of materials such that if a material lower in the list is rubbed with a material higher in the list, the higher material is always positive. - Page 13 012–07227A Basic Electrostatics System may observe that everywhere on the surface the charge has the same magnitude and sign. This occurs for uniform charge distribution. An important aspect of measuring charge distributions is charge conservation. The proof plane removes some charge from the surface it samples. If the proof plane is grounded after each measurement, the surface will be depleted of charge with consecutive measurements.
- Page 14 Basic Electrostatics System 012–07227A Analysis 1. What produced the charge distributions at each step of the experiment? 2. Why did any charge remain on the second sphere even after it was grounded? Extra Things to Try 1. To show that the charge on a conductor always resides on the outside surface, bend a flexible sheet of metal into a cylinder.
Need help?
Do you have a question about the ES-9079 and is the answer not in the manual?
Questions and answers