Table of Contents
Advertisement
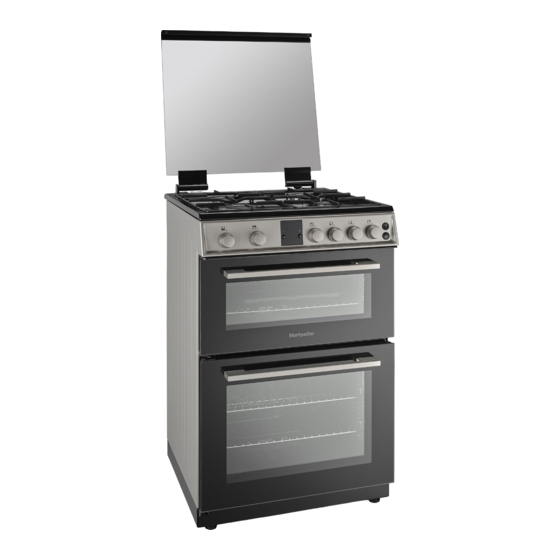
60cm Gas Freestanding Double Oven.
MDOG60LW/K/S - White/Black/Silver
Please read these instructions carefully before attempting to install or use this appliance.
We recommend that you keep these instructions in a safe place for future reference.
THE PERFECT BALANCE OF FUNCTION AND STYLE
LAUNDRY - DISHWASHING - COOKING - COOLING
Installation and Operating Instructions
Advertisement
Table of Contents

Related Manuals for montpellier MDOG60LS


Summary of Contents for montpellier MDOG60LS
- Page 1 THE PERFECT BALANCE OF FUNCTION AND STYLE LAUNDRY - DISHWASHING - COOKING - COOLING Installation and Operating Instructions 60cm Gas Freestanding Double Oven. MDOG60LW/K/S - White/Black/Silver Please read these instructions carefully before attempting to install or use this appliance. We recommend that you keep these instructions in a safe place for future reference.
- Page 2 Welcome Thank you for choosing this Montpellier appliance. Our appliances have been designed to provide you with the best combination of style, reliability and performance to give you years of trouble-free use. You may be familiar with a similar product, but please take time to read these instructions carefully before installing or using your appliance to ensure you get the most from your purchase.
-
Page 3: Table Of Contents
CONTENTS 1.SAFETY INSTRUCTIONS ....................4 1.1 General Safety Warnings ....................4 1.2 Installation Warnings ......................7 1.3 During Use ........................8 1.4 During Cleaning and Maintenance ................10 2.INSTALLATION AND PREPARATION FOR USE ............11 2.1 Instructions for the Installer ..................12 2.2 Installation of the Cooker ....................12 2.3 Gas Connection ......................12 2.4 Gas Conversion (If required) ..................14 2.5 Electrical Connection and Safety..................15... -
Page 4: Safety Instructions
1. SAFETY INSTRUCTIONS • Carefully read all instructions before using your appliance and keep them in a convenient place for reference when necessary. • This manual has been prepared for more than one model therefore your appliance may not have some of the features described within. - Page 5 • For models which incorporate a hob lid, clean any spillages off the lid before use and allow the cooker to cool before closing the lid. • Do not operate the appliance with an external timer or separate remote-control system. WARNING: To prevent the appliance tipping, the stabilising brackets must be installed.
- Page 6 • Your appliance is produced in accordance with all applicable local and international standards and regulations. • Maintenance and repair work should only be carried out by authorised service technicians. Installation and repair work that is carried out by unauthorised technicians may be dangerous.
-
Page 7: Installation Warnings
1.2 inStallation WarninGs • Do not operate the appliance before it is fully installed. • The appliance must be installed by an authorised technician. The manufacturer is not responsible for any damage that might be caused by incorrect placement and installation by unauthorised people. -
Page 8: During Use
1.3 DurinG uSe • When you first use your oven you may notice a slight smell. This is perfectly normal and is caused by the insulation materials on the heater elements. We suggest that, before using your oven for the first time, you leave it empty and set it at maximum temperature for 45 minutes. - Page 9 • Do not place heavy or flammable items (e.g. nylon, plastic bags, paper, cloth, etc.) into the drawer. This includes cookware with plastic accessories (e.g. handles). • Do not hang towels, dishcloths or clothes from the appliance or its handles. •...
-
Page 10: During Cleaning And Maintenance
1.4 DurinG CleaninG anD MaintenanCe • Make sure that your appliance is turned off at the mains before carrying out any cleaning or maintenance operations. • Do not remove the control knobs to clean the control panel. • To maintain the efficiency and safety of your appliance, we recommend you always use original spare parts and to call our authorised service agents when needed. -
Page 11: Installation And Preparation For Use
2. INSTALLATION AND PREPARATION FOR USE Emptying of burned gases from the WARNING : This appliance must be installed by an authorised service environment person or qualified technician, according to the instructions in this guide Gas appliances expel burned gas waste and in compliance with the current local to the outside air, either directly or via a regulations. -
Page 12: Instructions For The Installer
General instructions • If a cooker hood or cupboard is to be installed above the appliance, the safety • After removing the packaging material distance between cooktop and any from the appliance and its accessories, cupboard/cooker hood should be as per ensure that the appliance is not the manufacturers guidelines. - Page 13 • The seals used during connection should Points that must be checked during also be approved to be used in gas flexible hose assembly connections. Do not use plumbing seals for gas connections. • If the gas connection is made by a flexible hose fixed onto the gas inlet •...
-
Page 14: Gas Conversion (If Required)
2.4 GaS ConverSion Grill burner Screw (IF REQUIRED) Your appliance is designed to be operated with LPG/NG gas. The gas burners can be adapted to different types of gas, by replacing the corresponding injectors and adjusting the minimum flame length suitable to the gas in use. -
Page 15: Electrical Connection And Safety
Thermostatic oven valve Adjusting the minimum flame position First of all, make sure that the appliance is unplugged from the mains electrical supply and that the gas feed is open. The minimum flame position is adjusted with a flat screw located on the valve. -
Page 16: Anti-Tilting Kit
During installation, please ensure The document bag contains an that isolated cables are used. An incorrect anti-tilting kit. Loosely attach the anti- connection could damage your appliance. If the tilting bracket (1) to the wall using the mains cable is damaged and needs to be screw (2) and wall plug (3), following the replaced this should be done by a qualified measurements shown in the figure and... -
Page 17: Product Features
3. PRODUCT FEATURES Important: Specifications for the product vary and the appearance of your appliance may differ from that shown in the figures below. List of Components 1. Cooktop 2. Control Panel 3. Top Oven Door Handle 4. Top Oven Door 5. -
Page 18: Use Of Product
4. USE OF PRODUCT lines and will avoid any accumulation of unburned gas. Wait 90 seconds before re- igniting an extinguished gas burner. 4.1 uSe of GaS burnerS Oven / Grill Burners Ignition of the Burners Regardless of the model of your appliance, The position symbol above each control all oven burners are equipped with a gas knob indicates the burner that the knob... -
Page 19: Main Oven Controls
• Do not allow pan handles or any other cooking utensils to project over the edge of the cooker top. Crown Spark plug Burner Circular Saucepan To switch the hob burners off, turn the hob Base burner knob clockwise to the ‘0’ position or so that the marker on the hob burner knob points upwards. -
Page 20: Top Oven Controls
Preheating Do not place baking trays directly on • We recommend you preheat the oven the oven base as it interferes with the for 10 minutes before use. For recipes oven air circulation and can lead to needing high temperatures, such as bread, base burning. - Page 21 Cooking Grilling • The grill burner creates a constant heat • Ensure that food is placed centrally on source and cannot be adjusted between the shelf and that there is sufficient room the maximum and minimum positions. around the baking tray / dish to allow for When switching the grill burner off, turn maximum circulation.
-
Page 22: Use Of The Digital Minute Minder
4.5 uSe of the DiGital Minute Sound Adjustment MinDer. To adjust the volume of the audible warning sound, while the current time of day is displayed, press and hold the “-” button for Time Adjustment 1-2 seconds until an audible signal sounds. After this, each time the “-”... -
Page 23: Cleaning And Maintenance
5. CLEANING AND Catalytic Cleaning MAINTENANCE • Catalytic liners are installed within the oven cavity. These are the matte- finished, light-coloured panels on the 5.1 CleaninG sides and/or the matte-finished panel at the rear of the oven. They work by collecting any grease and oil residue WARNING: Switch off the appliance during cooking. - Page 24 Cleaning the Gas Hob Cleaning the Stainless Steel Parts • Clean the gas hob on a regular basis. • Clean the stainless steel parts of your • Take off the pan supports, caps and appliance on a regular basis. crowns of the hob burners. •...
- Page 25 Removal of the Oven Door Removal of the Inner Glass Before cleaning the oven door glass, You must remove the oven door glass you must remove the oven door, as before cleaning, as shown below. shown 1. Push the glass in the direction of B and below.
-
Page 26: Maintenance
5.2 MaintenanCe Removal of the Wire Racks To remove the wire rack, pull the wire rack as shown in the figure. After releasing it from the clips (a), lift it up and out of the WARNING: The maintenance of this locating holes. -
Page 27: Troubleshooting & Transport
6. TROUBLESHOOTING & TRANSPORT 6.1 troubleShootinG If you still have a problem with your appliance after checking these basic troubleshooting steps, please contact an authorised service person or qualified technician. Problem Possible Cause Solution The oven and/or grill may be in the ´off` position. -
Page 28: Transport
There is foreign matter caught between the timer buttons. Remove the foreign matter and try again. The timer buttons cannot be pressed Touch model: there is moisture on the Remove the moisture and try again. control panel. properly. Check whether the key lock function is set. The key lock function is set. -
Page 29: Technical Specifications
7. TECHNICAL SPECIFICATIONS 7.1 injeCtor table G30 28-30 mbar 12,3 kW 894,4 g/h G30/G31 II2H3+ GB Class:1 G20 20 mbar 28-30/37 mbar LARGE BURNER DIA. of INJECTOR (1/100mm) NOMINAL RATING (KW) CONSUMPTION 276 l/h 218,1 g/h MEDIUM BURNER DIA. of INJECTOR (1/100mm) NOMINAL RATING (KW) 1,75 1,75... -
Page 30: Energy Fiche
7.2 enerGy fiChe Brand Model MDOG60LW MDOG60LK MDOG60LS Type of Oven Mass 49,2 Energy Efficiency Index - conventional 105,0 Energy Efficiency Index - fan forced Energy Class Energy consumption (gas) - conventional MJ/cycle - 4,86 kWh/cycle 1,35 Energy consumption (gas) - fan forced... - Page 31 Brand Model MDOG60LW MDOG60LK MDOG60LS Type of Hob Number of Cooking Zones Heating Technology-1 Size-1 Auxiliary Energy Efficiency-1 Heating Technology-2 Size-2 Semi-Rapid Energy Efficiency-2 59,0 Heating Technology-3 Size-3 Semi-Rapid Energy Efficiency-3 59,0 Heating Technology-4 Size-4 Rapid Energy Efficiency-4 57,0 Energy Efficiency of Hob...
- Page 32 Your 2 year Manufacturer's guarantee THIS DOES NOT AFFECT YOUR STATUTORY RIGHTS. Your new Montpellier appliance carries a free guarantee which protects you against the cost of repairs during the first 24 months from date of purchase provided that: Any claim is accompanied by evidence of the model reference, model serial number and proof of purchase, such as a Sales Receipt, showing that the appliance was purchased within the 24 months prior to the date of claim.
- Page 33 Montpellier Domestic Appliances Ltd. Unit 1, Tewkesbury Retail Park, Northway Lane, Tewkesbury, Gloucestershire GL20 8JU www.montpellier-appliances.com The symbol on the product or on its packaging indicates that this product may not be treated as household waste. Instead it shall be handed over to the applicable collection point for the recycling of electrical and electronic equipment. By ensuring this product is disposed of correctly, you will help prevent potential negative consequences for the environment and human health, which could otherwise be caused by inappropriate waste handling of this product.
Need help?
Do you have a question about the MDOG60LS and is the answer not in the manual?
Questions and answers