Hitachi PC-ARFG2-A Operation Manual
Advanced color wired remote controller
Hide thumbs
Also See for PC-ARFG2-A:
- Operation manual (56 pages) ,
- Installation & maintenance manual (46 pages)

Subscribe to Our Youtube Channel
Related Manuals for Hitachi PC-ARFG2-A


Summary of Contents for Hitachi PC-ARFG2-A
- Page 1 – OPERATION MANUAL – Advanced Color Wired Remote Controller MODELS Conference Room PC-ARFG2-A PC-ARFG2-M PC-ARFG2-U Temp Cool Fan Speed Louver Menu ORIGINAL INSTRUCTIONS A16381TMEU...
-
Page 2: Table Of Contents
Table of Contents Table of Contents 1. Safety Summary ................................1 2. Setting Names and Functions ............................4 3. Operation Method ................................5 3.1 Basic Procedures ..............................5 3.2 Operation Mode (Cool, Heat, Dry, Cool/Heat Auto and Fan Operation) ..............6 3.3 Temperature Setting ..............................6 3.4 Fan Speed Setting ..............................7 3.5 Louver Swing Direction ............................8 3.6 Operation ................................9... -
Page 3: Safety Summary
Use only Johnson Controls-Hitachi Air Conditioning recommended, provided as standardized, or replacement parts. • Johnson Controls-Hitachi Air Conditioning will not assume any liability for injuries or damage caused by not following steps outlined or described in this manual. Unauthorized modifications to Johnson Controls-Hitachi Air Conditioning products are prohibited as they…... - Page 4 1. Safety Summary Take the following precautions to reduce the risk of property damage. • Do not touch the main circuit board or electronic components in the controller or remote devices. Make sure that dust and/or steam does not accumulate on the circuit board. •...
- Page 5 When shielded cabling is applied, proper bonding and termination of the cable shield is required as per Johnson Controls-Hitachi Air Conditioning guidelines. Plenum and riser ratings for communication cables must be considered per application and local code requirements.
-
Page 6: Setting Names And Functions
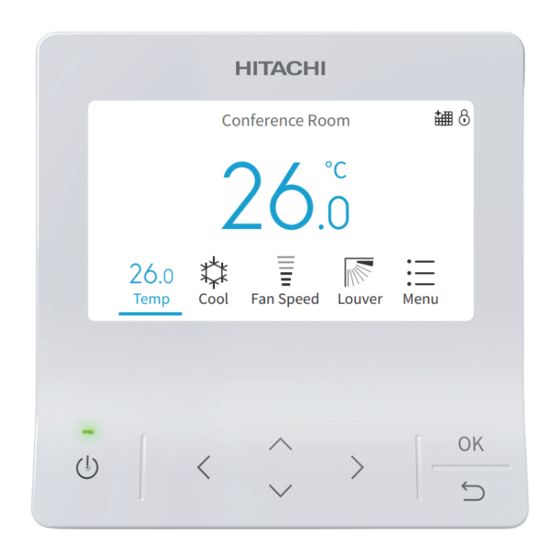
2. Setting Names and Functions 2. Setting Names and Functions The figure below shows all the functions for reference. The actual display during operation is different. Display Part Room Name Conference Room Set Temperature Louver Direction Operation Mode Temp Fan Speed Louver Menu Cool... -
Page 7: Operation Method
3. Operation Method 3. Operation Method 3.1 Basic Procedures 1. Air Conditioner ON. 2. Air Conditioner OFF When air conditioner is off, press " " or " " to switch below items: "Temperature" ↔ "Mode" ↔ "Fan Speed" ↔ "Menu" . Temperature Mode Main... -
Page 8: Operation Mode (Cool, Heat, Dry, Cool/Heat Auto And Fan Operation)
3. Operation Method 3.2 Operation Mode (Cool, Heat, Dry, Cool/Heat Auto and Fan Operation) Heat mode is only available when the indoor unit supports cooling and heating. Cooling only machine cannot support heating. 1. Operation mode setting Step1. Press " " or " " to select "Mode". Mode Cool Temp... -
Page 9: Fan Speed Setting
3. Operation Method 3.4 Fan Speed Setting 1. This function is used to set fan speed. Step1. Press " " or " " and select "Fan Speed". Fan Speed Temp Cool Fan Speed Louver Menu Step2. By pressing " " or " ", the fan speed changes as follows. High2 ∧... -
Page 10: Louver Swing Direction
3. Operation Method 3.5 Louver Swing Direction 1. This function is used to set the louver direction. Step1. Press " " (On/Off). Make sure that the air conditioner is ON. Press " " or " " and select "Louver". Step2. By pressing " " or " ", the louver direction changes as below diagram, and the direction of different types of louver is displayed differently. -
Page 11: Operation
3. Operation Method 3.6 Operation NOTES: • Once the temperature and Fan speed settings are set, the setting status is stored and does not need to be reset. • To change the settings, refer to Page 6 and Page 7 . 3.6.1 Operation Start 1. -
Page 12: Icon Description
3. Operation Method 3.7 Icon Description The status of the remote controller is displayed on the operation screen. NOTES: • It may not be displayed depending on the type of outdoor unit or indoor unit you are using. • If there are multiple status, the high priority icon is displayed first. Icon Description A schedule timer is set. - Page 13 3. Operation Method Icon Description This is the main remote controller setting. Main Use the main remote controller to set the main power savings setting. In the case of a single unit, the main does not light up. Sub remote controller is set. Except for some power savings functions, the sub remote controller cannot be set to save power.
-
Page 14: Menu Operation
4. Menu Operation 4. Menu Operation NOTE: • The settings for the function with " " displayed is not available. Press " " or " " at home screen to select "Menu". Menu (Mon) 16:30 Function Menu Screen Display Setting Service &... -
Page 15: Function Menu Screen Display
5. Function Menu Screen Display 5. Function Menu Screen Display Various function settings are shown in this chapter. For how to enter the Menu screen, please refer to "4. Menu Operation". NOTES: • Some functions cannot be set depending on the type, configuration, and usage status of the indoor unit. •... -
Page 16: Simple Timer Setting
5. Function Menu Screen Display 5.1 Simple Timer Setting This function is used to start or stop the unit operation at the set time. The timer operation contents can be set from "Not Used", "Once", or "Everyday". NOTES: • If "Once" on the timer operation setting is selected, the setting content changes automatically to "Not Used" after one timer operation. -
Page 17: Operation Schedule Setting
5. Function Menu Screen Display 5.2 Operation Schedule Setting This function is used to start or stop the unit operation at the set time. The temperature can be set during operation. The operation schedule can be set up to 5 times a day on each day of the week. Operation Schedule (Mon) 16:30 Verify Operation Schedule... - Page 18 5. Function Menu Screen Display 5.2.1 Schedule Day and Time Setting NOTES: • Scheduled operation (stop) is not possible when the remote control is prohibited. • When is displayed, scheduled operation (stop) is not available. • Refer to "6.1 Adjusting Date/Time" to set the date and time. 1.
- Page 19 5. Function Menu Screen Display 5.2.2 Schedule Turn ON/OFF Setting 1. Set schedule ON / OFF Step1. Select "Operation Schedule" on the "Function Menu" Function Menu (Mon) 16:30 screen and press "OK". Simple Timer • Operation Schedule If the current time is not set, the "Adjusting Date/ Power Savings Setting Time"...
- Page 20 5. Function Menu Screen Display 5.2.3 Schedule Holiday Setting NOTE: • For holiday setting, the schedule setting indicator turns off. 1. Set schedule holiday Step1. Select "Operation Schedule" on the "Function Menu" Function Menu (Mon) 16:30 screen and press "OK". Simple Timer •...
- Page 21 5. Function Menu Screen Display 5.2.4 Reset the Setting 1. Reset the setting Step1. Select "Operation Schedule" on the "Function Menu" Function Menu (Mon) 16:30 screen and press "OK". Simple Timer • Operation Schedule If the current time is not set, the "Adjusting Date/ Power Savings Setting Time"...
-
Page 22: Power Savings Setting
5. Function Menu Screen Display 5.3 Power Savings Setting Item Description ① Suppress the heating and cooling capacity of the indoor unit. Capacity Control Set control mode and power savings level with its corresponding value. ② Interlock with indoor units of the same outdoor unit system and switch to FAN operation in sequence. Rotation Control Set control mode and fan mode time. - Page 23 5. Function Menu Screen Display 5.3.2 Power Savings ON/OFF Setting 1. Set the power savings ON/OFF Function Menu (Mon) 16:30 Simple Timer Step1. Select "Power Savings Setting" on the "Function Menu" Operation Schedule screen and press "OK". Power Savings Setting Night Quiet Operation Power Saving/Night Quiet Schedule Select...
- Page 24 5. Function Menu Screen Display 5.3.3 Power Savings Level Setting 1. Set the power savings level Function Menu (Mon) 16:30 Step1. Select "Power Savings Setting" on the "Function Menu" Simple Timer screen and press "OK". Operation Schedule Power Savings Setting Night Quiet Operation Power Saving/Night Quiet Schedule Select...
-
Page 25: Night Quiet Operation
5. Function Menu Screen Display 5.4 Night Quiet Operation This function restricts the operation noise of the outdoor unit. NOTES: • This cannot be set if the sub remote controller or outdoor unit does not support power savings. • It is possible to change the operation noise reduction function setting of the outdoor unit by making the following operation noise reduction settings. -
Page 26: Power Saving/Night Quiet Schedule Setting
5. Function Menu Screen Display 5.5 Power Saving/Night Quiet Schedule Setting This function starts and stops power savings control and operation noise reduction control at the desired time. Power saving/night quiet schedule settings can be set up to five times a day on each day of the week. The power savings schedule controls the schedule set in the power savings mode setting. - Page 27 5. Function Menu Screen Display 5.5.1 Schedule Day and Time Setting NOTE: • indicates that schedule control is not possible. Refer to "6.1 Adjusting Date/Time" to set the date and time. 1. Set the schedule day and time Function Menu (Mon) 16:30 Step1.
- Page 28 5. Function Menu Screen Display 5.5.2 Schedule Turn ON/OFF Setting 1. Turn ON / OFF the schedule Step1. Select "Power Saving/Night Quiet Schedule" on the Function Menu (Mon) 16:30 "Function Menu" screen and press "OK". Simple Timer • If the sub remote controller or indoor unit does not Operation Schedule support power savings, the power saving schedule Power Savings Setting...
-
Page 29: Power Consumption Display
5. Function Menu Screen Display 5.6 Power Consumption Display This function displays the power consumption of the outdoor unit compressor. The value of each displayed in Graph/List format is 1 day (24h (- every 2 hrs.)), 1 week (7 days), and 1 year (12 months). -
Page 30: Autoboost Setting
5. Function Menu Screen Display 5.7 Autoboost Setting The function is used to increase the cooling and heating capacity in 30 minutes once the operation starts. This function is only available when the operation mode is Cool or Heat. The unit starts each time in quick mode until the setting is canceled. NOTES: •... -
Page 31: Comfort Setting
5. Function Menu Screen Display 5.8 Comfort Setting This function is used to control discharge or supply air temperature when in the cooling mode. NOTES: • This function cannot be set when the indoor unit does not support this function. •... -
Page 32: Setback Setting
5. Function Menu Screen Display 5.9 Setback Setting 1. Setback schedule setting This function is used to start/stop setback mode at desired time. It is available only when setback mode is set as Schedule mode. To change the setback mode, select another mode at the function selection setting. Contact your distributor for detailed information. - Page 33 5. Function Menu Screen Display 2. Setback manual setting This function is used to temporarily activate Setback operation. It is available only when Setback mode is set as Manual mode; this function is normally used to set a long vacation. The items cannot be set/modified if indoor unit does not support this function.
-
Page 34: Elevating Grille Setting
5. Function Menu Screen Display 5.10 Elevating Grille Setting This function is used to raise and lower grille when the air filter and grille need to be cleaned. It is available only when the elevating grille is equipped with the air panel. When the air inlet grille is set inside the air panel, ensure that the air inlet grille is horizontal and the wire is suspended tightly without loosening. -
Page 35: Filter Reminder Reset Setting
5. Function Menu Screen Display 5.11 Filter Reminder Reset Setting This function is used to turn off the filter reminder indication and to reset the time of use for the filter. 1. Reset the filter reminder time Function Menu (Mon) 16:30 Step1. -
Page 36: Frostwash
5. Function Menu Screen Display 5.12 FrostWash This function suppresses a clog on the heat exchanger. First, freeze the indoor unit heat exchanger when whole system is under stoppage. Then defrost it to remove the dust with drain water. Auto-FrostWash and Manual FrostWash are selectable. NOTES: •... - Page 37 5. Function Menu Screen Display • FrostWash Intervals (Page 36 ) You can set the total operating time of the indoor unit as below. When the total operating time reaches the set value, FrostWash is performed while Function 1 Auto-FrostWash the operation is stopped.
- Page 38 5. Function Menu Screen Display Step3. Press " " or " " to select the setting item and press "OK". FrostWash Setting The item changes as follows: FrostWash Start "FrostWash Start" ↔ "Enable/Disable Auto-FrostWash" Enable/Disable Auto-FrostWash ↔ "Set FrostWash Intervals" ↔ "Auto-FrostWash Set FrostWash Intervals Schedule"...
- Page 39 5. Function Menu Screen Display ③ Set Auto-FrostWash Schedule Step1. Press " " or " " to select "Auto-FrostWash Schedule" and FrostWash Setting press "OK". FrostWash Start • If the current time is not set, the time setting screen Enable/Disable Auto-FrostWash (Page 43 ) is automatically displayed.
- Page 40 5. Function Menu Screen Display 5.12.4 Display in FrostWash In FrostWash, the following is usually displayed If the indoor or outdoor temperature does not in order. meet the conditions for FrostWash, the following is displayed. ① - 1 When the indoor unit is out of the ①...
- Page 41 5. Function Menu Screen Display 5.12.5 FrostWash Operation History NOTES • If the current time is not set, the date will be "- -". • The start time is the time when FrostWash is being prepared. 1. FrostWash operation history Step1.
-
Page 42: Individual Louver Setting
5. Function Menu Screen Display 5.13 Individual Louver Setting This function is to individually set the air direction of multiple air outlets. NOTES: • This function is available when the indoor unit supports individual louvers. • It cannot be set while the air conditioner is stopped. •... - Page 43 5. Function Menu Screen Display Step5. Press" " or " " to select the louver angle and press "OK". 00-00 →Return to Step3. The louver angle is changed as follows. Indv. Indv. Indv. Indv. Adjust air direction & louver angle. Indv.
-
Page 44: Louver Open/Close
5. Function Menu Screen Display 5.14 Louver Open/Close This function is used to fully open louver for adjusting the horizontal (left or right) direction of the air flow. NOTES: • This function cannot be set when the air conditioner is ON. •... -
Page 45: Screen Display Setting
6. Screen Display Setting 6. Screen Display Setting 1. Screen display setting Step1. Select "Screen Display Setting" on the "Menu" screen and Menu (Mon) 16:30 press "OK". Function Menu Screen Display Setting Service & Installation Contact Information Temp Cool Fan Speed Louver Menu Step2. - Page 46 6. Screen Display Setting Step3. Press " " or " " to select "yyyy/mm/dd/hh/mm". Adjusting Date/Time Press " " or " " to change the setting. 2020 Select OK to confirm Back Step4. After making all settings, If select " "...
-
Page 47: Run Indicator Brightness
6. Screen Display Setting 6.2 Run Indicator Brightness 1. Set run indicator brightness Step1. Select "Run Indicator Brightness" on the "Screen Display Screen Display Setting (Mon) 16:30 Adjusting Date/Time Setting" screen and press "OK". Run Indicator Brightness Display Adjustment Temperature Language Setting Select Back... - Page 48 6. Screen Display Setting Step3. Press " " or " " to change the brightness value. Brightness Select " " and press "OK", the screen returns to Step2. Back 6.3.2 Backlight Dim Time 1. Set backlight dim time Screen Display Setting (Mon) 16:30 Step1.
-
Page 49: Temperature
6. Screen Display Setting 6.3.4 Screen Theme 1. Set screen theme Screen Display Setting (Mon) 16:30 Step1. Select "Display Adjustment" on the "Screen Display Adjusting Date/Time Setting" screen and press "OK". Run Indicator Brightness Display Adjustment Temperature Language Setting Select Back Step2. - Page 50 6. Screen Display Setting Step3. Press " " or " " to select unit or width. Press " " or " " to Unit and Width change the setting. • When the unit is selected, it changes as below. F ↔ °C •...
-
Page 51: Language Setting
7. Contact Information 6.5 Language Setting This function is to change the displayed language. Selectable language: Japanese, English(°C), English( F), Simplified Chinese, Traditional Chinese, French, Portuguese, or Spanish. 1. Set display language Screen Display Setting (Mon) 16:30 Step1. Select "Language Setting" on the "Screen Display Adjusting Date/Time Setting"... -
Page 52: Hotel Mode Setting
8. Hotel Mode Setting 8. Hotel Mode Setting When the advanced wired remote controller is set to hotel mode, the home screen and menu are changed. For how to set the hotel mode, refer to "Hotel Mode Setting" in the Installation Manual. •... -
Page 53: Language
8. Hotel Mode Setting Menu (Mon) 16:30 ③ ② Screen Display Setting ④ Reset Controller Setting Main ⑤ More Settings Contact Information Off Timer Fan Speed Louver Language Off Timer Menu ① ① Language Change to the desired language. ② Off Timer Turn off the air conditioner after the desired time. -
Page 54: Off Timer
8. Hotel Mode Setting 8.2 Off Timer NOTES: • "Off timer" can be set even when the air conditioner is stopped. • If the set time is reached during stop, the off timer setting is canceled. • While the wired remote controller is prohibited, "off timer" cannot stop the air conditioner operation. 1. -
Page 55: In Alarm Condition
9. In Alarm Condition 9. In Alarm Condition Indoor unit number (Refrigerant system-address number) 01-02 Alarm Code: When more than one indoor unit is connected, press " " or " " to show other indoor units. MODEL : F .08 TIC4024B21S TVWHR096B32S Alarm Reset... - Page 56 © 2023 Johnson Controls-Hitachi Air Conditioning, Inc. 2023.03 Ver.A Printed in China...
Need help?
Do you have a question about the PC-ARFG2-A and is the answer not in the manual?
Questions and answers