Table of Contents
Advertisement
Quick Links
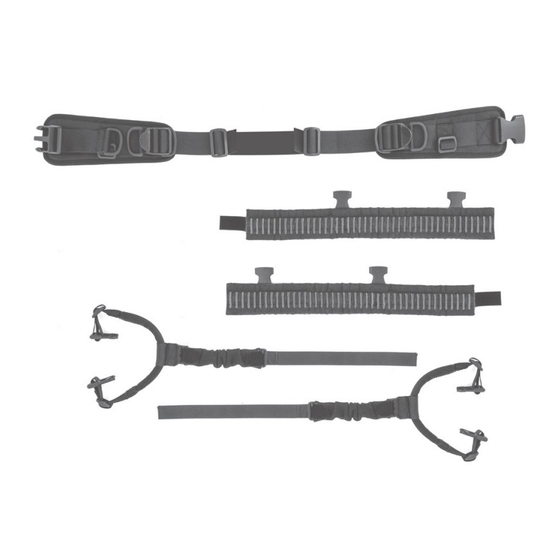
(A)
(B)
(C)
(D)
PL: UWAGA!: Ortezę należy zakładać w pozycji siedzącej.
EN: ATTENTION!: The brace should be put on in a sitting position.
2. PL: Przyłóż pelotę tylną (1) do pleców i zapnij z przodu pas (A) na klamerkę (2).
EN:
Place the back pad (1) against the lower back and fasten the belt (A) on the buckle (2) at the front.
1. PL: Rozepnij ortezę.
EN:
(1)
KOD KATALOGOWY
NAZWA HANDLOWA
MODEL
CODE
TRADE NAME
MODEL
A. Uniwersalny pas nośny z pelotą tylną
/ Universal belt with a back pad
B. System dynamiczny unoszący kolana
/ Knee lifting dynamic system
C. Opaski podrzepkowe /
D. System dynamiczny unoszący opadające stopy
/ Dynamic system lifting the dropping foots
Unfasten the
brace.
(A)
OKD-10 DUAL
ORTEZA KOŃCZYNY DOLNEJ
ORTEZA KOŃCZYNY DOLNEJ OKD-10
OKD-10 DUAL
LOWER-EXTREMITY SUPPORT
LOWER-EXTREMITY SUPPORT OKD-10
Patellar straps
(2)
© Reh4Mat 11/2022
Advertisement
Table of Contents

Related Manuals for REH4MAT OKD-10 DUAL


Summary of Contents for REH4MAT OKD-10 DUAL
- Page 1 KOD KATALOGOWY OKD-10 DUAL NAZWA HANDLOWA ORTEZA KOŃCZYNY DOLNEJ MODEL ORTEZA KOŃCZYNY DOLNEJ OKD-10 CODE OKD-10 DUAL TRADE NAME LOWER-EXTREMITY SUPPORT MODEL LOWER-EXTREMITY SUPPORT OKD-10 A. Uniwersalny pas nośny z pelotą tylną / Universal belt with a back pad B. System dynamiczny unoszący kolana / Knee lifting dynamic system C.
- Page 2 Fasten the strap (C) under the patella by a way that the buckles (6,7) are symmetrically on interlacing the strap (8) through the buckle (9) both sides of the knee. and fasten with Velcro. Close the Velcro fastener (10). © Reh4Mat 11/2022...
- Page 3 EN: ATTENTION!: The lower adjuster should always be at the hook. When putting the brace on the left leg, proceed in the same way as putting the brace on the right leg. © Reh4Mat 11/2022...
- Page 4 EN: Set the desired length and tension of the belt (23) with the adjuster (24). Secure the end of the tape by threading it through the regulator. If necessary, cut off any unnecessary length of tape. Make adjustments on the left and right sides of the belt. 11. PL: Gotowy wyrób. EN: Product is ready to use. © Reh4Mat 11/2022...
Need help?
Do you have a question about the OKD-10 DUAL and is the answer not in the manual?
Questions and answers