Table of Contents
Advertisement
Quick Links
Advertisement
Table of Contents

Related Manuals for QSC LS118


Summary of Contents for QSC LS118
- Page 1 L Class User Manual LS118 Active Subwoofer TD-001679-01-A *TD-001679-01*...
-
Page 2: Table Of Contents
Using the LS118 Integrated Suspension Points . . . . . . . . . . . . . . . . . - Page 3 LS118 Rear Panel User Interface . . . . . . . . . . . . . . . . . .
-
Page 4: Explanation Of Symbols
EXPLANATION OF SYMBOLS The term “WARNING!” indicates instructions regarding personal safety. If the instructions are not followed, the result may be bodily injury or death. The term “CAUTION!” indicates instructions regarding possible damage to physical equipment. If these instructions are not followed, it may result in damage to the equipment that may not be covered under the warranty. -
Page 5: Fcc Statement
• Consult the dealer or an experienced radio/TV technician for help. Warranty For a copy of the QSC Limited Warranty, visit the QSC website at www.qsc.com. NOTE: Read and follow these instructions carefully. If the subwoofer(s) is not suspended properly, it could fall, causing personal injury and damage to the equipment. -
Page 6: Introduction
• Energy-efficient, 3600 W peak power Class D amplifier module with Power Factor Correction and extremely low AC consumption • Acoustic Linear Phase (ALP) design provides complementary coherence between QSC loudspeakers/subwoofers deployed in the same audio system delivering a uniform listening experience across the entire venue. -
Page 7: Features
Features Front Back Right Side Bottom Left Side — Figure 1 — Alignment cups for stacking 2. Four low-noise, heavy-duty casters 3. Amplifier protection/Temporary Weather Shield (TWS) accessory attachment ring 4. Dual M20 threaded socket for 35 mm loudspeaker pole 5. Slip-resistant feet - four on the bottom 6. -
Page 8: Ls118 Ground Deployment
LS118 Ground Deployment The LS1 18 active subwoofer can be used as a single low-frequency acoustic source or in multiples for additional low-frequency reproduction levels. A simple, practical rule-of-thumb is to use one subwoofer for every two top loudspeakers deployed. The simplest setup consists of placing a single subwoofer between a pair of loudspeakers. -
Page 9: Better: Stacked
Better: Stacked Stacking two LS1 18 active subwoofers is similar to the side-by- side arrangement. Place the rear-facing subwoofer on the bottom. Cardiod > Forward Front View (as seen from the audience) Cardiod > Rear Floor — Figure 4 — Good: Side-by Side Cardiod >... -
Page 10: Three-Box Cardioid Systems
Three-Box Cardioid Systems A three-box array, with two forward-facing subwoofers and one rear-facing subwoofer, gives additional acoustic output to the front but with slightly less optimal rear attenuation. Figure 6 is a top view of a back-to-back three-box array. Figure 7 is a front view of a stacked three-box array. Use the bottom subwoofer as the rear-facing one. Cardiod >... -
Page 11: Pole-Mounting Loudspeakers Over A Subwoofer
Pole-Mounting Loudspeakers over a Subwoofer The LS1 18 active subwoofer is equipped with two M20 threaded pole sockets: one on the top, and one on the side. Use the tables below to determine which poles are safe to use with LA108/LA1 12 loudspeakers and an LS1 18 subwoofer in horizontal or vertical orientations. -
Page 12: Ls118 Flown Deployment
• Use only dedicated QSC M10 Eyebolt Kit-S for suspending the subwoofer. Further details can be found below. • Be absolutely certain of the integrity of any structural member intended to support suspended loads. Hidden structural members can have hidden structural weakness. -
Page 13: Using The Ls118 Integrated Suspension Points
Using the LS118 Integrated Suspension Points WARNING!: Only a single LS1 18 can be safely suspended utilizing the QSC M10 Eyebolt Kit-S (sold separately). DO NOT attempt to suspend additional loudspeakers or subwoofers underneath the LS1 18 subwoofer. The LS1 18 has M10 bolt points on both the top and the sides of the subwoofer and can be deployed in either direction, based on the space or visual requirements of the installation. -
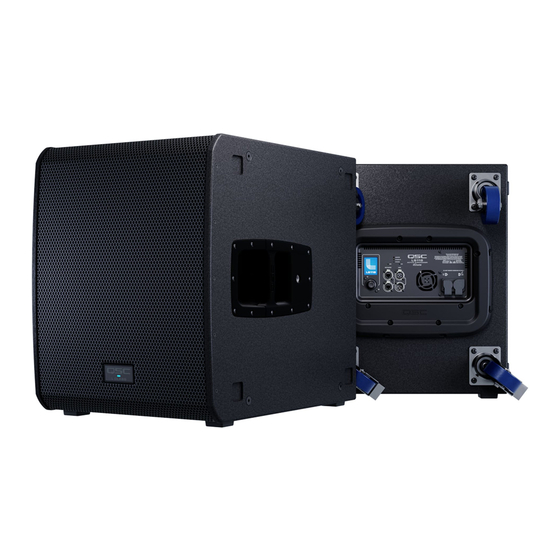
Page 14: Ls118 Rear Panel
LS118 Rear Panel — Figure 9 — Full color screen displays Menus and Settings 2. Rotary encoder to adjust gain, select values, and press for enter 3. Push to enter the Menu, or return to Home Screen from Menu 4. Push to ID subwoofer in SysNav or Q-SYS Ecosystem ™... -
Page 15: System Power
System Power The LS1 18 power module does not include a power switch. This is done to prevent an array from being suspended and a loudspeakers'/subwoofers' power switch inadvertently bumped or left in the off position. To power a subwoofer on/off, either switch the AC supply at the source or twist the AC POWER-IN connector clockwise or counter-clockwise to power each subwoofer on/off. -
Page 16: Daisy Chaining Using Power Cable Jumpers
Neutrik powerCON TRUE1 loop-through cables are not included with LS1 18 subwoofers but may be purchased separately from most professional audio equipment suppliers or from QSC. • LS-KIT-J (International Jumper Kit: includes 2x 120 cm PowerCON jumpers and 2x 120 cm EtherCON jumpers, 1.5 mm /H05VV cables) •... -
Page 17: Power Off Sequence
® ® disconnected. The analog connections can be used alongside a line array that is ethernet connected for QSC SysNav ™ control, as standalone without SysNav control, or as a backup audio connection in the event of digital audio failure. -
Page 18: Daisy Chaining Using Network Jumper Cables
Daisy Chaining using Network Jumper Cables There are two common methods for connecting network devices: a. Star Topology: In this method, each device has its own port on an ethernet switch. This is the most robust method, but it requires a cable home run from each device back to the ethernet switch, which is suitable for permanent installations but challenging for temporary deployments. -
Page 19: Control
Each array of loudspeakers/subwoofers can subscribe to a Dante audio-over-IP Transmitter (TX), sent over the network from common audio sources such as a digital mixing console or a QSC Q-SYS Core. Dante subscriptions can be set up using one of two methods: a. -
Page 20: Ls118 Rear Panel User Interface
2. Press to access the MENU from the HOME screen, or press while in the MENU to return to the HOME screen. 3. Press ID button to identify subwoofer location when connected to QSC SysNav ™ or Q-SYS Ecosystem 4. -
Page 21: Home Screen Status
Blue: Low Pass Filter is engaged (and current setting is displayed in the icon). 80 Hz is the recommended factory default. Grey: Low Pass Filter has been defeated. NOTE: HPF can only be defeated when connected to QSC SysNav. Delay Blue: The onboard Architectural Delay is engaged (0-200 ms). -
Page 22: Menu
LED Mode: Front and Rear lit, Front only, Rear only, Blackout (all out) LCD Brightness: Adjust LCD screen brightness for light or dark environments Network: Displays network IP address and subnet for QSC SysNav connection, as well as IP address, subnet, and TX Source for the Dante network connection. -
Page 23: Dsp Features
LS118 Care and Maintenance The LS1 18 does not contain user-serviceable parts. QSC does not recommend using chemicals or solvents to wash loudspeakers/ subwoofers. Instead, use a damp towel with water only, and dry immediately after wiping down. Do not allow water to pool on the rigging, hardware, or rear user interface. -
Page 24: Ls118 Appendix
Read knowledge base articles and discussions, download software and firmware, view product documents and training videos, and create support cases. https://qscprod.force.com/selfhelpportal/s/ Customer Support Refer to the Contact Us page on the QSC website for Technical Support and Customer Care, including their phone numbers and hours of operation. https://www.qsc.com/contact-us/ Warranty For a copy of the QSC Limited Warranty, visit the QSC, LLC., website at www.qsc.com.
Need help?
Do you have a question about the LS118 and is the answer not in the manual?
Questions and answers