AEG BPK435090B User Manual
Hide thumbs
Also See for BPK435090B:
- User manual (160 pages) ,
- User manual (24 pages) ,
- User manual (244 pages)
Table of Contents
Advertisement
Quick Links
Advertisement
Table of Contents

Related Manuals for AEG BPK435090B


Summary of Contents for AEG BPK435090B
- Page 1 BPK435090B User Manual Oven USER MANUAL...
-
Page 2: Table Of Contents
FOR PERFECT RESULTS Thank you for choosing this AEG product. We have created it to give you impeccable performance for many years, with innovative technologies that help make life simpler – features you might not find on ordinary appliances. Please spend a few minutes reading to get the very best from it. -
Page 3: Safety Information
SAFETY INFORMATION 8. USING THE ACCESSORIES.....19 11.4 Cleaning Reminder...... 26 11.5 How to remove and install: Door..26 8.1 Inserting accessories..... 19 11.6 How to replace: Lamp....27 9. ADDITIONAL FUNCTIONS....... 20 12. TROUBLESHOOTING......27 9.1 Lock..........20 12.1 What to do if.........28 9.2 Automatic switch-off.......20 12.2 Service data.........29 9.3 Cooling fan........21... -
Page 4: General Safety
SAFETY INFORMATION Keep all packaging away from children and dispose of it • appropriately. WARNING: The appliance and its accessible parts become • hot during use. Keep children and pets away from the appliance when in use and when cooling down. If the appliance has a child safety device, it should be •... -
Page 5: Safety Instructions
SAFETY INSTRUCTIONS To remove the shelf supports first pull the front of the shelf • support and then the rear end away from the side walls. Install the shelf supports in the opposite sequence. Do not use a steam cleaner to clean the appliance. •... -
Page 6: Electrical Connection
SAFETY INSTRUCTIONS Depth of the appliance 567 mm Built in depth of the appliance 546 mm Depth with open door 1027 mm Ventilation opening minimum size. Opening placed 560x20 mm on the bottom rear side Mains supply cable length. Cable is placed in the 1500 mm right corner of the back side Mounting screws... -
Page 7: Care And Cleaning
SAFETY INSTRUCTIONS • Do not change the specification of this appliance. • Make sure that the ventilation openings are not blocked. • Do not let the appliance stay unattended during operation. • Deactivate the appliance after each use. • Be careful when you open the appliance door while the appliance is in operation. Hot air can release. -
Page 8: Pyrolytic Cleaning
SAFETY INSTRUCTIONS 2.5 Pyrolytic cleaning WARNING! Risk of Injury / Fires / Chemical Emissions (Fumes) in Pyrolytic Mode. • Before carrying out the pyrolytic cleaning and initial preheating remove from the oven cavity: – any excess food residues, oil or grease spills / deposits. –... -
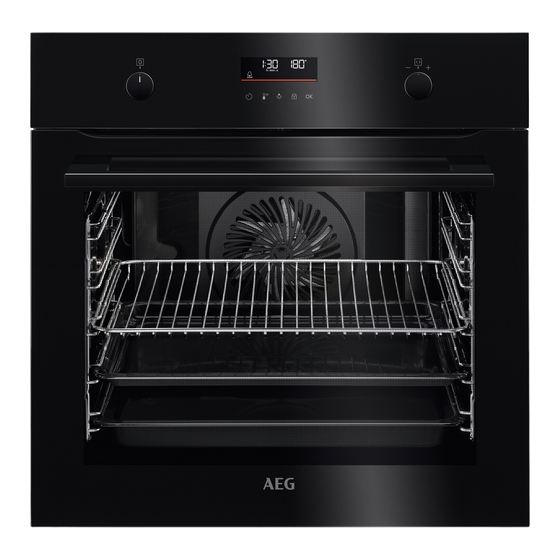
Page 9: Product Description
PRODUCT DESCRIPTION • Cut off the mains electrical cable close to the appliance and dispose of it. • Remove the door catch to prevent children or pets from becoming trapped in the appliance. 3. PRODUCT DESCRIPTION 3.1 General overview Control panel Knob for the heating functions Display Control knob... -
Page 10: Control Panel
CONTROL PANEL 4. CONTROL PANEL 4.1 Retractable knobs To use the appliance press the knob. The knob comes out. 4.2 Control panel overview Select a heating function to turn on the appliance. Turn the knob for the heating functions to the off position to turn the appliance off. -
Page 11: Initial Cleaning
DAILY USE 5.1 Initial cleaning Before the first use, clean the empty appliance and set the time: 00:00 Set the time. Press 5.2 Initial preheating Preheat the empty oven before the first use. Step 1 Remove all accessories and removable shelf supports from the oven. Step 2 Set the maximum temperature for the function: Let the oven operate for 1 h. -
Page 12: Notes On: Moist Fan Baking
DAILY USE Heating function Application To bake and roast food on one shelf position. Conventional Cooking To make convenience food (e.g., french fries, potato wedges or spring rolls) crispy. Frozen Foods To bake pizza. To make intensive browning and a crispy bottom. Pizza Function To bake cakes with crispy bottom and to preserve food. -
Page 13: How To Set: Assisted Cooking
DAILY USE When you use this function the lamp automatically turns off after 30 sec. For the cooking instructions refer to "Hints and tips" chapter, Moist Fan Baking. For general energy saving recommendations refer to "Energy Efficiency" chapter, Energy Saving. 6.4 How to set: Assisted Cooking Every dish in this submenu has a recommended heating function and temperature. - Page 14 DAILY USE Dish Weight Shelf level / Accessory Steak, medium 180 - 220 g per 3; roasting dish on wire shelf piece; 3 cm Fry the meat for a few minutes on a hot pan. In‐ thick slices sert to the appliance. Beef roast / 1.5 - 2 kg 2;...
- Page 15 DAILY USE Dish Weight Shelf level / Accessory Spare Ribs 2 - 3 kg; use 3; deep pan raw, 2 - 3 cm Add liquid to cover the bottom of a dish. Turn the thin spare ribs meat after half of the cooking time. Lamb leg with 1.5 - 2 kg;...
- Page 16 DAILY USE Dish Weight Shelf level / Accessory Fish fillet 3; casserole dish on wire shelf Use your favourite spices. Cheesecake 28 cm springform tin on wire shelf Apple cake 3; baking tray Apple tart 2; pie form on wire shelf Apple pie 22 cm pie form on wire shelf Brownies...
-
Page 17: Clock Functions
CLOCK FUNCTIONS Dish Weight Shelf level / Accessory Pizza fresh, thin 2; baking tray lined with baking paper Pizza fresh, thick 2; baking tray lined with baking paper Quiche 2; baking tin on wire shelf Baguette / Cia‐ 0.8 kg 2;... - Page 18 CLOCK FUNCTIONS How to set: Time of day To change the time of day enter the menu Set the clock. Press: and select Settings, Time of day. How to set: Minute minder Step 1 Step 2 Step 3 The display shows: 0:00 Set the Minute minder...
-
Page 19: Using The Accessories
USING THE ACCESSORIES How to set: Time Delay Step 1 Step 2 Step 3 Step 4 Step 5 Step 6 The dis‐ The dis‐ play play shows: shows: the time --:-- of day Select Press re‐ Set the Set the STOP Press: Press:... -
Page 20: Additional Functions
ADDITIONAL FUNCTIONS Baking tray / Deep pan: Push the tray between the guide bars of the shelf support. 9. ADDITIONAL FUNCTIONS 9.1 Lock This function prevents an accidental change of the appliance function. Turn it on when the appliance works - the set cooking continues, the control panel is locked. Turn it on when the appliance is off - it cannot be turned on, the control panel is locked. -
Page 21: Cooling Fan
HINTS AND TIPS 9.3 Cooling fan When the appliance operates, the cooling fan turns on automatically to keep the surfaces of the appliance cool. If you turn off the appliance, the cooling fan can continue to operate until the appliance cools down. 10. -
Page 22: Moist Fan Baking - Recommended Accessories
HINTS AND TIPS 10.3 Moist Fan Baking - recommended accessories Use the dark and non-reflective tins and containers. They have better heat absorption than the light colour and reflective dishes. Ramekins Pizza pan Baking dish Flan base tin Ceramic Dark, non-reflective Dark, non-reflective Dark, non-reflective 8 cm diameter,... -
Page 23: Care And Cleaning
CARE AND CLEANING °C Small cakes, 20 per tray, True Fan Cooking 20 - 30 preheat the empty oven Small cakes, 20 per tray, Conventional Cooking 20 - 30 preheat the empty oven Multilevel baking - biscuits °C Short bread True Fan Cooking 25 - 45 2 / 4... -
Page 24: Notes On Cleaning
CARE AND CLEANING 11.1 Notes on cleaning Clean the front of the appliance only with a microfibre cloth with warm water and a mild detergent. Use a cleaning solution to clean metal surfaces. Cleaning Clean stains with a mild detergent. Agents Clean the cavity after each use. -
Page 25: How To Use: Pyrolytic Cleaning
CARE AND CLEANING 11.3 How to use: Pyrolytic Cleaning Clean the oven with Pyrolytic Cleaning. WARNING! There is a risk of burns. CAUTION! If there are other appliances installed in the same cabinet, do not use them at the same time as this function. It can cause damage to the oven. Before the Pyrolytic Cleaning: Turn off the oven and wait Remove all accessories and... -
Page 26: Cleaning Reminder
CARE AND CLEANING 11.4 Cleaning Reminder The oven reminds you when to clean it with pyrolytic cleaning. To turn off the reminder enter the Menu and flashes in the display for 5 sec after each select Settings, Cleaning Reminder. cooking session. 11.5 How to remove and install: Door You can remove the door and the internal glass panels to clean it. -
Page 27: How To Replace: Lamp
TROUBLESHOOTING Step 7 Clean the glass panel with water and soap. Dry the glass panel carefully. Do not clean the glass panels in the dish‐ washer. Step 8 After cleaning, do the above steps in the opposite se‐ quence. Step 9 Install the smaller panel first, then the larger and the door. -
Page 28: What To Do If
TROUBLESHOOTING 12.1 What to do if... In any cases not included in this table please contact with an Authorised Service Centre. The appliance does not turn on or does not heat up Problem Check if... You cannot activate or operate the appliance. The appliance is correctly connected to an electrical supply. -
Page 29: Service Data
13. ENERGY EFFICIENCY 13.1 Product Information and Product Information Sheet according to EU Ecodesign and Energy Labelling Regulations Supplier's name Model identification BPK435090B 944188765 Energy Efficiency Index 81.2 Energy efficiency class Energy consumption with a standard load, conventional 1.09 kWh/cycle... -
Page 30: Energy Saving
MENU STRUCTURE Volume 71 l Type of oven Built-In Oven Mass 34.0 kg IEC/EN 60350-1 - Household electric cooking appliances - Part 1: Ranges, ovens, steam ovens and grills - Methods for measuring performance. 13.2 Energy saving The appliance has features which help you save energy during everyday cooking. Make sure that the appliance door is closed when the appliance operates. -
Page 31: Environmental Concerns
ENVIRONMENTAL CONCERNS Select the option from Menu struc‐ Adjust the value Select the set‐ - select to - press to ture and press ting. enter the Menu. confirm setting. and press Turn the knob for the heating functions to the off position to exit the Menu. Menu structure Assisted Cooking Cleaning... - Page 32 www.aeg.com/shop...
Need help?
Do you have a question about the BPK435090B and is the answer not in the manual?
Questions and answers