Advertisement
FIGURE/ IMAGEN A
E
D
A
C
B
B
290089
REV06281 1
FIGURE/ IMAGEN A
E
D
A
C
B
B
290089
REV06281 1
ENGLISH
CONGRATULATIONS!
You've purchased the finest in natural lighting
A
technology with your new OttLite
PRODUCT REGISTRATION FORM
Please complete the enclosed Product Registration
Form and return it today by mail, or register online
by going to: http://warranty.OttLite.com.
1. Remove all packing from product and set
upright on a solid surface
2. Referencing FIGURE A, install four (4)
AA batteries (not provided) per BATTERY
INSTALLATION AND REMOVAL section.
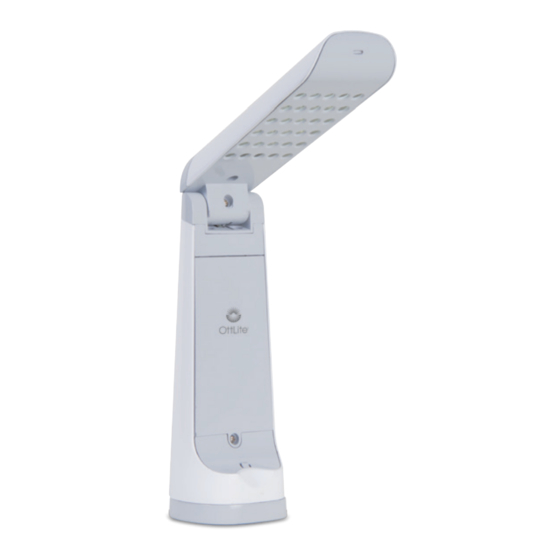
3. To operate ON, flip open the LED Housing (A)
from the finger detent (B).
4. To operate OFF, close the LED Housing (A).
5. External power can be used to power the light
reference FIGURE B.
a. Plug a 6Vdc supply into the jack
F
b. The supply must have a minimum
c. The power supply will NOT charge the lamp
NOTE: DO NOT FORCE THE LED HOUSING
as damage to the light may occur. The LED
FIGURE/ IMAGEN B
Housing employs an external stop to limit
upward movement.
CDO009
ENGLISH
CONGRATULATIONS!
You've purchased the finest in natural lighting
A
technology with your new OttLite
PRODUCT REGISTRATION FORM
Please complete the enclosed Product Registration
Form and return it today by mail, or register online
by going to: http://warranty.OttLite.com.
1. Remove all packing from product and set
upright on a solid surface
2. Referencing FIGURE A, install four (4)
AA batteries (not provided) per BATTERY
INSTALLATION AND REMOVAL section.
3. To operate ON, flip open the LED Housing (A)
from the finger detent (B).
4. To operate OFF, close the LED Housing (A).
5. External power can be used to power the light
reference FIGURE B.
a. Plug a 6Vdc supply into the jack
F
b. The supply must have a minimum
c. The power supply will NOT charge the lamp
NOTE: DO NOT FORCE THE LED HOUSING
as damage to the light may occur. The LED
FIGURE/ IMAGEN B
Housing employs an external stop to limit
upward movement.
CDO009
®
product.
F
provided (F).
½ ampere capability.
batteries.
product.
®
F
provided (F).
½ ampere capability.
batteries.
OttLite
LED Handheld Light
®
BATTERY INSTALLATION AND REPLACEMENT
Warning: Keep away from children. If
swallowed, promptly see doctor. Do not
install backwards, charge, put in fire or mix
with other battery types – may explode or
leak causing injury.
1. Fully open the LED Housing (A).
2. Lay the LED Handheld Light down on a firm
surface covered with a cloth to protect the
product's finish.
3. Remove the screw (C) that holds the battery
cover (D) closed.
4. Swing the battery cover (D) away from the screw
hole and lift away from the compartment.
5. Install four (4) AA batteries as indicated (orienta-
tion icons also exist inside the compartment).
6. Insert the battery cover tabs (E) into the top
of the compartment, then lower until closed;
re-insert the screw (C) previously removed.
7. Test battery installation by briefly turning on
the light.
Notice: Only replace batteries as a
simultaneous set and do not mix with older
batteries. Remove batteries if consumed or
if the light has not been in use for a long
period of time.
Enjoy your OttLite
LED Handheld Light!
®
OttLite
LED Handheld Light
®
BATTERY INSTALLATION AND REPLACEMENT
Warning: Keep away from children. If
swallowed, promptly see doctor. Do not
install backwards, charge, put in fire or mix
with other battery types – may explode or
leak causing injury.
1. Fully open the LED Housing (A).
2. Lay the LED Handheld Light down on a firm
surface covered with a cloth to protect the
product finish.
3. Remove the screw (C)d that holds the battery
cover (D) closed.
4. Swing the battery cover (D) away from the screw
hole and lift away from the compartment.
5. Install four (4) AA batteries as indicated (orienta-
tion icons also exist inside the compartment).
6. Insert the battery cover tabs (E) into the top
of the compartment, then lower until closed;
re-insert the screw (C) previously removed.
7. Test battery installation by briefly turning on
the light.
Notice: Only replace batteries as a
simultaneous set and do not mix with older
batteries. Remove batteries if consumed or
if the light has not been in use for a long
period of time.
Enjoy your OttLite
LED Handheld Light!
®
Advertisement
Table of Contents

Related Manuals for OttLite CDO009


Summary of Contents for OttLite CDO009
- Page 1 BATTERY INSTALLATION AND REPLACEMENT Warning: Keep away from children. If You’ve purchased the finest in natural lighting swallowed, promptly see doctor. Do not technology with your new OttLite ® product. install backwards, charge, put in fire or mix PRODUCT REGISTRATION FORM with other battery types –...
- Page 2 FÉLICITATIONS ! BATERÍAS Este nuevo producto OttLite ® que usted En achetant un produit OttLite , vous avez ® Avertissement : Garder hors de la acaba de adquirir representa lo mejor en acheté ce qui se fait de mieux en matière portée des enfants.
Need help?
Do you have a question about the CDO009 and is the answer not in the manual?
Questions and answers