
Related Manuals for Sonation PRSO-V1-BR


Summary of Contents for Sonation PRSO-V1-BR
- Page 1 Sonation Sonation lab solutions. lab solutions. Analytics COLUMN OVEN PRSO-V1-BR FOR BRUKER CAPTIVE SPRAY USERS MANUAL...
- Page 2 Produkte herewith declares that the products déclare par la présente que le produits dichiara che il prodotti PRSO-V1, PRSO-V1-BR den Anforderungen der folgenden EG-Richtlinien entspricht. meets the provisions of following EC-Directives. remplit les exigences des Directives CE suivantes.
-
Page 3: Table Of Contents
Contents Safety 1.1 Important safety instructions ............................ 4 1.2 Operating conditions and conventional usage ......................4 Scope of supply Functional description 3.1 Oven ..................................6 3.2 Controller .................................. 6 Installation 4.1 Hardware installation ..............................7 Installation of the mounting kit ..........................7 Mounting the oven to the source ......................... 8 Connecting the controller ............................8 Column loading ..............................9 4.2 Software Installation.............................. -
Page 4: Safety
PRSO-V1-BR for Bruker Captive Spray User manual 1 Safety 1.1 Important safety instructions Read these instructions. ƒ Keep these instructions. ƒ Heed all warnings. ƒ Follow all instructions. ƒ Do not use this apparatus near water. ƒ Mains powered apparatus shall not be exposed to dripping or splashing and no objects filled with liquids, such as ƒ vases, shall be placed on the apparatus. Do not block any ventilation openings. Install in accordance with the manufacturer’s instructions. ƒ Do not install near any heat sources such as radiators, heat registers, stoves, or other apparatus that produce heat. ƒ Do not defeat the safety purpose of the polarized or grounding-type plug. A polarized plug has two blades with one ƒ wider than the other. A grounding type plug has two blades and a third grounding prong. The wide blade or the third prong are provided for your safety. If the provided plug does not fit into your outlet, consult an electrician for replacement of the obsolete outlet. (for USA and Canada) Protect the power cord from being walked on or pinched particularly at plugs, convenience receptacles, and the point ƒ where they exit from the apparatus. WARNING: This apparatus shall be connected to a mains socket outlet with a protective earthing connection. ƒ... -
Page 5: Scope Of Supply
User manual PRSO-V1-BR for Bruker Captive Spray 2 Scope of supply The Sonation Column Oven PRSO-V1 and Bruker mounting kit for Captive Spray consists of the following parts: PRSO-V1-BR for Bruker Captive Spray: Column Oven consisting of top and bottom part ƒ Four conical inserts for column routing ƒ Regulator ƒ USB to serial converter ƒ Software CD / USB stick ƒ Oven control cable ƒ Cable for RS232 and contact closure ƒ Power supply cable ƒ Power supply 24V, wide range input ƒ Crossholder with lid ƒ Preassembled mounting kit: Mounting plate ƒ... -
Page 6: Functional Description
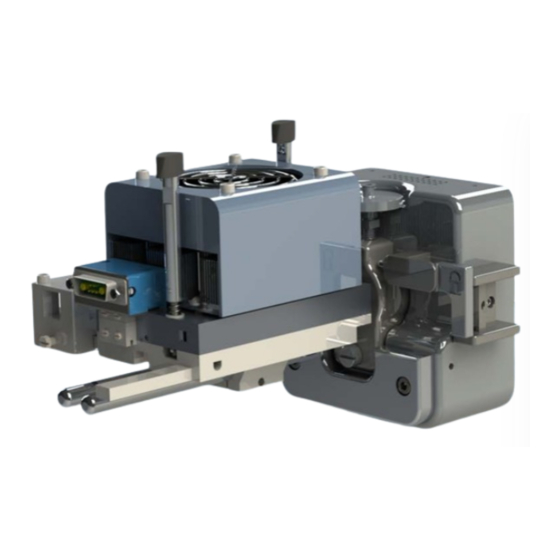
PRSO-V1-BR for Bruker Captive Spray User manual 3 Functional description 3.1 Oven Fig. 1: Open oven with Bruker Captive Spray Source ƒ Warning: During operation the surface of the oven can get very hot! The oven itself consists of two main parts. The top-part contains the heating/cooling unit, the heat sink and a ventilator. This part is connected to the oven controller. The bottom part holds the column and provides two inlets and one outlet for the columns. Depending on the column length, the front or the lateral column inlet is used and therefore the front or the lateral arm can be used to mount the crossholder. It can be used to hold a tee to split away a part of the HPLC flow if needed. The conical inserts can be screwed into the bottom part as needed to route the column from the inlet to the outlet. -
Page 7: Installation
User manual PRSO-V1-BR for Bruker Captive Spray controller and oven. The rear view shows the connectors for the connection to the power supply, the PC and the contact closure interface. 4 Installation 4.1 Hardware installation Installation of the mounting kit Fig. 3: Mounting kit installation Install the preassembled mounting kit to your Captive Spray source. There should be some play to align the oven outlet with the inlet union of the source. Fig. 4: Bruker Captive Spray Source with mounting holes Note: Newer Captive Spray sources already have the mounting holes for the column oven. If your source does not have the mounting holes, please contact Sonation or Bruker. Page 7... -
Page 8: Mounting The Oven To The Source
PRSO-V1-BR for Bruker Captive Spray User manual Mounting the oven to the source Slide the bottom part of the oven onto the rails and secure it in the preferred position by tightening the knurled screw. Fig. 5: Open oven with Bruker Captive Spray Source Connecting the controller Connect the 24-Volt power supply to the power connector. The power supply will be connected to a wall outlet later. Fig. 6: Mounting rails with locking mechanism ƒ The wide side of the plug faces the top of the control module, do not force it in twisted. -
Page 9: Column Loading
User manual PRSO-V1-BR for Bruker Captive Spray Column loading Short columns Longer columns Fig. 7: Column loading Open the oven by turning the little spring loaded handles at the front and back of the oven. The upper part can be removed now. Install your column either through the front- or left side gap, depending on the column length. Longer columns enter through the left side gap and can be wound around the inserts as often as needed. If needed, install your T- or cross piece into the cross holder. It can slide on the left or front rail and can be secured with the Nylon screw in the crossholder. ƒ Do not use any adhesive tape or other temperature sensitive materials inside the oven. Now reinstall the upper part of the oven and plug in the power cord from the power supply to a wall outlet. The oven is now ready to use. 4.2 Software Installation Installing the oven control software To install the oven control software, just execute the setup program under COControl/COControl 3.3.0.5 Setup.exe from... -
Page 10: Control
PRSO-V1-BR for Bruker Captive Spray User manual 5 Control Using COControl After starting the software it comes up with the main view. Fig. 8: COControl Choose the COM-port to which the controller is connected and click “connect”. Now you should see the current temperature of the oven in the display in the upper right. If no temperature is displayed, please ensure that the upper part of the oven sits proper on the bottom part. If the oven is open, no temperature will be displayed. In the main view you can also adjust the two temperature setpoints “Temp. normal” and “Temp. high”. By clicking “Switch regulator on” the regulator starts to heat or cool the oven to one of the setpoints, depending on the state of the contact closure input. To visualize the temperature profile, a graph window can be displayed. To show it up, chose “Options>Graph window” from the main menu. Fig. 9: Graph view of COControl In the settings window under “Options>Settings” the graph window can be started automatically on startup. It is possible to unlock an extended temperature range. If your application requires higher or lower temperatures, please ask Sonation for an option code. But also keep in mind that a higher temperature range is stress for the Peltier-modules and can lead to a shorter lifetime. Page 10... -
Page 11: Faq - Frequently Asked Questions
User manual PRSO-V1-BR for Bruker Captive Spray 6 FAQ - Frequently Asked Questions My PC does not have any COM-ports / no available COM-ports. Can I run the oven anyhow? Yes. Please use the provided USB to serial converter to install a virtual com-port. I’ve successfully connected to the oven but can still see no temperature. What is wrong? Please ensure that your oven is closed properly. When the oven is open or even not properly closed, the temperature... - Page 12 Sonation Sonation lab solutions. lab solutions. IMPROVE YOUR SCIENCE SONATION GMBH TEL.: +49 (0) 7351 30038-39 ALTE SCHULSTRASSE 39 E-MAIL: MAIL@SONATION.COM DE-88400 BIBERACH WWW.SONATION.COM WWW.SONATION.COM │ DOCUMENT ID: 300023_000_02 DATE: 2023-03-28...
Need help?
Do you have a question about the PRSO-V1-BR and is the answer not in the manual?
Questions and answers