
Related Manuals for BAFANG DP C271.CAN


Summary of Contents for BAFANG DP C271.CAN
-
Page 1: Table Of Contents
7 USER MANUAL FOR DP C271.CAN CONTENT 7.1 Important Notice 7.6.4 Headlights / backlighting 7.2 Introduction of Display 7.6.5 Walk Assistance 7.3 Product Description 7.6.6 USB Charge Function 7.6.7 Maintanence 7.3.1 Specifications 7.7 Settings 7.3.2 Functions Overview 7.4 Display Information 7.7.1 “Display setting”... -
Page 2: Important Notice
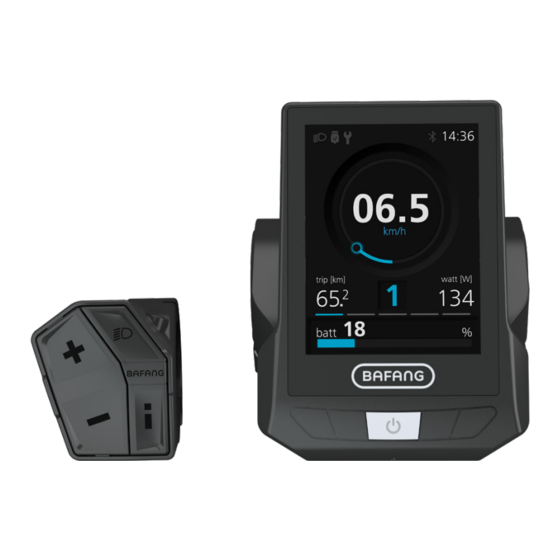
• Do not clean the display with a steam jet, high-pressure cleaner or water hose. 7.2 INTRODUCTION OF DISPLAY • Model: DP C271.CAN BUS • The label marking is as follows: • The housing material is PC, the window is high hardness glass, as following: DPC271CF80101.0... -
Page 3: Product Description
• Two UI interfaces are available for users to choose. • Six languages are available for users to choose. • USB charging (5V and 500mA) • Bluetooth function. (the display can connect to the mobile through Bafang Go APP) BF-UM-C-DP C271-EN June 2022... -
Page 4: Display Information
7.4 DISPLAY INFORMATION The display shows this symbol, if the light is on. USB charging indicator displays the icon, if an external USB device is connected to the display. Maintenance indicator. Bluetooth indicator. Time indication. Speed indication. Different modes: daily kilometers (trip) - total kilometers (odo) - Maximum speed (max) - Average speed (avg) - Range (range) - Ca- dence (cadence) - Travel time (time) - Energy... -
Page 5: Normal Operation
7.6 NORMAL OPERATION 7.6.1 Switching the System ON/OFF Press and hold ” “ (>2S) on the display to turn on the system. Press and hold ” “ (>2S) again to turn off the system. If the "automatic shutdown time" is set to 5 minutes (it can be set with the "Auto Off" function, See "Auto Off"), the display will automatically be turned off within the desired time when it is not in op- eration. -
Page 6: Selection Mode
7.6.3 Selection Mode Briefly press the (0.5s) button to see the different trip modes. daily kilometers (trip) - total kilometers (odo) - Maximum speed (max) - Average speed (avg) - Range (range) - Cadence (cadence) - Travel time (time) - Energy consumption (calories(only with torque sensor fitted)) -cycle. -
Page 7: Walk Assistance
7.6.5 Walk Assistance 7.6.7 Maintanence The Walk assistance can only be activated With a mileage of more than 5000 km with a standing pedelec. (or 100 charge cycles), the " " icon will displayed on the display. Every 5000 km the Activation: Press the button until this symbol... -
Page 8: Settings
7.7 SETTINGS After the display is turned on, double press button to access the “Setting” menu. By pressing the button (<0.5S) , you can select: Display Setting, Information, Language, Themes or EXIT. Then press the (<0.5S) button to confirm your selected option. - Page 9 7.7.1.6 “MAX PAS” Support level The “Max Pas” can‘t be set. 7.7.1.7 “Back Light” Set light sensitivity Press the (<0.5S) button to highlight “Back Light” in the Display setting menu. Then press (<0.5S) to select. Then with the button to select the level 7.7.1.4 “TRIP Reset”...
- Page 10 Starting password: By entering your old password once, fol- lowed by inputting the new password twice, Select “ON” in“Start PassWord” interface, then your password will be changed. then briefly pressing (<0.5S) to confirm. Now you can input your 4-digit pin code. By using the (<0.5S) button choose numbers between "0-9".
-
Page 11: Information
7.7.1.9 “Set Clock” 7.7.2 “Information” Press the (<0.5S) Button to high- Once the system is turned on, double press light “Set Clock” in the Display setting menu. button to access the “Setting” menu. Then briefly press the (<0.5S) button to Now by pressing the (<0.5S) but- confirm selection. - Page 12 7.7.2.3 Controller Information Press the (<0.5S) button and select "Ctrl Info", and then press the (<0.5S) button to read the software and hardware data of the controller. To exit, press the (<0.5S) button, or select “Back” to return to the information interface. Content Explanation Current temperature in...
-
Page 13: Language
7.7.2.6 Error Code 7.7.4 “Themes” Press the (<0.5S) button and select Once the system is turned on, double press “Error Code”, and then press the (<0.5S) button to access the “Setting” menu. button to confirm. It shows error informa- Now by pressing the (<0.5S) tion for the last ten errors of the pedelec. -
Page 14: Error Code Definition
7.8 ERROR CODE DEFINITION The HMI can show the faults of Pedelec. When a fault is detected, the icon will be indicated and one of the following error codes will be indicated too. Note: Please read carefully the description of the error code. When the error code appears, please first restart the system. - Page 15 Error Declaration Troubleshooting 1. Check all connectors from the battery are correctly connected to the motor. Error with the temperature sensor inside of the battery 2. If the problem still occurs, please change the Battery. 1. Allow the pedelec to cool down and restart the The protection temperature system.
- Page 16 Error Declaration Troubleshooting 1. Check that all connections are connected correctly. 2. Please connect the pedelec to the BESST system to see if speed signal can be read by the BESST tool. Speed signal of the torque 3. Change the Display to see if the problem is solved. sensor has an error 4.
- Page 17 Error Declaration Troubleshooting Using the BESST tool update the controller to see if WDT circuit is faulty this resolves the problem. If not, please change the controller or contact your supplier. Total voltage from the battery is Please change the battery. too high Total voltage from the battery is Please Charge the battery.
Need help?
Do you have a question about the DP C271.CAN and is the answer not in the manual?
Questions and answers