Denon DP-300F Turntable Manual
- Service manual (22 pages) ,
- Operating instructions manual (14 pages) ,
- Instrucciones de funcionamiento (14 pages)
Advertisement
- 1 IMPORTANT SAFETY INSTRUCTIONS
- 2 Getting Started
- 3 Connections
- 4 Operation
- 5 Troubleshooting
- 6 Specifications
- 7 Documents / Resources
IMPORTANT SAFETY INSTRUCTIONS
- Read these instructions.
- Keep these instructions.
- Heed all warnings.
- Follow all instructions.
- Do not use this apparatus near water.
- Clean only with dry cloth.
- Do not block any ventilation openings. Install in accordance with the manufacturer's instructions.
- Do not install near any heat sources such as radiators, heat registers, stoves, or other apparatus (including amplifiers) that produce heat.
- Do not defeat the safety purpose of the polarized or grounding-type plug. A polarized plug has two blades with one wider than the other. A grounding type plug has two blades and a third grounding prong. The wide blade or the third prong are provided for your safety. If the provided plug does not fit into your outlet, consult an electrician for replacement of the obsolete outlet.
- Protect the power cord from being walked on or pinched particularly at plugs, convenience receptacles, and the point where they exit from the apparatus.
- Only use attachments/accessories specified by the manufacturer.
- Use only with the cart, stand, tripod, bracket, or table specified by the manufacturer, or sold with the apparatus. When a cart is used, use caution when moving the cart/ apparatus combination to avoid injury from tip-over.
![]()
- Unplug this apparatus during lightning storms or when unused for long periods of time.
- Refer all servicing to qualified service personnel. Servicing is required when the apparatus has been damaged in any way, such as power-supply cord or plug is damaged, liquid has been spilled or objects have fallen into the apparatus, the apparatus has been exposed to rain or moisture, does not operate normally, or has been dropped.

SAFETY PRECAUTIONS

RISK OF ELECTRIC SHOCK
DO NOT OPEN
TO REDUCE THE RISK OF ELECTRIC SHOCK, DO NOT REMOVE COVER (OR BACK). NO USER-SERVICEABLE PARTS INSIDE. REFER SERVICING TO QUALIFIED SERVICE PERSONNEL.
 The lightning flash with arrowhead symbol, within an equilateral triangle, is intended to alert the user to the presence of uninsulated "dangerous voltage" within the product's enclosure that may be of sufficient magnitude to constitute a risk of electric shock to persons.
 The exclamation point within an equilateral triangle is intended to alert the user to the presence of important operating and maintenance (servicing) instructions in the literature accompanying the appliance.


TO REDUCE THE RISK OF FIRE OR ELECTRIC SHOCK, DO NOT EXPOSE THIS APPLIANCE TO RAIN OR MOISTURE.
- Location of Caution Labels: Bottom
![]()

FCC INFORMATION
For US customers:
This product has been tested and found to comply with the limits for a Class B digital device, pursuant to Part 15 of the FCC Rules. These limits are designed to provide reasonable protection against harmful interference in a residential installation.
For Canadian customers:
This Class B digital apparatus complies with Canadian ICES-003.
NOTES ON USE
WARNINGS
- Avoid high temperatures. Allow for sufficient heat dispersion when installed in a rack.
- Handle the power cord carefully. Hold the plug when unplugging the cord.
- Keep the unit free from moisture, water, and dust.
- Unplug the power cord when not using the unit for long periods of time.
- Do not obstruct the ventilation holes.
- Do not let foreign objects into the unit.
- Do not let insecticides, benzene, and thinner come in contact with the unit.
- Never disassemble or modify the unit in any way.
- Ventilation should not be impeded by covering the ventilation openings with items, such as newspapers, tablecloths or curtains.
- Naked flame sources such as lighted candles should not be placed on the unit.
- Observe and follow local regulations regarding battery disposal.
- Do not expose the unit to dripping or splashing fluids.
- Do not place objects filled with liquids, such as vases, on the unit.
- Do not handle the mains cord with wet hands.
- When the switch is in the OFF (STANDBY) position, the equipment is not completely switched off from MAINS.
- The equipment shall be installed near the power supply so that the power supply is easily accessible.

To completely disconnect this product from the mains, disconnect the plug from the wall socket outlet.
The mains plug is used to completely interrupt the power supply to the unit and must be within easy access by the user.
Getting Started
Thank you very much for purchasing the DENON turntable.
Please read the operating instructions thoroughly in order to acquaint yourself with the turntable system and achieve maximum satisfaction from it.
Before using
Pay attention to the following before using this unit:
- Power requirements
Power requirements for electrical equipment differ from area to area. Please ensure that your machine meets the power requirements in your area. If it doubt, consult a qualified electrician.
- About the power switch
This turntable is not equipped with a primary power switch. The power switch is incorporated in the tone arm of the turntable. The power to the turntable is cut when the tone arm returns to the tone arm rest. Note however, that the power is not completely turned off in this case. If you wish to completely turn the power off, disconnect the power supply cord from the household AC outlet. - Protect the turntable too
- Never touch the plug with wet hands.
- Always pull out by the plug and never the cable.
![shock hazard]() Only let a qualified professional repair or reassemble the turntable. An unauthorized person might touch the internal parts and receive a serious electric shock.
Only let a qualified professional repair or reassemble the turntable. An unauthorized person might touch the internal parts and receive a serious electric shock.- Never allow a child to put anything, especially metal, into the turntable.
- What you should know to protect yourself
- Use only a household AC power source. Never use a DC power source.
- If water is spilled on the turntable, disconnect it and call your dealer.
- Make sure that the turntable is well ventilated and away from direct sunlight.
- To avoid damage to the internal circuits and the external surface, keep it away from heat (stoves, etc.).
- Avoid using spray type insecticide near the turntable it can damage the finish and might ignite suddenly.
- To avoid damaging the finish, never use paint thinner or other similar chemicals to clean the turntable.
- Place the turntable on a flat and solid surface.
- If you don't plan to use the turntable for a long period of time, disconnect the power supply cord.
- To protect the insulators, always lift the turntable when you move it. And before moving the turntable, disconnect all the connecting cables.
- When transporting the turntable over a long distance, place it in its original box wrapped in protective wrappers.
- Moving the unit
To prevent short-circuits or damaged wires in the connection cables, always unplug the power supply cord and disconnect the connection cables between all other audio components when moving the unit. - Before turning the power switch on
Check once again that all connections are correct and that there are not problems with the connection cables. Always set the power switch to the standby position before connecting and disconnecting connection cables. - Store these instructions in a safe place.
After reading, store this instructions along with the warranty card in a safe place. - Note that the illustrations in these instructions may differ from the actual unit for explanation purposes.
Accessories
Check that the following parts are attached in addition to the main unit:
- Operating instructions 1
- Warranty 1
- Service station list 1
- Turntable (with belt) 1
![]()
- Turntable sheet 1
![]()
- Adapter for 45 rpm records 1
![]()
- Head shell with cartridge 1
![]()
- Dust cover 1
![]()
- Counterweight 1
![]()
- Hinges 2
![]()
- Spare lead wire 1


About the equalizer switch
This record player comes with a built-in equalizer.
Switch as shown below according to the terminal being used.
OFF:
When connecting to the PHONO input terminal
(The record player's equalizer cannot be used.)
ON:
When connecting a terminal other than the PHONO input terminal
(The record player's equalizer can be used.)

- The equalizer switch is set to the "ON" position upon shipment from the factory. Be sure to check before mounting the turntable and turntable sheet.
- The sound may be extremely weak or distorted if the equalizer switch is not properly set.
Assembly
NOTE:
- Do not remove the twist tie for clamping the tone arm until assembly is completed.
- Do not connect the power supply cord until assembly is completed.
Mounting the turntable
- Mount the turntable on the center spindle.
- Turn the turntable so that the roller is visible through the square hole with the ribbon tape for catching the belt.
- Pinch the ribbon tape and catch the belt on the outer center of the roller.
- Remove the ribbon tape once the belt is caught.
- Turn turntable slowly 5 or 6 turns. The belt is caught at the center of the roller.
- Mount the turntable sheet.
Mounting the counterweight
Insert the counterweight onto the shaft at the back of the tone arm and screw it in.
* Mount with the stylus pressure adjustment ring towards the front.
Mounting the head shell with cartridge
Insert the head shell with cartridge onto the tone arm and fasten it in place with the lock nut
Mounting the dust cover

- Insert the 2 included hinges securely into the holders at the back of the cabinet.
- Mount the hinge retainer sections of the dust cover onto the hinges.
- Insert fully in the direction of the arrow.
- When removing the dust cover, open the dust cover fully then pull out in the direction opposite the arrow.
![information]() Hold the dust cover near the hinge retainer sections when mounting and removing it.
Hold the dust cover near the hinge retainer sections when mounting and removing it.
Once assembly is finished, remove the twist tie for clamping the tone arm.
Adjustments
Turn the power off when making the adjustments.

Stylus pressure and anti-skating adjustment
NOTE:
- Be very careful not to damage the stylus tip on the turntable sheet, etc.
- Set the anti-skating knob to "0".
- Lower the lifter lever and move the tone arm over the turntable.
* For cartridges with removable stylus covers, remove the stylus cover.
![]()
- Balance the tone arm.
- Move the counterweight forward or backward so that the tone arm is parallel to the turntable surface when you are not touching it.
![]()
- Move the counterweight forward or backward so that the tone arm is parallel to the turntable surface when you are not touching it.


- Set the tone arm back on the armrest.
- Holding the counterweight with a finger so that it does not move, turn the stylus pressure adjustment ring so that it's "0" mark is lined up with the center line of the tone arm's rear shaft.
![]()
- Turn the counterweight in the direction of arrow "A" and set to the appropriate stylus pressure for the cartridge.
* The appropriate stylus pressure for the included cartridge is 2.0 g (19.6 mN). Set to "2". - Turn the anti-skating knob and set to the same value as for the cartridge's stylus pressure.
- The proper anti-skating value can be achieved.
![]()
- The proper anti-skating value can be achieved.


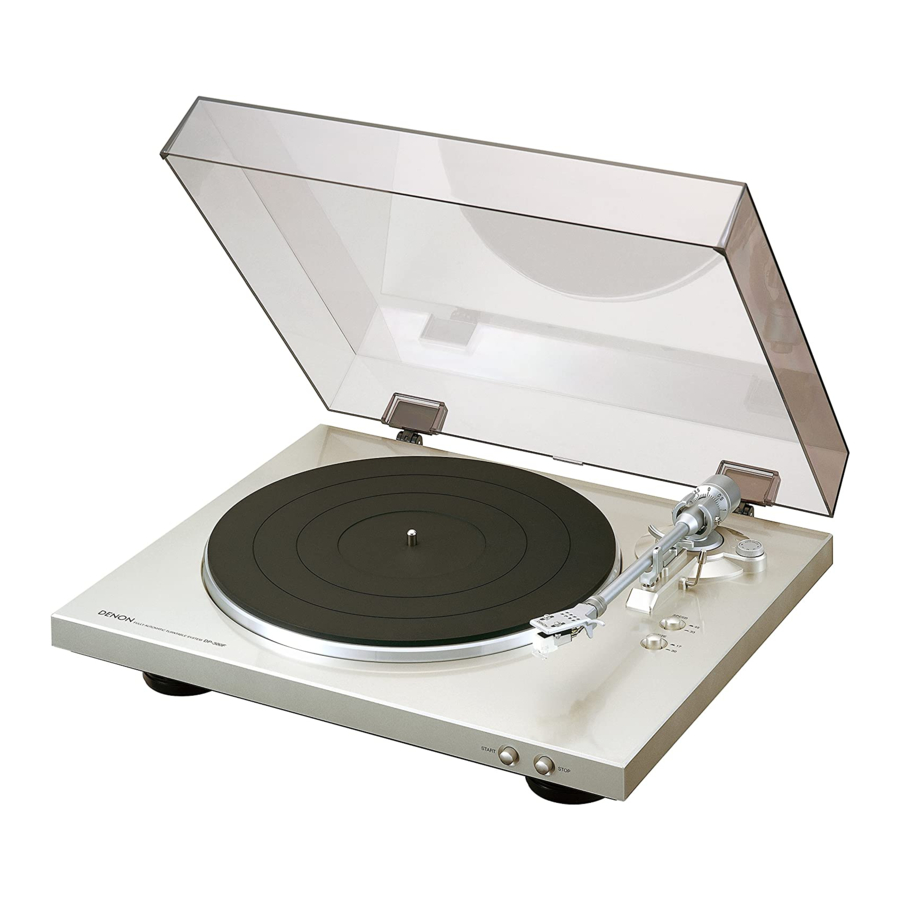
Part names and functions
For details on the functions of these parts, refer to the pages given in parentheses ( ).

- START button
- Starts playback.
- STOP button
- Stops playback.
- Finger catch
- Lock nut
- Armrest
- SIZE button (
![]() 17 /
17 / ![]() 30)
30)
 17 /
17 /  30)
30)- Set according to the size of the record to be played (11 ft/30 cm or 6 ft/17 cm).
- SPEED button (
![]() 45/
45/ ![]() 33)
33)
- Set according to the speed (revolutions per minute) of the record to be played.
- Lifter lever
- Anti-skating knob
- Stylus pressure adjustment ring
- Counterweight
- Dust cover
- Equalizer switch
- Dust cover hinge
Connections
NOTE:
- Turn off the power of the device to which the record player is being connected. Do not plug the record player's power plug into a power outlet until all connections are finished.
- Check that all connections are proper, then plug the record player's power plug into the AC outlet on the amplifier or into a household AC power outlet.
When connecting to the PHONO input terminal
Equalizer switch: OFF

When connecting a terminal other than the PHONO input terminal
Equalizer switch: ON

![information]() If the player starts operating when the power supply cord is plugged in, press the STOP button.
If the player starts operating when the power supply cord is plugged in, press the STOP button.
Operation

Opening the stylus cover

Starting playback using the auto play function
Raise the stylus cover before starting playback.
- Place the record on the turntable.
* For EP ("doughnut") records, use the 45 rpm adapter. - Set the record's playing speed using SPEED.
* For 33 1/3 records Set to![]() 33
33
For 45 records Set to![]() 45
45 - Set the record size using SIZE.
* For 30 cm records Set to![]() 30 cm
30 cm
For 17 cm records Set to![]() 17 cm
17 cm - Press START and hold it in for about 1 second.
- The turntable starts turning and playback starts automatically.
- Once the record is played, the tone arm returns to its original position and the turntable automatically stops turning.
- Once you have finished playing records, lower the stylus cover to protect the stylus tip.
- This set has an "auto return" function by which the tone arm automatically returns to its original position once a specific point is reached after a record finishes playing. Though there is no problem with records of normal size, with records including grooves up to this point, the auto return function may be activated before playback is finished.
NOTE:
- Do not touch the tone arm or turntable or turn off the power while a record is playing.
- The auto play system cannot be used for 9 ft/25 cm records. In this case operate manually. If the tone arm does not return to its original position after playback stops, press STOP.
Starting playback manually
- Place the record on the turntable.
*For EP ("doughnut") records, use the 45 rpm adapter. - Set the record's playing speed using SPEED .
* For 33 1/3 records Set to![]() 33
33
For 45 records Set to![]() 45
45 - Raise the lifter lever and holding the head shell's finger catch move the tone arm to the beginning of the selection you want to play.
- Lower the lifter lever.
- The tone arm lowers the stylus tip slowly onto the record and playback starts.
NOTE:
- Be careful not to scratch the record.
Stopping playback in the middle of a record
Press STOP
- Playback stops and the tone arm returns to its original position.
* It is also possible to stop playback by raising the lifter lever. In this case lift it using the head shell's finger catch and move the tone arm back to the arm rest.
Replacing the stylus
The included stylus has a service life of about 400 hours. To avoid damaging valuable records, replace the stylus without delay.
Purchase a replacement stylus at the store where you purchased the record player or your nearest repair and inquiry outlet. Specify that you want the "DSN-85" replacement stylus exclusively for the DP-300F.
Removing the replaceable stylus
Holding the cartridge steady with one hand, grasp the replaceable stylus with the other hand, push down in the direction of arrow  then pull the stylus off gently in the direction of arrow
  .
.

Mounting the replaceable stylus
Holding the cartridge steady with one hand, grasp the replaceable stylus with the other hand, point the catch on the replaceable stylus in the direction of arrow q , insert it all the way into the long hole in the cartridge, then push up in the direction of arrow a click is heard.

- Before replacing the stylus, turn off the amplifier's power and unplug the player's power supply cord.
- The stylus tip is an extremely delicate part, so handle it very carefully. Use a soft brush to gently remove any dust from the stylus tip.
- Removing the head shell makes it easy to replace the stylus.
Replacing the cartridge
If you wish to mount a different cartridge on this player, use one weighing about 44 to 93 mN (about 4.5 to 9.5 g).
To purchase a head shell only, ask for a "PCL-310BK" exclusively for the DP-300F at your store of purchase or nearest repair and inquiry outlet.
Removing the cartridge
- Turn the head shell lock nut in the direction of the arrow and remove the head shell.
![]()
- Remove the cartridge mount screws.

- Disconnect the lead wires on the cartridge side.


Mounting the cartridge
- Connect the lead wires. They are color-coded as shown below. Be careful to connect them properly.
| RED | Right channel (R) | |
| WHITE | Left channel (L) | |
| GREEN | Right channel ground (RG) | |
| BLUE | Left channel ground (LG) | |
- To achieve the required overhang, mount in such a way that the stylus tip is positioned about 1 ft/45 mm from the edge of the head shell's mount surface (the rubber washer), as shown on the diagram below. (The overhang for this player should be 0.75 ft/19 mm.)
- After replacing the cartridge, do not forget to readjust the horizontal balance, stylus pressure, and anti-skating value.
- The thickness of the terminal depends on the replacement cartridge, and some may not connect securely. In this case, use the included spare lead wire.


Troubleshooting
If a problem should arise, first check the following.
- Are the connections correct?
- Have you operated the player according to the Operating Instructions?
If this unit is not operating properly, check the items listed in the table below. Should the problem persist, there may be a malfunction. Disconnect the power immediately and contact your store of purchase.
| Symptom | Cause | Measures |
Power does not turn onTurntable does not turn |
|
|
No sound is produced |
|
|
| The sound is scratchy, the stylus skips or the sound is distorted. |
|
|
| The sound is either extremely weak or too strong and distorted. |
|
|
Howling is produced |
|
|
| The tone arm does not move even when the START button is pressed. |
|
|
Specifications
| Power supply: | AC 120 V, 60 Hz |
| Power consumption: | 2 W |
| Maximum external dimensions: | With dust cover closed: 434 (W) x 122 (H) x 381 (D) mm (17-3/32" x 4-51/64" x 15") (including protruding parts) With dust cover open: 434 (W) x 386 (H) x 413 (D) mm (17-3/32" x 15-13/64" x 16-19/64") (including protruding parts) |
| Mass: | 5.5 kg (12 lbs 2 oz) |
| Drive type: | Belt drive |
| Motor: | DC servo motor |
| Speed: | 33-1/3 rpm, 45 rpm |
| Wow & flutter: | 0.10% W.R.M.S |
| S/N ratio: | 60 dB |
| Tone arm: | Static balance straight type tone arm |
| Effective arm length: | 221.5 mm |
| Overhang: | 19 mm |
| Cartridge: | MM type |
| Output voltage: | With equalizer OFF : 2.5 mV With equalizer ON : 150 mV |
| Optimum stylus pressure: | 19.6 mN (2.0 g) |
| Replaceable stylus number: | DSN-85 |
| Stylus pressure adjustment range: | 0 ~ 39.2 mN (0 ~ 4.0 g) One step 0.98 mN (0.1 g) |
| Suitable cartridge empty weight: | 44 mN ~ 93 mN (4.5 ~ 9.5 g) |
| Head shell weight: | 98 mN (10.0 g) (including screws and nuts) |
| Head shell part number: | PCL-310BK |
* For purposes of improvement, specifications and design are subject to change without notice.

Documents / ResourcesDownload manual
Here you can download full pdf version of manual, it may contain additional safety instructions, warranty information, FCC rules, etc.
Advertisement


Need help?
Do you have a question about the DP-300F and is the answer not in the manual?
Questions and answers