
Subscribe to Our Youtube Channel
Related Manuals for Denon DP-3000NE


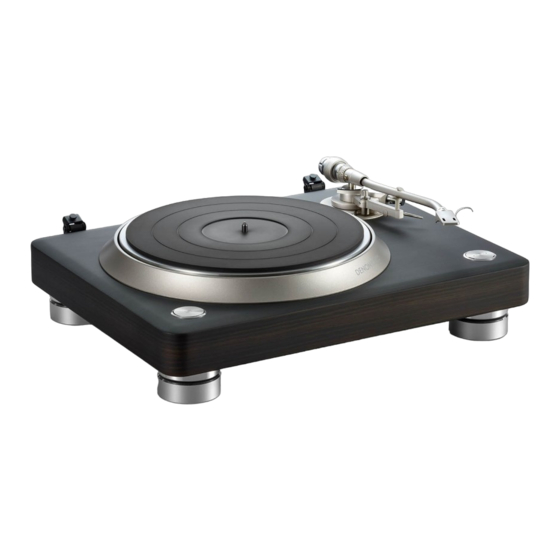
Summary of Contents for Denon DP-3000NE
- Page 1 Contents Preparations Connections Playback Tips Appendix DP-3000NE Direct Drive Turntable Owner’s Manual Front Rear...
- Page 2 Contents Preparations Connections Playback Tips Appendix Playback Cautions on handling About care Record playback About condensation Record playback About lubricating Stopping playback Accessories Tips Part names and functions Front Contents Rear Troubleshooting Preparations Power does not turn on Power cannot be turned off Assembly No sound comes out Mounting the platter...
- Page 3 Contents Preparations Connections Playback Tips Appendix Cautions on handling About care About lubricating Clean the cabinet and dust cover with the wiping cloth. Follow the The motor does not require lubricating. Do not lubricate this unit. instructions when using a chemical cleaner. Benzene, paint thinner or other organic solvents as well as insecticide may cause material changes and discoloration if brought into contact with the unit, and should therefore not be used.
- Page 4 Playback Tips Appendix Thank you for purchasing this Denon product. To ensure proper operation, please read this owner’s manual carefully before using the product. After reading this manual, be sure to keep it for future reference. Accessories Check that the following parts are included with the product.
- Page 5 Contents Preparations Connections Playback Tips Appendix Screw set for mounting a cartridge Screwdriver Counterweight Subweight Screws (short/medium/long): 2 each Nuts: 2 Washers: 2 45 rpm adaptor Cartridge spacers Front Rear...
- Page 6 Contents Preparations Connections Playback Tips Appendix Part names and functions Front For details, see the next page. Front Rear...
- Page 7 Contents Preparations Connections Playback Tips Appendix F Tone arm The counterweight is mounted on the back. (v p. 11) The head shell is attached to the tip. (v p. 14) The sub weight is mounted on the back. (v p. 15) G Counterweight Attached to the back of the tone arm to adjust stylus pressure.
- Page 8 Contents Preparations Connections Playback Tips Appendix Rear A PHONO OUTPUT connectors C AC inlet (AC IN) Connect equipment such as an amplifier with a PHONO input terminal. Used to connect the power cord. (v p. 25) (v p. 24) B SIGNAL GND terminal Use the included earth wire, even when connecting this unit to amplifiers with grounded connections.
- Page 9 Contents Preparations Connections Playback Tips Appendix o Contents Assembly Mounting the platter Mounting the counterweight Mounting the cartridge Mounting the head shell Attaching the dust cover Mounting the subweight Adjustments Adjusting the height of the insulators Adjusting the stylus pressure Adjusting anti-skating Adjusting the height of the tone arm Front...
- Page 10 Contents Preparations Connections Playback Tips Appendix Assembly Mount these included parts on the main unit before use. Make sure to perform setup on a stable, even surface to prevent the influence of vibration or slanted angles on record playback. Platter mat Platter Center spindle Counterweight...
- Page 11 Mount the platter mat on the platter. NOTE 0 It should be mounted carefully to avoid applying excessive force because the thread of the counterweight is delicate. 0 Mount the mat with the side featuring the DENON logo facing down. Front Rear...
- Page 12 Contents Preparations Connections Playback Tips Appendix Mounting the cartridge NOTE 0 Use the included screws, nuts, washers and screwdriver. Attach the head shell to the cartridge (not included) 0 Do not touch the stylus. loosely. Refer to the display or manual of the cartridge you are using and ensure that the lead wire is correctly connected to the terminal of 0 If the lead wire on the head shell is disconnected, connect the tip of the lead the cartridge.
- Page 13 Contents Preparations Connections Playback Tips Appendix Adjust the overhang and then securely fasten the C Tighten the screws with a screwdriver to secure the cartridge to cartridge to the head shell. the head shell. A Mount the overhang gauge (included) to the head shell. NOTE Head shell mount surface 0 Mount the cartridge with no tilt or floating so that the stylus tip can trace the groove...
- Page 14 Contents Preparations Connections Playback Tips Appendix Mounting the head shell Turn the lock nut in the direction of the arrow to secure the head shell. Insert the head shell into the tip of the tone arm. Lock nut Insert the head shell with its guide pin facing up and aligned with the hole on the top of the tone arm.
- Page 15 Contents Preparations Connections Playback Tips Appendix Attaching the dust cover Mounting the subweight If your cartridge and head shell are too heavy to keep the tone arm parallel Insert the edges of the hinges on the main unit into the to the record with the counterweight alone, attach the included subweight hinge slots of the dust cover.
- Page 16 Contents Preparations Connections Playback Tips Appendix Adjustments Adjusting the height of the insulators Tone arm Counterweight Turn the insulators to adjust their height so that the turntable is placed level. Lifter Arm height adjustment knob Platter Head shell Increases the height Reduces the height Insulator NOTE...
- Page 17 Contents Preparations Connections Playback Tips Appendix Adjusting the stylus pressure Remove the tone arm from the arm rest. To enable the record stylus to follow the grooves of the record and pick up Holding the finger lift of the headshell, move the tone sound (vibrations), it is necessary to apply a constant pressure (stylus arm over the platter.
- Page 18 Contents Preparations Connections Playback Tips Appendix Turn twist the counterweight so that the tone arm is floating parallel to the platter. Perform adjustment by turning the counterweight gradually while 0 Adjustments can also be made by sliding part of the counterweight. Loosen periodically removing your hand to check the position.
- Page 19 Contents Preparations Connections Playback Tips Appendix Return the tone arm to the armrest. Turn the counterweight in the direction of the arrow to set the right cartridge stylus pressure. Holding the counterweight with a finger so that it does not move, turn the stylus pressure adjustment ring so that its “0”...
- Page 20 Contents Preparations Connections Playback Tips Appendix Adjusting anti-skating 0 If the stylus pressure of your cartridge is higher than 3.0 g , set “3”. Anti-skating adjustment is performed to counter the force which pulls the 0 This will not affect the sensitivity of the arm because the anti-skating function of stylus tip inside due to the record rotation.
- Page 21 Contents Preparations Connections Playback Tips Appendix Adjusting the height of the tone arm Use the arm height adjustment knob to turn the base of the tone arm and adjust the height. Depending on the cartridge or head shell you are using, the tone arm may Adjust until the tone arm is parallel to the top of the record.
- Page 22 Contents Preparations Connections Playback Tips Appendix Turn the arm height adjustment knob clockwise to lock 0 The tone arm height can be adjusted from 0 to 0.35 inches (9 mm). 0 If the cartridge height is too small, it may not be possible to make the tone arm parallel to the record by adjusting the height of the tone arm.
- Page 23 Contents Preparations Connections Playback Tips Appendix o Contents Connecting amplifier that have a phono input Connecting the power cord NOTE 0 Do not plug in the power cord until all connections have been completed. 0 Do not bundle power cords together with connection cables. Doing so can result in humming or noise.
- Page 24 Contents Preparations Connections Playback Tips Appendix Connecting amplifier that have a phono input Amplifier with a PHONO input terminal SIGNAL PHONE IN Earth wire (included) Audio cable (included) 0 If a device connected to this unit has an earth terminal, connect the earth wire (included) to the earth terminal of this unit (SIGNAL GND). This may reduce noise during playback.
- Page 25 Contents Preparations Connections Playback Tips Appendix Connecting the power cord After completing all the connections, insert the power plug into the power outlet. A power cord for each region is included. Use the power cord for your region. North Japan Europe America Power cord (included)
- Page 26 Contents Preparations Connections Playback Tips Appendix Record playback Record playback START/STOP button Platter Tone arm Place a record on the platter. 0 For EP (“doughnut”) records, insert the included 45 rpm adapter onto the center spindle. 0 The adapter for 45 rpm records can also be used as a stabilizer. Press the SPEED 33/45 button to set the right platter speed for the record you are playing.
- Page 27 Contents Preparations Connections Playback Tips Appendix Lift the lifter lever and remove the tone arm from the Lower the lifter lever. arm rest. The tone arm slowly lowers, and playback starts when the stylus tip reaches the record. Lifter lever Grip the finger lift, and move the stylus tip directly above the start position of the track to play.
- Page 28 Contents Preparations Connections Playback Tips Appendix Stopping playback Raise the lifter lever. Raise the tone arm to remove the stylus from the record. Holding the finger lift of the headshell, return the tone arm to the armrest. Lower the lifter lever. Press the START/STOP button.
-
Page 29: Table Of Contents
Contents Preparations Connections Playback Tips Appendix Contents o Troubleshooting Power does not turn on Power cannot be turned off No sound comes out Hum noise is heard Audio skips, scratches or is distorted Howling is produced The tone arm stops moving halfway The platter does not rotate at the set speed Front Rear... -
Page 30: Troubleshooting
Contents Preparations Connections Playback Tips Appendix Troubleshooting If a problem should arise, first check the following: 1. Are the connections correct? 2. Is the set being operated as described in the owner’s manual? 3. Are the other devices operating properly? If this unit does not operate properly, check the corresponding symptoms in this section. -
Page 31: Power Does Not Turn On
Contents Preparations Connections Playback Tips Appendix Power does not turn on Power is not turned on. Check whether the power plug is correctly inserted into the power outlet. (v p. 25) Power cannot be turned off Power cannot be turned off. This unit does not have a power switch. -
Page 32: Hum Noise Is Heard
Contents Preparations Connections Playback Tips Appendix Hum noise is heard Hum noise is heard. Check that the earth wire of the audio cable is connected to the amplifier. (v p. 24) Check that the audio cable is connected to the amplifier correctly. (v p. 24) Check that the head shell is securely fastened to the tone arm. -
Page 33: Howling Is Produced
Contents Preparations Connections Playback Tips Appendix Howling is produced Howling is produced. This unit and speaker are too close together. Move the speaker away from this unit. This unit is in an unstable position. Install in a stable, level location. Playback volume is too loud. - Page 34 Contents Preparations Connections Playback Tips Appendix Specifications o Turntable section Driving system: Direct drive Speed: 33 1/3 rpm, 45 rpm, 78 rpm Wow & flutter: Less than 0.06 % WRMS Starting time: Specified speed within 1.0 sec (for 33 rpm) Starting torque: 3.9 lb/in (4.5 kg/cm) Platter:...
- Page 35 Contents Preparations Connections Playback Tips Appendix o Tone arm section Arm form: Static balance S-shaped pipe arm Effective arm length: 9.6 inches (244 mm) Overhang: 0.55 inches (14 mm) Tracking error: Within 2.5° (max) Arm height adjustable range: About 0.35 inches (9 mm) Stylus pressure variable range: 2.5 g (24.5 mN) / per rotation One step 0.1 g (0.98 mN)
- Page 36 Contents Preparations Connections Playback Tips Appendix Dimensions (Unit : in. (mm)) 19.7 (500) (72) (50) (50) 15.7 (400) Front Rear...
- Page 37 Contents Preparations Connections Playback Tips Appendix 【Dust cover opened】 65° (80) Weight: 40.8 lb (18.5 kg) (including the dust cover) Front Rear...
- Page 38 3520 10915 00ASA ©2023 DEI Sales, Inc. All Rights Reserved.
Need help?
Do you have a question about the DP-3000NE and is the answer not in the manual?
Questions and answers