
Related Manuals for Denon DP400BK


Summary of Contents for Denon DP400BK
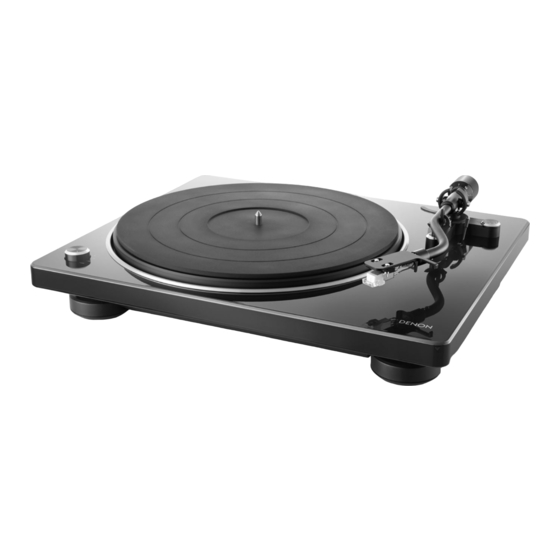
- Page 1 Contents Preparations Connections Playback and recording Tips Appendix DP-400 TURNTABLE Owner’s Manual Front panel Rear panel...
- Page 2 Contents Preparations Connections Playback and recording Tips Appendix Connections Accessories Features Connecting devices that do not have a phono input Part names and functions Connecting devices that have a phono input Front panel Connecting the AC adapter Rear panel Playback and recording Preparations Record playback Assembly...
- Page 3 Contents Preparations Connections Playback and recording Tips Appendix Tips Contents Troubleshooting Power does not turn on/Power is turned off The turntable does not spin No sound comes out Audio skips, scratches or is distorted Howling is produced The tone arm stops moving halfway Appendix Replacing the stylus Replacing the cartridge...
- Page 4 Playback and recording Tips Appendix Thank you for purchasing this Denon product. To ensure proper operation, please read this owner’s manual carefully before using the product. After reading this manual, be sure to keep it for future reference. Accessories Check that the following parts are supplied with the product.
- Page 5 Equipped with a function to switch RPM between 33 1/3, 45 and Modern design Much like the PMA-60, DRA-100 and other devices in our Denon Change record playback speed between 33 1/3, 45 and 78 RPM as Design Series, all unnecessary decoration has been eliminated for an needed.
- Page 6 Contents Preparations Connections Playback and recording Tips Appendix Part names and functions Front panel For details, see the next page. Front panel Rear panel...
- Page 7 Contents Preparations Connections Playback and recording Tips Appendix E Tone arm The counterweight is mounted on the back. (v p. 12) The head shell with cartridge is attached to the tip. (v p. 12) F Counterweight Attached to the back of the tone arm to adjust stylus pressure. “Mounting the counterweight”...
- Page 8 Contents Preparations Connections Playback and recording Tips Appendix Rear panel A EQUALIZER ON/OFF switch C SIGNAL GND terminal This switches the built-in equalizer on and off. Switch as needed Use the grounding wire on the supplied audio cable, even when depending on whether the connected amplifier or mini component connecting this device to amplifiers with grounded connections.
- Page 9 Contents Preparations Connections Playback and recording Tips Appendix o Contents Assembly Mounting the turntable Mounting the counterweight Mounting the head shell with cartridge Attaching the dust cover Using the dust cover as a record stand Adjustments Adjusting the stylus pressure Adjusting anti-skating Front panel Rear panel...
- Page 10 Contents Preparations Connections Playback and recording Tips Appendix Assembly Mount these included parts on the main unit before use. Make sure to perform setup on a stable, even surface to prevent the influence of vibration or slanted angles on record playback. Turntable sheet Turntable Ribbon tape...
- Page 11 0 Take care not to twist the belt when hanging it. 0 Store the ribbon tape after use, as it is required when replacing the belt. Mount the turntable sheet on the turntable. 0 Mount the sheet with the side featuring the DENON logo facing down. Front panel Rear panel...
- Page 12 Contents Preparations Connections Playback and recording Tips Appendix Mounting the counterweight Mounting the head shell with cartridge Insert the counterweight into the shaft on the back of Insert the head shell into the tip of the tone arm. the tone arm, and turn it in the direction of the arrow Insert the head shell with its guide pin facing up and aligned with while gently pushing it.
- Page 13 Contents Preparations Connections Playback and recording Tips Appendix Attaching the dust cover Using the dust cover as a record stand Attach the dust cover to the included dust cover stand to use it as a record Mount the hole on the dust cover on the center spindle. stand.
- Page 14 Contents Preparations Connections Playback and recording Tips Appendix Record sleeves can be fitted into the indent on the dust cover stand and leaned against the dust cover. Front panel Rear panel...
- Page 15 Contents Preparations Connections Playback and recording Tips Appendix Adjustments Adjusting the stylus pressure Anti-skating dial Counterweight To enable the record stylus to follow the grooves of the record and pick up Tone arm sound (vibrations), it is necessary to apply a constant pressure (stylus pressure) to the record from the stylus tip.
- Page 16 Contents Preparations Connections Playback and recording Tips Appendix Release the armrest lock. Turn twist the counterweight so that the tone arm is floating parallel to the turntable. Perform adjustment by turning the counterweight gradually while periodically removing your hand to check the position. Keep it parallel Holding the finger lift of the headshell, move the tone arm over the turntable.
- Page 17 Contents Preparations Connections Playback and recording Tips Appendix Adjusting anti-skating Holding the counterweight with a finger so that it does not move, turn the stylus pressure adjustment ring so Anti-skating adjustment is performed to counter the force which pulls the that its “0”...
- Page 18 Contents Preparations Connections Playback and recording Tips Appendix o Contents Connecting devices that do not have a phono input Connecting devices that have a phono input Connecting the AC adapter NOTE 0 Do not plug in the AC adapter until all connections have been completed. 0 Do not bundle AC adapter together with connection cables.
- Page 19 Contents Preparations Connections Playback and recording Tips Appendix Connecting devices that do not have a phono input This unit has a built-in phono equalizer that enables record playback when connected to devices with external audio input without a built-in phono equalizer or with mini component system.
- Page 20 Contents Preparations Connections Playback and recording Tips Appendix Connecting devices that have a phono input When connected to a device with a built-in phono equalizer, use that device’s phono equalizer during record playback. Use the EQUALIZER ON/OFF switch to turn the phono equalizer on this unit “OFF” when connected to a device with a built-in phono equalizer. Amplifiers with a phono input PHONO IN...
- Page 21 Contents Preparations Connections Playback and recording Tips Appendix Connecting the AC adapter Wait until all connections have been completed before connecting the AC adapter. Attach the plug needed for your wall outlet as shown in the figure below. 【Attaching the AC adapter plug】 【Removing the AC adapter plug】...
- Page 22 Contents Preparations Connections Playback and recording Tips Appendix o Connecting the AC adapter Household power outlet AC adapter (supplied) Front panel Rear panel...
- Page 23 Contents Preparations Connections Playback and recording Tips Appendix o Contents Record playback Front panel Rear panel...
- Page 24 Contents Preparations Connections Playback and recording Tips Appendix Record playback Record playback Tone arm Place a record on the turntable. 0 For EP (“doughnut”) records, insert the included 45 rpm adapter onto the center spindle. Turn the power/rpm switch knob to match the turntable rpm with the rpm of the record.
- Page 25 Contents Preparations Connections Playback and recording Tips Appendix Raise the stylus cover of the cartridge. Grip the finger lift, and move the stylus tip directly above the start position of the track to play. Stylus cover Release the arm rest lock and raise the lifter lever. Lifter lever Finger lift Front panel...
- Page 26 Contents Preparations Connections Playback and recording Tips Appendix Stopping playback Lower the lifter lever. The tone arm slowly lowers, and playback starts when the stylus tip reaches the record. Raise the lifter lever. Raise the tone arm to remove the stylus from the record. Holding the finger lift of the headshell, return the tone arm to the armrest.
- Page 27 Contents Preparations Connections Playback and recording Tips Appendix Using the automatic stop function Turn the power/rpm switch knob to OFF. The turntable stops. When automatic stop is on, the tone arm automatically raises after playback and then the turntable stops. This keeps the turntable from continuing to turn and cause stylus wear should you accidentally fall NOTE asleep while listening to a record, etc.
-
Page 28: Table Of Contents
Contents Preparations Connections Playback and recording Tips Appendix Contents o Troubleshooting Power does not turn on/Power is turned off The turntable does not spin No sound comes out Audio skips, scratches or is distorted Howling is produced The tone arm stops moving halfway Front panel Rear panel... -
Page 29: Troubleshooting
Contents Preparations Connections Playback and recording Tips Appendix Troubleshooting If a problem should arise, first check the following: 1. Are the connections correct? 2. Is the set being operated as described in the owner’s manual? 3. Are the other devices operating properly? If this unit does not operate properly, check the corresponding symptoms in this section. -
Page 30: Power Does Not Turn On/Power Is Turned Off
Contents Preparations Connections Playback and recording Tips Appendix Power does not turn on/Power is turned off Power is not turned on. Check whether the power plug is correctly inserted into the power outlet. (v p. 22) The power is off. Turn the power/rpm switch knob to the appropriate setting for the record you want to play. (v p. 24) Power automatically turns off. -
Page 31: No Sound Comes Out
Contents Preparations Connections Playback and recording Tips Appendix No sound comes out No sound is produced. Or sound is distorted. Check the connections for all devices. (v p. 18) Insert connection cables all the way in. Check that input connectors and output connectors are not reversely connected. Check cables for damage. -
Page 32: Howling Is Produced
Contents Preparations Connections Playback and recording Tips Appendix Howling is produced Howling is produced. This unit and speaker are too close together. Move the speaker away from this unit. This unit is in an unstable position. Install in a stable, level location. Playback volume is too loud. - Page 33 Contents Preparations Connections Playback and recording Tips Appendix Replacing the stylus The supplied stylus is good for approximately 400 hours of playback. Replace the stylus in a timely fashion to prevent damage to your record collection. When replacing the stylus, make sure to request the DSN-85 for dedicated use with this unit at either the location where you purchased this unit or a local repair shop.
- Page 34 Contents Preparations Connections Playback and recording Tips Appendix Replacing the cartridge If you wish to mount a different cartridge on this unit, use one weighing about 59 to 128 mN (about 5 to 13 g). o Removing the cartridge Turn the lock nut in the direction of the arrow and Remove the cartridge mount screws.
- Page 35 Contents Preparations Connections Playback and recording Tips Appendix o Mounting the cartridge Connect the lead wires to the cartridge. Mount the cartridge on the head shell. Lead wires are differentiated by color as shown in the following To achieve the required overhang, mount in such a way that the diagram.
- Page 36 Contents Preparations Connections Playback and recording Tips Appendix Specifications o Turntable section Drive type: Belt drive Motor: DC servo motor RPM speeds: 33 1/3, 45, 78 RPM Wow & flutter: 0.1% WRMS S/N ratio: 62 dB o Tone arm section Tone arm: Static balanced type Tone arm effective length:...
- Page 37 Contents Preparations Connections Playback and recording Tips Appendix o Cartridge section Cartridge: MM type Output voltage: Equalizer off: 2.5 mV Equalizer on: 150 mV Optimum stylus pressure: 2.0 g (19.6 mN) Replacement stylus product number: DSN-85 o AC adapter section (External Power Supply Information) Manufacturer: SHENZHEN FU JIA APPLIANCE CO., LTD.
- Page 38 Contents Preparations Connections Playback and recording Tips Appendix o General Power consumption: 10 W Power consumption in standby mode: 0.5 W or less zWhen automatic stop function is enabled For the purpose of improvement, the specifications and design are subject to change without notice. Front panel Rear panel...
- Page 39 Contents Preparations Connections Playback and recording Tips Appendix Dimensions (Unit : mm) 18.2 Front panel Rear panel...
- Page 40 Contents Preparations Connections Playback and recording Tips Appendix 【With dust cover attached】 Weight: 5.6kg (including the dust cover) Front panel Rear panel...
- Page 41 3520 10640 00ADC Copyright ©2018 D&M Holdings Inc.All Rights Reserved.
Need help?
Do you have a question about the DP400BK and is the answer not in the manual?
Questions and answers