Table of Contents
Advertisement
Quick Links
Advertisement
Table of Contents

Related Manuals for GORMAN-RUPP PUMPS HANDY-SUB SE1 1/2B3-E.33 12V


Summary of Contents for GORMAN-RUPP PUMPS HANDY-SUB SE1 1/2B3-E.33 12V
- Page 1 OM−06490−01 August 10, 2011 INSTALLATION, OPERATION, AND MAINTENANCE MANUAL WITH PARTS LIST HANDY-SUB SUBMERSIBLE PUMP MODEL SE1 1/2B3−E.33 12V THE GORMAN-RUPP COMPANY MANSFIELD, OHIO GORMAN-RUPP OF CANADA LIMITED ST. THOMAS, ONTARIO, CANADA Printed in U.S.A. 2011 The Gorman-Rupp Company...
- Page 2 Register your new Gorman-Rupp pump online at www.grpumps.com Valid serial number and e-mail address required. RECORD YOUR PUMP MODEL AND SERIAL NUMBER Please record your pump model and serial number in the spaces provided below. Your Gorman-Rupp distributor needs this information when you require parts or service. Pump Model: Serial Number:...
-
Page 3: Table Of Contents
TABLE OF CONTENTS INTRODUCTION ..........PAGE I −... - Page 4 TABLE OF CONTENTS (continued) Cable Assembly and Motor Cover Removal ....... PAGE E −...
-
Page 5: Introduction
SE SERIES OM−06490 INTRODUCTION Thank You for purchasing a Gorman-Rupp pump. The following are used to alert maintenance per- Read this manual carefully to learn how to safely sonnel to procedures which require special atten- install and operate your pump. Failure to do so tion, to those which could damage equipment, and could result in personal injury or damage to the to those which could be dangerous to personnel:... -
Page 6: Safety - Section A
SE SERIES OM−06490 SAFETY - SECTION A This information applies to the SE Se- casing, electrical shock could occur, ries Handy-SubT submersible electric causing severe injury or death to per- motor driven pump. sonnel. Do not operate this pump where explo- Always make sure the switch on the sive vapors or flammable material exist. -
Page 7: Installation − Section Bpage B
SE SERIES OM−06490 INSTALLATION − SECTION B Review all SAFETY information in Section A. c. The standard pump is furnished with two 30-foot (3 m) long power cables. Inspect the cables for cuts or damage. d. Screw the lifting eye (shipped loose) into the tapped hole in the top of the motor cover until Do not operate this pump where explo- fully seated, and secure it with the jam nut. -
Page 8: Lifting
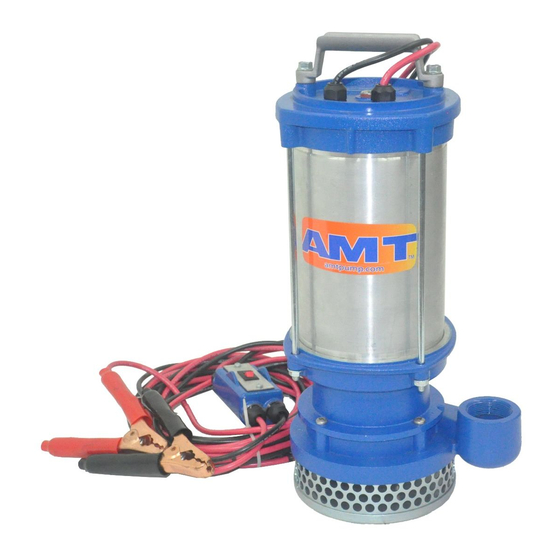
OM−06490 SE SERIES OUTLINE DRAWING TOP VIEW Figure 1. Pump Model SE1 1/2B3−E.33 12V Lifting Positioning the Pump Pump unit weights will vary depending on the This pump is designed to operate fully or partially mounting and drive provided. Check the shipping submerged;... -
Page 9: Typical Pump Installations
SE SERIES OM−06490 ON SUPPORTS BY BAIL IN PERFORATED CULVERT PIPE Figure 2. Typical Pump Installations PIPING The pump volute is equipped with a standard Never attempt to alter the length or re- 1−1/2−inch NPT tapped discharge connection. Either hose or rigid pipe may be used for the dis- pair any power cable with a splice. - Page 10 OM−06490 SE SERIES 1) Connect the red cable clamp from the pump nection should be made as far away from the to the positive (+) terminal on negative battery as possible. grounding systems, or to the negative (−) ter- minal on positive grounding systems. BATTERY Power line to...
-
Page 11: Operation − Section C
OM−06490 SE SERIES OPERATION − SECTION C Review all SAFETY information in Section A. Running Time The pump draws about 30 Amps, and can be oper- Follow the instructions on all tags, labels and ated for about 45 minutes on a fully-charged 55 decals attached to the pump. -
Page 12: Stopping
OM−06490 SE SERIES the strainer screen, purging most of the debris from it. If this fails to clean the screen, remove the pump from the sump and remove the debris manu- ally (see MAINTENANCE AND REPAIR in Section Do not attempt to lift the pump by the power cables, carry handle or piping. -
Page 13: Troubleshooting − Section Dpage D
SE SERIES OM−06490 TROUBLESHOOTING − SECTION D Review all SAFETY information in Section A. TROUBLE POSSIBLE CAUSE PROBABLE REMEDY MOTOR WILL NOT Hardened mud or sludge in impeller. Remove strainer, check and clean. Poor connection at battery or vehicle Check and correct connections. ground. -
Page 14: Electrical Testing
OM−06490 SE SERIES TROUBLE POSSIBLE CAUSE PROBABLE REMEDY PUMP RUNS WITH Pumping entrained air. Check liquid level in sump; check EXCESSIVE NOISE position of pump. OR VIBRATION Damaged impeller. Inspect and replace impeller. Motor shaft or bearings defective. Disassemble pump and check motor and bearings. -
Page 15: Pump Maintenance And Repair - Section E
SE SERIES OM−06490 PUMP MAINTENANCE AND REPAIR - SECTION E MAINTENANCE AND REPAIR OF THE WEARING PARTS OF THE PUMP WILL MAINTAIN PEAK OPERATING PERFORMANCE. STANDARD PERFORMANCE FOR PUMP MODEL SE1 1/2B3−E.33 12V Based on 70_ F (21_ C) clear water at sea level. performance may be difference due to such fac- Since pump installations are seldom identical, your tors as viscosity, specific gravity and temperature. - Page 16 OM−06490 SE SERIES SECTION DRAWING PARTS PAGE Figure 1. Pump Model SE1 1/2B3−E.33 12V PAGE E − 2 MAINTENANCE & REPAIR...
-
Page 17: Parts List: Pump Model
SE SERIES OM−06490 PARTS LIST Pump Model SE1 1/2B3−E.33 12V (From S/N 1483930 Up) If your pump serial number is followed by an N", your pump is NOT a standard production model. Contact the Gorman-Rupp Company to verify part numbers. ITEM PART NAME PART... -
Page 18: Pump And Seal Disassembly And Reassembly
OM−06490 SE SERIES motor housing is to be opened, the work must be PUMP AND SEAL DISASSEMBLY done in a clean, well-equipped shop. All mainte- AND REASSEMBLY nance functions must be done by qualified person- nel. Review all SAFETY information in Section A. Follow the instructions on all tags, label and de- cals attached to the pump. -
Page 19: Impeller Removal
SE SERIES OM−06490 Impeller Removal during reassembly (see the parts lists for numbers). Wedge a piece of wood between the vanes of the Cleaning And Inspection Of Pump Parts impeller (8) and the inside of the pump casing (5). Carefully inspect any O-rings or gaskets before re- Insert a large flat-bladed screwdriver into the slot in moval and cleaning to determine if a proper seal the end of the shaft. -
Page 20: Seal Installation
OM−06490 SE SERIES PUMP STATIONARY STATIONARY CASING CUP SEAT ELEMENT ROTATING ELEMENT ROTOR SHAFT BELLOWS BELLOWS RETAINER SPRING SPRING CENTERING IMPELLER WASHER SHIMS IMPELLER Figure 2. Seal Assembly Seal Installation thumbs to press the assembly into the bore. Apply equal pressure on opposite sides until the seat (Figures 1 and 2) contacts the bore shoulder. -
Page 21: Impeller Installation
SE SERIES OM−06490 Slide the seal spring over the shaft and bellows re- MOTOR DISASSEMBLY tainer, and install the spring centering washer. See Figure 2 for the proper order of seal assembly. Disassembly of the motor is rarely required except to replace electrical components or the motor brushes. - Page 22 OM−06490 SE SERIES Unscrew the twist-type connector (29) securing Reposition the previously separated motor casing the black (negative) power cable lead to the red parts. Use caution not to pinch the motor leads and motor lead. Separate the motor cover from the cas- to make sure the split grommet is properly posi- ing tube.
- Page 23 SE SERIES OM−06490 Position the motor cover in the casing tube with the Screw the gland nuts (24) into the motor cover to studs (1B) through the holes in the motor cover. seal the cables. Install the hardware (27 and 28) and tighten the Secure the cable leads to the motor cover with the nuts (27) in an alternating pattern until the motor cable clamp (23) and hardware (21 and 22).
- Page 24 For U.S. and International Warranty Information, Please Visit www.grpumps.com/warranty or call: U.S.: 419−755−1280 International: +1−419−755−1352 For Canadian Warranty Information, Please Visit www.grcanada.com/warranty or call: 519−631−2870 THE GORMAN-RUPP COMPANY D MANSFIELD, OHIO GORMAN-RUPP OF CANADA LIMITED ST. THOMAS, ONTARIO, CANADA...
Need help?
Do you have a question about the HANDY-SUB SE1 1/2B3-E.33 12V and is the answer not in the manual?
Questions and answers