Table of Contents
Advertisement
Quick Links
Click a title in this table of contents to access the corresponding section
1.
YOUR HERCULES WIFI EXTENDER ............................................................................... 4
1.1. Recommendations ...................................................................................................... 4
1.2. Specifications .............................................................................................................. 4
1.3. System requirements .................................................................................................. 5
1.4. Factory default settings (for advanced users) ............................................................. 5
1.5. Box contents ............................................................................................................... 5
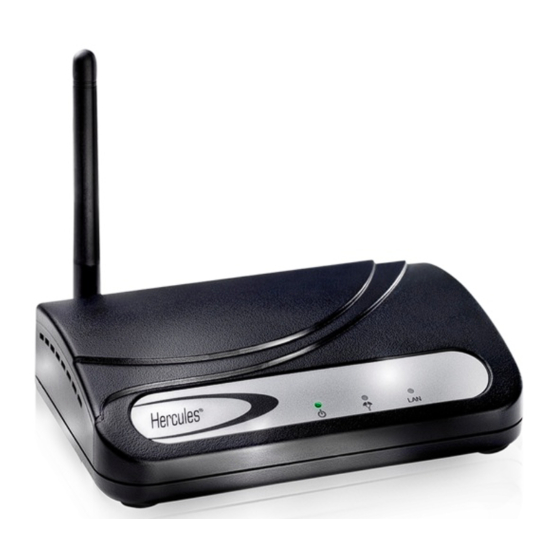
1.6. Front face overview ..................................................................................................... 5
1.7. Connectivity overview ................................................................................................. 6
2.
INSTALLING YOUR HERCULES WIFI EXTENDER ........................................................ 7
2.1. Launching the Hercules WiFi Extender Installation Assistant .................................... 7
2.2. Preliminary step: MODE SELECTION ........................................................................ 8
2.3. Installing Hercules WiFi Extender in WiFi Extender Mode ......................................... 9
2.3.1.
Mode) .............................................................................................................. 9
2.3.2.
Step 2: VERIFYING THE ROUTER (WiFi Extender Mode) .......................... 10
2.3.3.
Extender Mode) ............................................................................................. 10
2.3.4.
Mode) ............................................................................................................ 11
2.3.5.
(WiFi Extender Mode) ................................................................................... 12
2.3.6.
QuickAccess ................................................................................................. 12
2.3.7.
Mode) ............................................................................................................ 14
2.3.8.
Step 7: POSITIONING THE WIFI EXTENDER (WiFi Extender Mode .......... 15
2.3.9.
Step 8: VERIFYING THE WIFI CONNECTION ............................................ 17
Extender Mode) ............................................................................................. 18
2.3.11. Step 10: INSTALLATION COMPLETE (WiFi Extender Mode) ..................... 19
2.4. Installing the Hercules WiFi Extender in WiFi Access Point Mode ........................... 20
2.4.1.
Step 1: VERIFYING THE ROUTER (WiFi Access Point Mode) ................... 20
2.4.2.
Access Point Mode) ...................................................................................... 21
2.4.3.
Mode) ............................................................................................................ 22
CONTENTS
Hercules HWGEXT-54
Advertisement
Table of Contents

Related Manuals for Hercules HWGEXT-54


Summary of Contents for Hercules HWGEXT-54
-
Page 1: Table Of Contents
2.3.10. Step 9: CONNECTING TO THE EXTENDED WIFI NETWORK (WiFi Extender Mode) ..................... 18 2.3.11. Step 10: INSTALLATION COMPLETE (WiFi Extender Mode) ..... 19 2.4. Installing the Hercules WiFi Extender in WiFi Access Point Mode ......20 2.4.1. Step 1: VERIFYING THE ROUTER (WiFi Access Point Mode) ....20 2.4.2. - Page 2 Step 6: CONNECTING TO THE WIFI NETWORK (WiFi Access Point Mode)......................26 2.4.8. Step 7: INSTALLATION COMPLETE (WiFi Access Point Mode) ....27 2.5. Broadcasting your Internet connection via the Hercules WiFi Extender ....28 2.5.1. Testing your Internet connection ..............28 2.5.2.
- Page 3 4.11.1. Changing modes (WiFi Extender Mode or WiFi Access Point Mode) ..94 4.11.2. Configuring the internal DHCP server ............95 4.11.3. Cloning your PC's MAC address ..............96 4.11.4. Changing the Hercules WiFi Extender password ......... 97 4.11.5. Product information ..................98 GLOSSARY ........................99 TECHNICAL SUPPORT ....................
-
Page 4: Your Hercules Wifi Extender
Hercules HWGEXT-54 1. YOUR HERCULES WIFI EXTENDER Hercules is proud to present the Hercules WiFi Extender, a device that will literally extend your sensation of wireless freedom. When ideally positioned in your home, it will bridge distances and get around obstacles which used to limit wireless communication between your computers, sharing your Internet access, your devices or your data. -
Page 5: System Requirements
Hercules WiFi Extender IP address: 192.168.178.200 Password: 123456 1.5. Box contents Please verify that all of the following elements are present in your Hercules WiFi Extender box: Hercules HWGEXT-54 WiFi Extender CD-ROM containing Installation Assistant and user manual in PDF format ... -
Page 6: Connectivity Overview
[RESET] Return to factory settings button: Switch on the Hercules WiFi Extender and wait until initialization is complete. Next, press the RESET button using an object with a pointed tip for 10 seconds. Release the button and wait for the Hercules WiFi Extender to restart. -
Page 7: Installing Your Hercules Wifi Extender
Hercules HWGEXT-54 2. INSTALLING YOUR HERCULES WIFI EXTENDER To simplify this task, Hercules proposes launching an Assistant which will verify with you, step by step, that the installation of your Hercules WiFi Extender is carried out correctly. 2.1. Launching the Hercules WiFi Extender Installation... -
Page 8: Preliminary Step: Mode Selection
Hercules WiFi Extender's function allowing you to extend your WiFi network to other rooms in your home. - If you click the Continue button in order to install your Hercules WiFi Extender in WiFi Extender Mode, go to section 2.3. -
Page 9: Installing Hercules Wifi Extender In Wifi Extender Mode
After the installation, you will be able to return your modem router or your computer to its proper spot in your home. You can also position your Hercules WiFi Extender between the modem router and the computer (for details on the best positioning, please refer to Step 7: POSITIONING THE WIFI EXTENDER). -
Page 10: Step 2: Verifying The Router (Wifi Extender Mode)
Hercules HWGEXT-54 2.3.2. Step 2: VERIFYING THE ROUTER (WiFi Extender Mode) - Please verify that your modem router is powered on and that its WiFi LED is lit up. 2.3.3. Step 3: DISCONNECTING ETHERNET CONNECTIONS (WiFi Extender Mode) - Disconnect all Ethernet cables (connected to your modem router or to another network) from your computer. -
Page 11: Step 4: Disconnecting Any Wifi Networks (Wifi Extender Mode)
Hercules HWGEXT-54 2.3.4. Step 4: DISCONNECTING ANY WIFI NETWORKS (WiFi Extender Mode) - If your computer is connected to any WiFi network, disconnect it by clicking the WiFi disconnection button. Otherwise, proceed to the next step by clicking the Continue button. -
Page 12: Step 5: Powering On And Connection To Your Computer (Wifi Extender Mode)
2.3.5. Step 5: POWERING ON AND CONNECTION TO YOUR COMPUTER (WiFi Extender Mode) - Connect the Hercules WiFi Extender’s power cable to the power plug and plug the power adapter into an electrical outlet located near your main computer and your modem router. - Page 13 Click Next. Enter the security key defined during creation of the network. Click Connect. The Hercules WiFi Extender connects to your modem router. Configuration is now complete. If it was successful, move on to Step 6: DISCONNECTION FROM YOUR COMPUTER.
-
Page 14: Step 6: Disconnection From Your Computer (Wifi Extender Mode)
2.3.7. Step 6: DISCONNECTION FROM YOUR COMPUTER (WiFi Extender Mode) Once the Hercules WiFi Extender has been configured to extend your WiFi network throughout your home, you can disconnect it from your computer and unplug it from the electrical outlet. You should then position it in your desired location and plug it into an electrical outlet again. -
Page 15: Step 7: Positioning The Wifi Extender
2.3.8. Step 7: POSITIONING THE WIFI EXTENDER (WiFi Extender Mode To help you choose the best location for your Hercules WiFi Extender, we present below several pieces of advice which you may adapt according to your environment (number of rooms, computers, storeys in your home, the presence of obstacles, the locations of electrical outlets and telephone plugs…). - Page 16 Hercules HWGEXT-54 The WiFi performance of your Hercules WiFi Extender may be greatly affected by certain obstacles, such as the presence of paper (a bookcase), metal, water (an aquarium), or a wall made of reinforced concrete between your WiFi Extender and any WiFi adapters.
-
Page 17: Step 8: Verifying The Wifi Connection
Hercules HWGEXT-54 2.3.9. Step 8: VERIFYING THE WIFI CONNECTION - Power on your WiFi Extender. In a few moments, its WiFi LED should progress from flashing (while connecting) to always lit up (connected). If the LED never progresses to the connected state, your WiFi Extender is too far from your modem router. -
Page 18: Step 9: Connecting To The Extended Wifi Network (Wifi Extender Mode)
2.3.10. Step 9: CONNECTING TO THE EXTENDED WIFI NETWORK (WiFi Extender Mode) Now that your Hercules WiFi Extender is installed and connected to your modem router, you can enjoy using your WiFi network with extended coverage. You can now connect your computer or WiFi device (game console, telephone, PDA...) simply by selecting the name of the WiFi network transmitted by your modem... -
Page 19: Step 10: Installation Complete (Wifi Extender Mode)
- To install QuickAccess, tick the Install "Hercules QuickAccess" on my PC box. - Click Finish. If you do not wish to install this utility, you will only be able to access your Hercules WiFi Extender by manually entering its address (please see chapter 4.1 Opening the doors of WiFi Extender... -
Page 20: Installing The Hercules Wifi Extender In Wifi Access Point Mode
Internet connection, your files or your printer with other wireless devices. In order for your modem router to become a WiFi access point to transmit data to other wireless devices, you must leave your Hercules WiFi Extender connected to your modem router's Ethernet port after the installation. -
Page 21: Step 2: Disconnecting Any Ethernet Connections (Wifi Access Point Mode)
Hercules HWGEXT-54 2.4.2. Step 2: DISCONNECTING ETHERNET CONNECTIONS (WiFi Access Point Mode) - Disconnect all Ethernet cables (connected to your modem router or to another network) from your computer. User Manual – 21/104... -
Page 22: Step 3: Disconnecting Any Wifi Networks (Wifi Access Point Mode)
Hercules HWGEXT-54 2.4.3. Step 3: DISCONNECTING ANY WIFI NETWORKS (WiFi Access Point Mode) - If your computer is connected to any WiFi network, disconnect it by clicking the WiFi disconnection button. Otherwise, proceed to the next step by clicking the Continue button. -
Page 23: Step 4: Powering On And Connection To Your Computer (Wifi Access Point Mode)
2.4.4. Step 4: POWERING ON AND CONNECTION TO YOUR COMPUTER (WiFi Access Point Mode) - Connect the Hercules WiFi Extender’s power cable to the power plug and plug the power adapter into an electrical outlet located near your main computer and your modem router. -
Page 24: Wifi Connection Of The Hercules Wifi Extender To Your Router Via Quickaccess
This site corresponds to the WiFi Extender Manager interface associated with your Hercules WiFi Extender. To access it, simply accept the authorization to display this site. The WiFi Extender’s address will be stored in your Web browser, and thereafter you will be able to directly access WiFi Extender Manager. -
Page 25: Step 5: Disconnection From Your Computer And Connection To Your Router (Wifi Access Point Mode)
AND CONNECTION TO YOUR ROUTER (WiFi Access Point Mode) Your Hercules WiFi Extender is now ready to transmit the selected WiFi network to your wireless devices. - Disconnect the Ethernet cable connecting your WiFi Extender to your computer. - Connect the Ethernet cable to one of the connectors marked LAN on your modem router. -
Page 26: Step 6: Connecting To The Wifi Network (Wifi Access Point Mode)
2.4.7. Step 6: CONNECTING TO THE WIFI NETWORK (WiFi Access Point Mode) Now that your Hercules WiFi Extender is installed and connected to your modem router, you can enjoy using your WiFi network. You can now connect your computer or WiFi device (game console, telephone, PDA...) simply by selecting the name of the WiFi network transmitted by your Hercules WiFi Extender and entering the security key used. -
Page 27: Step 7: Installation Complete (Wifi Access Point Mode)
- To install QuickAccess, tick the Install "Hercules QuickAccess" on my PC box. - Click Finish. If you do not wish to install this utility, you will only be able to access your Hercules WiFi Extender by manually entering its address (please see chapter 4.1 Opening the doors of WiFi Extender... -
Page 28: Broadcasting Your Internet Connection Via The Hercules Wifi Extender
2.5.1. Testing your Internet connection After having installed your Hercules WiFi Extender, you can carry out a first connection test. For example, you should verify that you have access to your WiFi network by connecting to it with a laptop computer, located in another room in your home, within the coverage zone of your WiFi network. - Page 29 Hercules HWGEXT-54 - Windows XP or Vista 1. Click Start/Control Panel. Double-click Network Connections. 2. In the LAN or High-Speed Internet section, right-click the icon corresponding to your network adapter (or network bridge, if you have created one) and select Properties.
- Page 30 Method 2: Relaunch the installation from the CD-ROM - Insert the included installation CD-ROM into your drive, and follow the procedure indicated in chapter Launching the Hercules WiFi Extender Installation Assistant. 30/104 – User Manual...
- Page 31 CD-ROM (see method 2, above). Method 4: Access Technical Support - Please visit http://ts.hercules.com and select your language. You will then be able to access different services (Frequently Asked Questions (FAQ), the latest firmware versions) which may help to resolve your problem.
-
Page 32: Welcome To The Wireless Attitude
3. WELCOME TO THE WIRELESS ATTITUDE Now that you have mastered the main functionalities of the Hercules WiFi Extender, it is time to move on to a few practical applications. In the following chapters, we will show you how wireless computing is closely linked to user-friendliness and ease of use. - Page 33 Hercules HWGEXT-54 - Click this message to display the list of networks. The Connect to a network window appears. - Browse through the list and select your wireless network (here, the Hercules network). You will note that this network is secure.
- Page 34 Hercules HWGEXT-54 Please wait a few moments. Once the connection to the Hercules network has been established, you can save this network in your favorites by ticking the Save this network box and Start this connection automatically, if you wish. In that case, your computer will always attempt to connect to this network at the start of each new session.
- Page 35 Customize link located opposite the name of your network in the Hercules (public network) zone of the Network and Sharing Center. - In the taskbar, click the network connection icon to verify that you are connected to the Hercules network (the message Currently connected to: Hercules should be displayed).
-
Page 36: Computers Running Windows Vista: Disconnecting From A Wireless Network
Hercules HWGEXT-54 3.3. Computers running Windows Vista: Disconnecting from a wireless network Once you are connected to a network, you can disconnect via the Network and Sharing Center, for example. Via the Network and Sharing Center: - Click the Disconnect link. - Page 37 Hercules HWGEXT-54 For example, to remove the Hercules network to which you have just connected, select it in the list (it is then highlighted in blue), then click the Remove button. To add a network, click the Add button. Windows Vista launches the manual connection to a wireless network assistant.
-
Page 38: Computers Running Windows Vista: Sharing Folders, A Printer Or An Adsl Connection
Hercules HWGEXT-54 3.5. Computers running Windows Vista: Sharing folders, a printer or an ADSL connection To create a network of computers, share data, a printer or an ADSL connection between computers running Windows Vista, it is not imperative that the computers belong to the same workgroup. However, if you wish to share between Windows Vista and an earlier operating system, make sure to define the same workgroup on all computers. - Page 39 Hercules HWGEXT-54 Enabling file sharing - In the Sharing and Discovery zone, click the Off link or the button located opposite File sharing. - Select the Turn on file sharing radio button. - Click Apply. In the Windows Vista confirmation window, click Continue.
- Page 40 Hercules HWGEXT-54 create files (there will be no limitations on the contents of these folders in terms of viewing, making changes and additions or other actions). - Click Apply. In the Windows Vista confirmation window, click Continue. Enabling printer sharing Note: To enable printer sharing, you must first have installed a printer.
-
Page 41: Windows Vista: Sharing Public Or Personal Folders
Hercules HWGEXT-54 - Click Apply. In the Windows Vista confirmation window, click Continue. - In the following window, you can define the different settings, such as: authorize or refuse groups of users, set parental controls, select media types to be shared, and so on. - Page 42 Hercules HWGEXT-54 1. Select the folder that you wish to share, without opening it. Here, your Pictures folder. 2. Right-click the folder. Select Share. 3. In the File Sharing window, select the user(s) who will be able to access this folder, then click Add.
-
Page 43: Computers Running Windows Vista: Accessing Shared Folders
Hercules HWGEXT-54 4. Select the Permission Level you wish to assign by clicking on the line for that user: Reader (authorization to view only), Contributor (authorization to view, add and delete) or Co-owner (authorization to view, modify, add and delete). - Page 44 Hercules HWGEXT-54 The list of installed printers is displayed. 3. Right-click the printer and select the Sharing… option. 44/104 – User Manual...
- Page 45 Hercules HWGEXT-54 4. In the Printer Properties window, click the Change sharing options button. 5. In the Windows Vista confirmation window, click Continue. 6. Tick the Share this printer box. 7. Select the name of the printer which will be displayed on the network under Share name.
-
Page 46: Computers Running Windows Vista : Accessing The Shared Printer
Hercules HWGEXT-54 3.5.5. Computers running Windows Vista : Accessing the shared printer On the computers that will use the shared printer: 1. Click Start/Control Panel. 2. Under the Hardware and Sound heading, click the Printer link. 3. Click the Add a printer button. - Page 47 Hercules HWGEXT-54 4. Click Add a network, wireless or Bluetooth printer. 5. Windows searches for the shared printers on your network. Select the shared printer. 6. Click Next. 7. If required, accept installation of the printer’s drivers when prompted by Windows.
-
Page 48: Windows Vista: Sharing An Adsl Connection In An Infrastructure Type Network
Infrastructure mode by default. In this mode, the WiFi adapters are connected to your access point, which might be your modem router, your Hercules Modem Router or your Hercules Router connected to a modem. Infrastructure mode is ideal for exchanging data, playing online, and also for sharing an Internet connection and/or printer among several computers. - Page 49 Hercules HWGEXT-54 6. In the Wireless Network Connection Properties tab, select Internet Protocol version 4 (TCP/IPv4). 7. Click Properties. 8. In the Internet Protocol version 4 (TCP/IPv4) window, select Obtain address automatically and Obtain DNS server address automatically. 9. Click OK to validate.
-
Page 50: Computers Running Windows Xp: Connecting To A Wireless Network
Alternative: Some manufacturers of WiFi adapters supply their own connection software (example: Hercules WiFi Station, bundled with Hercules WiFi adapters). We recommend that you refer to their user manual for help on establishing your connection. Once your computer is switched on, your WiFi adapter automatically detects the wireless networks available and displays them in a specific window. -
Page 51: Computers Running Windows Xp: Disconnecting From A Wireless Network
Hercules HWGEXT-54 - Browse through the list and select your wireless network (here, the Hercules1 network). You will note that this network is secure. Note: If you select a security-enabled network, you must enter the key in the window. To do so, you must know the key defined when setting up your wireless network (the Livebox security key is indicated on the underside of the device). -
Page 52: Computers Running Windows Xp: Managing Your Favorite Networks
Hercules HWGEXT-54 3.8. Computers running Windows XP: Managing your favorite networks A favorite is a group of settings for connecting to a known Infrastructure or Ad hoc network (your own, a neighbor’s, a friend’s). To display your favorite networks, or add or remove a network, click the Change the order of preferred networks link in the Wireless Network Connection window. - Page 53 Hercules HWGEXT-54 To add a network to your favorites: Click the Add button. Windows XP opens up a new window in which you can enter the information. Enter the network's SSID. Select security information: Network Authentication and Data Encryption. Remember to untick the The key is provided for me automatically box to be able to enter at the network key (in the case of a WEP key).
-
Page 54: Computers Running Windows Xp: Sharing Folders, A Printer Or An Adsl Connection
Hercules HWGEXT-54 Click the Move up or Move down buttons to change the connection priority. Click OK. 3.9. Computers running Windows XP: Sharing folders, a printer or an ADSL connection A simple solution for sharing folders, a printer or an... - Page 55 Hercules HWGEXT-54 The window opposite may appear if The Wizard found disconnected network hardware. 3. If your Hercules Wireless Adapter wireless network connection is not displayed in the list, tick the Ignore disconnected network hardware box, then click Next. Otherwise,...
- Page 56 Hercules HWGEXT-54 7. If the window opposite appears, select the Hercules Wireless G wireless network connection, then click Next. 8. When this warning screen appears, ignore it by clicking Next. If you are using a modem router including a firewall, your computers are already protected.
- Page 57 Hercules HWGEXT-54 11. Enter the computer name and a description, if required. Give the computer a name that is unique and sufficiently distinctive, making it easy to recognize on your network (my-computer, wifi-computer or julie, for example). 12. Click Next.
-
Page 58: Windows Xp: Sharing Folders
Hercules HWGEXT-54 17. Click Finish to exit the Wizard. Once the procedure is finished, Windows XP may prompt you to restart your computer. The procedures described in this chapter are specific to Windows XP. For all other questions related to sharing folders, a printer or an Internet connection, or on using Windows, please refer to the Windows online help utility. -
Page 59: Windows Xp: Accessing Shared Folders
Hercules HWGEXT-54 The [Shared folder name] Properties window is divided into two sections. Local sharing and security only allows for the sharing of files among several users on the same PC. The files are then placed in a Shared Documents folder. Network sharing and security, however, allows for the sharing of files among more than one computer. - Page 60 Hercules HWGEXT-54 On the computer connected to the printer: 1. Click Start/Control Panel/Printers and Other Hardware/ Printers and Faxes. 2. Right-click the printer and select Sharing. 3. In the Sharing tab, select the Share this printer radio button and enter a name for your printer.
-
Page 61: Windows Xp: Modifying A Workgroup Name
5. In the Workgroup zone, enter a name for the group (HOME, OFFICE or HERCULES, for example). The workgroup name must be identical (be sure to respect the case of letters) for all computers you wish to link together in a network. -
Page 62: Windows Xp: Manually Enabling Or Disabling Your Adapter's Wifi Connection (Advanced Users)
Windows 2000 does not include any Assistant allowing you to access these functions. You must therefore use the proprietary software furnished with your WiFi device to carry out all of these operations (example: Hercules WiFi Station, bundled with Hercules WiFi adapters). 62/104 – User Manual... -
Page 63: Computers Running Windows 2000: Sharing Folders, A Printer Or An Adsl Connection
5. In the Workgroup zone, enter a name for the group (HOME, OFFICE or HERCULES, for example). The workgroup name must be identical (be sure to respect the case of letters) for all computers you wish to link together in a network. -
Page 64: Windows 2000: Sharing Folders
Hercules HWGEXT-54 3.11.2. Windows 2000: Sharing folders 1. Select the folder you wish to share, without opening it. 2. Right-click the folder. Select Sharing. 3. In the Sharing tab, select Share this folder. 4. On the Share name line, enter the folder name as it will be displayed on the network (12 characters maximum to ensure compatibility with other operating systems). - Page 65 Hercules HWGEXT-54 On the computer connected to the printer: 1. Click Start/Settings/Printers. 2. Right-click the printer and select Sharing…. 3. In the Sharing tab, select the Shared as: radio button and enter a name for your printer. Give the printer a name that is unique and sufficiently distinctive, making it easy to recognize (my-printer or home laser printer, for example).
-
Page 66: Windows 2000: Modifying A Workgroup Name
5. In the Workgroup zone, enter a name for the group (HOME, OFFICE or HERCULES, for example). The workgroup name must be identical (be sure to respect the case of letters) for all computers you wish to link together in a network. -
Page 67: Windows 2000: Sharing An Adsl Connection In An Infrastructure Network
Proceed as follows for each computer that will use the shared Internet connection: 1. Click Start/Settings/Network and Dial-up Connections. 2. Select the connection to the local area network corresponding to your Hercules Wireless G device. 3. Right-click the connection and select Properties. 4. In the Local Area Connection Properties window, select Internet Protocol (TCP/IP). -
Page 68: Windows 2000: Manually Enabling Or Disabling Your Adapter's Wifi Connection (Advanced Users)
You can manually enable or disable your adapter’s WiFi connection for a variety of reasons: to temporarily avoid connecting to networks, save battery power, etc. To manually enable or disable your Hercules Wireless G adapter’s WiFi connection in Windows 2000: - Access the Device Manager. -
Page 69: Wifi Extender Manager For Advanced Users
This chapter is dedicated to users who wish to learn the subtleties of WiFi, and explore the more advanced functionalities offered by WiFi Extender Manager to get the most out of their Hercules WiFi Extender. But be careful! Changing certain settings may affect the proper functioning of your network. You should bear in mind, however, that nothing is irreversible, and that you can always return to the original configuration or reload a personalized configuration. -
Page 70: Protecting Access To Wifi Extender Manager
The password ensures that you are the only one who can access your WiFi Extender Manager, and therefore your Hercules WiFi Extender’s settings. For this reason, it is important that you change the password when using WiFi Extender Manager for the first time (see below). - Page 71 The door to WiFi Extender Manager opens to the Home page depicted below. You can now explore all of your Hercules WiFi Extender's functionalities. If you have selected WiFi Extender Mode during the installation, the following home page is displayed:...
-
Page 72: Navigating Within The Wifi Extender Manager Interface
Nevertheless, should you ever feel a bit lost, you can always click the Return to home page link at any time to return to the starting point for all of your Hercules WiFi Extender's functionalities. 72/104 – User Manual... -
Page 73: Consulting Information About Your Wifi Network
Hercules HWGEXT-54 4.4. Consulting information about your WiFi network You have just opened the door to enter WiFi Extender Manager. It is now time to explore all of its possibilities. Start off by having a look at the various items of information displayed on your screen depending on the mode... - Page 74 Hercules HWGEXT-54 - On the home page, click the Advanced Settings button to access the advanced settings for your WiFi network. - Select Advanced WiFi settings, then Configuration Assistant. - On the page displayed, click the WiFi configuration button. The WiFi Extender Manager Configuration Assistant launches detection of existing networks. The detected WiFi networks (that of your modem router and the other networks) are displayed in a dedicated page.
- Page 75 Hercules HWGEXT-54 - Verify that the SSID of the detected WiFi network corresponds to the one defined during creation of the network. Please also make a note of the WEP key defined during creation of the network, as you will be prompted to enter it in the next step.
-
Page 76: Connecting To A Wifi Network (Wifi Access Point Mode)
Hercules HWGEXT-54 - Enter the security key defined during creation of the network. - Click Connect. WiFi Extender Manager connects your WiFi Extender to the modem router. Should the connection fail, you can restart the procedure, taking care to select the correct network and enter the correct security settings. - Page 77 Hercules HWGEXT-54 - Enter the SSID of your choice or keep the Hercules SSID. SSID corresponds to the network name you defined during creation of your WiFi network. - Click Next. User Manual – 77/104...
- Page 78 Hercules HWGEXT-54 - Enter the security level of your choice. - Enter a security key. Please refer to chapter 4.9 Securing your WiFi network for information on how to select your key. - Click Next. 78/104 – User Manual...
- Page 79 Hercules HWGEXT-54 WiFi Extender Manager applies the WiFi settings to your Hercules WiFi Extender, which then starts to transmit the WiFi network you have defined. User Manual – 79/104...
-
Page 80: Limiting Access To Your Wifi Network To Certain Wifi Computers And Devices
Hercules HWGEXT-54 4.7. Limiting access to your WiFi network to certain WiFi computers and devices Filtering by MAC address is a complement to your security parameters, allowing you to select the wireless computers and devices authorized to connect to your local area WiFi network. - Page 81 Once you have enabled the filtering by MAC address function, only the computers and devices appearing in this list will be authorized to connect to your Hercules WiFi Extender. If friends visit with their WiFi computers or devices, or if you wish to connect new WiFi devices, don't forget to add their MAC addresses to the filtering list and pair them with the Livebox, otherwise they will never be able to connect.
-
Page 82: Personalizing The General Settings For Your Wifi Network
WiFi Extender Manager while connected to your Hercules WiFi Extender via WiFi and, for WiFi Extender Mode, before having previously modified them on your modem router. If you do not know the functions of these settings, we recommend that you keep the default settings. - Page 83 Enter another name, if you wish (32 alphanumeric characters maximum). - If you want the Hercules WiFi Extender to transmit the same network name as the modem router, tick the Transmit with the same name as my network (recommended) box.
- Page 84 The SSID is hidden, and the network name is not displayed during detection by a WiFi client (the Network name (SSID) field is blank in Hercules WiFi Station, for example). Make sure that you do not lose or forget this name, as you will need it to connect your WiFi devices.
- Page 85 To personalize general settings (WiFi Access Point Mode): - On the Advanced WiFi settings page, click the General settings button. The WiFi network transmitted: field indicates the name of the WiFi network transmitted by the Hercules WiFi Extender. Enter another name, if you wish (32 alphanumeric characters maximum).
- Page 86 Hercules HWGEXT-54 - The transmission rate is the speed at which data packets are transferred (sent and received). It is set to Auto by default, but can be adjusted from 1Mbps (min) to 54Mbps (max). - The Beacon Period lets you set the wireless network detection interval.
-
Page 87: Securing Your Wifi Network
Hercules HWGEXT-54 4.9. Securing your WiFi network Creating a WiFi network is very useful if you have several wireless computers or devices, but how can you avoid having someone on the outside connect to your network without permission or intercept your unencrypted data exchanges? Thanks to WiFi Extender Manager, you can define your own security choices step by step. - Page 88 WiFi Extender Manager while connected to your Hercules WiFi Extender via WiFi and, for WiFi Extender Mode, before having previously modified them on your modem router. In WiFi Extender Mode, you cannot select a different security level than the one on your modem router.
- Page 89 Hercules HWGEXT-54 The Security level: field indicates the type of security currently selected for your WiFi network (normally, security level of your modem router). You can select another security level by clicking the drop-down menu: WEP 64-bit, WEP 128-bit, WPA- PSK (TKIP), WPA2 (AES), WPA-PSK or WPA2.
-
Page 90: A Toolbox With Multiple Facets
WiFi Extender Manager functions as a toolbox which can help you, in particular, to correct any mistakes you might make. 4.10.1. Restarting the Hercules WiFi Extender The Restart WiFi Extender function cuts the Hercules WiFi Extender's WiFi connection and restarts WiFi Extender Manager. All computers or devices connected via WiFi will be disconnected. -
Page 91: Restoring Your Original Settings
- Press the Reset button using an object with a pointed tip for 10 seconds. Release the button wait your Hercules WiFi Extender to restart. Your WiFi Extender will load its original settings and restart. User Manual – 91/104... -
Page 92: Updating The Firmware
Hercules HWGEXT-54 4.10.3. Updating the firmware If you wish to take advantage of new functionalities or improved functionalities for your Hercules WiFi Extender, we recommend that you regularly visit the www.hercules.com website (Support/FAQ tab) to check whether any firmware updates are available. -
Page 93: Loading And Saving Your Configuration Settings
4.10.4. Loading and saving your configuration settings If you create several configurations adapted to different uses, you can easily save and load the configuration of your choice on your Hercules WiFi Extender. To save a configuration: - On the home page, click the Toolbox button. -
Page 94: Other Advanced Options
Hercules WiFi Extender's function allowing you to extend your WiFi network to other rooms in your home. 94/104 – User Manual... -
Page 95: Configuring The Internal Dhcp Server
Hercules HWGEXT-54 4.11.2. Configuring the internal DHCP server This chapter will explain how to change your WiFi Extender's IP address and configure the internal DHCP server, which manages the IP addresses of your computers. To access the DHCP server configuration page:... -
Page 96: Cloning Your Pc's Mac Address
- You can modify the IP Address of your Hercules WiFi Extender (192.168.1.254, by default), its Subnet mask (255.255.255.0, by default), and designate the gateway. Be sure to make a note of the IP address. Without it, you will not be able to reconnect to your Hercules WiFi Extender. -
Page 97: Changing The Hercules Wifi Extender Password
Hercules HWGEXT-54 4.11.4. Changing the Hercules WiFi Extender password For reasons of confidentiality or security, you may wish to change the password. WiFi Extender Manager allows you to select a new password when you first connect (please see chapter 4.2. Protecting access to WiFi Extender Manager) or via the Advanced Settings window (see below). -
Page 98: Product Information
Hercules HWGEXT-54 4.11.5. Product information WiFi Extender Manager lets you consult all items of information relating to the functioning of your Hercules WiFi Extender. To consult product information: - On the home page, click the Product information button. - Various items of information are displayed,... -
Page 99: Glossary
Standard established by the IEEE (Institute of Electrical and Electronics Engineers, an American organization) in the 802.11 family, whose goal is to improve security by integrating WPA-PSK authentication into AES encryption. This Hercules client is compatible with this standard. Access point The access point is the heart of your local WiFi network. - Page 100 Infrastructure mode Communication mode consisting of grouping together several computers equipped with WiFi in a network via a wireless access point such as the Hercules ADSL router. IP address Unique computer address assigned by the router. Each computer has its own IP address, allowing it to be identified within the network.
- Page 101 Device installed at the heart of a WiFi network, allowing for the connection of several computers equipped with WiFi adapters for the exchange of data. WiFi Station Utility developed by Hercules to define, verify and configure all connection and security settings regarding your WiFi installation. WLAN (Wireless Local Area Network) Wireless local area network, generally employing the 802.11b or g standard.
-
Page 102: Technical Support
6. TECHNICAL SUPPORT If you encounter a problem with your product, please go to http://ts.hercules.com and select your language. From there you will be able to access various utilities (Frequently Asked Questions (FAQ), the latest versions of drivers and software) that may help to resolve your problem. - Page 103 Hercules HWGEXT-54 Trademarks Hercules® is a registered trademark of Guillemot Corporation S.A. Livebox® is a registered trademark of Orange. This produc t is not officially licensed or endorsed by Orange. Intel® and Pentium® are registered trademarks of Intel Corporation. Wireless Attitude ! is a trademark of Guillemot Corporation S.A.
- Page 104 Hercules HWGEXT-54 Copyright © Guillemot Corporation S.A. 2008. All rights reserved. This publication may not be reproduced in whole or in part, summarized, transmitted, transcribed, stored in a retrieval system, or translated into any language or computer language, in any form or by any means, electronic, mechanical, magnetic, photocopying, recording, manual or otherwise, without the prior written permission of Guillemot Corporation S.A.
Need help?
Do you have a question about the HWGEXT-54 and is the answer not in the manual?
Questions and answers